WD MY PASSPORT GO 1TB SSD User manual
- Category
- External hard drives
- Type
- User manual

MY PASSPORT
™
GO
Portable Storage
User Manual

Accessing Online Support
Visit our product support website at http://support.wdc.com and choose from these topics:
▪ Downloads — Download software and updates for your WD product
▪ Registration — Register your WD product to get the latest updates and special offers at
http://register.wdc.com. You can also register using WD Discovery software.
▪ Warranty & RMA Services — Get warranty, product replacement (RMA), RMA status, and data recovery
information
▪ Knowledge Base — Search by keyword, phrase, or Answer ID
▪ Installation — Get online installation help for your WD product or software
▪ WD Community — Share your thoughts and connect with other WD users at http://community.wdc.com

Table of Contents
_________
Accessing Online Support.................................................................................ii
_________
1 About Your WD Drive.....................................................................................1
Features.............................................................................................................................1
Kit Contents...................................................................................................................... 1
Optional Accessories.......................................................................................................2
Operating System Compatibility....................................................................................2
Disk Drive Format.............................................................................................................3
Physical Description.........................................................................................................3
USB 3.0 Cable...................................................................................................................... 3
Registering Your Drive.....................................................................................................3
_________
2 Connecting the Drive and Getting Started.................................................4
Connecting the Drive...................................................................................................... 4
Getting Started with the WD Software......................................................................... 4
_________
3 Backing Up Files.............................................................................................6
How the Backup Function Works...................................................................................6
Backing Up Files............................................................................................................... 7
_________
4 Restoring Files..............................................................................................10
How the Restore Function Works.................................................................................10
Restoring Files................................................................................................................ 10
_________
5 Managing and Customizing the Drive........................................................ 12
Checking Drive Health................................................................................................... 12
Safely Disconnecting the Drive .................................................................................... 13
Erasing the Drive.............................................................................................................13
Using the Drive Erase Function.........................................................................................13
Registering the Drive......................................................................................................14
Restoring the WD Software...........................................................................................14
_________
My Passport Go
User Manual
i

6 Managing and Customizing the Software..................................................15
Configuring Your Cloud Service Account.................................................................... 15
Uninstalling the WD Software....................................................................................... 16
_________
7 WD Discovery............................................................................................... 17
Installing WD Discovery................................................................................................. 17
Using WD Discovery.......................................................................................................18
Devices Tab.....................................................................................................................18
Apps Tab......................................................................................................................... 18
Available Apps................................................................................................................ 18
_________
8 Using the Drive with a Mac Computer......................................................20
Reformatting the Drive..................................................................................................20
Restoring the WD Software..........................................................................................20
_________
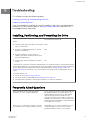
9 Troubleshooting...........................................................................................21
Installing, Partitioning, and Formatting the Drive........................................................21
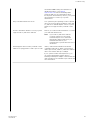
Frequently Asked Questions..........................................................................................21
_________
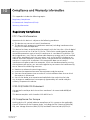
10 Compliance and Warranty Information................................................... 23
Regulatory Compliance.................................................................................................23
FCC Class B Information................................................................................................... 23
ICES-003/NMB-003 Statement........................................................................................ 23
CE Compliance For Europe.............................................................................................. 23
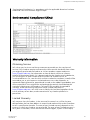
Environmental Compliance (China)..............................................................................24
Warranty Information.................................................................................................... 24
Obtaining Service..............................................................................................................24
Limited Warranty...............................................................................................................24
Australia/New Zealand.....................................................................................................25
Warranty............................................................................................................................ 26
Obtaining Service..............................................................................................................27
My Passport Go
User Manual
ii

1
About Your WD Drive
Welcome to your My Passport
™
Go portable SSD drive. My Passport Go is the tough
SSD drive built to travel. With a rubber protective bumper on the outside, a solid
state drive on the inside, and a built-in cable for convenience; this is no ordinary
drive. My Passport Go is the perfect drive to take anywhere with confidence.
This introductory chapter includes the following topics:
Features
Kit Contents
Operating System Compatibility
Disk Drive Format
Physical Description
Registering Your Drive
Features
Tough and Durable — The My Passport Go portable drive has a shock-absorbing
rubber bumper and no moving parts, making it drop-resistant up to 2 meters and
helping to keep your content safe from bumps and shakes.
Compact and Integrated — Its pocket-sized form factor and built-in cable make the
My Passport Go drive incredibly convenient to bring with you anywhere without
leaving important components behind.
SSD Performance — At more than 2.5x faster than most portable hard drives, the My
Passport Go portable drive delivers SSD performance of up to 400MB/s.
Worry-free Portability — Engineered and manufactured by Western Digital, a leading
storage company, the My Passport Go drive provides you with reliability and
dependability you can trust.
Fully Compatible — Whether using a PC or Mac computer, your My Passport Go drive
works easily right out of the box and includes automatic backup software for
Windows and is also Time Machine compatible for Mac backup (reformatting
required).
Trust and Reliability — The My Passport Go drive comes with a 3-year limited
warranty.
Important:
For the latest WD product information and news, visit our
website at http://www.wdc.com. For the latest software,
firmware, and product documentation and information, go to
http://support.wdc.com/downloads.aspx
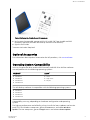
Kit Contents
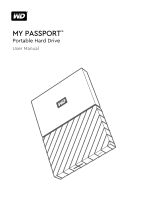
As shown in figure 1, your My Passport Go drive kit includes the following:
About Your WD Drive
My Passport Go
User Manual
1

Figure 1: My Passport Go Portable Storage Kit Components
▪ My Passport Go portable storage with built-in USB 3.0 Type-A cable and WD
Discovery software (includes WD Backup and WD Drive Utilities)*
▪ Quick Install Guide
*Internet Activation Required
Optional Accessories
For information about optional accessories for WD products, visit www.wd.com
Operating System Compatibility
Your My Passport Go drive and the WD Discovery and WD Drive Utilities software
are compatible with the following operating systems:
Windows
®
macOS
™
▪
Windows 7
▪
Windows 8
▪
Windows 8.1
▪
Windows 10
▪
Sierra
▪
High Sierra
▪
Mojave
The WD Backup software is compatible with the following operating systems:
▪
Windows 7
▪
Windows 8
▪
Windows 8.1
▪
Windows 10
Compatibility can vary, depending on hardware configuration and operating
system.
For highest performance and reliability, always install the latest updates and service
pack (SP). For Windows computers, go to the Start menu and select Windows
Update. For Mac computers, go to the Apple menu and select Software Update.
About Your WD Drive
My Passport Go
User Manual
2

Disk Drive Format
Your My Passport Go drive is formatted as a single exFAT partition for compatibility
with updated Windows and Mac OS X operating systems. To use with other
operating systems, see Reformatting the Drive and Troubleshooting.
Physical Description
As shown in figure 2, the My Passport Go drive has:
▪ A built-in USB 3.0 Type-A cable
USB 3.0 Cable
The USB 3.0 Type-A cable supports data transfer rates up to 5 Gb/s.
USB 3.0 is backward compatible with USB 2.0. A USB 2.0 Interface supports data
transfer rates up to 480 Mb/s.
Figure 2: My Passport Go drive, with built-in USB 3.0 Type-A cable
Registering Your Drive
Always register your My Passport Go drive to get the latest updates and special
offers. You can easily register your drive using the WD Discovery software. Another
way is to register online at http://register.wdc.com.
About Your WD Drive
My Passport Go
User Manual
3

2
Connecting the Drive and Getting Started
This chapter provides instructions for connecting the drive and installing the WD
software on your computer. It includes the following topics:
Connecting the Drive
Getting Started with the WD Software
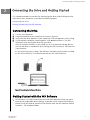
Connecting the Drive
1. Turn on your computer.
2. Connect the drive to your computer as shown in
figure 3.
3. Verify that the drive appears in your computer's
file management utility listing.
4. If a Found New Hardware screen appears, click Cancel to close it. The WD
software installs the proper driver for your drive.
Your My Passport Go drive is now ready to use as an external storage device.
You can enhance its capabilities by installing the WD Discovery
™
software that
is on the drive:
▪ Once WD Discovery is open, WD Backup
™
(Windows only) can be installed
▪ WD Drive Utilities
™
is installed automatically with WD Discovery
Figure 3: Connecting the My Passport Go Drive
Getting Started with the WD Software
1. For Windows, run WD Discovery.exe to install WD software to help you get a
backup plan and modify drive settings. If you don’t have Internet connectivity,
please install WD Backup and WD Drive Utilities from the WD Software
Offline
Installers > For Windows folder.
Connecting the Drive and Getting Started
My Passport Go
User Manual
4

2. For Mac, open WD Discovery for Mac.dmg to install WD software to modify
drive settings. If you don’t have Internet connectivity, please install WD Drive
Utilities from the WD Software Offline Installers > For Mac folder.
Connecting the Drive and Getting Started
My Passport Go
User Manual
5

3
Backing Up Files
This chapter includes the following topics:
How the Backup Function Works
Backing Up Files
How the Backup Function Works
The WD Backup software is a scheduled backup application that automatically
backs up the files that you select on the schedule that you specify.
When you create a backup plan, you specify the backup:
▪ Target—the external storage device where you will copy your
files for backup
protection. The backup target can be any supported:
◦ External storage drive
◦ Cloud service account
▪ Source—the computer
files and folders that you want to copy to the backup
target for backup protection. The backup source can be any internal hard drive,
hard drive partition, or any:
◦ External storage drive
◦ Supported cloud service account
▪ Schedule—the time of day, day of week, and month that you want to run the
backup.
When you click Start Backup after creating a backup plan, the WD Backup software
copies all of the
specified backup source files and folders to the specified backup
target. Then, on the schedule you specified, the WD Backup software automatically
backs up any:
▪ New file that was created in or copied to a backup-protected device or folder
▪ Existing backup-protected
file that was changed
This protection is automatic—the WD Backup software does it for you without any
action on your part. Just leave the backup source and target devices connected to
your computer.
Note:
Whenever you disconnect and reconnect a backup target or source
device, the WD Backup software rescans the backup source device for
new or changed files and resumes automatic backup protection
according to the schedule.
Excluded Files—The WD Backup software will not backup files that have specific:
▪ Attributes: reparsePoint, temporary
▪ Names: \AppData\Roaming\Microsoft\Windows, [CommonApplicationData]
\Western Digital\, [CommonApplicationData]\Microsoft\Windows\Caches\,
config.msi, MSOCache, ntuser.dat, ntuser.ini, [RecycleBin], $recycle.bin, recycler,
[Root]\Drivers\, [Root]\Temp\, System Volume Information, WD
Backup.swstore, .WD Hidden Items, WD SmartWare.swstor, [Windows]
▪ Extensions: .ds_store, .temp, .tmp, .wdsync
▪ Start value: ~
Backing Up Files
My Passport Go
User Manual
6

▪ End values: desktop.ini, .dropbox, .dropbox.attr, hiberfil.sys, -journal,
pagefile.sys, thumbs.db
Backing Up Files
1. Open the Select your WD storage device or cloud service dialog by clicking
either:
▪ Add Backup Plan on the WD Backup screen
▪ Configure backup on the WD Backup view menu from the Windows task bar
2. The Select your WD storage device or cloud service dialog shows all of the
hardware devices and cloud service accounts that you can use for a backup
target device:
a. Select to highlight the device that you want to use.
b. If you have more than three available devices, use the left- and right-scroll
buttons to see them all.
c. Click Next to display the Setup Complete dialog:
Note that:
IF you selected a . . .
THEN the WD Backup software displays
a . . .
Cloud service account, Log in or connect dialog that you must
complete to continue. (See Configuring Your
Cloud Service Account.)
Password-protected device that is locked, No writable partition message. In this case,
use WD Drive Utilities software to unlock the
drive, then reselect it.
3. The initial/default configuration of the backup settings on the Setup Complete
dialog is for hourly backups of everything in the Windows Users folder for your
computer user name.
On the Setup Complete dialog:
IF you want to . . .
THEN click . . .
Accept the default settings, Start Backup to save and launch your backup
plan and close the Setup Complete dialog.
Skip to Step 10.
Specify a different backup schedule, Edit Schedule to display the Automatic Backup
Schedule screen and proceed to Step 4.
Change the Include Files setting, Edit Files to display the Select Files to Back Up
screen and skip to Step 7.
4. On the Automatic Backup Schedule screen, select the option for the automatic
backup schedule that you want:
Selecting . . .
Configures automatic backups . . .
Hourly Every hour, on the hour, 24 hours/day, 7 days/
week.
Daily Once a day, on the days of the week you
select, at the hour or half-hour you specify.
Backing Up Files
My Passport Go
User Manual
7

Selecting . . . Configures automatic backups . . .
For a daily backup:
1.
Select or clear the Days check boxes to
specify the days of the week you want to
run your backup.
2.
Use the "At" selection box to specify the
time of day that you want to run your
backup.
Monthly Once a month on the day you select, at the
hour or half-hour you specify.
For a monthly backup:
1.
Select or clear the Weeks check boxes to
specify which occurrences of the day that
you want to run your backup—First,
Second, Third, Fourth, or Last.
2.
Select or clear the Days check boxes to
specify the days of the week that you
want to run your backup.
3.
Use the "At" selection box to specify the
time of day that you want to run your
backup.
5. Click OK to save and implement your change to the backup schedule and close
the Automatic Backup Schedule screen.
6. After changing the backup schedule:
IF you want to . . .
THEN click . . .
Accept the default Include Files setting, Start Backup to save and launch your backup
plan and close the Setup Complete dialog.
Skip to Step 10.
Change the Include Files setting, Edit Files to display the Select files to back up
screen and proceed to Step 7.
7. On the Select Files to Back Up screen:
a. Click to select the device that has the
files and folders you want to back up:
▪ My Computer
▪ Dropbox
Note:
If the files and folders you want to back up are in a Dropbox account and you
have not configured the account for access by the WD Backup software see
Configuring Your Cloud Service Account
b. In the file structure view of the selected device, click the selectors to open
the listings and select the check box for each file and folder that you want
to back up. Note that selecting the check box for a folder automatically
selects the check boxes for all of the
files and subfolders in the folder.
c. Clear the check box for each file and folder that you do not want to include
in the backup. Note also that clearing the check box for a folder
automatically clears the check boxes for all of the
files and subfolder in the
folder.
Note:
The default backup source is everything in the Windows Users folder for your
computer user name. Be sure to clear that selection if you do not want to
include those files and folders in your backup.
d.
Click OK to save your selections and close the Select Files to Back Up
screen.
Backing Up Files
My Passport Go
User Manual
8

8. Verify that your Automatic Backups and Include Files specifications are correct.
9. Click Start Backup to save and launch your backup plan and close the Setup
Complete dialog.
10. The WD Backup software runs the first backup immediately and shows the
progress with a Backup in progress (x % complete) message on the Backup
dialog. After the initial backup completes, the backup runs automatically
according to the
specified schedule.
Backing Up Files
My Passport Go
User Manual
9

4
Restoring Files
This chapter includes the following topics:
How the Restore Function Works
Restoring Files
How the Restore Function Works
The WD Backup software makes it easy for you to restore backed up files from your backup
target device to either:
▪ Their original locations on the backup source device
▪ Any other location you select
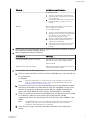
Restore is generally a four-step process:
1. Select the backup target device and the scheduled backup that has the files
you want to restore.
2. Select the location where you want to restore the
files.
3. Specify what you want to restore—either individual files and folders, or
everything.
4. Restore the
files.
Restoring Files
1. Open the Restore dialog by clicking either:
▪ Restore on the WD Backup screen.
▪ Restore files on the WD Backup view menu from the Windows task bar.
2. On the Restore dialog:
a. If you have more than one backup target device connected to your
computer, click to select the one that has the backup
files you want to
restore.
b. Select the location option for where you want to restore the
files:
IF you want to restore
files to . . . THEN select . . .
Their original locations, Original Location.
A new location, Select Location to activate the Browse
button and:
1.
Click Browse to display the Select
Location screen:
2.
Use the folder structure view of your
computer to select the restore location.
3.
With the selected folder name in the
Folder box, click Select Folder.
4.
The WD Backup software closes the
Select Location screen and displays the
path to the selected folder on the
Restore dialog.
Restoring Files
My Passport Go
User Manual
10

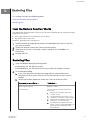
c. Click Select Files to Restore to display the Restore Files screen with the
earliest backup selected by default in the View files from list.
3. On the Restore Files screen:
a. In the View files from list, select the backup that has the files you want to
restore.
b. Use the folder structure view of the selected backup to specify the
files
that you want to restore:
IF you want to restore . . . THEN . . .
All of the files in the selected backup, Select the top-level check box to specify the
entire backup.
Selected files and folders,
1. Click the selectors in the folder
structure view of the backup to open
the folders and subfolders.
2.
Select the check boxes for the files or
folders that you want to restore.
Note that selecting the check box for a
folder automatically selects all of the
files and subfolders in the folder.
c. Click Restore to restore the selected files or folders to the specified
location.
Restoring Files
My Passport Go
User Manual
11

5
Managing and Customizing the Drive
This chapter includes the following topics:
Checking Drive Health
Safely Disconnecting the Drive
Erasing the Drive
Registering the Drive
Restoring the WD Software
The WD Discovery software makes it easy for you to manage and customize your
drive for the best possible performance:
▪ Diagnose—Run diagnostics and status checks to make sure your drive is working
properly.
▪ Sleep Timer—Reduces power to your drive during extended periods of inactivity
to conserve power and extend the life of the drive.
▪ Drive Erase—Erase all of the data on the drive.
▪ About—See the installed software version, check for software updates, and
register your drive to receive free technical support during the warranty period
and
find out about product enhancements and price discount opportunities.
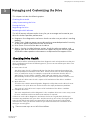
Checking Drive Health
The WD Drive Utilities software provides three diagnostic tools to help make sure that your
drive is performing well. Run the following tests if you are concerned that your drive is not
operating properly:
▪ Drive status check
The drive status check is a failure-prediction function that continuously monitors key
internal performance attributes of the drive. A detected increase in drive temperature,
noise, or read/write errors, for example, can provide an indication that the drive is
approaching a serious failure condition. With advanced warning, you could take
precautionary measures, like moving your data to another drive, before a failure occurs.
The result of a drive status check is a pass or fail evaluation of the drive’s condition.
▪ Quick drive test
Your drive has a built-in Data Lifeguard
™
diagnostic utility that tests the drive for error
conditions. The quick drive test checks the drive for major performance problems.
The result of a quick drive test is a pass or fail evaluation of the drive’s condition.
▪ Complete drive test
The most comprehensive drive diagnostic is the complete drive test. It tests every sector
for error conditions and inserts bad sector markers as required.
It is best to run the drive diagnostics and status checks on a regular basis, before you
encounter any problems with your drive. And, because they are so fast, running the drive
status check and the quick drive test provides a high level of assurance with minimal
inconvenience. Then, run all three whenever you encounter disk error conditions when
writing or accessing
files.
1. There are two ways to run WD Drive Utilities:
Managing and Customizing the Drive
My Passport Go
User Manual
12

a. If you have WD Discovery installed and open, you can run WD Drive Utilities
by going to the Apps tab, finding WD Drive Utilities and clicking Open.
b. Otherwise, you can run WD Drive Utilities from the Windows Start menu by
clicking Start > All Programs > WD Discovery > More WD Apps > WD Drive
Utilities or Start > All Programs > WD Apps > WD Drive Utilities.
2. If you have more than one supported drive connected to your computer, select
the one that you want to check.
3. On the Diagnose dialog, click the button for the test that you want to run:
▪ Run Drive Status Check
▪ Run Quick Drive Test
▪ Run Complete Drive Test
Safely Disconnecting the Drive
Windows and Macintosh operating systems have a means for safely disconnecting
and removing the drive without turning off the system:
▪ Windows has a Safely Remove Hardware and Eject Media icon in the system tray
which, when used, ensures that all data is
flushed from system cache before
device removal.
▪ Mac users can simply drag the drive icon to the trash before disconnecting it.
Erasing the Drive
Note:
Erasing your drive also deletes the WD software and all of the support
files and utilities. You can download these to restore your My Passport
Go drive to its original configuration after erasing the drive.
Using the Drive Erase Function
To erase your drive when it is not locked:
1. There are two ways to run WD Drive Utilities:
a. If you have WD Discovery installed and open, you can run WD Drive Utilities
by going to the Apps tab,
finding WD Drive Utilities and clicking Open.
b. Otherwise, you can run Drive Utilities from the Windows Start menu by
clicking Start > All Programs > WD Discovery > More WD Apps > WD Drive
Utilities or Start > All Programs > WD Apps > WD Drive Utilities.
2. If you have more than one supported drive connected to your computer, select
the one that you want to erase.
3. On the WD Drive Utilities screen, click Drive Erase to display the drive erase
dialog.
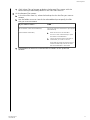
4. On the drive erase dialog:
a. If you want to change the volume name, type over the name in the Volume
Name box.
b. Read the explanation of the loss of data if you erase your drive. If you want
to save any of the data that is on the drive, back it up to another device
before continuing with the drive erase.
c. Click the I understand... check box to signify that you accept the risk and
activate the Erase Drive button.
Managing and Customizing the Drive
My Passport Go
User Manual
13

d. Click Erase Drive.
Go to http://support.wdc.com and see Knowledge Base answer ID 7 for
information about downloading and restoring the WD software on your
My Passport Go drive.
Note:
Erasing your drive also removes your password. If you used a password to
protect your drive, you will need to re-create it after restoring the WD software.
Registering the Drive
The WD Discovery software uses your computer’s Internet connection to register your
drive. Registering the drive provides free technical support during the warranty period and
keeps you up-to-date on the latest WD products. You can also register your drive online at
http://register.wd.com
1. Make sure that your computer is connected to the Internet.
2. Click WD Discovery > Devices to display the registration screen.
3. If you have more than one supported drive connected to your computer, select
the one that you want to register.
4. Click About > Register to display the Register Your Device screen.
5. On the Register Your Device screen:
a. Type your
first name in the First name box.
b. Type your last name in the Last name box.
c. Type your email address in the Email box.
d. Select your language in the Select a country box.
e. Select or clear the Subscribe to all emails from WD check box to specify
whether you want to receive
notifications about software updates, product
enhancements, and price discount opportunities.
f. Click Register device.
Restoring the WD Software
In addition to deleting all of the data on your drive, erasing or reformatting the
drive also removes the WD software and all of the support
files, utilities and online
help.
If you ever need to remove and reinstall the WD software on your computer, or
move the drive to another computer and install the software there, you will need to
restore the WD software on your drive. To do this, after you have erased or
reformatted the drive, go to http://support.wdc.com and see Knowledge Base
answer ID 7.
Managing and Customizing the Drive
My Passport Go
User Manual
14

6
Managing and Customizing the Software
This chapter includes the following topics:
Configuring Your Cloud Service Account
Uninstalling the WD Software
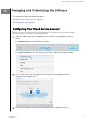
Configuring Your Cloud Service Account
Before you can use a cloud service as a backup source or target device, you must
configure
your account for access by the WD Backup software.
1. Open the Select your WD storage device or cloud service dialog by clicking
either:
▪ Add Backup Plan on the WD Backup screen:
▪ Configure backup on the WD Backup view menu from the Windows taskbar:
2. On the Select your WD storage device or cloud service dialog, select to
highlight the Dropbox icon:
3. Click Next to display the connection dialog for your Dropbox account:
Managing and Customizing the Software
My Passport Go
User Manual
15

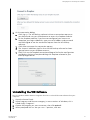
4. On the connection dialog:
a. Click Sign In. The WD Backup software initiates a connection request on
your behalf and uses your Web browser to access the Dropbox website.
b. On the Dropbox website, if you have not
configured your account to
remember your login credentials, type your email address and password
and click Sign In to see the connection request from the WD Backup
software.
c. Click Allow to accept the connection request.
d. The Success! indication
signifies that the WD Backup software has been
granted access to your Dropbox account.
e. Click Finish on the Dropbox connection dialog to
finalize the configuration
and display the Setup Complete dialog with Dropbox selected as your
backup target device:
Uninstalling the WD Software
Use the Windows Add or Remove Programs function to uninstall the WD software from your
computer.
1. Go to the Control Panel.
2. Select Programs and Features category; in some versions of Windows, this is
called simply "Programs".
3. Choose the program you want to remove, then click Uninstall.
4. When prompted with an "Are you sure..." question, click Yes.
Managing and Customizing the Software
My Passport Go
User Manual
16
Page is loading ...
Page is loading ...
Page is loading ...
Page is loading ...
Page is loading ...
Page is loading ...
Page is loading ...
Page is loading ...
Page is loading ...
Page is loading ...
Page is loading ...
Page is loading ...
-
 1
1
-
 2
2
-
 3
3
-
 4
4
-
 5
5
-
 6
6
-
 7
7
-
 8
8
-
 9
9
-
 10
10
-
 11
11
-
 12
12
-
 13
13
-
 14
14
-
 15
15
-
 16
16
-
 17
17
-
 18
18
-
 19
19
-
 20
20
-
 21
21
-
 22
22
-
 23
23
-
 24
24
-
 25
25
-
 26
26
-
 27
27
-
 28
28
-
 29
29
-
 30
30
-
 31
31
-
 32
32


WD MY PASSPORT GO 1TB SSD User manual
- Category
- External hard drives
- Type
- User manual
Ask a question and I''ll find the answer in the document
Finding information in a document is now easier with AI
Related papers
-
WD WDBABF0000NBK - TV HD Media Player User manual
-
WD MyCloud Pro Series Mirror Personal Storage Drive User manual
-
WD UZG0010BBK-WESN Western Digital Elements Portable User manual
-
WD 1TB Elements USB 3.0 User manual
-
-
WD My Cloud EX2 Ultra User manual
Other documents
-
Western Digital MYPASSPORT NEW 1TB User manual
-
Sweex US152 Datasheet
-
-
-
 Western Digital My Passport Portable Hard Drive User manual
-
 Western Digital WDBKVX0020PSL-WESN Installation guide
-
Western Digital MY PASSPORT SSD User manual
-
 Western Digital WDBTLG0010BGY-WESN Installation guide
-
 Western Digital My Passport Ultra 2TB User manual
-
Western Digital My Passport Ultra User manual


