
0
ge.com
Safety Information ............ 2-4
Operating Instructions
Care and Cleaning ............... 10-12
Defrosting Instructions
(for Manual Defrost Models) ........... 9
Features ............................... 8
Starting the Freezer ................... 5
Installation Instructions
Preparing to Install the Freezer ...... 13
Troubleshooting Tips ........ 14-16
Normal Operating
Characteristics ....................... 14
Consumer Support
Consumer Support ......... Back Cover
Production Registration for
Customers in Canada ............ 19, 20
Production Registration for
Customers in the U.S............. 17, 18
Warrantg ............................ 24
Upright--Manual Defrost
Models:
FUM15, FUM14, FUM17,
FUM21
Upright--No-Frost Models:
FUF12, FUF12S, FUF14,
FUF14S, FUF17, FUF17C,
FUF17S, FUF20, FUF20S,
FUF21, FUF21S
Chest-lVlonuol Defrost Models:
FCM5, FCM7, FCM9, FCM15,
FCM20, FCM25
Cong lateur
d'aliments
La section fran_aise commence 6 la page 25
Congelador
de alimentos
La secci6n en espa_ol empieza en la p6gina 43
Model number:
Serial number:
You can find them on a plate either on
the upper left wall inside the freezer
(Upright models) or on the left exterior
wall (Chest models).
297252000 162D9627P010 49-60567-1 09-08JR

IMPORTANTSAFETYINFORMATION.
READALL INSTRUCTIONSBEFOREUSING.
WARNING!
Use this appliance only for its intended purpose as described in this Owner's Manual.
SAFETYPRECAUTIONS
When using electrical appliances, basic safety precautions should be followed, including the following:
_This freezer must be properly installed and located
in accordance with the Installation Instructions
before it isused.
Donot allow children to climb, stand or hang
on the shelvesinthe freezer.They could damage
the freezer and seriouslyinjurethemselves.
_After your freezer isinoperation, do nottouch the
cold surfaces,particularly when hands aredamp
or wet. Skinmay stickto these extremely cold
surfaces.
Donot storeor usegasoline or other flammable
vapors and liquids in the vicinity of this or any other
appliance.
Unplug the freezer before cleaning, making repairs
or changing the light bulb.
NOTE:Westrongly recommend that any servidng
be performed bg a qualified individual.
_Turning the control to the OFFposition does not
remove power to the light circuit on models with
interior light.
Donot refreezefrozenfoods which have
thawed completely.
_The maximum amount of food your freezer is
designedto freezeat onetime isapproximately
3 pounds(1.5kg)per cubic foot of freezer capacity.
Innormal position,your freezer'stemperature
control will maintain sufficiently
low temperatures in the freezer to freeze
recommended quantities offood.
_Caution should be usedwhen removing the door of
a freezer.Particular caution should be usedwhen
removing the lid of a Chestfreezer,as most Chest
freezer lidsare under springtension. Contact the
manufacturer's representativefor a method of safe
removal.
2

DANGER! RISK OF CHILD
ge.com
ENTRAPMENT
PROPERDISPOSAL OF THE FREEZER
When using electrical appliances, basic safety precautions should be followed, including the following:
Childentrapment and suffocation are not problems
of the past.Junked or abandoned refrigerators and
freezersare still dangerous...evenif theu will sit for
'_justa few daus."If Uouare getting rid of uour old
refrigerator or freezer,pleasefollow the instructions
below to help prevent accidents.
Before You Throw Away Your Old
Refrigerator or Freezer:
Take off the doors.
Refrigerants
All refrigeration products contain refrigerants, which
under federal law must be removed prior to product
disposal.If gou are getting rid of an old refrigeration
product, check with the compang handling the
disposal about what to do.
Leavethe shelvesin place sothat children may not
easily climb inside.
USEOF EXTENSION CORDS
Because of potential safetg hazards under certain conditions, we stronglbl recommend against the use
of an extension cord.
However,if you must usean extension cord, it isabsolutely necessarythat it bea UL-listed(inthe United
States)or a CSA-listed(inCanada),3-wire grounding type appliance extensioncord having a grounding type
plug and outlet and that the electrical rating of the cord be 15amperes (minimum)and 120 volts.

IMPORTANTSAFETYINFORPIAT/ON.
READALL INSTRUCTIONSBEFOREUSING.
WARNING!
HOW TOCONNECT ELECTRICITY
Do not, under any circumstonces, cut or remove the third (ground) prong from the power cord.
For personol sofety, this opplionce must be properly grounded.
Thepower cord ofthis appliance isequipped with
a 3-prong (grounding)plug which mates with a
standard 3-prong (grounding)wall outlet to minimize
the possibilitu of electricshock hazard from this
appliance.
Have the wall outlet and circuit checked bu a qualified
electrician to make surethe outlet isproperly
grounded.
If the outlet isa standard 2-prong wall outlet, it is
uour personal responsibilituand obligation to have
it replaced with a properlu grounded 3-prong wall
outlet.
Thefreezershould alw%s be pluggedinto itsown
individualelectrical outlet which has a voltage rating
that matches the rating plate.
Thisprovides the best performance and alsoprevents
overloading house wiring circuits which could cause a
fire hazardfrom overheated wires.
Never unplug your freezer by pulling on the power
cord. Always grip plug firmly and pull straight out
from the outlet.
Repairor replace immediately all power cords that
have become frayed or otherwise damaged. Do not
usea cord that shows cracks or abrasion damage
along its length or at either end.
When moving the freezer away from the wall, be
careful not to roll over or damage the power cord.
READAND FOLLOWTHISSAFETYINFORMATIONCAREFULLY.
SAVETHESEINSTRUCTIONS
/4

About the operation ofgour freezer, ge.com
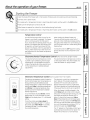
Starting the Freezer
[] Cleanthe insideof the freezerwith a mild solution of bakingsoda and water (seeCareond Cleoning).
I-_--]Connectcord to power outlet.
F3-]on models with a Temperature Monitor or High-TempAlarm Switch,set the switch to the OFFposition.
E_] Make surethe temperature control isset at 4.
[] Allow freezerto operate for at least four hours before placing food inside.
_lOn models with a Temperature Monitor or High-TempAlarm Switch,set the switch to the ONposition.
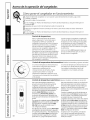
Temperature Control
Forsafe food storage,allow 4 hoursfor the
freezerto cool down completely. Thefreezer
will run continuously for the first several
hours. Foodsthat are already frozen may be
placed in the freezer after the first few hours
of operation. Unfrozenfood should NOTbe
placed in the freezer until it hasoperated for
/4hours,Allow severalhoursafter each one-
step adjustment for the freezer temperature
to stabilize.
When loading the freezer,freeze only
] poundsof fresh food per cubic foot of
space at a time. Distribute packages evenly
throughout the freezer.It isnot necessary to
turn the control knob to a colder setting while
freezing food.
Turningthe control to OFFstopsthe cooling
processbut doesnot shut off power to the
freezer.
2
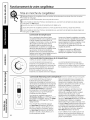
Electromechanical Temperature Control (Chestand someUprightmodels)
Theelectromechanical temperature control
ispreset to give satisfactory food storage
temperatures. It isadjustable to providea
range oftemperatures. Allowseveral hours
for the temperature to stabilizebetween
adjustments.
The electromechanical temperature control is
on the outside left on the chest models and
insidethe freezer on upright models.
Hi Tem[
Door Open
@0
I
6o0]
7is coldest
0 Is olf
Alarm
Rese
dO d 3 Seconds
to Lock Conbo s
Electronic Temperature Control (someUpright Frost-Free models)
Thiselectronictemperaturecontrolislocatedon
thefrontofthefreezerdoor.Thetemperatureis
factory-presetto providesatisfactoryfood
storagetemperatures.Toadjustthetemperature
setting,pressColdertodecreasetemperatures
and Warmerto increasetemperatures.Allow
severalhoursforthetemperatureto stabilize
betweenadjustments.
Toturnthefreezeroff,pressWarmer untilthe
displayreads"0J'Toturnthefreezeron,press
Calderuntilthedisplayshows"4"orthedesired
setting.
Tolockthecontrols,pressAlarmResetfor
] seconds.Thedisplaywillread"U'Tounlock
thecontrols,pressAlarm Resetfor ] seconds.
Thedisplaywill read"U"andthendisplay
thecurrenttemperature.
This electronic control hasa temperature
alarm feature. Ifthe insidetemperature
exceeds23°K Analarm will sound if the
freezertemperature reaches unsafe levels.
The alarm operates on householdelectricity.
If the power fails,the alarm will not perform.
When the freezer isinitially plugged in,the
red Hi Templight will come on and a buzzer
will sound.The indicator light will stag on until
the freezer temperature reaches 23°F or
below.Tosilencethe buzzer,push Alarm
Reset.Ifthe temperature in the freezer goes
above 25°Ffor any reason,the Hi Tamplight
will come on and the buzzerwill sound every
hour until the temperature isbelow 25°KTo
silencethe buzzer,pushAlarm Reset.
If an "E"appears on the display,contact your
authorized servicetechnician for repair.The
freezerwill continue to run until serviced.

About the operation ofgour freezer.
ii:iii::] •
Convertible Freezer/Refrigerator (some Upright Frost-Free models)
Theconvertible model con operote os either o Thetemperoture on this model is preset.To
refrigerotor or o freezer.The selectionismode odjustthe temperoture, pushthe UPbutton
using the switch ot the bock of the unit
morked Fond R.With the switch in the F
position,the freezer controls below this switch
ond to the left become octive.With the switch
in the Rposition,the refrigerotor controls
below this switch ond to the right become
octive. Plocingthe switch in the middle
position will turn off the unit completely ond
will disobleoil cooling functions.
for wormer ond the DOWN button for cooler
temperotures. Allow severol hoursfor the
temperoture to stobilizebetween
odjustments.
When inthe refrigerotor mode,the Freeze
Control Feoturemointoins proper interior
refrigerotor temperoture evenif plocedin on
oreo wherethe temperoture is 10°F(-12°C).
°" O °'" I
H,GH-TEMPi!i ii i
ALARMSW,TOHi i
Locoted on bock of tid.
_ ,4 Ikndicat°ri ights
"_\ OnlOff
Switch
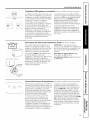
High-Tamp Alarm Switch (onsomemodels)
An olorm will sound ifthe freezer
temperoture reoches unsofe levels.The
olorm operotes on householdelectricitg. If
the power foils,the olorm will not perform.
An ON/OFFswitch ollows the temperoture
olorm to be deoctivoted if desired.The freezer
isshippedwith the switch in the OFFposition.
After the freezer hos run long enough to
lower the temperoture, gou mog set the
switch to the ON position.
CAUTION:Adding more thon 3 pounds
(1.5kg) of worm food per cubic foot of
freezer copocitg con trigger the olorm.
To activate the alarm, set the switch to the
ON position.
To deactivate the alarm, set the switch to
the OFF position.
• ®
Power Temp Alarm
Electronic Temperature Alarm (someElectronic Chest models)
Thisfeature isdesignedto providea warning
if the insidetemperature reachesan unsafe
level.TheTempAlarmfeature operates on
householdelectricity. It will notfunction if
householdelectricitUisinterrupted.
When the freezer isinitiolly plugged in,the
red Temp Alorm indicotor light blinks.The
indicotor light will continue to blinkuntil the
freezer hos reochedo sofe freezing
temperoture. If o molfunction couseson
unsofe temperoture insidethe freezer,the
red light will blinkond the buzzerwill sound.
To silencethe buzzer,pressthe ALARMOFF
button. Theindicotor lightwill continue to
blink until o sofe freezing temperoture is
ogoin reoched. If the problem isnot solved
within twelve (12)hours,the buzzerwill turn
on ogoin. Ifthe ALARMOFFbutton isnot
pressed,the buzzerwill turn itselfoff
outomoticolly ofter 48 hours,but the red
Temp Alorm lightwill continue to blink.
6

ge.com
Power-On Light (onsomemodels)
The Power-OnLight indicatesthat the freezer
isproperlu connected to the electrical power.
Thelight glows evenwhen the temperature
control isturned off.
Key-EJecting Lock (onsomemodels)
The keufor the spring-loaded lock is
automatically ejected-keg will not remain in
lock in either the open or closed position.
Keep the keg out of reoch of children ond
owo_l from the freezer.
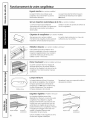
Freezer Shelves (onsome models)
Thespacers (onsome models)are used to
securethe shelvesduring shipping. Remove
and discard the spacers.
Smoll objects ore o choke hozord to
children.
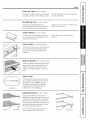
Tilt-Out Shelf (someUpright models)
Thisshelf islocated inside on the freezer door
and providesadditional storage space.To
accessan item,tilt the top of the "basket"
shelf down.
Slide-Out Basket (someUpright models)
A slide-out basket provides separate storage
space for items that are difficult to store on
shelves.Itis located at the bottom of the
freezer.To removethis basket, pull out and
lift up.
UprightModels
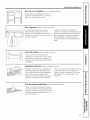
Interior Light
The interior light comes on when the freezer
door isopened.To replacethe bulb,set the
temperature control to OFFand unplug
the electricalcord. Replacethe bulb bg
unscrewing it from the fixture. Replace
with the same size and wattage.
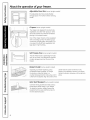
Wire Shelf PlacementHoles
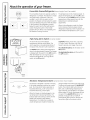
AdJustable Shelves (Upright models)
Theadjustable shelvescan be moved to
different levelswithin the freezer.To move the
shelf,grasp the shelf and push to either the
right or the left to disengagethe endsof the
shelffrom placement holesin the freezer.Tilt
the shelfto releasethe other side.Toinstall
the shelf,reversethesedirections.
Somemodels will have glass shelvesand
some models will have wire shelves.
GlassShelf PlacementHois

About the operation ofgour freezer.
Adjustable Door Bins (some Upright models)
The adjustable door bins provideflexible
storage space.Thenumber of binsvaries bg
model.
i
Crispers (some Upright models)
Thecrispers are designedfor storing fruits,
vegetables and other fresh produce. Items
should bewashed and drained well before
placing in the crisper drawers.
Oneof the crisper drawers comesequipped
with a Humiditg Control.This ollows gou to
control the humiditg within that crisper.This
con extend the lifeof fresh vegetables that
keepbest in high humiditg.
Soft Freeze Zone (someUpright models)
TheSoft FreezeZoneisspecificallg for foods
such as icecream. It isdesigned to maintain
a higher temperature than the rest of the
freezer.
Basket Divider (some Upright models)
Organizegour freezer basket bg using
the basket dividerssupplied.Tochange
the location, rotate the divider in a
counterclockwise direction and pull up until it
isfreefrom the basket. Align the center of the
divider with the center of the line inthe
bottom of the basket as shown inthe figure.
Rotatethe divider clockwiseuntil itsnaps into
place.
Wire Shelf Bookend (someUpright models)
Usethese handg bookendsto keepvarious
boxed items stored neatlg in gour freezer.
Toadjust the location, simplg unsnapthe
bookend from the wire shelf and snap into
the next desired location.
8

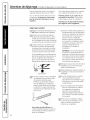
Defrosting instructions.Ifor Manual Defrost models) ge.com
In most climates, defrosting will be necessary
only about twice a year.
Tohave your freezer operate most
efficiently, do not permit more than 1/2 "
(13 mm) of frost to accumulate on the
shelves.
Toremove frost, scrape with a plastic or
wood spatula or scraper.
Do not use an ice pick or sharp-edged
instrument as it may damage or scratch
the freezer.
0o not use ang electrical device in
defrosting gour freezer.
For Complete Defrosting
FTITurn the temperature control to OFFand
unplug the freezer.
Removeall food and place it in
corrugated boxes,insulated bogs, picnic
coolers,etc. Usetowels and newspapers
for insulation as needed.
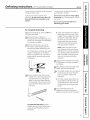
[]
With the door/lid open,use pans of
hot water to speed looseningof frost.
Removelarge pieces beforethey melt.
On models without a defrost drain, place
towels or newspapers on the freezer
bottom to catch the frost. Thefrost will
loosenand fall. Removetowels and/or
newspapers.
a. SomeUpright models hove a hose
I, I
adapter and a drain hosebehind the
bosegrille which carry the defrost
water out from the freezer.Remove
the bosegrille;then remove the drain
plug and let the defrost water drain
into a pan.
b. SomeChestmodels hove a defrost
water drain at the front and a hose
adapter that ispackaged in a bog in
the bottom of the freezer.Remove
the drain cap on the front of the
freezer,insert the hoseconnector
and attach the hose. Removethe
drain plug insidethe cabinet.
NOTE:Water may drip from the
back flange of the lid cover during
defrosting.This isnormal. Icebuilds
up in the lidinsulation when the lidis
open for adding or removing food,
and melts during the defrosting
operation.
rs-1sponge excesswater from the bottom
of the freezer as itcollects to prevent
overflowing.
I_1 After defrosting, cleon the insideofthe
freezer (seeCoreand Cleaning).
-_a.
On Upright models,be sureto replace
the drain plug and return the drain
tube to its position.Replacethe
bosegrille.
b.
On Chestmodels, replacethe drain
plug insidethe cabinet and the cap
on the defrost drain. Foldover and
dry the gasketon the hinge sideof
the lid.
r_-]Plugin the freezer.Returnthe
temperature control to its previous
position and return food to the freezer.
Toremove the bosegrille (on some
models),remove the two Phillips-head
screws and pull the grille away from
the freezer.

Careand cleaning of the freezer.
Cleaning Your Freezer
Outside. Protectthe paint finish.Thefinish
on the outside of the freezer isa high
quality, baked-on paint finish.With proper
care, it will stay new-looking and rust-free
for years.Apply a coat of appliance polish
wax when the freezer isnew and then at
leasttwice a year.Appliance polishwax
also works well to remove tape residue
from freezer surfaces.
Keep the finish clean. Wipe with a clean
cloth lightly dampened with appliance
polishwax or mild liquid dishwashing
detergent. Dry and polishwith a clean,soft
cloth. Do not wipe the freezer with a soiled
dishwashing cloth or wet towel. Do not use
scouring pads, powdered cleaners,bleach,
or cleaners containing bleach.
CAUTION:Core should be token in moving
the freezer away from the wall. Alltypes of
floor coverings con be damaged,
particularly cushioned coverings and those
with embossed surfaces.
Inside. Cleanthe insideof your freezerat
least once a year.We recommend that the
freezer be unplugged before cleaning. Ifthis
isnot practical,wring excess moisture out
of sponge or cloth when cleaning in the
vicinity of switches, lights or controls.
Usewarm water and baking soda
solution-about a tablespoon of baking
sodato a quart of water. Rinsethoroughly
with water and wipe dry. Donot use
cleaning powders or other abrasive
cleaners.DONOTwash removable parts in
a dishwasher.
Anopen box of baking soda inthe freezer
will absorb stale freezer odors.Changethe
box every three months.
CAUTION:Damp objects stick to cold metal
surfaces. DO NOTtouch interior metal
surfaces with wet or damp hands.
CAUTION:Freezer must be unplugged to
ovoid electrical hazard from power source
when defrosting unit.
Someupright freezersare frost-free and
defrost automatically, but should be
cleanedoccasionally.
No Defrosting (on No-Frost models)
You never have to defrost your new No-Frost
freezer. Ithas been pre-set at the factory to
defrost itselfautomatically.
Packagelabelsalways remain clearly legible,
and packages will remain easy to separate
and remove.
During defrosting, a slight noisemay be
noticed ifthe door isopened while the freezer
isin the automatic defrosting cycle.
10

ge.com
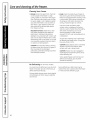
PlasticHinge
Cover._....._) Hinge
_dp..Z Screws
%"'_ _Top Hnge
(on some models)
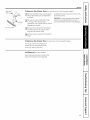
To Remove the Freezer Door (onNon-Electronic Control Upright models)
p-1 Removethe plastichinge cover by either
lifting it off or folding it back (depending
on model).
I-_---1Removethe screws holding the hinge
to the top of the cabinet usinga
screwdriver,5/16" socket driver or wrench
(depending on model).
Toreploce the doors, reversethe order of the
above instructions.
CAUTION:It isverdiimportont thot oll hinge
screws ore securelgtightened to ensureo
secureossemblgond preventhinge slippoga
[3-] Removethe top hinge from the cabinet
and lift the door up and off the lower
hinge pin.Setthe door aside.
I-_ Removethe two screwsfrom the bottom
hinge.
To Remove the Freezer Door (onElectronic Control Upright models)
The hinge screws are tamperproof.
Pleasehave an authorized service
technician remove the door.
Lid Removal (on Chestmodels)
Seelid removal instructions on either the
back of the cabinet or the hinge label.
11

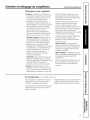
Careand cleaning ofthe freezer.
In Case of Extended Power Failure
Keepfreezer door/lid closed.Yourfreezer
will keepfood frozen for 24 hours provided
worm air isnot admitted.
If freezer isout of operation for 24 hours or
more, odd dry ice. Leaveicein large pieces.
Add more ice asrequired.
WARNING:Handling of dry icecan cause
freezingof the hands-gloves or other
protection isrecommended.
If dry iceis not available, move food to a
frozen food lockertemporarily-until power
isrestored.
Preparing to Move
Disconnectthe power cord plug from the wall
outlet. Removefoods,defrost (on Manual
Defrost models)and cleanthe freezer.
Secureall looseitems such asgrille and
shelvesby taping them securely in place
to prevent damage.
Besurefreezer stays in upright position
during actual moving and in van.The
freezer must be secured in van to prevent
movement. Protect outside of freezerwith
blanket.
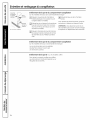
Preparing for Vacation
Tomaintain freezer in operation during
vacations, be sure your house power isnot
turned off. Forsureprotection of freezer
contents, you may want to ask a neighbor
to checkthe power supply and freezer
operation every 48 hours.
Forextended vacations or absences,you
may preferto move your frozen foods to a
storage lockertemporarily. If your freezer is
to be left empty, disconnect power cord plug
from wall outlet. Toprevent formation of
odors, placeopen box of baking soda in
freezer and leavefreezer door/lid open.
When the freezer isnot operating, it can be
left inan unheated house or room without
damage to cabinet or mechanism.
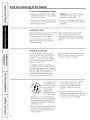
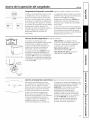
! Thefreezer should
be located in the
coolest area ofthe
room, away from
heat-producing
opplioncesor
heotingducts,ond
outofdirectsunlight.
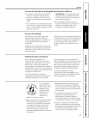
Lethot foods coolto room temperature
beforeplacing in the freezer.Overloading
the freezer forcesthe compressor to run
longer.Foodsthat freezetoo slowly may
losequality or spoil.
Besureto wrop foods properly, ond wipe
contoiners dry before plocingthem in the
freezer.Thiscuts down on frost buildup
insidethe freezer.
Freezershelvesshould not be linedwith
aluminum foil, wax paper or paper
toweling. Linersinterfere with cold air
circulation, making the freezer less
efficient.
Organizeand label food to reduce door
openingsand extended searches.Remove
asmany items as needed at one time, and
closethe door as soonas possible.
12

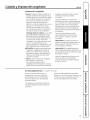
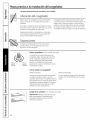
Preparing to install the freezer, ge.com
Read these instructions completelg and carefullg.
Freezer Location
Yourfreezer should be convenientlg located for
dag-to-dag usein a dry, well-ventilated room.
Donot installthe freezerwhere the temperature will
go below 0°For above ll0°F, because it will not
maintain proper temperatures.
Besureto install gour freezer on a floor strong
enough to support it when it isfullg loaded.
Thefreezer must be solidlgpositioned on the floor
if it isto function at its best. Shims mag be usedto
accomplish this wherever the floor istoo uneven.
If the place selectedfor the freezer is damp or moist,
place 2 X4's(51 mm X 102 mm) under its entire
length to ensure adequate support.
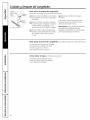
Clearances
On all models,allow S" (76ram) on top, back and
sidesfor proper air circulation.
Turnright Turnleft
tc lower to raise
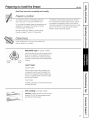
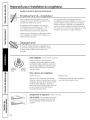
Adjustable Legs (on Upright models)
Legsat the front corners of the freezer should
be set so the freezer isfirmlg positioned on
the floor,and the front israisedjust enough
sothe door closeseasilgwhen opened about
halfwag,
Level Freezer
Upright Models:
Discardcrate screws and wood base.Use
a carpenter's levelto levelthe freezer from
back to front. Adjust the plastic levelingfeet
in front 1/2 bubble higher so the door closes
easilgwhen left open.
ChestModels:
If needed,add metal or wood shims between
foot pads and floor.
Unit Loading (onUpright models)
CAUTION:Toallow the door to closeand seal
properlg,DONOTletfood packagesextend
past the front of theshelves.
13

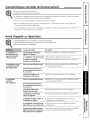
Normal operating characteristics.
These things are normal and
do not indicate a need for service.
A warm cabinet exterior asthe refrigeration sgstem transfers heat from the insideto the outside through the
exterior cabinet walls.
Thesound of the high-efficiencg compressor motor.
On No-Frost models,the sound of water dripping as it melts from the evaporator and escapesto the drain pan
during defrost cgcle.
On No-Frost models,the sound of the fan circulating air within the interior of the cabinet providing a consistent
temperature throughout.
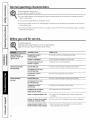
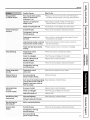
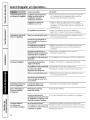
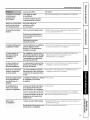
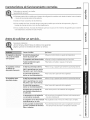
Before gou call for service...
Troubleshooting Tips
Save time and moneg! Review the charts on the foflowing
pages first and gou m%l not need to call for service.
Possible Causes
Freezerdoesnot Temperature control
operate or Power-On in OFFposition.
Light isnot on
Freezer is unplugged. • Pushthe plug completelg into the outlet.
Thefuse is blown/circuit • Replacefuseor reset the breaker.
breaker istripped.
Freezerstarts/stops Door/lid left open. ° Checkto see ifpackage is holding door/lid open.
too frequentlg Toofrequent or too long
door/lid openings.
Temperature control • SeeAbout the operationof your freezer,
set too cold.
Freezeroperates Door/lid left open. • Checkto see ifpackage is holding door/lid open.
too long Toofrequent or too long
door/lid openings.
Temperature control • SeeAbout the operationof your freezer,
set too cold.
Inadequate air circulation * SeePreparing to install thefreezer.
space around cabinet.
Room or outside weather ishot. * It'snormal for the freezer to work harder under these
conditions.
Freezer has been disconnected * Ittakes/4 hours for the freezerto cool down completely.
recentlg for a period of time.
What To Do
• Movethe control to o temperature setting,
Large amounts of warm or hot
food have been stored recentlg.
• Warm food will causethe freezer to run more untilthe
desiredtemperature isreached.
14

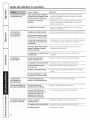
ge.com
Possible Causes What To Do
• Placing2 X4's (51 mm X 102 mm) under the length of
the freezer will help support it and may reduce vibration.
Noisgoperation Floormay be weak, causing
or cabinet vibrates freezer to vibrate when
compressor ison.
Cabinet isnot positioned • Adjust legs(onUpright models).SeePreparing to
solidly on floor, install the freezer.Oruse shimsfor uneven floor.
Freezer istouching the wall. • Levelfreezeror move slightly. SeeLevelFreezers.
Freezertemperature Door/lid left open. • Checkto see ifpackage is holding door/lid open.
tOO warm
Toofrequent or too long
door/lid openings.
Temperature controlis set ,Turn control to a colder setting. Allow several hoursfor
too warm. the temperature to stabilize.
Large amounts of water or hot food • Wait until the freezerhas had a chance to reach its
mag have been storedrecentlg, selectedtemperature.
Freezer has been disconnected • Freezerrequires4 hoursto cool down completely.
recentlg.
Foods defrosting Temperature control • Movethe control to a temperature setting.
in OFFposition.
Freezer is unplugged. • Pushthe plug completely into the outlet.
Thefuse is blown/circuit • Replacefuseor reset the breaker.
breaker istripped.
Door/lid left open. • Checkto see ifpackage is holding door/lid open.
Toofrequent or too long
door/lid openings.
Freezertemperature Temperature control • SeeAbout the operationof gout freezer.
too cold set too cold.
Noisture forms on Not unusual during • Wipe surface drg.
outside of cabinet periods of high humiditg.
Door mall not be seating properlll, • See Preparing to install the freezer.
causing cold air from inside the
freezer to meet warm moist air
from the outside.
Interior light does No power at outlet. • Replacefuseor reset the breaker.
not work
Freezer is unplugged. • Pushthe plug completely into the outlet.
(onsome models)
Light bulb burned out. • Replacebulb.
Door/lid won't fullg Legs need adjusting. • SeePreparing to install thefreezer.
close bg itseff
Packageholdingdoor/lid open.
Slowstarting time Built-inoverloadprotection.
after being off
Excessivefrost Door/lid left open. • Checkto see ifpackage is holding door/lid open.
buildup Toofrequent or too long
door/lid openings.
Not unusual during
periods of high humiditll.
15

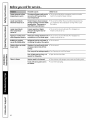
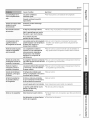
Before you call for service...
Freezerexternalsurface
temperatureis warm......
Possible Causes
The externel freezer wells con be
es much es 30°F wormer then
room temperature.
What To Do
• Thisis normal while the compressor works to transfer
heot from insidethe freezer cobinet.
Louder sound levels Hodern freezers hoveincreased ,This is normGI,When the surrounding noiselevelislow,
whenever freezer ison storagecepecitgend more stable gou might hear the compressor running while it cools
the interior.
temperatures. Theg requiree
high-efficiencg compressor.
Longer sound levels Freezer operates at higher • Thisis normal. Sound will leveloff or disappear as
when compressor pressures during the start of freezer continues to run.
comeson the ONcgcle.
Poppingorcrockingsound Metal parts undergoexpansionand * Thisis normal. Sound will leveloff or disappear as
whencompressorcomeson contraction,as in hot water pipes, freezer continues to run.
Bubbling or gurgling Refrigerant (usedto coolfreezer)is * Thisis normal.
sound, likeboiling water circulatingthroughout the sgstem.
Moisture forms oninside Weather is hot end humid, which * Thisis normal.
freezer walls increases internel rate offrost
buildup.
Door meg not be seatingproperlg. • SeePreparing to install thefreezer.
Door is kept open too long, or is • Openthe door lessoften.
opened too frequentlg.
Odors in freezer Interior needs to becleened. • Cleaninterior with sponge,warm water and bakingsodG.
Foods with strong odors ere in • Coverthe food tightly.
the freezer.
16

GE Service Protection Plus'"
GE,a name recognized worldwide for quality and dependability together with Assurant Solutions, offers you
Service Protection PlusT"--comprehensive protection on your appliances.*
Benefits Include:
• Prompt, reliable service from GEAuthorized Servicers
• Convenient hours designed to suit your busy schedule
• Quality replacement parts
• The dependability of GE,a name recognized and trusted worldwide
• Ask about our interest-free payment plans
With Service Protection Plus gou can expect:
• An extended service plan that limitsunexpected repair bills
• Service coverage for most major brands
• Unlimited service calls for the length of your contract, or credit toward a replacement product
• Service coverage for covered operating parts and labor on appliances and home electronics that fail during normal single family
household use
• Yoursatisfaction isour goal. We strive to provide you with excellent service in a professional and timely manner.
Place gour confidence in GE and call us in the U.S. toll-free at 1.800.626.2224 for more information.
*Most brands covered up to 15 gears old in the continental U.S.
SPP is a trademark of General Electric Compang.
_.,._ Cut here
Please place in envelope and mail to:
General Electric Company
Warrantg Registration Department
P.O.Box 32150
Louisville,KV 40232-2150
17

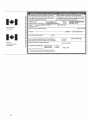
Consumer Product Ownership Registration
Dear Customer:
Thank you for purchasing our product and thank you for placing your confidence in us.
We are proud to have you as a customer!
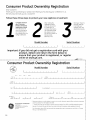
Follow these three steps to protect your new appliance investment:
Complete and mail
gour Consumer
Product Ownership
Registration todag.
Have the peace of
mind of knowing we
can contact you in
the unlikely event of a
safety modification.
After mailing the
registration below,
store this document
in a safe place. It
contains information
you will need should
you require service.
Our service number is
8OO.GE.CARES
(800.432.2737).
Read your Owner's
Manual carefully.
It will help you
operate your new
appliance properly.
Model Number Serial Number
Important: If you did not get a registration card with your
product, detach and return the form below to
ensure that your product is registered, or register
online at www.ge.com.
_,,,_ Cut here
Consumer Product Ownership Registration
@
Model Number Serial Number
I
ME[] Ms.[] Mrs.[I Miss[I
First I
Name I I I I I I
I Last I
I Name I I I I I I I I I I
Street
I
Address I I I I I I I I I I I I I I I I I I I I
Apt. # I I I I I
E-mail Address*
City I
Date Placed
In Use [
Month __
Zip
,,,,, ,,,,,, I Statel, I Cadel,, ' , I
I I Dayl, I Yearl, I Phone
Numberl l, I-I,, I-I
GE Consumer & Industrial
Appliances
General ElectricCompany
Louisville, KY40225
ge.com
* Please provide your e-mail address to receive, via e-mail, discounts, special offers and other important
communications from GEAppliances (GEA).
i} Check here if you do not want to receive communications from GEA'scarefully selected partners.
FAILURETOCOMPLETEAND RETURNTHIS CARDDOESNOTDIMINISH YOURWARRANTYRIGHTS.
For information about GEA'sprivacy and data usage policy, go to www.ge.com and click on "Privacy
Policy" or call 800.626.2224.
18
Page is loading ...

For Canadian
Customers
Pour les
Consommateurs
Canadiens
Z
rr"
Z
Z
w
Z
_9
Z
7
C.3
i.....
Pleaseregisteryourproducttoenableustocontactyou Veuillezenregi_ervolreproduitafindenouspe_eltrede
intheremoteeventasafetynolJceisissuedforthisproduct communiqueravecvoussijamaisunavisdes6curitficoncemant
andtoallowforefficientcommunica_onundertheterms ceproduit6tait6misetdecommuniquerfacilementavecvousen
ofyourwarranty,shouldtheneedarise, verbadevotregarartde,silebesoinsenfairsentir.
REGISTERON-LINE: www.geappliances.ca MAILTO: RO.BOX1780,MISSISSAOGA
ENREGISTREMENTSURINTERNETD,: www.electmmenagersge,ea POSTERD,: ONTARIO,14Y461
[][] MISS/MLLE.MR'/M[][] as.MRS'/MME'FIRSTNAME/PRENOM LASTNAME/NOM
STREETNO/N° RUE STREETNAME/RUE
CITY/VILLE
AP%.NO/APP./RR#
PROVINCE POSTALCODE/POSTAL
AREACODE/IND.REG.[TELEPHONE JE-M_L
DIDYOUPURCHASEASERVICECONTRACTFORTHISAPPUANCE? YES/OUI [] IFYES/ SIOUl:EXPIRATION
Y/A M D/J
AVEZ-VOUSACHETI_UN CONTRATDESERVICEPOURCETAPPAREIL? NO/NON []
NAME OFSELLINGDEALER/ NOMDUMARCHAND MODEL/MODELE
SERIAL/Sf_RIE
INSTALLA'I]ONDATE/DATED'INSTALLATION
Y/A M D/J CORRESPONDENCE [] ENGLISH
CORRESPONDANCE [] FRAN?AIS
[] Ido notwishtoreceiveanypromotionaloffersregardingthisproduct.
[] Jened_sirepasrecevoird'offrespromotionnellesconcemantceproduit
20
Page is loading ...
Page is loading ...
Page is loading ...

FreezerWarranty.
All warranty service provided by our Factory Service Centers,
or on authorized Customer Core®technician. Toschedule service,
on-line, contact us at ge.com, or call 800.GE.CARES(U.S.),
1.800.561.3344 (Canada). Please have serial number and model
number available when calling for service.
Staple Four receipt here.
Proof of the original purchase
dote is needed to obtain service
under the warrant F.
Fromthe dateof the
original purchase
GE Will Replace:
Any part ofthe freezerwhich foilsdue to o defect in materiuls or workmanship. Duringthis
limited one-year warranty, GEwill also provide,free of charge, all labor and related serviceto
replacethe defective part.
Service trips to gour home to teach gou how to use
the product.
Improper installation, deliverg or maintenance.
Failure of the product if it is abused, misused, or used for
other than the intended purpose or used commerciallg.
Food spoilage caused bg:
a) Power interruptionfrom the utilitg.
b) Blown fuse, open circuit breaker or other power
disconnection on the owner's premises.
c) Freezer not operating because of abnormallg low
electric power voltage or inadequate house wiring.
Damage caused after deliverg.
Replacement of house fuses or resetting of circuit
breakers.
Damage to the product caused bg accident, fire, floods
or acts of God.
Incidental or consequential damage caused bg possible
defectswith this appliance.
Product not accessible to provide required service.
EXCLUSION OF IMPLIED WARRANTIES--Vour sole and exclusive remedy is product repair as provided in
this Limited Warranty. Any implied warranties, including the implied warranties of merchantability or
fitness for a particular purpose, are limited to one year or the shortest period allowed by law.
This warranty is extended to the original purchaser and any succeeding owner for products purchased for home
use within the USA and Canada. If the product is located in on area where service by o GE Authorized Servicer
is not available, you may be responsible for o trip charge or you may be required to bring the product to on
Authorized GE Service location for service. In Alaska, the warranty excludes the cost of shipping or service coils
to your home.
Some states do not allow the exclusion or limitation of incidental or consequential damages. This warranty
gives you specific legal rights, and you may also hove other rights which vary from state to state. To know
what your legal rights ore, consult your local or state consumer affairs office or your state's Attorney General.
Warrantor"
General Electric Company. Louisville, KV40225
Mabe Canada Inc., Burlington, ON L7R 5B6
24
Page is loading ...
Page is loading ...
Page is loading ...
Page is loading ...
Page is loading ...
Page is loading ...
Page is loading ...
Page is loading ...
Page is loading ...
Page is loading ...
Page is loading ...
Page is loading ...
Page is loading ...
Page is loading ...
Page is loading ...
Page is loading ...
Page is loading ...
Page is loading ...
Page is loading ...
Page is loading ...
Page is loading ...
Page is loading ...
Page is loading ...
Page is loading ...
Page is loading ...
Page is loading ...
Page is loading ...
Page is loading ...
Page is loading ...
Page is loading ...
Page is loading ...
Page is loading ...
Page is loading ...
Page is loading ...
Page is loading ...
Page is loading ...
-
 1
1
-
 2
2
-
 3
3
-
 4
4
-
 5
5
-
 6
6
-
 7
7
-
 8
8
-
 9
9
-
 10
10
-
 11
11
-
 12
12
-
 13
13
-
 14
14
-
 15
15
-
 16
16
-
 17
17
-
 18
18
-
 19
19
-
 20
20
-
 21
21
-
 22
22
-
 23
23
-
 24
24
-
 25
25
-
 26
26
-
 27
27
-
 28
28
-
 29
29
-
 30
30
-
 31
31
-
 32
32
-
 33
33
-
 34
34
-
 35
35
-
 36
36
-
 37
37
-
 38
38
-
 39
39
-
 40
40
-
 41
41
-
 42
42
-
 43
43
-
 44
44
-
 45
45
-
 46
46
-
 47
47
-
 48
48
-
 49
49
-
 50
50
-
 51
51
-
 52
52
-
 53
53
-
 54
54
-
 55
55
-
 56
56
-
 57
57
-
 58
58
-
 59
59
-
 60
60


Ask a question and I''ll find the answer in the document
Finding information in a document is now easier with AI
in other languages
- français: GE FUF14DVDRWW Le manuel du propriétaire
- español: GE FUF14DVDRWW El manual del propietario
Related papers
Other documents
-
Crosley CFC09LW7 Owner's manual
-
Crosley CFUFH17LW3 User manual
-
-
-
Frigidaire FFU14F5HWL Owner's manual
-
-
-
-
-
Frigidaire FFN15M5HW User guide