
HEARTH PRODUCTS
KITS AND ACCESSORIES
MOSAIC™ BRICK PANELS
INSTRUCTIONS FOR INSTALLING MOSAIC™
BRICK PANELS IN:
INDOOR WOOD-BURNING FIREPLACE MODELS
GEORGIAN 36/42/50
GEORGIAN CAT 42/50
OUTDOOR WOOD-BURNING FIREPLACE
MODELS
ORACLE 36/42/50
ORACLE CAT 42/50
VENETIAN 36/42/50
VENT FREE BOX MODELS
MARQUEE 36/42/50
KIT CONTENTS
• (1) ea. Left Leading Brick Panel.
• (1) ea. Right Leading Brick Panel.
• (1) ea. Left Side Brick Panel.
• (1) ea. Right Side Brick Panel.
• (1) ea. Rear Brick Panel.
• (1) ea. Hearth Brick Panel.
• (1) ea. Ash Brick Panel.
The following items, required for this installation, are
included in this kit:
(1) ea. Kit, Hardware
GENERAL INFORMATION
This kit contains seven (7) brick panels (two side leading
bricks, two side bricks, one rear brick, one hearth brick, one
ash brick), one hardware kit and installation instructions.
P/N 126643-01 REV A 04/2014
P126643 01
INSTALLER NOTICE:
• READ ALL THESE STEPS BEFORE STARTING THE
INSTALLATION.
• THESE INSTRUCTIONS MUST BE LEFT WITH THE
APPLIANCE.
• ALL WARNINGS, PRECAUTIONS, AND INSTRUC-
TIONS IN THE INSTALLATION INSTRUCTIONS
PROVIDED WITH THE APPLIANCE ALSO APPLY
TO THESE INSTRUCTIONS.
• IF YOU ENCOUNTER ANY PROBLEMS, NEED
CLARIFICATION OF THESE INSTRUCTIONS, OR
ARE NOT QUALIFIED TO PROPERLY INSTALL
THIS KIT, CONTACT YOUR LOCAL DISTRIBUTOR
OR DEALER.

www.Astria.US.com 126643-01A
2
IMPORTANT: Installation of brick panels should be
done after the fireplace is placed in a permanent
location.
Note: Remove grate, screen assemblies and all hardware
components out of the box prior to installation.
INSTALLATION
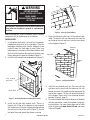
1. Install bottom brick panel. Using at least two people,
hold bottom brick panel by its side edges. Place the
back edge of bottom panel into the firebox first and
carefully lower the front edge of panel. Make sure
bottom panel is centered in the firebox and flush with
the front of the fireplace. Be careful not to pinch your
fingers between the panel and firebox (Figure 1).
2. Install the left and right side leading bricks (Figure 1).
WARNING
LIFTING HAZARD
SINGLE -PERSON LIFT COULD
CAUSE INJURY.
USE ASSISTANCE WHEN MOVING
OR LIFTING.
Figure 1 - Installing Hearth and Leading Brick panels
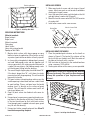
Figure 2 - Slots for Firebrick Walls
Figure 3 - Installing Side Walls
Retaining
Bracket
Leading
Brick
Right Wall
Hearth Panel
Side leading
brick Panel
Slot Right Face
Hearth
4. Secure the firebrick wall using 2 of the retainers pro-
vided. The bracket will slip underneath the metal lip
on the top of the wall and screw into the inner dome
of the fireplace (Figure 3).
5. Install the rear firebrick wall last. Place the wall face
side down on the hearth with the bottom of the wall
toward the rear of the firebox and the top toward the
front of the fireplace. Tilt the wall up toward the back
of the firebox. Secure with 2 rear retaining brackets
provided (Figure 4, page 3).
6. It is recommended that the joints between all firebrick
walls be grouted for a more finished look, see grout-
ing instructions. For more information and to watch
a how to video go to www.Astria.US.com and select
Technical Support.
3. Install the left and right firebrick walls. There is a
bracket with 2 tabs on the bottom of each firebrick
wall. Angle the wall into the fireplace opening and into
the slots on the side of the hearth (Figure 2), then tilt
the top of the panel toward the firebox surround.

www.Astria.US.com
126643-01A 3
GROUTING INSTRUCTIONS
Material provided:
Bag of cement
Bag of sand
Material required:
Piping bag
Joints striker
Heavy duty mixing bucket
Sponge or Wet Cloth
1. Moisten brick surface with damp sponge or spray
bottle just prior to application. When bricks are wet,
any excess grout mixture on bricks will easily wipe off.
2. In a heavy duty mixing bucket, add equal parts cement
and sand. Add enough water and mix together well
using a power drill with mixing wand attachment to
a yogurt like consistency. Not adding enough water
can lead to grout falling out after burning.
3. The overall length of piping bag should be about 16".
If the bag is longer than 16", cut it down to size by
removing end with larger opening. This will make the
bag easier to handle.
4. Put grout mixture into piping bag making sure the
smaller opening is downward and over a moist towel
to avoid spilling. Place a wet towel over the bucket
making sure it is directly on the surface of grout
mixture. This will keep the mixture moist and it will
not dry out before use.
5. Grout all joints where two firebrick walls come to-
gether.
6. Using a trowel, remove excess grout mixture by mov-
ing trowel in the direction of the joint. Grout mixture
in the joint should now be flush with brick surface.
If not enough grout is applied into each space, grout
may fall out after burning.
7. Using a joint striker, smooth out grout line. Allow 72
hours before operating fireplace.
Figure 4 - Installing Rear Wall
Retaining Bracket INSTALLING SCREEN
1. Slide round end of screen rod into rings at top of
screen. Attach one push-on nut to end of rod before
attaching last ring of screen.
2. Insert the round end screen rod into hole on the left
and right side of smoke shelf (Figure 5).
3. Mount flat end of screen rod with #10 x 5/8" to center
of smoke shelf.
4. Install other screen rod in same manner.
Figure 6 - Installing Grate Retainers
Figure 5 - Installing Fireplace Screen
Rating Plate Hole for Screen Rod
Leading
Bricks
INSTALLING GRATE RETAINERS
1. Place the provided grate retainers on the hearth as
shown in Figure 6. The back of the retainer will be
flush with the rear firebrick wall. Mark the center of
the hole on the hearth with a marker.
2. Drill two holes in the hearth in the marked locations
using a masonry 3/16" drill bit.
3. Secure grate retainer with masonry screws provided.
WARNING: Risk of fire! Replace grate with IHP
approved grate only. The grate has been designed
to keep the operation of your fireplace safe and
efficient.

Innovative Hearth Products reserves the right to make changes at any time, without
notice, in design, materials, specifications, prices and also to discontinue colors, styles
and products. Consult your local distributor for fireplace code information.
Printed in U.S.A. © 2014 IHP LLC
P/N 126643-01 Rev. A 04/2014.
1508 Elm Hill Pike, Suite 108
Nashville, TN 37210
1-800-655-2008
www.IHP.US.com
P126643 01
-
 1
1
-
 2
2
-
 3
3
-
 4
4


Astria Fireplaces GEORGIAN Instruction Sheet
- Category
- Fireplaces
- Type
- Instruction Sheet
Ask a question and I''ll find the answer in the document
Finding information in a document is now easier with AI
Related papers
Other documents
-
Superior WRT6036RS Installation And Operation Instructions Manual
-
FMI WCM-42JA Owner's manual
-
-
Superior Fireplaces WRT8000 Operating instructions
-
FMI JM42SRA Owner's manual
-
-
-
-
-