Zebra LE1700 Windows Vista User manual
- Category
- Graphic tablets
- Type
- User manual

Motion™ LE1700 Tablet PC
User’s Guide
Windows Vista

© 2008 Motion Computing, Inc. All rights reserved.
This document contains information protected by
copyright. No part of this document may be
reproduced in any form without written consent from
Motion.
The information in this document is provided “as is”
and is subject to change without notice. Motion is not
liable for errors or omissions in this document.
Motion, Motion Computing, Speak Anywhere, and
View Anywhere are trademarks or registered
trademarks of Motion Computing, Inc. in the U.S.A.
and other countries.
Acrobat is a registered trademark of Adobe Systems
Incorporated.
Atheros. the Atheros logo, Super G, Super A/G, Wake-
on-Wireless, and Wake-on-Theft are registered
trademarks of Atheros Communications, Inc.
AuthenTec is a registered trademark of AuthenTec, Inc.
Bluetooth is a registered trademark owned by the
Bluetooth SIG, Inc., U.S.A. and licensed to Motion
Computing, Inc.
Intel, Intel Inside, the Intel Inside logo, Pentium,
Centrino, and PROSet are trademarks or registered
trademarks of Intel Corporation or its subsidiaries in
the United States and other countries.
Knowles and IntelliSonic are trademarks or registered
trademarks of Knowles Acoustics, Inc.
OmniPass is a trademark of Softex, Inc.
Realtek is a trademark of Realtek Semiconductor
Corporation.
Microsoft Windows, Windows Vista, and Windows
Journal are trademarks or registered trademarks of
Microsoft Corporation in the United States and/or
other countries.
SigmaTel is a registered trademark and Universal Jacks
is a trademark of SigmaTel Corporation.
Wi-Fi is a registered trademark of the Wi-Fi Alliance.
End users may not loan, rent, lease, lend, or otherwise
transfer the CDs or DVDs provided for recovery
purposes to another user, except as permitted in the
End User License Agreement for such product.
This product incorporates copy protection technology
that is protected by U.S. and foreign patents, including
patent numbers 5,315,448 and 6,836,549, and other
intellectual property rights. The use of Macrovision's
copy protection technology in the product must be
authorized by Macrovision. Reverse engineering or
disassembly is prohibited.
Motion Computing, Inc. has made every effort to
identify trademarked properties and owners on this
page. All brands and product names used in this
document are for identification purposes only and
may be trademarks or registered trademarks of their
respective companies.
The warranties for Motion products are set forth in the
express limited warranty statements accompanying
such products. Nothing in this document constitutes
an additional warranty.
The Motion Computing products and services may be
covered by one or more patent-protected inventions.
Additional patents may also be pending. For more
information, see
www.motioncomputing.com/info/patents.asp.
PN 024-02-0119
Revision A02
September 2008

iii
Contents
Chapter 1 Getting Started . . . . . . . . . . . . . . . . . . . . . . . . . . . 1
Finding information . . . . . . . . . . . . . . . . . . . . . . . . . . . . . . . . . . . . . . . . . . . . . . . . . . . . . . . . . . . . . 1
Overview. . . . . . . . . . . . . . . . . . . . . . . . . . . . . . . . . . . . . . . . . . . . . . . . . . . . . . . . . . . . . . . . . . . . . . . . 2
Setting up the LE1700 . . . . . . . . . . . . . . . . . . . . . . . . . . . . . . . . . . . . . . . . . . . . . . . . . . . . . . . . . . . 5
Chapter 2 Features. . . . . . . . . . . . . . . . . . . . . . . . . . . . . . . . . . 7
Pen . . . . . . . . . . . . . . . . . . . . . . . . . . . . . . . . . . . . . . . . . . . . . . . . . . . . . . . . . . . . . . . . . . . . . . . . . . . . . 8
Front panel buttons . . . . . . . . . . . . . . . . . . . . . . . . . . . . . . . . . . . . . . . . . . . . . . . . . . . . . . . . . . . . . 9
Status lights . . . . . . . . . . . . . . . . . . . . . . . . . . . . . . . . . . . . . . . . . . . . . . . . . . . . . . . . . . . . . . . . . . . . 10
Security . . . . . . . . . . . . . . . . . . . . . . . . . . . . . . . . . . . . . . . . . . . . . . . . . . . . . . . . . . . . . . . . . . . . . . . . 11
Windows Security button . . . . . . . . . . . . . . . . . . . . . . . . . . . . . . . . . . . . . . . . . . . . . . . . . . . . . . . 11
Fingerprint reader . . . . . . . . . . . . . . . . . . . . . . . . . . . . . . . . . . . . . . . . . . . . . . . . . . . . . . . . . . . . . . 11
Display. . . . . . . . . . . . . . . . . . . . . . . . . . . . . . . . . . . . . . . . . . . . . . . . . . . . . . . . . . . . . . . . . . . . . . . . . 12
View Anywhere display (optional). . . . . . . . . . . . . . . . . . . . . . . . . . . . . . . . . . . . . . . . . . . . . . . 12
Microphones . . . . . . . . . . . . . . . . . . . . . . . . . . . . . . . . . . . . . . . . . . . . . . . . . . . . . . . . . . . . . . . . . . . 12
Speakers . . . . . . . . . . . . . . . . . . . . . . . . . . . . . . . . . . . . . . . . . . . . . . . . . . . . . . . . . . . . . . . . . . . . . . . 12
Ambient light sensor (ALS). . . . . . . . . . . . . . . . . . . . . . . . . . . . . . . . . . . . . . . . . . . . . . . . . . . . . . 13
Motion DataGuard . . . . . . . . . . . . . . . . . . . . . . . . . . . . . . . . . . . . . . . . . . . . . . . . . . . . . . . . . . . . . 13
Infrared (IrDA) . . . . . . . . . . . . . . . . . . . . . . . . . . . . . . . . . . . . . . . . . . . . . . . . . . . . . . . . . . . . . . . . . . 13
USB 2.0 ports . . . . . . . . . . . . . . . . . . . . . . . . . . . . . . . . . . . . . . . . . . . . . . . . . . . . . . . . . . . . . . . . . . . 13
Headphones port. . . . . . . . . . . . . . . . . . . . . . . . . . . . . . . . . . . . . . . . . . . . . . . . . . . . . . . . . . . . . . . 13
Microphone port . . . . . . . . . . . . . . . . . . . . . . . . . . . . . . . . . . . . . . . . . . . . . . . . . . . . . . . . . . . . . . . 14
Security slot . . . . . . . . . . . . . . . . . . . . . . . . . . . . . . . . . . . . . . . . . . . . . . . . . . . . . . . . . . . . . . . . . . . . 14
VGA port . . . . . . . . . . . . . . . . . . . . . . . . . . . . . . . . . . . . . . . . . . . . . . . . . . . . . . . . . . . . . . . . . . . . . . . 14
DVI-D port . . . . . . . . . . . . . . . . . . . . . . . . . . . . . . . . . . . . . . . . . . . . . . . . . . . . . . . . . . . . . . . . . . . . . 14
Docking port . . . . . . . . . . . . . . . . . . . . . . . . . . . . . . . . . . . . . . . . . . . . . . . . . . . . . . . . . . . . . . . . . . . 15
Ethernet port. . . . . . . . . . . . . . . . . . . . . . . . . . . . . . . . . . . . . . . . . . . . . . . . . . . . . . . . . . . . . . . . . . . 15
SD (Secure Digital) card slot. . . . . . . . . . . . . . . . . . . . . . . . . . . . . . . . . . . . . . . . . . . . . . . . . . . . . 15
PC card slot . . . . . . . . . . . . . . . . . . . . . . . . . . . . . . . . . . . . . . . . . . . . . . . . . . . . . . . . . . . . . . . . . . . . 15
SIM card slot . . . . . . . . . . . . . . . . . . . . . . . . . . . . . . . . . . . . . . . . . . . . . . . . . . . . . . . . . . . . . . . . . . . 15
Wi-Fi (802.11a/b/g wireless). . . . . . . . . . . . . . . . . . . . . . . . . . . . . . . . . . . . . . . . . . . . . . . . . . . . . 16
Wireless Broadband . . . . . . . . . . . . . . . . . . . . . . . . . . . . . . . . . . . . . . . . . . . . . . . . . . . . . . . . . . . . 16
Bluetooth wireless. . . . . . . . . . . . . . . . . . . . . . . . . . . . . . . . . . . . . . . . . . . . . . . . . . . . . . . . . . . . . . 17
Antenna . . . . . . . . . . . . . . . . . . . . . . . . . . . . . . . . . . . . . . . . . . . . . . . . . . . . . . . . . . . . . . . . . . . . . . . 17
Power adapter . . . . . . . . . . . . . . . . . . . . . . . . . . . . . . . . . . . . . . . . . . . . . . . . . . . . . . . . . . . . . . . . . 17
Battery . . . . . . . . . . . . . . . . . . . . . . . . . . . . . . . . . . . . . . . . . . . . . . . . . . . . . . . . . . . . . . . . . . . . . . . . . 18

iv Contents
Chapter 3 Using your Tablet PC . . . . . . . . . . . . . . . . . . . .19
Using Motion Dashboard . . . . . . . . . . . . . . . . . . . . . . . . . . . . . . . . . . . . . . . . . . . . . . . . . . . . . . . 20
Using the pen . . . . . . . . . . . . . . . . . . . . . . . . . . . . . . . . . . . . . . . . . . . . . . . . . . . . . . . . . . . . . . . . . . 21
Using Tablet PC Input Panel . . . . . . . . . . . . . . . . . . . . . . . . . . . . . . . . . . . . . . . . . . . . . . . . . . . . 22
Configuring pen options . . . . . . . . . . . . . . . . . . . . . . . . . . . . . . . . . . . . . . . . . . . . . . . . . . . . . . . 22
Enabling personalized handwriting recognition . . . . . . . . . . . . . . . . . . . . . . . . . . . . . . . . . 23
Using personalized handwriting recognition . . . . . . . . . . . . . . . . . . . . . . . . . . . . . . . . . . . . 23
Configuring front panel buttons . . . . . . . . . . . . . . . . . . . . . . . . . . . . . . . . . . . . . . . . . . . . . . . . 24
Using USB. . . . . . . . . . . . . . . . . . . . . . . . . . . . . . . . . . . . . . . . . . . . . . . . . . . . . . . . . . . . . . . . . . . . . . 24
Using Ethernet . . . . . . . . . . . . . . . . . . . . . . . . . . . . . . . . . . . . . . . . . . . . . . . . . . . . . . . . . . . . . . . . . 25
Using the display. . . . . . . . . . . . . . . . . . . . . . . . . . . . . . . . . . . . . . . . . . . . . . . . . . . . . . . . . . . . . . . 25
Adjusting the display brightness . . . . . . . . . . . . . . . . . . . . . . . . . . . . . . . . . . . . . . . . . . . . . 25
Rotating the display . . . . . . . . . . . . . . . . . . . . . . . . . . . . . . . . . . . . . . . . . . . . . . . . . . . . . . . . . 25
Changing the display rotation sequence . . . . . . . . . . . . . . . . . . . . . . . . . . . . . . . . . . . . . 26
Setting up an external display . . . . . . . . . . . . . . . . . . . . . . . . . . . . . . . . . . . . . . . . . . . . . . . . . . 26
Using the built-in microphones . . . . . . . . . . . . . . . . . . . . . . . . . . . . . . . . . . . . . . . . . . . . . . . . . 27
Connecting headphones, external speakers, or a microphone . . . . . . . . . . . . . . . . . . . 28
Using speech recognition . . . . . . . . . . . . . . . . . . . . . . . . . . . . . . . . . . . . . . . . . . . . . . . . . . . . . . 29
Setting up speech recognition . . . . . . . . . . . . . . . . . . . . . . . . . . . . . . . . . . . . . . . . . . . . . . . 29
Using Dictation and Voice Commands . . . . . . . . . . . . . . . . . . . . . . . . . . . . . . . . . . . . . . . 30
Using power plans . . . . . . . . . . . . . . . . . . . . . . . . . . . . . . . . . . . . . . . . . . . . . . . . . . . . . . . . . . . . . 31
Selecting a power plan . . . . . . . . . . . . . . . . . . . . . . . . . . . . . . . . . . . . . . . . . . . . . . . . . . . . . . 31
Changing power plan settings . . . . . . . . . . . . . . . . . . . . . . . . . . . . . . . . . . . . . . . . . . . . . . . 32
Creating a power plan . . . . . . . . . . . . . . . . . . . . . . . . . . . . . . . . . . . . . . . . . . . . . . . . . . . . . . . 32
Using Standby . . . . . . . . . . . . . . . . . . . . . . . . . . . . . . . . . . . . . . . . . . . . . . . . . . . . . . . . . . . . . . . . . 32
Using Hibernate. . . . . . . . . . . . . . . . . . . . . . . . . . . . . . . . . . . . . . . . . . . . . . . . . . . . . . . . . . . . . . . . 33
Using the battery. . . . . . . . . . . . . . . . . . . . . . . . . . . . . . . . . . . . . . . . . . . . . . . . . . . . . . . . . . . . . . . 34
Checking battery power . . . . . . . . . . . . . . . . . . . . . . . . . . . . . . . . . . . . . . . . . . . . . . . . . . . . . 34
Charging the battery . . . . . . . . . . . . . . . . . . . . . . . . . . . . . . . . . . . . . . . . . . . . . . . . . . . . . . . . 34
Battery and power management tips . . . . . . . . . . . . . . . . . . . . . . . . . . . . . . . . . . . . . . . . 35
Removing and replacing the battery . . . . . . . . . . . . . . . . . . . . . . . . . . . . . . . . . . . . . . . . . 35
Swapping the battery . . . . . . . . . . . . . . . . . . . . . . . . . . . . . . . . . . . . . . . . . . . . . . . . . . . . . . . 36
Battery maintenance . . . . . . . . . . . . . . . . . . . . . . . . . . . . . . . . . . . . . . . . . . . . . . . . . . . . . . . . . . . 36
Long-term battery storage (not attached to tablet) . . . . . . . . . . . . . . . . . . . . . . . . . . . 36
Disposing of used batteries . . . . . . . . . . . . . . . . . . . . . . . . . . . . . . . . . . . . . . . . . . . . . . . . . . 37
Extended Battery Self-Conditioning. . . . . . . . . . . . . . . . . . . . . . . . . . . . . . . . . . . . . . . . . . . . . 37
Troubleshooting the Extended Battery . . . . . . . . . . . . . . . . . . . . . . . . . . . . . . . . . . . . . . . 37
Using Motion OmniPass and the fingerprint reader . . . . . . . . . . . . . . . . . . . . . . . . . . . . . . 38
Capturing a fingerprint . . . . . . . . . . . . . . . . . . . . . . . . . . . . . . . . . . . . . . . . . . . . . . . . . . . . . . 39
Using password replacement . . . . . . . . . . . . . . . . . . . . . . . . . . . . . . . . . . . . . . . . . . . . . . . . 41
Using the password wizard . . . . . . . . . . . . . . . . . . . . . . . . . . . . . . . . . . . . . . . . . . . . . . . . . . 42
Logging on to a remembered site. . . . . . . . . . . . . . . . . . . . . . . . . . . . . . . . . . . . . . . . . . . . 42
Setting up a smart card device . . . . . . . . . . . . . . . . . . . . . . . . . . . . . . . . . . . . . . . . . . . . . . . 42
Setting up strong logon security . . . . . . . . . . . . . . . . . . . . . . . . . . . . . . . . . . . . . . . . . . . . . 43
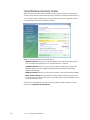
Using Windows Security Center. . . . . . . . . . . . . . . . . . . . . . . . . . . . . . . . . . . . . . . . . . . . . . . . . 44
Setting up users and passwords . . . . . . . . . . . . . . . . . . . . . . . . . . . . . . . . . . . . . . . . . . . . . . . . 45
Setting up Windows user accounts . . . . . . . . . . . . . . . . . . . . . . . . . . . . . . . . . . . . . . . . . . 45
Setting a BIOS password. . . . . . . . . . . . . . . . . . . . . . . . . . . . . . . . . . . . . . . . . . . . . . . . . . . . . 45
Setting up a hard disk drive (HDD) password . . . . . . . . . . . . . . . . . . . . . . . . . . . . . . . . . 46
Using Wi-Fi (802.11a/b/g). . . . . . . . . . . . . . . . . . . . . . . . . . . . . . . . . . . . . . . . . . . . . . . . . . . . . . . 47

Contents v
Enabling or disabling Wi-Fi . . . . . . . . . . . . . . . . . . . . . . . . . . . . . . . . . . . . . . . . . . . . . . . . . . 47
Setting up a Wi-Fi connection. . . . . . . . . . . . . . . . . . . . . . . . . . . . . . . . . . . . . . . . . . . . . . . . 47
Using Wireless Broadband . . . . . . . . . . . . . . . . . . . . . . . . . . . . . . . . . . . . . . . . . . . . . . . . . . . . . . 48
Activating your Wireless Broadband service . . . . . . . . . . . . . . . . . . . . . . . . . . . . . . . . . . 48
Enabling Wireless Broadband . . . . . . . . . . . . . . . . . . . . . . . . . . . . . . . . . . . . . . . . . . . . . . . . 48
Starting the connection manager . . . . . . . . . . . . . . . . . . . . . . . . . . . . . . . . . . . . . . . . . . . . 48
Connecting and disconnecting . . . . . . . . . . . . . . . . . . . . . . . . . . . . . . . . . . . . . . . . . . . . . . 49
Using Bluetooth . . . . . . . . . . . . . . . . . . . . . . . . . . . . . . . . . . . . . . . . . . . . . . . . . . . . . . . . . . . . . . . . 49
Enabling or disabling Bluetooth. . . . . . . . . . . . . . . . . . . . . . . . . . . . . . . . . . . . . . . . . . . . . . 49
Setting up a Bluetooth device. . . . . . . . . . . . . . . . . . . . . . . . . . . . . . . . . . . . . . . . . . . . . . . . 50
If the device is not discovered… . . . . . . . . . . . . . . . . . . . . . . . . . . . . . . . . . . . . . . . . . . . . . 51
Using infrared . . . . . . . . . . . . . . . . . . . . . . . . . . . . . . . . . . . . . . . . . . . . . . . . . . . . . . . . . . . . . . . . . . 52
Finding additional software. . . . . . . . . . . . . . . . . . . . . . . . . . . . . . . . . . . . . . . . . . . . . . . . . . . . . 52
Chapter 4 Care and Maintenance . . . . . . . . . . . . . . . . . . .53
General care. . . . . . . . . . . . . . . . . . . . . . . . . . . . . . . . . . . . . . . . . . . . . . . . . . . . . . . . . . . . . . . . . . . . 53
Standard display . . . . . . . . . . . . . . . . . . . . . . . . . . . . . . . . . . . . . . . . . . . . . . . . . . . . . . . . . . . . . . . 54
View Anywhere display . . . . . . . . . . . . . . . . . . . . . . . . . . . . . . . . . . . . . . . . . . . . . . . . . . . . . . . . . 54
Cleaning in a health care environment . . . . . . . . . . . . . . . . . . . . . . . . . . . . . . . . . . . . . . . . . . 55
Disinfecting procedures . . . . . . . . . . . . . . . . . . . . . . . . . . . . . . . . . . . . . . . . . . . . . . . . . . . . . 55
Training and documentation considerations . . . . . . . . . . . . . . . . . . . . . . . . . . . . . . . . . 55
Cleaning solutions. . . . . . . . . . . . . . . . . . . . . . . . . . . . . . . . . . . . . . . . . . . . . . . . . . . . . . . . . . . 56
Cleaning the fingerprint reader . . . . . . . . . . . . . . . . . . . . . . . . . . . . . . . . . . . . . . . . . . . . . . . . . 56
Pen . . . . . . . . . . . . . . . . . . . . . . . . . . . . . . . . . . . . . . . . . . . . . . . . . . . . . . . . . . . . . . . . . . . . . . . . . . . . 57
Replacing pen tips. . . . . . . . . . . . . . . . . . . . . . . . . . . . . . . . . . . . . . . . . . . . . . . . . . . . . . . . . . . 57
Ordering new pens . . . . . . . . . . . . . . . . . . . . . . . . . . . . . . . . . . . . . . . . . . . . . . . . . . . . . . . . . . 57
Replacing the antenna. . . . . . . . . . . . . . . . . . . . . . . . . . . . . . . . . . . . . . . . . . . . . . . . . . . . . . . . . . 58
Traveling with your Tablet PC . . . . . . . . . . . . . . . . . . . . . . . . . . . . . . . . . . . . . . . . . . . . . . . . . . . 58
Traveling by air . . . . . . . . . . . . . . . . . . . . . . . . . . . . . . . . . . . . . . . . . . . . . . . . . . . . . . . . . . . . . . 59
FAA Wireless air travel requirement . . . . . . . . . . . . . . . . . . . . . . . . . . . . . . . . . . . . . . . . . . 59
Restoring data. . . . . . . . . . . . . . . . . . . . . . . . . . . . . . . . . . . . . . . . . . . . . . . . . . . . . . . . . . . . . . . . . . 59
Using Acronis True Image in Windows . . . . . . . . . . . . . . . . . . . . . . . . . . . . . . . . . . . . . . . 59
Using Acronis Startup Recovery Manager . . . . . . . . . . . . . . . . . . . . . . . . . . . . . . . . . . . . 60
Creating a backup archive . . . . . . . . . . . . . . . . . . . . . . . . . . . . . . . . . . . . . . . . . . . . . . . . . . . . . . 60
Creating a bootable disk . . . . . . . . . . . . . . . . . . . . . . . . . . . . . . . . . . . . . . . . . . . . . . . . . . . . . . . . 60
Removing the Acronis OEM Zone . . . . . . . . . . . . . . . . . . . . . . . . . . . . . . . . . . . . . . . . . . . . . . . 61

vi Contents
Appendix A Troubleshooting and Support. . . . . . . . . .63
Troubleshooting . . . . . . . . . . . . . . . . . . . . . . . . . . . . . . . . . . . . . . . . . . . . . . . . . . . . . . . . . . . . . . . 63
Power . . . . . . . . . . . . . . . . . . . . . . . . . . . . . . . . . . . . . . . . . . . . . . . . . . . . . . . . . . . . . . . . . . . . . . 63
Battery. . . . . . . . . . . . . . . . . . . . . . . . . . . . . . . . . . . . . . . . . . . . . . . . . . . . . . . . . . . . . . . . . . . . . . 64
Display. . . . . . . . . . . . . . . . . . . . . . . . . . . . . . . . . . . . . . . . . . . . . . . . . . . . . . . . . . . . . . . . . . . . . . 64
Input . . . . . . . . . . . . . . . . . . . . . . . . . . . . . . . . . . . . . . . . . . . . . . . . . . . . . . . . . . . . . . . . . . . . . . . 65
Ports and connectors . . . . . . . . . . . . . . . . . . . . . . . . . . . . . . . . . . . . . . . . . . . . . . . . . . . . . . . . 66
Network . . . . . . . . . . . . . . . . . . . . . . . . . . . . . . . . . . . . . . . . . . . . . . . . . . . . . . . . . . . . . . . . . . . . 66
Audio . . . . . . . . . . . . . . . . . . . . . . . . . . . . . . . . . . . . . . . . . . . . . . . . . . . . . . . . . . . . . . . . . . . . . . . 66
System. . . . . . . . . . . . . . . . . . . . . . . . . . . . . . . . . . . . . . . . . . . . . . . . . . . . . . . . . . . . . . . . . . . . . . 67
Frequently asked questions. . . . . . . . . . . . . . . . . . . . . . . . . . . . . . . . . . . . . . . . . . . . . . . . . . . . . 67
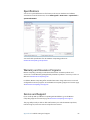
Specifications . . . . . . . . . . . . . . . . . . . . . . . . . . . . . . . . . . . . . . . . . . . . . . . . . . . . . . . . . . . . . . . . . . 69
Warranty and Insurance Programs . . . . . . . . . . . . . . . . . . . . . . . . . . . . . . . . . . . . . . . . . . . . . . 69
Service and Support . . . . . . . . . . . . . . . . . . . . . . . . . . . . . . . . . . . . . . . . . . . . . . . . . . . . . . . . . . . . 69
Index . . . . . . . . . . . . . . . . . . . . . . . . . . . . . . . . . . . . . . . . . . . . . .71

1
Getting Started
1
The Motion Computing LE1700 is a full-featured Tablet PC, combining performance, long
battery life, and a lightweight, sleek design. The LE1700 offers the latest innovations in
mobile computing: a user-focused design, unmatched mobility, and state-of-the-art
security.
If you are new to Tablet PCs, use the information in this section to get started quickly. If you
are already familiar with tablet computers, you can skip to the next chapter to learn about
the features of the LE1700. If there are certain things you want to learn about your new
Tablet PC, look on the Contents page.
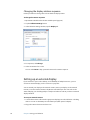
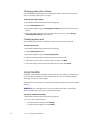
Finding information
If you are viewing this PDF document on your screen, you can use the following methods to
find information:
• In the Bookmark pane, click or tap a topic to view it. If the Bookmark pane is not visible,
select View > Navigation Tabs > Bookmarks.
• On the Contents page, click or tap a topic to view it.
• To search the document, select Edit > Find.
Because you typically use a tablet pen instead of a mouse with a Tablet PC, we use the term
tap instead of click in most situations.

2 Chapter 1 Getting Started
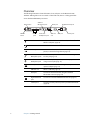
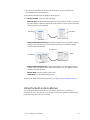
Overview
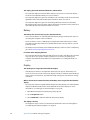
The following illustrations show the buttons, slots, and ports on the Motion LE1700
Tablet PC. Although there are no controls on the back side, there is a sliding panel that
covers the Extended Battery connector.
Wireless switch Enable and disable the Wi-Fi, Bluetooth, and Broadband
Wireless adapters (page 16).
Power switch Turns the Tablet PC on and off.
USB 2.0 ports Connect USB devices, such as a mouse, digital camera,
printer, or external storage device (page 13).
Audio in/
Microphone port
Connect a microphone or other audio source using a
3.5 mm jack (page 14).
Audio out/
Headphone port
Connect headphones, speakers, or audio equipment
using a 3.5 mm jack (page 13).
DVI-D port Connect an external monitor using DVI. Requires an
optional adapter (page 14).
SIM card slot Attach a SIM card (page 15).
VGA port Connect an external monitor using the standard
DB-15 VGA connector (page 14).
Gigabit Ethernet
port
Connect to a 10/100/1000 Ethernet network (page 15).
Security slot Connect a security cable to protect your tablet from theft
(page 14).
Power switch
Audio in/
Microphone port DVI-D port Gigabit Ethernet port
Wireless
switch
USB 2.0
ports
Audio out/
Headphones port
VGA port Security slot
SIM card
slot

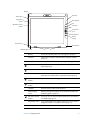
Chapter 1 Getting Started 3
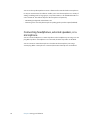
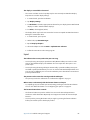
Battery Powers the Tablet PC when it is not plugged in (page 18).
Antenna Improves the reception of the Broadband Wireless adapter
(page 17).
Microphones Record sounds and use for speech recognition (page 12).
Esc button Cancel the current task. Equivalent to the Esc key on a
keyboard (page 9).
Function button Activate secondary functions for other buttons (page 9).
Directional pad Use for basic navigation. Equivalent to the arrow keys on a
keyboard. The center button is equivalent to Enter (page 9).
Dashboard
button
Open Motion Dashboard (page 9).
Rotate display
button
Rotate the display orientation (page 9).
Speakers Listen to music or other audio (page 12).
Ambient light
sensor
Measures background light and can automatically adjust the
display brightness (page 13).
Windows Security
button
Use to log on to or lock your tablet. Equivalent to Ctrl+Alt+Del
on a keyboard (page 11).
Fingerprint reader Scan your fingerprints for added security. You can also use the
fingerprint reader as a navigation device (page 11).
Status lights Show battery and power status (page 10).
Battery
Status lights
Microphone
Esc
Function
Directional
pad
Rotate
Microphone
Speakers
Ambient light sensor
Microphone
Fingerprint
reader
Windows Security
display
Antenna
Dashboard
button

4 Chapter 1 Getting Started
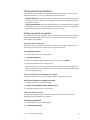
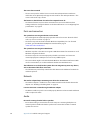
Power adapter port Connect the power adapter (page 17).
SD card slot Attach an SD (Secure Digital) card (page 15).
PC card slot Attach a Type-I or Type-II PCMCIA card (page 15).
Infrared Communicate with other devices using Infrared
(page 13).
Air vent Dissipates heat from the tablet.
Pen bay Store the pen when not in use.
Pen tether Attach the pen tether.
Antenna Improves the reception of the Wireless Broadband
adapter.
Docking
attachments
Attachment points for docks, keyboards, and other
accessories.
Docking port Interface for docks, keyboards, and other accessories.
Accessory port Connect Motion Computing accessories, such as
external drives.
SD card slot Infrared Air vent
Pen tether
port
PC card slot Pen bayPower adapter
Antenna
Docking attachment
Accessory port
Docking attachments
Docking port

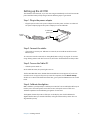
Chapter 1 Getting Started 5
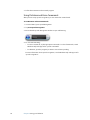
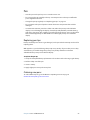
Setting up the LE1700
The LE1700 is self-contained, so you can start using it immediately. You should connect AC
power until the battery is fully charged. Use the following steps to get started:
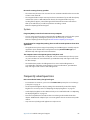
Step 1: Plug in the power adapter
• Plug the power cord in to the power adapter. Insert the power cord into an outlet and
the power adapter plug into the power adapter port on the Tablet PC.
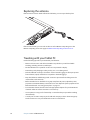
Step 2: Connect the cables
• If you want to connect your Tablet PC to a network, insert an Ethernet cable into the
Ethernet port.
To connect to a wireless network, see “Using Wi-Fi (802.11a/b/g)” on page 47. To connect
using docking stations and other accessories, refer to the documentation for that product.
Step 3: Turn on the Tablet PC
• Slide the power switch on.
As the Tablet PC starts, the power light comes on.
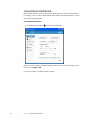
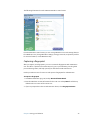
The first time Windows starts, the Windows Vista Welcome Center appears. If you do not
want this screen to appear every time you start the computer, clear the Run at startup
check box. To return to the Welcome Center later, go to System and Maintenance in Control
Panel.
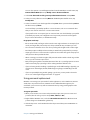
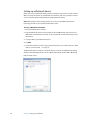
Step 4: Calibrate the digitizer
With a Tablet PC, you frequently use a tablet pen instead of a mouse and keyboard for input.
Use the pen to move the pointer around the screen, and tap the screen to click. Use
Tablet PC Input Panel and handwriting recognition to enter text.
The digitizer detects the position of the pen on the display. You should calibrate the
digitizer the first time you start the Tablet PC, and again whenever the pointer does not
align with the pen tip.
To Tablet PC
To wall
outlet
power port

6 Chapter 1 Getting Started
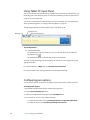
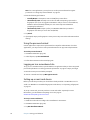
To calibrate the digitizer
1. Press the Dashboard button ( ) to start Motion Dashboard.
You can use Motion Dashboard to configure your Tablet PC and to start commonly used
tablet applications. See “Using Motion Dashboard” on page 20.
2. Under Pen & Tablet, tap Calibrate Digitizer.
3. Follow the instructions in the calibration program.
Note: If you are left-handed, see “How do I adjust the Tablet PC for left-handed use?” on
page 68.
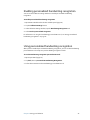
Step 5: Get familiar with your Tablet PC
Motion Computing offers free Web-based Quick Start Training that you can use to
familiarize yourself with the features of your Tablet PC. If you are new to tablet computing,
you can use the training to get started quickly. You can find the training at
http://training.motioncomputing.com.
You can also use the Windows Tablet PC tutorials to learn about the tablet computing
capabilities of Windows Vista, such as pen support, digital ink input, and handwriting
recognition.
To start the tutorials, select Start > All Programs > Tablet PC > Tablet PC Tutorials.

7
Features
2
The Motion Computing LE1700 Tablet PC has the power and features of a notebook
computer, while giving you the added mobility and versatility of a tablet computer.
Use the information in this chapter to get more familiar with the hardware features of your
LE1700 Tablet PC, such as buttons, slots, connectors, and wireless adapters
The LE1700 Tablet PC includes the following features:
• Intel® Core™2 Duo 1.5 GHz Processor or
Intel® Core™ Solo 1.2 GHz Processor
• Mobile Intel® 945GM Express Chipset
• Integrated Wi-Fi (802.11a/b/g) networking
• Integrated Bluetooth® and infrared
• Integrated Wireless Broadband
• Integrated DataGuard to help protect the hard drive
• DDR2 RAM
• 12.1" TFT LCD (XGA or SXGA+)
• Integrated fingerprint reader
• Integrated Ethernet

8 Chapter 2 Features
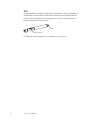
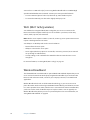
Pen
An important difference between traditional PCs and Tablet PCs is that you frequently use
the tablet pen to interact with the computer instead of a mouse and keyboard. The pen
includes a pressure-sensitive tip, a function button, and an eraser. The pen contains no
batteries and requires no external power.
For information about using the pen, see “Using the pen” on page 21.
Tip
Function button
Eraser

Chapter 2 Features 9
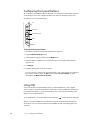
Front panel buttons
You can use the buttons on the front of the tablet to perform many functions without
having to use the pen. The buttons are customizable, so you can modify their functions to
suit the way you work. See “Configuring front panel buttons” on page 24.
The directional pad orientation rotates to match the display orientation. To move the
pointer in a certain direction, press that direction on the pad regardless of orientation. For
example, the “up” direction in landscape orientation becomes the “left” direction in portrait
orientation.
Button Primary
Secondary
(Function + button)
Esc Cancels the current task. Equivalent
to the Esc key.
Alt + Tab
Function Activates secondary function for
other buttons
N/A
Directional pad Use to move the pointer or navigate
through documents. Equivalent to
arrow keys on a keyboard. The center
button is equivalent to Enter.
Left = Shift +Tab
Right = Tab
Up = Page Up
Down = Page Down
Dashboard Starts Motion Dashboard Starts Windows Journal
Rotate screen Rotates the orientation of the display Starts Tablet PC Input Panel
Esc
Function
Directional pad
Dashboard
Rotate screen

10 Chapter 2 Features
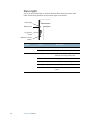
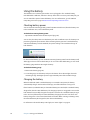
Status lights
You can use the indicator lights on the front of the LE1700 to monitor the status of the
tablet. The following illustration shows the status lights on the LE1700.
Light Status Description
Power Steady blue On
Blinking blue The Tablet PC is in Standby mode
Battery Steady blue The battery is fully charged and the
Tablet PC is running on AC power
Steady amber Charging
Flashing amber (fast) 5% charge or less remaining
Flashing amber (slow) The battery is too hot to charge
Off The Tablet PC is running on battery
power
Power light
Battery light
Windows Security
Fingerprint
reader
button

Chapter 2 Features 11
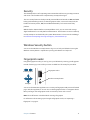
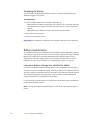
Security
The LE1700 provides a safe computing environment that enables strong security protection
and serves as the foundation for complementary security technologies.
The core security features include password-protected Phoenix TrustedCore BIOS with HDD
locking and networking control, a built-in fingerprint reader, a universal security lock, the
Dashboard Security Center, TPM (Trusted Platform Module), and a Smart Card-ready
platform.
With the built-in TPM and Infineon Security Platform Tools, you can create and manage
digital certificates for user and platform authentication. These features are most commonly
used by enterprises and enabled by the system administrator. To learn more about TPM, go
to www.motioncomputing.com/support/support_documentation.asp.
Windows Security button
You can use the Windows Security button to log on to or lock your Tablet PC. Pressing the
Windows Security button is equivalent to pressing Ctrl+Alt+Del on a keyboard.
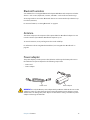
Fingerprint reader
Using the fingerprint reader, you can log on to your Tablet PC by scanning your fingerprint
instead of entering a password. This presents an added level of security for your tablet.
You can use the OmniPass application to associate your fingerprint with passwords for Web
pages and other applications. You can also use the fingerprint reader as a navigation device.
Move your finger on the fingerprint reader to move the pointer on the screen.
Note: The scroll function is disabled while scanning a fingerprint.
For information about setting up and using the fingerprint reader, see “Capturing a
fingerprint” on page 39.
Scan fingerprint
Navigate
Windows Security button
Fingerprint reader

12 Chapter 2 Features
Display
The LE1700 includes a 12.1-inch display with the following features:
• A highly readable LCD (liquid crystal display).
• XGA (1024 × 768) or SXGA+ (1400 × 1050) resolution.
• A protective layer that offers a firm writing surface and minimizes glare.
• A digitizer panel that enables handwritten entry with the tablet pen.
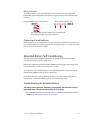
View Anywhere display (optional)
The View Anywhere™ display option enhances outdoor viewing and bright-light viewing
environments. The View Anywhere display includes all the features of the standard display
plus:
• A protective layer that improves the sunlight contrast ratio and significantly reduces
reflection and glare.
• Improved sunlight contrast ratio, which enhances viewability at wide viewing angles.
• Reduced reflection and glare and improved light pass-through efficiency.
Microphones
The LE1700 is equipped with integrated microphones that you can use to record audio,
dictate notes, and use voice commands without the need for an external microphone.
You can also use the Microphone port to connect an external microphone or microphone
headset. See “Connecting headphones, external speakers, or a microphone” on page 28.
Speakers
The LE1700 is equipped with integrated stereo speakers that you can use to listen to music,
movies, or other multimedia applications.
You can also use the headphones port to connect external speakers or headphones. See
“Connecting headphones, external speakers, or a microphone” on page 28.

Chapter 2 Features 13
Ambient light sensor (ALS)
If you have dynamic brightness selected and are running on battery power, the ambient
light sensor measures the surrounding light and adjusts the display brightness and contrast
accordingly. This ensures that you have proper settings for all lighting conditions. To enable
dynamic brightness, see “Adjusting the display brightness” on page 25.
Motion DataGuard
The LE1700 includes the DataGuard feature, which detects shocks, extreme vibrations, and
falls. If detected, DataGuard moves the drive heads away from the disk, which can prevent
hard drive failures and data loss. For more information, go to Control Panel and open
DataGuard.
Infrared (IrDA)
Your Tablet PC has integrated Infrared, which you can use to connect your tablet to other
computers and devices wirelessly. The LE1700 supports the IrDA standard (Infrared Data
Association), which ensures that you can connect to printers, modems, cellular phones, and
other devices. Infrared has a range of approximately one meter, and requires line-of-sight
alignment between the two devices.
USB 2.0 ports
Two USB 2.0 (High-speed USB) ports can be used to attach any USB device such as a mouse,
digital camera, printer, or external storage device. The USB ports are compatible with older
USB devices (USB 1.1).
For more information, see “Using USB” on page 24.
Headphones port
The headphones port is on the left edge of the Tablet PC. It is marked with a small
headphones symbol and is designed as an audio output channel only. You can attach
headphones or external speakers to this port.
For more information, see “Connecting headphones, external speakers, or a microphone”
on page 28.

14 Chapter 2 Features
Microphone port
The microphone port is on the left edge of the Tablet PC. It is marked with a small
microphone symbol and is designed as an audio input/line in channel only. You can attach
an external microphone directly to this port to enhance your audio recording capabilities.
The internal microphones are disabled when an external microphone is attached.
For more information, see “Connecting headphones, external speakers, or a microphone”
on page 28.
Security slot
You can use the security slot to attach your tablet to a desk, table or other fixture. You must
purchase a security lock separately.
VGA port
You can use the VGA port to connect standard VGA monitors. When you attach an external
monitor, you can use the external monitor only, or the external monitor and the Tablet PC
display together. See “Setting up an external display” on page 26.
DVI-D port
The DVI-D (Digital Video Interface) connector is on the left edge of the tablet and is
identified by the DVI-D designation. With an optional DVI-D cable, you can attach a digital
video monitor. For more information, go to the Motion Computing accessories page at
www.motioncomputing.com/accessories.
When you attach an external monitor, you can use the external monitor only, or use the
monitor and the Tablet PC display as a mirrored or extended display. See “Setting up an
external display” on page 26.
Page is loading ...
Page is loading ...
Page is loading ...
Page is loading ...
Page is loading ...
Page is loading ...
Page is loading ...
Page is loading ...
Page is loading ...
Page is loading ...
Page is loading ...
Page is loading ...
Page is loading ...
Page is loading ...
Page is loading ...
Page is loading ...
Page is loading ...
Page is loading ...
Page is loading ...
Page is loading ...
Page is loading ...
Page is loading ...
Page is loading ...
Page is loading ...
Page is loading ...
Page is loading ...
Page is loading ...
Page is loading ...
Page is loading ...
Page is loading ...
Page is loading ...
Page is loading ...
Page is loading ...
Page is loading ...
Page is loading ...
Page is loading ...
Page is loading ...
Page is loading ...
Page is loading ...
Page is loading ...
Page is loading ...
Page is loading ...
Page is loading ...
Page is loading ...
Page is loading ...
Page is loading ...
Page is loading ...
Page is loading ...
Page is loading ...
Page is loading ...
Page is loading ...
Page is loading ...
Page is loading ...
Page is loading ...
Page is loading ...
Page is loading ...
Page is loading ...
Page is loading ...
Page is loading ...
Page is loading ...
Page is loading ...
Page is loading ...
-
 1
1
-
 2
2
-
 3
3
-
 4
4
-
 5
5
-
 6
6
-
 7
7
-
 8
8
-
 9
9
-
 10
10
-
 11
11
-
 12
12
-
 13
13
-
 14
14
-
 15
15
-
 16
16
-
 17
17
-
 18
18
-
 19
19
-
 20
20
-
 21
21
-
 22
22
-
 23
23
-
 24
24
-
 25
25
-
 26
26
-
 27
27
-
 28
28
-
 29
29
-
 30
30
-
 31
31
-
 32
32
-
 33
33
-
 34
34
-
 35
35
-
 36
36
-
 37
37
-
 38
38
-
 39
39
-
 40
40
-
 41
41
-
 42
42
-
 43
43
-
 44
44
-
 45
45
-
 46
46
-
 47
47
-
 48
48
-
 49
49
-
 50
50
-
 51
51
-
 52
52
-
 53
53
-
 54
54
-
 55
55
-
 56
56
-
 57
57
-
 58
58
-
 59
59
-
 60
60
-
 61
61
-
 62
62
-
 63
63
-
 64
64
-
 65
65
-
 66
66
-
 67
67
-
 68
68
-
 69
69
-
 70
70
-
 71
71
-
 72
72
-
 73
73
-
 74
74
-
 75
75
-
 76
76
-
 77
77
-
 78
78
-
 79
79
-
 80
80
-
 81
81
-
 82
82


Zebra LE1700 Windows Vista User manual
- Category
- Graphic tablets
- Type
- User manual
Ask a question and I''ll find the answer in the document
Finding information in a document is now easier with AI
Related papers
-
Motion Computing LE1700 Windows XP User manual
-
-
Zebra C5 / F5 Reference guide
-
Zebra LE1700 Reference guide
-
-
-
-
Motion Computing LE1700 Owner's manual
-
Motion Computing M1400 User manual
-
Other documents
-
DeLOCK 61662 Datasheet
-
-
-
-
Sharper Image TV Wireless Headphones Owner's manual
-
-
LOGON LCR001 63 in 1 User manual
-
HP Compaq tc1100 Tablet PC Quick start guide
-
Genius GP560 Owner's manual
-
Philips 150DM User manual