Page is loading ...

Ver 2.0
1
11
1
~ÄëçäìíÉ=ÑáÇÉäáíó
Owners Manual and Set-up Guide:
Genesis 1.1 Loudspeaker System
Contents
1 SET-UP GUIDE 5
1.1 UNPACKING 5
1.2 PLACEMENT OF THE GENESIS 1.1 LOUDSPEAKER 8
1.3 WOOFER CONNECTIONS 9
1.4 SERVO-CONTROLLED BASS AMPLIFIER CONNECTIONS 10
1.5 CROSSOVER CONNECTIONS 11
1.6 REMOTE CONTROL 12
1.7 CROSSOVER CONTROLS 13
2 TUNING THE SYSTEM 13
2.1 BEGIN WITH THE BASS LEVEL 14
2.2 IMAGING AND SOUNDSTAGE 15
2.3 PHASE CONTROL 16
2.4 FURTHER ADJUSTMENTS 17
3 THE REFINEMENT STAGE 17
3.1 RUNNING-IN THE SYSTEM 17
3.2 M
AKE ONE CHANGE AT A TIME 17
3.3 D
EFINING THE SOUNDSTAGE 18
3.4 APPROPRIATE MID-BASS BALANCE 18
3.5 ROOM TREATMENT 19
3.6 M
ASTERING THE REFINEMENTS OF THE SYSTEM 20
4 THE TECHNOLOGY 21
4.1 DESIGN PHILOSOPHY: DIPOLAR LINE SOURCE 21
4.2 T
HE GENESIS RIBBON TWEETER 22
4.3 75-INCH MIDRANGE RIBBON 23
4.4 THE SERVO-BASS ADVANTAGE 23
4.5 T
HE WOOFER TOWER 24
4.6 S
ERVO-CONTROLLED AMPLIFIER/CROSSOVER 25
4.7 THE CROSSOVER 25
4.8 C
ORIAN™ BAFFLE, WINGS AND BASES 26
4.9 S
UMMARY 26

Ver 2.0
2
22
2
~ÄëçäìíÉ=ÑáÇÉäáíó
Details:
Genesis Advanced Technologies
654 S Lucile St
Seattle, WA 98108 USA
Tel +1 206 762 8383 Fax +1 206 762 8389
www.genesisloudspeakers.com
Here are the serial numbers of your Genesis 1.1 System. Please
keep this document safe for future reference.
Serial Numbers
Mid/Tweeter Panels : ________________
Woofer Towers : ________________
Bass Amplifiers : ________________
Dealer: Date: .

Ver 2.0
3
33
3
~ÄëçäìíÉ=ÑáÇÉäáíó
A Message from Genesis
Congratulations! You are now the owner of the finest loudspeaker
system in the world. The Genesis Advanced Technologies 1.1
Loudspeaker System is the embodiment of our philosophy of
“
absolute fidelity
” – the ability to reproduce any musical event
faithfully, with no compromise, in your home. With its vast abilities, the
Genesis 1.1 is also able to deliver sound as the filmmaker intended in
home theater applications.
The Genesis 1.1 is commissioned for the most discerning music
lovers in the world. Every system is custom made and unique. It is the
state-of-the-art in transducer technology and craftsmanship.
A Short History: In June 1979, Mr. Arnie Nudell, the founder of
Infinity Systems and Genesis, headed a small team at Infinity that
conceived and created the remarkable Infinity Reference Standard
(IRS). This soon came to be known as the world’s ultimate reference
system for the reproduction of music. Fourteen years later in June
1993, Nudell, in collaboration with Paul McGowan, introduced to the
world the Genesis 1 – a new benchmark for the reference
loudspeaker system.
The current Genesis 1.1 embodies over 20 years of evolution and
revolution in loudspeaker design. It is the current ultimate reference
for the reproduction of music. Whereas many other products might
excel in one or more key areas, the Genesis 1.1 excels in every
important aspect of sound reproduction:
Spectral Coherence: The sound must be seamless, as if the lowest
bass frequencies were cut from the same cloth as the highest
frequencies.
Harmonic Structure: All instruments must be readily identifiable by
their harmonic content. There must be a uniformly consistent energy
vs. frequency ratio throughout the entire audio spectrum with uniformly
low distortion in order for this to be achieved.
Macro Dynamic Capability: Sometimes characterized as “dynamic
range”, macro-dynamics can be best defined in musical terms – from
mezzo forte (mf or medium-loud), to triple forte (fff or very loud).

Ver 2.0
4
44
4
~ÄëçäìíÉ=ÑáÇÉäáíó
Micro Dynamic Capability: This describes the ability of a system to
resolve the lowest level material with as much articulation and imaging
as it does at the louder levels. The most difficult areas for loudspeaker
systems to reproduce well are the extremes, i.e. the micro-dynamics
from ppp to p (pianissimo to piano), and the last part of the macro-
dynamics f to fff (forte to triple forte).
Imaging and Soundstaging: A reference system must be able to
recreate a deep, tall and wide soundstage with accurate imaging
when reproducing recordings that contain such information. The effect
is that of being able to clearly distinguish the specific locations
(left/right, forward/back, height) at which the instruments are playing,
and to be able to hear their performance from the perspective of the
venue in which it was recorded.
These concepts can be understood in a basic sense by examining the
temporal coherence of a loudspeaker system. If each frequency of the
audio spectrum arrives at the listener at the same time, spatial cues
emanating from a performance are reproduced, i.e. sound waves
bounced from the walls, floor and ceiling of the venue, attenuated in
amplitude and displaced in time, can be resolved in space by two
stereo channels. If a reference system can slice time “thinly enough”,
and have excellent low-level resolving power, one can experience
many such bounces off surfaces; all displaced correctly in time,
ultimately defining the soundstage.
Low Harmonic and Intermodulation Distortion: The greatest sound
pressure peaks should create almost no distortion whatever. Many
loudspeakers begin to experience signal compression at loud levels.
When this happens, music becomes distorted as sounds compress.
Reference systems cannot exhibit these symptoms. Just as live music
sounds relaxed at the loudest levels, so must the reference system.
Please read this Owners Manual and Set-up Guide to get the
maximum enjoyment out of your purchase. Also, if you have access to
the internet, please check back at our website often. The address is
www.genesisloudspeakers.com. We will post the latest updates, tips &
tricks and support for our customers.

Ver 2.0
5
55
5
~ÄëçäìíÉ=ÑáÇÉäáíó
1 Set-up Guide
Now that you have your new Genesis 1.1 loudspeaker system, we
realize that you can’t wait to hook it up and start playing! However, this
is a big, complex system. There is no “quick” set-up.
You will need at least three immensely strong people. Be prepared to
allocate 5 to 8 hours to the initial unpacking, set-up and configuration.
Mentally condition yourself for hard, manual work that must also be
done carefully and precisely so as not to hurt your precious new
acquisition.
1.1 Unpacking
The Genesis 1.1 system is packed in eight (8) wooden shipping crates
and four (4) cardboard boxes. There are two crates containing a
woofer tower each, two midrange/tweeter wing-panel crates
containing two wings per crate, two crates each containing the
midrange ribbon and tweeters mounted on a Corian™ panel, a crate
with the two midrange/tweeter wing bases, and another one with the
two woofer tower bases. There will also be a box containing two
crossover boxes, two boxes each holding a 6-channel servo-
controlled bass amplifier, and a box containing all the supplied
connecting cables.
To remove the contents of all the crates, you will need at least three
immensely strong people – the Genesis 1.1 loudspeaker system
weighs a total of 2,640 lbs (1,200kg) – to move the various parts of the
speakers around. We cannot be held liable for damage to either the
speakers or your backs during unpacking and setting up.
First, determine where you will be placing the speakers. They are
extremely heavy, so some forward planning will come in handy.
Depending on the surface they are set on, you may find that the
speakers are impossible to shift after setting up. Please see the
section on placement and carefully mark up the places where you will
set the four columns.
Start by un-boxing the woofer tower and wing bases. These are
the small, flat wooden the crates. Unscrew the plywood top and
remove. You will want to use a fully-recharged mechanical
screwdriver for this as there are many, many long tightly
inserted screws to be removed.

Ver 2.0
6
66
6
~ÄëçäìíÉ=ÑáÇÉäáíó
Undo the lag bolts that hold the bases to the crate. Remove the bases
one at a time and set them down where the woofer towers and wings
will go. Verify that the positions are accurately aligned as it may be
impossible to move them later.
Next, remove the woofer towers from their shipping crates. These are
the largest of the wooden crates. Position the crate near where you
have put the woofer tower bases. You do not want to move the woofer
tower very far once it is out of the crate. Either woofer tower can be
used on the left or the right, so just pick one.
First, remove the screws holding the top lid down
and open the top of the crate. Remove the woofer
grill cover and put aside safely.
You may be surprised to see that the woofer tower
is not wrapped in anything. This is to allow safe
handling of the tower. If there is anything covering
the veneer, it may be difficult to pick up this
immensely heavy tower. The covering may tear,
causing you to drop the tower. The soft foam
cushioning is sufficient to ensure that the veneer
finish is not marked.
Next, remove the screws holding one side of the
crate together. The woofer tower is then exposed and you can now lift
the tower out the front of the opened crate. It may be easier if you
dismantle all four sides of the crate if you do not have two immensely
strong people capable of lifting the woofer tower by themselves. With
the sides removed, four people can lift the tower out of the crate and
onto its base.
Determine which side is the top,
and which the bottom. The
bottom of the woofer is covered
with soft felt, and the top is
covered with veneer. Pick up the
woofer tower, place the bottom
on the base and stand the tower
up.
Set up the other woofer tower in
the same way. You should flatten

Ver 2.0
7
77
7
~ÄëçäìíÉ=ÑáÇÉäáíó
all crates and store them safely, in case you need to move these
speakers some time in the future.
Next, set up the midrange/tweeter wings. The wings
are marked left and right, so set them up on the
correct side. First locate the crate containing the left
wings, and locate the corresponding Corian panel.
The left Corian panel will have the column of tweeters
to the right of the midrange ribbon.
Unscrew the top of crates and remove the lids. First,
remove the Corian panel with the tweeters and
midrange and insert it into the center part of the base.
Have someone hold the panel in place until the wings
are put in place. The wings hold the panel up, and if
the panel tilts too far front or back, the bottom might
break off.
Then, while someone else holds the panel vertical,
place one of the veneer/mdf wings into the slot beside the panel.
Once both wings are in place, screw the three parts together. Make
sure that the tweeters are on the inside – ie. the row of tweeters are
closer together than the midrange ribbons.
Insert all 12 screws provided (with the
washers) from the back through the
holes in the wings into the inserts on the
Corian panel. Finger-tighten the screws,
taking care to seat the screws properly
into the brass inserts. You may have to
move the panel forwards and
backwards slowly to align all the screws
properly.
Once all 12 screws are in, you can then
tighten them to make the surface of the
wings flush with the Corian panel. Do not
over-tighten. The screws are just used to
hold the wings and panel vertically in
place. The curve of the wings provides
most of the structural strength.

Ver 2.0
8
88
8
~ÄëçäìíÉ=ÑáÇÉäáíó
1.2 Placement of the Genesis 1.1 Loudspeaker
The G1.1 requires a large room in order to give the speaker ample
space from the walls so that it can perform at its best. A typical room
size is 29 ft x 48 ft with 12 ft ceilings.
A good starting position for the midrange/tweeter panels is 15 feet into
the room as measured from the front wall (the wall behind the
speakers which you look at as you are seated listening to the
speakers) to the face of the speakers. You will want to sit 18 feet away
as measured from the face of the speakers to the ears, and have
approximately 15 feet (if available) behind you to the rear wall. Place
the column of tweeters on the inside, and position the mid/tweeter
panels so that the centers of the tweeters are 6 feet 10 inches apart.
Next, position the woofer towers just to the outside of, and behind the
mid/tweeter wings. Having the woofers diagonally six feet behind the
midrange/tweeters work well. Placing the woofer towers asymmetric in
the room results in a smoother bass response than if the woofers are
symmetric. If you have a much more space and a wider room, the
woofer towers can be also be positioned outside the mid/tweeter
wings in an arc such that the center of the woofer cone and the
tweeters are equidistant from the listeners.
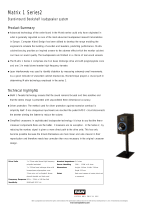
Tweeters
6’ to 8’
1/3 or 20% 1/3 or 20%
Typical room placement: Place speakers and
listeners about 1/3 of the way into the room

Ver 2.0
9
99
9
~ÄëçäìíÉ=ÑáÇÉäáíó
For some rooms, there may not be enough space and you will have to
adjust as you see fit. In a smaller room, the speakers can be just 20%
of the way into the room, and the listening position can then be 20%
from the rear wall. (see the diagram above). If you have to sit less
than 10 feet in front of the speakers, you have too small a room to
accommodate the Genesis 1.1’s.
1.3 Woofer Connections
Included with your Genesis 1.1 is a set of four large
cables (with 3 channels each) used to connect the
woofers. Each end of the cable is clearly marked,
"amplifier" or "speaker" in red or white lettering.
Use the set with red lettering for the right channel
and white lettering for the left channel.
Connect the appropriate ends to your Genesis
Servo-controlled Bass amplifiers, and the rear of the
woofer towers. It does not matter which connector
is attached to which woofer as long as the left/right
channels and cable direction are correct.
For interest and reference, the connectors are
numbered 1 thru 6 from left to right and top to bottom.
Woofer number 1 being the top woofer, and woofer
number 6 being the bottom woofer.
When you connect the
woofer tower outputs
pay close attention to the way the
connector works. The connector is a
Neutrik™ Speakon™, it only goes in one
way. You cannot put it in wrong, but you
can fail to put it in all the way. Push the
plug in, and twist it clockwise until the lock
clicks.
At the amplifier end of the cables, you will
notice that there are “flying leads” coming
out of the Neutriks all terminating in a little
silver jack per cable. These are grounding
jacks for the internal shield of the cables.
These can be plugged into a termination
female jack that is attached to the chassis
of your amplifier. This is necessary in a
high-static environment, or if there is

Ver 2.0
10
1010
10
~ÄëçäìíÉ=ÑáÇÉäáíó
significant hum being induced from electromagnetic radiation nearby.
Otherwise, the ground jack can just be left unplugged.
1.4 Servo-controlled Bass Amplifier Connections
The way that the Servo Controlled Bass (SCB) amplifier is connected
to the rest of your system will largely determine the coherency of the
bass to the midrange. However, no one method will work with all
systems. The first big problem is that no power amplifier is “straight
wire with gain”. The second problem is that interconnects and speaker
cables are not perfect conductors.
Hence, the Genesis 1.1 provides for two different methods of
connection.
1) Each SCB amp has two input connectors, unbalanced RCA
and balanced XLR. Either connection can be used but not
both. This is the simplest way, to connect either the RCA or
XLR input of the SCB amplifier to the output of your
preamplifier. Use the same quality interconnect as you would
for the main pre-amplifier to power amplifier interface. Bass is
the foundation of music, and it may be difficult to integrate the
bass to the midrange if there is a significant quality difference in
the interconnection.
If your preamplifier has only one set of outputs, you may have
to invest in a good-quality Y-connector (either RCA or XLR), or
commission a special Y-cable from your preferred interconnect
provider. However, if your preamplifier has two sets of outputs,
use one for driving the power amplifier that will drive the
midrange/ tweeter and use the other output for the SCB
amplifier.
A problem with this method is that if the power amplifier used
shifts phase significantly between its input and output (it may
be phase coherent at its output), the midrange/tweeters may
be out of phase with the woofers.
2) Alternatively, a cable (the Servo-Bass Interconnect) is provided
that will enable the high-level output of the midrange/tweeter
power amplifier to drive the SCB amplifier. This has a Neutrik
XLR connector at one end, and bare wire at the other end.
Within the Neutrik connector is a balancing and attenuation
circuit that allows this connection to work with most (but not all)
power amplifiers.

Ver 2.0
11
1111
11
~ÄëçäìíÉ=ÑáÇÉäáíó
The preferred connection is to attach the bare wire on the
Servo-Bass Interconnect to the midrange INPUT binding posts
on the crossover box. This way, the Servo-Bass amplifier will
“see” the same musical signal as the midrange/tweeter
crossover, resulting in the most coherent crossover between
the upper bass and lower midrange.
We prefer the second method. This will allow everything in the chain
up to the Genesis 1.1 crossover box (including all electronics and
cables) to be taken into account.
However, there are some systems that do not allow this. Some power
amplifiers have BOTH positive and negative outputs at a significant
potential above ground. Examples include some Class D designs.
Other power amplifiers are significantly deficient in the bass, like
single-ended triode designs. In both these cases, connecting the
servo-bass amplifier to the preamp is the lesser of two evils.
1.5 Crossover Connections
The cross-over boxes have three
pairs of input and output connectors
each. They are (from left to right) front
tweeters, midrange and rear tweeters.
The top row of connectors are the
inputs and the bottom row are the
outputs. These high quality binding
posts from Cardas will accept either
banana plugs or spade connectors.
The crossovers are designed
in three electrically separated parts so that the G1.1 can be
tri-amplified with identical amplifiers. Do NOT use a low-
powered SET amplifier for the tweeters, and a high-powered
solid-state amplifier for the midrange. You will ruin the
spectral and phase coherency of the G1.1.
A pair of jumpers with banana plugs at one end and spade
connectors at the other end are provided to get you started if
you only have a single channel of amplification. In that case,
use your speaker wires to connect to the midrange input (the
middle) and the jumpers to connect to the front and rear
tweeters.
With two channels of amplification, run one channel on the
midrange, and the other channel on the front tweeters. Then

Ver 2.0
12
1212
12
~ÄëçäìíÉ=ÑáÇÉäáíó
use the supplied jumpers to connect the rear tweeters either to the
midrange or the front tweeters. Depending on the amplifier used, one
or the other will sound better.
These jumpers are made using the same internal wire connect the
drivers of the Genesis 1.1. However, you should also try using
jumpers made of the same wire as you use for your speaker cables.
For example, if your speaker cables are Cardas Golden Reference,
then get the same for your jumpers.
Next, the crossover box should be hooked up to the midrange/tweeter
wings. From left to right, match the cross-over box connectors to the
mid-panel connectors. Again, a set of jumpers is provided to help you
get started. These are made of the Genesis internal hook-up wire, and
are high quality OFC conductors with Kimber™ banana plugs. You
could also try having jumpers made of the same wire as your speaker
cables.
Using either set of jumpers, when the banana plugs are used to attach
the jumpers to the binding posts, remove completely the gold nut on
the binding posts if it is not used. The sound will improve with the
removal of unnecessary metal. Keep the nuts safely in case you will
be using spades for termination in the future.
1.6 Remote Control
The Genesis remote control for the Servo-
Controlled Bass amplifier has two modes of
operation. To operate the G1.1 woofer amplifier,
press the MODE button until the red LED lights.
The remote control is used to turn on, and set up
the volume, and other parameters on the woofer
towers. The display on the amplifier will always
flash to identify the function being adjusted.
The high-pass “HP” filter determines how low the
woofers will play. Set this initially to 16Hz. Then,
adjust the low-pass “LP” filter (how high a
frequency that the woofer plays). Set this to
100Hz using the buttons marked "LP". Use the
button marked "VOL" to adjust the bass gain to
15, to start with.
If you are using the Servo-Bass Interconnect, use the “PHS” buttons
to adjust the phase to 0 (zero). If you are using the output from the

Ver 2.0
13
1313
13
~ÄëçäìíÉ=ÑáÇÉäáíó
preamplifier to drive your Servo-Controlled Bass amplifier, and your
power amplifier is a solid-state design, adjust the phase to 45. If your
power amplifier is a transformer-coupled valve design, adjust the
phase to 75.
The remote control has two buttons on the lower portion of the hand-
held marked “MEM 1” and “MEM 2”. These controls will memorize the
settings you have selected. To memorize a setting, point the remote
control at the amplifier. Press the MEM1 or MEM2 button and hold
down for 2 seconds. After 2 seconds, the reading will flash and your
new settings will have been memorized.
To recall the memorized setting, press the appropriate memory button
once. You may want to memorize two different settings to match your
recording's bass level closely, or you may want to use one bass
setting for music and yet another for video.
1.7 Crossover Controls
You will notice two control knobs on the crossover box. The left hand
knob is a volume control for the rear tweeters. Turning this control
clockwise will increase the level of the rear tweeters. Use this control if
you need a bit more treble or to increase the apparent space of the
soundstage. Start with this control at the twelve o'clock (high noon)
position.
The control on the right side is a five-position switch used to adjust the
soundstage height. Depending on your room acoustics and your
amplifier, position three has the sound stage at about the middle – like
the soundstage when you are seated in the stalls seats in a concert
hall. Position five pushes the soundstage high, like the orchestra level
seats, and position one has the lowest soundstage – like you are in
the circle seats.
2 Tuning the system
Music is the best way to begin your setup procedure. We suggest that
video sources be used only after you have setup the system to
properly reproduce music.
We suggest that you start with a single female vocal with instrumental
accompaniment because the sound of the human voice is more easily
recognizable than many instruments and is the least complex sound
to deal with.

Ver 2.0
14
1414
14
~ÄëçäìíÉ=ÑáÇÉäáíó
2.1 Begin with the bass level
For now, leave the low-pass filter set at 100 Hz, This control will be
addressed later. Turn the volume control of the woofer amplifier up or
down until the voice sounds correct. Whatever controls you use, turn
them up and down only a little at a time. It is easy to turn it up or down
too much.
Concentrate on the mid-bass regions (as opposed to the very low
bass in your recording) to achieve a natural blend. The voice and the
music accompaniment should sound as if it were cut from one cloth,
not separate. The reason we use a female vocal to start is that male
vocals will have very much more bass content, and the lower bass
may obscure the mid-bass crossover point.
If the voice sounds “thin” or does not have enough “chest” to its
sound, turn the woofers amplifier’s volume up till it does. If you find
that turning the volume up creates too much low bass, you may want
to experiment with lowering the low-pass filter cut-of frequency.
The Low-pass Filter control will raise or lower the frequency cut-off
point of the woofer. Turning the low-pass filter up to a higher number
will extend the upper bass regions without affecting the low bass level.
Some very large rooms may require that you set the low-pass filter to
115Hz. Do not be afraid to increase this control to give the sound
more body, or reduce it if you find that there is mid-bass boominess.
Next, set the woofers using more than just a voice. Select some music
that you know to have good deep bass. Using the volume control on
the servo amplifier’s remote control, set the woofers for a natural and
powerful bass sound. Use a symphonic piece of music if you can, or
use a natural double bass instrument for your guide. If there is a
running bass line, each note should sound equally loud.
Try to make it sound real. You may have to return to the vocal to
make sure you have not gone too far.
If, at this point, there is not enough mid-bass, turn the Low-pass
number to a higher position or, alternately, position the main speakers
closer together in order to achieve better mid-bass coupling between
the main speakers. If it sounds too “fat”, turn the Low-pass control
down or adjust the volume.

Ver 2.0
15
1515
15
~ÄëçäìíÉ=ÑáÇÉäáíó
2.2 Imaging and Soundstage
One great advantage of a true line-source is that good imaging and
soundstage is a given. However, it is possible to fine-tune the system
for ultimate enjoyment.
If your vocal selection is a well-recorded audiophile CD or LP with
good soundstaging information, the performer should appear to come
from behind the loudspeakers and be at the appropriate height for a
standing person.
If the vocal appears to be larger than life, you should first check the
system volume. Is it a volume that would be appropriate for
someone actually singing in your room? If there is too much volume
the artist will appear too big, and the opposite is true for too little
volume.
If the volume is set correctly and the image is still too big, place the
woofer towers closer together or closer to the midrange/ tweeter
wings and re-listen. Repeat this process till you have it right. Having
the woofer towers inside of the midrange/tweeter wings is rarely the
correct solution. If the image is still too large, try moving the
midrange/tweeter wings closer together.
If the voice is too low in height, turn the Midrange Control to the next
higher position and the image of the voice will move upward slightly.
If you have the speakers only 20% away from the front wall, and you
are not getting enough front to back depth (the singer not appearing
behind the speaker enough), pull the midrange tweeter panels away
from the front wall a little bit at a time. If you do not have them pulled
far enough away, you may not have enough front to back depth. If
you get the speakers much beyond 1/3 of the way into the room (or
27 ft), it is unlikely that pulling them further away will have any
further effect.
Find the best compromise for your room, your tastes and your space
requirements. If the speakers are too far apart you will lose the side
image and if they are too close together you will have too small a
center stage. We recommend you begin with the midrange/tweeter
wings six to eight feet apart as measured from tweeter to tweeter. If
you are not getting proper focus on the voice, you may angle the
midrange panels about 5 to 10 degrees towards your seating position
until you have a properly defined center image.

Ver 2.0
16
1616
16
~ÄëçäìíÉ=ÑáÇÉäáíó
When properly set up, very little sound should appear to come
directly from the speaker. Instead, the sound stage should extend far
beyond the left and right edge of the loudspeakers and there should
be tremendous front to back depth. When the recording is close-miked
(when the instrument or performer is very close to the recording
microphone), the music may appear to come directly from the
loudspeaker. This is normal. Typically, however, the sound should
appear to be detached from the loudspeakers.
A simple rule of thumb to follow is that focus will be achieved by
placing the speakers closer together or toed-in. Front to back depth
can be adjusted by varying the distance from the rear wall. Further, as
the system “breaks-in”, the depth and width of the soundstage will
increase, and so will the “smoothness” of the sound.
2.3 Phase Control
We suggested in the beginning of this section to set the phase to 0, 45
or 75 degrees. Now that you have roughed the system in, you may
want to experiment with different phase settings.
Using the remote control you can adjust the woofer's phase angle up
or down in five-degree increments.
The changes are subtle and they usually affect the imaging and
soundstage. Listen carefully to the positioning (in acoustic space), of
the orchestral players as you change the phase control. You may
notice small shifts in their apparent relationship to the other members
of the orchestra. Do not expect them to actually move. Expect minute
changes in the soundstage, the apparent width of the stage, your
ability to distinguish individual players etc.
If you are using the output from the preamplifier to drive the servo-
bass amplifier, the phase setting you need will depend on the relative
difference between the input phase and the output phase of the power
amplifier used. In extreme cases, where the power amplifier inverts
phase, the phase setting you use may have to be 135 degrees or
more.
Experiment with rock and blues recording (even if you only listen to
classical music). If the phase is correct, your foot will naturally tap in
time to the music. If the phase is out, you may think that the drummer
is having difficulty coordinating his cymbal work with his kick drum.

Ver 2.0
17
1717
17
~ÄëçäìíÉ=ÑáÇÉäáíó
2.4 Further adjustments
With the woofer towers positioned in the recommended placement,
behind and outside the midrange tweeter panels, low bass in the
room should not be a problem. Should you have too much bass,
simply turn the volume down on the remote control. Too little, and the
opposite will apply.
In some problematic rooms a resonance may develop at one or two
frequencies that is unnatural to the music. By moving the woofer
towers closer to the rear wall or farther from the rear wall, the
resonance may be reduced at the listener’s position. In extreme cases,
moving the entire system so that the listening position is asymmetric in
the room may solve the problem.
There are no absolute rules concerning problematic rooms, so do not
be afraid to experiment with your speaker placement.
Ultimately, it is all about balance. You have a number of controls at
hand with which to adjust the bass response, the low-pass filter
frequency and woofer volume. You can also move the speakers
closer together (for better coupling), and also move the woofer towers
closer together, or further apart, or even move them closer to a corner
of the room, for more bass.
3 The Refinement stage
After following the rough setup guide above, you may not be
completely satisfied with the results. We share with you here some of
our detailed observations in setting up these loudspeakers.
3.1 Running-in the System
We often make the mistake of setting up a “cold” system, and then be
disappointed when the system breaks in. For all Genesis
loudspeakers, we recommend the use of the IsoTek Full System
Enhancement and Rejuvenation Disc (www.isoteksystems.com). This
will reduce the hundreds of hours of run-in time needed to a couple of
days.
3.2 Make One Change at a Time
One rule of thumb you should always keep in mind - make one
change at a time! Do not, for instance, change position of the
speakers and make an adjustment to the amplifier all at once. Make
each of these changes separately and note the difference - by
listening - with each adjustment, then make the next change.

Ver 2.0
18
1818
18
~ÄëçäìíÉ=ÑáÇÉäáíó
3.3 Defining the Soundstage
A common problem we find with many set-ups is a tendency to
separate the speakers too far from each other. This gives an
unnaturally stretched soundstage between the two speakers, and
creates problems with focus. The key problem is a lack of soundstage
information beyond the left and right sides of the speakers.
If you find that the sound is not spacious enough or you are not getting
enough front to back depth, pull the speaker away from the front wall.
This is typically preferable to separating the two speakers too far, and
will almost always give you better depth and soundstage information.
A word of caution though: if you move the speakers too far from the
front wall you may lose the focus of the image.
3.4 Appropriate Mid-bass Balance
Yet another problem is a lack of mid-bass energy. In order for the
appropriate amount of mid-bass energy to be present, the speakers
should be close enough together to achieve proper "coupling" of the
midrange ribbon drivers. Coupling is desirable in the lower frequencies
from the mid-bass on down. This simply means that the left and right
drivers "work together" as opposed to working independently.
With the broad wings of the Genesis 1.1, we have not found this to be a
problem. However, if the gap between the two towers is more than 7
feet, you will find that the speakers lose coupling, and the mid-bass
suffers.
If you find there isn't enough deep bass, your first remedy is the
volume control on the woofer amplifier. This has several limitations.
First, turned up too high, you may get some distortion on very low
frequencies or you may overheat the amplifier.
Push the woofer towers back towards the rear wall. This will increase
the coupling of the woofers to the room. Do this procedure in small
increments (approximately one inch at a time), and return often to the
recordings you have used to adjust the front to back depth and
soundstage properties of your system. It is easy, yet unproductive, to
go too far in one direction. If you move the woofer towers too far from
the rear wall you may lose low bass extension, too near and you may
get too much wall reinforcement.
Secondly, you may make the mid-bass produced by the top range of
the woofer out of proportion with the mid-bass produced by the bottom
range of the midrange ribbon. This would tend to sound slow or thick in

Ver 2.0
19
1919
19
~ÄëçäìíÉ=ÑáÇÉäáíó
the mid-bass regions. Keep the low-pass below 115Hz except in
exceptionally large rooms.
Another good rule of thumb is to first set the volume control of the
woofer towers for proper mid-bass rather than low bass. The theory is
that if the mid-bass is correct, then the low bass should be very close
to correct. If the mid-bass is proper and the low bass is still not right,
here are some other suggestions:
A good balance between proper low bass extension and a deep and
spacious soundstage needs to be established to optimize your new
speaker's performance.
In order to achieve what the speaker is capable of, we suggest you
focus your efforts on a proper balance of soundstage elements that
includes information beyond the left and right sides of the speakers;
front to back depth well behind the speaker, excellent focus of
instruments and voices with proper vertical information and mid-bass
fill.
A Genesis loudspeaker system, correctly set up, can and should
provide a soundstage that goes beyond the confines of the walls of
your listening room, and yet with pinpoint focus; the speakers
disappearing completely on a recording containing such information.
3.5 Room Treatment
No room is perfect. To optimize your sonic presentation it may be
helpful to treat your room. Here are some guidelines:
1. Front walls. The G1.1 loudspeaker is a dipole and therefore
there is sound coming from both the front and the back. How
the front wall is treated or not treated is important. Do not use
either diffusion or absorption on the front wall. The “focus lens”
used by some room designers is likely to be detrimental to all
Genesis loudspeakers.
Generally speaking, the Genesis loudspeakers prefer a live
front wall. By these terms we mean the amount of reflection of
sound. A typical wall of glass, brick, cement or drywall material
is a highly reflective “live” surface.
A heavily curtained or sound-proofed wall would be considered
a "dead wall" or a non-reflective wall. A normal thin curtain
across a window causes only a small amount of absorption.

Ver 2.0
20
2020
20
~ÄëçäìíÉ=ÑáÇÉäáíó
2. Sidewalls. Because the speaker is a dipole it is less sensitive
to the sidewalls. However, as a rule of thumb, it is a good idea
to keep the speaker as far away from the sidewalls as is
practical. With this in mind, it may be helpful to add some
damping material or diffuser panels to the point of first
reflection.
This is where the sound from the loudspeaker first hits the
sidewall, then bounces to the listener. This reflection is
undesirable because it is slightly delayed from the original
sound. The point on the sidewall can be easily determined with
the help of a second person and a mirror:
Sitting in your listening position, have an assistant hold a mirror
up on the sidewall. Move the mirror until you can see the
tweeters. This is the point of first reflection. A diffuser (see your
dealer), an absorptive material or even a piece of furniture can
help break up this point of first reflection. The best diffuser is
also the most useful, a full-height rack of LPs!
3. Rear wall. In many cases it will be unnecessary to do anything
with the wall behind your listening position. However, if due to
the constraint of room size you are sitting very close to the rear
wall, you may want to experiment with diffusers or absorbers
behind you for best sound. Some absorption behind the
listener is usually beneficial in reducing slap echos.
3.6 Mastering the Refinements of the system
Fine tuning an audio system is an art that will take time and patience.
It can be one of the more rewarding learning experiences you will
have in the pursuit of music and its enjoyment. Unfortunately, for the
G1.1, trying to move the loudspeakers yourself is also likely to give you a
hernia. Luckily, the dipole line-source is easily positioned, and your fine
tuning may be confined to the settings on the servo-bass amplifier.
One of the best pieces of advice we can offer is that you take
advantage of the ear's ability to identify similarities in sound. This
ability is useful in fine-tuning your system because, if every recording
you listen to has a similarity of sound (too much or too little of a certain
frequency for instance), then you can be fairly certain that you have yet
to perfect your set-up. Keep at it and remember to enjoy your music
as you work on perfecting your set-up.
/