Page is loading ...

Quiet Walls
2/2019
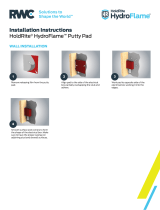
Installation Instructions
DO NOT USE
QUIET WALLS
TO SURROUND OR ENCLOSE ANY LIGHT FIXTURES
CUT Quiet Wall BACK A MINIMUM OF 24” AWAY FROM INCANDESCENT LIGHTS
Preparation:
Quiet Walls will be delivered in a box containing the material 1 of 2 sizes, 4’x16’ which can be cut into 2-
8’ pieces or 4’x20’ which can be cut into 2-9’ or 2-10’ pieces. The easiest way to cut the material is to
unroll the Quiet wall, place it on a flat surface, use a straight edge and cut with a utility knife.
1. Typically installed after framing, insulation and electrical is complete. Insulation should be used
in addition for optimal performance.
2. Ensure that all applicable inspections are completed prior to installation of Quiet Wall
3. Quiet Wall may be installed prior to “drying in” the building (prior to installation of windows and
doors)
Storage:
Quiet Wall should be stored in a dry environment. It may be stored outside on construction sites but
should be tarped. If the box containing the Quiet walls material becomes wet the material inside will not
be damaged and is usable. If stored below freezing temperatures, material may require 24-48 hours of
acclimation to regain pliability.
Wood or
Metal Studs
•
Acclimate Quiet Walls for a minimum of 24 hours at temperatures 60
o
F or greater
to reduce material stiffness when handling;
• Starting in one corner of the room, install Quiet Walls flush with the top of the wall
studs, and hang it vertically.
• Wood Studs: Attach Quiet Wall directly to the top of the wood plate using wide-
crown ½” staples or pan head screws. A fastener every 12” horizontally is
recommended along the top. Straighten Quiet Walls so that it is flush against the
wood studs, and apply from the top down. Using staples or pan head screws,
attach Quiet Walls to each stud in the center of the stud. Only 1 fastener is
required for each vertical stud each 36”. Use an exterior fastener pattern, only
fastening to the studs where the seam falls.
o NOTE: Hammer Stapler may be best way to attach staples through Quiet
Walls into studs.
• Metal Studs: Attach Quiet Walls directly to the metal stud using pan head screws.
A screw every 12” is recommended along the top. Straighten Quiet Walls so that it
is flush against the metal studs. Pan Head screws, attach Quiet Walls to the stud in
the middle of the stud. Only 1 fastener is required for each vertical stud.
• NOTE: High Walls
o Quiet Walls on walls higher than 15’ shall be secured with washers along
the top to prevent the fastener from pulling through the material
o Fasteners should also be used on intermediate studs (in addition to
exterior studs) every 12’ vertically
•
Install
Quiet Wall
s
on all required walls;

Quiet Walls
2/2019
•
Keep fasteners as flush as possible, since all protrusions will put a dimple into the
finished wallboard. Fasteners shall not protrude more than 1/16” from Quiet Walls
surface.
• Tightly butt the side of the next sheet of Quiet Walls to the edge of the attached
sheet. Do not overlap seams;
• Tape all seams with Acrylic tape or equivalent. The tape is semi-permanent, and
will be permanently sealed in position when drywall is hung.
o If Quiet Walls is installed horizontally or a seam does not fall on a stud the
seams must be taped preferably with Acrylic tape which provides a long
lasting attachment.
o If seams fall on the stud, with no gaps >1/8”, no taping is required. Drywall
installation will seal the Quiet Walls against the existing studs.
o Commercial Alternatives include commercial duct tape
• Quiet Walls is easily cut to fit around irregular objects and electrical boxes. The
material should be cut around outlets, switches, and junction boxes. Gaps shall be
less 1/8”. If greater, they shall be sealed with acoustical caulk.
• Putty pads should be installed on the back of all electrical boxes;
• Caulk the bottom plate at the floor line with acoustical sealant;
• Install drywall per normal technique (ASTM# C840 – Standard Specification for
Application and Finishing of Gypsum Board). dB-3 will be fastened permanently
when the gypsum board is hung.
/