Page is loading ...

Mi-T-M
WCL-SERIES Operator's Manual 1
OPERATORS MANUAL FOR Mi-T-M
®
WCL-10S/30S-0M10
CLARIFIER TYPE SOLIDS SEPARATOR
©Copyright 2005, Mi-T-M Corporation® 37-0592-092018
CAUTION
RISK OF INJURY!
READ MANUAL BEFORE OPERATING!
This manual is an important part of the water treatment system and must remain with the unit
when you sell it!

2 Mi-T-M
®
WCL-SERIES Operator's Manual
TABLE OF CONTENTS
INTRODUCTION ............................................................................................................................................................. 3
CONTENTS OF WCL-SERIES WATER TREATMENT SYSTEM ................................................................................... 4
SPECIFICATIONS ........................................................................................................................................................... 4
IMPORTANT SAFETY WARNINGS ............................................................................................................................. 5-7
RISK OF ELECTRIC SHOCK OR ELECTROCUTION ............................................................................................. 5
RISK OF EXPLOSION OR FIRE .............................................................................................................................. 6
RISK OF BURSTING ................................................................................................................................................ 6
RISK OF BURNS ...................................................................................................................................................... 6
RISK FROM MOVING PARTS .................................................................................................................................. 7
RISK OF BODILY INJURY ........................................................................................................................................ 7
FLOW CHART .............................................................................................................................................................. 8-9
FEATURES .................................................................................................................................................................... 10
INSTALLATION ........................................................................................................................................................ 11-12
PREPARATION ............................................................................................................................................................. 13
PRE-OPERATION CHECKLIST ............................................................................................................................. 13
PRE-START PROCEDURES .................................................................................................................................. 13
START-UP ............................................................................................................................................................... 13
OPERATION .................................................................................................................................................................. 14
MAINTENANCE ....................................................................................................................................................... 14-15
WASTE OIL DECANTER ........................................................................................................................................ 14
SLUDGE TUB OPERATION ................................................................................................................................... 15
WINTERIZING ........................................................................................................................................................ 15
TROUBLESHOOTING ............................................................................................................................................. 16-17
STATEMENT OF WARRANTY ...................................................................................................................................... 18
WARNING: This product can expose you to
chemicals including carbon monoxide, which is
known to the State of California to cause birth
defects or other reproductive harm. For more
information go to www.P65Warnings.ca.gov
WARNING
WARNING: This product can expose you to
chemicals including Lead, which is known to
the State of California to cause cancer and birth
defects or other reproductive harm. For more
information go to www.P65Warnings.ca.gov
WARNING

Mi-T-M
WCL-SERIES Operator's Manual 3
Congratulations on the purchase of your new Mi-T-M water treatment system! You can be assured your Mi-T-M water
treatment system was constructed and designed with quality and performance in mind. Each component has been
rigorously tested to ensure the highest level of acceptance.
This operator's manual was compiled for your benet. By reading and following the simple safety, installation, opera-
tion, maintenance and troubleshooting steps described in this manual, you will receive years of trouble free operation
from your new Mi-T-M water treatment system. The contents of this manual are based on the latest product information
available at the time of publication. Mi-T-M reserves the right to make changes in price, color, materials, equipment,
specications or models at any time without notice.
! IMPORTANT !
These paragraphs are surrounded by a "SAFETY ALERT BOX". This box is used to designate
and emphasize Safety Warnings that must be followed when operating this water treatment
system.
Accompanying the Safety Warnings are "signal words" which designate the degree or level
of hazard seriousness. The "signal words" used in this manual are as follows:
DANGER: Indicates an imminently hazardous situation which, if not avoided, WILL
result in death or serious injury.
WARNING: Indicates a potentially hazardous situation which, if not avoided, COULD
result in death or serious injury.
CAUTION: Indicates a potentially hazardous situation which, if not avoided MAY
result in minor or moderate injury.
The symbols set to the left of this paragraph are "Safety Alert Symbols". These symbols
are used to call attention to items or procedures that could be dangerous to you or other
persons using this equipment.
ALWAYS PROVIDE A COPY OF THIS MANUAL TO ANYONE USING THIS EQUIPMENT.
READ ALL INSTRUCTIONS BEFORE OPERATING THIS WATER TREATMENT SYSTEM AND
ESPECIALLY POINT OUT THE "SAFETY WARNINGS" TO PREVENT THE POSSIBILITY OF
PERSONAL INJURY TO THE OPERATOR.
Once the unit has been uncrated, immediately write in the serial number of your unit in the space provided below.
SERIAL NUMBER_________________________________
Inspect for signs of obvious or concealed freight damage. If damage does exist, le a claim with the transportation
company immediately. Be sure that all damaged parts are replaced and that the mechanical and electrical problems
are corrected prior to operation of the unit. If you require service, contact Mi-T-M Customer Service.
CUSTOMER SERVICE
CALL OUR TOLL-FREE NUMBER
for the Sales or Service Center nearest you!
800-553-9053
Please have the following information available for all service calls:
1. Model Number
2. Serial Number
3. Date and Place of Purchase
INTRODUCTION

4 Mi-T-M
®
WCL-SERIES Operator's Manual
CONTENTS OF WCL-SERIES WATER TREATMENT SYSTEM
Carefully unpack your new Mi-T-M Clarier Type Solids Separator. Check the contents against the packing list. Contact
the freight line if a damage claim is required on any component. The following items are the basic equipment sent with
your Clarier Type Solids Separator.
1. Unattached Float with Piggy Back Plug for Sump Pit
2. Claier Type Solids Separator
a. Clarier Tank
b. Tank Stand
c. Sump Pump
3. Waste Oil Decanter
4. Sludge Tub
5. Sludge Hose
6. Manual
Accessories: 165 gallon product tank.
80 gallon product tank.
Ladder and Mezzanine (for
WCL-30S only.)
SPECIFICATIONS
Model WCL-10S-0M100 WCL-30S-0M10
Maximum Flow 10 GPM 30 GPM
Electrical
230 Volt
1 Phase
8 Amps
230 Volt
1 Phase
8 Amps
Sump Pump 1HP 1HP
Clarier Capacity 300 Gallon 600 Gallon
Oil Coalescing Area 48 Square Feet 73 Square Feet
Waste Oil Decanter 25 Gallon 25 Gallon
Dimensions (LxWxH) 65" x 51" x 97" 76" x 60" x 104"
Net Dry Weight
(Approx.)
500 lbs. 650 lbs.

Mi-T-M
WCL-SERIES Operator's Manual 5
IMPORTANT SAFETY WARNINGS
WARNING: When using this product, basic precautions should always be observed, including the following:
READ ALL SAFETY WARNINGS BEFORE USING WATER TREATMENT SYSTEM
POTENTIAL CONSEQUENCE
PREVENTION
Serious injury or death could occur
if the water treatment system is
not properly grounded. Your water
treatment system is powered by
electricity and may cause electric
shock or electrocution if not installed
properly.
Electrical shock may occur if water
treatment system is not operated
properly.
Serious injury or death may occur if
electrical repairs are attempted by
unqualied persons.
Installation of this unit, including all electrical
connections, must comply with all local, state
and national codes.
This product must be grounded. Connect to a
GFCI circuit breaker when available. If the unit
should malfunction or breakdown, grounding
provides a path of least resistance for electric
current to reduce the risk of electric shock. Do
not ground to a gas supply line.
Improper connection of the equipment-
grounding conductor can result in a risk of
electrocution. Check with a qualied electrician
or service personnel if you are in doubt as to
whether the system is properly grounded.
Always be certain the unit is receiving proper
voltage (+/- 5% of the voltage listed on the
nameplate). Before installing electrical
connections, be certain the power switches
are in the "OFF" position.
Keep all connections dry and off the ground.
Do not touch pump, pump motor, discharge
piping or water when the unit is connected to
the power supply; regardless of whether the
unit is operating correctly or experiencing an
operation failure.
DO NOT allow metal components of the water
treatment system to come in contact with live
electrical components.
Never operate the water treatment system
with safety guards/covers removed or
damaged. Ensure all electrical covers are
securely in place when unit is operating.
Any electrical wiring or repairs performed on
this water treatment system should be done by
Authorized Service Personnel in accordance
with National and Local electrical codes.
Before opening any electrical enclosure,
always shut off the water treatment system
and drain the water. Disconnect the water
treatment system from the power source. If
the power disconnect is not in sight, lock it in
the open position and tag it to prevent power
usage. (Never assume the water treatment
system is safe to work on just because it is not
operating, it could restart at any time! Always
disconnect from the power source.) Allow the
water treatment system to cool down. Service
in a clean, dry, at area.
RISK OF ELECTRIC SHOCK
OR ELECTROCUTION
HAZARD

6 Mi-T-M
®
WCL-SERIES Operator's Manual
Never allow any part of your body to contact
the electrical motor until cooled.
POTENTIAL CONSEQUENCE
PREVENTION
IMPORTANT SAFETY WARNINGS
READ ALL SAFETY WARNINGS BEFORE USING WATER TREATMENT SYSTEM
RISK OF EXPLOSION OR FIRE
Serious injury or death could occur
from an explosion or re caused
by a system electric spark.
This unit must be placed in an area that is
well ventilated, free of ammable vapors,
combustible dust, gases or other combustible
materials.
HAZARD
RISK OF BURNS
Serious injury may occur from
touching the electrical motor.
This area can remain hot for
some time after the water
treatment system is shutdown.
RISK OF BURSTING Serious injury or death could occur
from bursting caused by excessive
pressure in the system.
Serious injury may occur if
attempting to start the water
treatment system when the pump
is frozen.
Do not use this water treatment system to pump
ammable material! An explosion could occur
from a gas vapor buildup inside the system.
In freezing temperatures, the unit must always
be warm enough to ensure there is no ice
formation in the pump. Do not start the water
treatment system if it has been in a freezing
environment without rst allowing the pump
to thaw.

Mi-T-M
WCL-SERIES Operator's Manual 7
RISK OF BODILY INJURY
Injury may occur from the water
treatment system.
Injury may occur from chemicals
contacting the skin.
!SAVE THESE INSTRUCTIONS!
POTENTIAL CONSEQUENCE
PREVENTION
IMPORTANT SAFETY WARNINGS
READ ALL SAFETY WARNINGS BEFORE USING WATER TREATMENT SYSTEM
DO NOT DRINK THE WATER IN THE
WATER TREATMENT SYSTEM!! This is
non-potable water and is not suitable for
consumption.
DO NOT allow children to operate this unit.
DO NOT overreach or stand on unstable
support.
Wet surfaces can be slippery, wear protective
foot gear and keep good footing and balance
at all times.
Know how to stop the water treatment system.
Be thoroughly familiar with controls.
Before servicing, ALWAYS shut off the water
treatment system.
Never use any solvents or highly corrosive
detergents or acid type cleaners with this water
treatment system.
Keep all chemicals out of the reach of
children!
Consult Material Safety Data Sheets for safe
handling of chemicals used with your system,
especially oxidizers and acids.
Serious injury may occur to the
operator from moving parts on the
water treatment system.
Do not operate the unit without all
protective covers in place.
Follow the maintenance instructions
specied in the manual.
RISK FROM MOVING PARTS
HAZARD

8 Mi-T-M
®
WCL-SERIES Operator's Manual
WATER TREATMENT SYSTEM FLOW CHART
WCL-0023 072514 MLK

Mi-T-M
WCL-SERIES Operator's Manual 9
As pressure washers are being operated, used water ows into the Wash Water Catch Pit (1). From there, it moves
to the 3-Stage Collection Pit (2). Heavy debris falls to the bottom of the pit where it is trapped by a weir which is
designed to stop heavy debris while allowing the remaining water to move into the Sump Pit (3). The Sump Pump (4)
draws water from the Sump Pit (3) and brings it through the Water Inlet Flow Control Valve 1. This adjustable valve
is used to regulate the ow of water entering the water clarication tank. A Flow Meter (5) is positioned just ahead
of the clarier tank. The water enters the water clarication tank through the Inlet Tee (6) and is directed down to the
Diverter Tee (7). From there the water is deected downward by the Solids Deection Cone (8), then to the Solids
Separation Chamber (9). The Solids Separation Chamber (9) allows the velocity of the water to slow so that any
suspended solids settle to the bottom. The water then rises up through the Top Separator Cone (10).
1) The non-emulsied oil molecules in the water oat to the surface of the Oil Separation Chamber (11). The
Oil Skimmer (12) is positioned near the top of the Oil Separation Chamber (11) which allows the thin layer
of surface oil and water to drain into the Waste Oil Decanter (13). Since oil is lighter than water, the oil oats
to the top and is released from the Waste Oil Decanter (13) when the Waste Oil Release Valve 2 is opened.
Excess water is returned to the Wash Water Catch Pit (1).
2) The solids that accumulate in the bottom of the Solids Separation Chamber (9) should be regularly drained
through the Solids Drain Valve 3 into the Sludge Tub (14) where the solids are ltered out and the water
is returned to the Wash Water Catch Pit (1). The Filter Bag (15) is biodegradable and may be tied off and
disposed of as it is lled. If the solids accumulated at the bottom of the Solids Separation Chamber (9) are
unable to drain, the Clean Out Valve 4 may be accessed to break the accumulation free.
3) An Anti-siphon Device (16) is attached to the Inlet Tee (6) to relieve any suction that may develop when the
Sump Pump (4) is turned off, preventing any siphoning of water back out of the water clarication tank.
Water then ows from the Oil Separation Chamber (11) through the Outlet Ring (17) and into the Outlet Tee (18).
The Outlet Tee (18) directs the water to discharge or into the Product Tank (optional) (19) where it is held for further
treatment.
WATER TREATMENT SYSTEM FLOW CHART

10 Mi-T-M
®
WCL-SERIES Operator's Manual
FEATURES FOR WCL-10S AND WCL-30S
5. Flow Meter
6. Inlet Tee
7. Diverter Tee
8. Solids Deection Cone
9. Solids Separation Chamber
10. Top Separation Cone
11. Oil Separation Chamber
12. Oil Skimmer
13. Waste Oil Decanter
14. Sludge Tub
15. Filter Bag
16. Anti-siphon Device
17. Outlet Ring
18. Outlet Tee
19. Product Tank (optional)
20. Product Tank Outlet (optional)
21. Product Tank Lid (optional)
22. Clarier Tank Lid
23. Plug-In
24. Oil Decanter Lid
25. Oil Decanter Outlet
26. Sludge Tub Lid
27. Sludge Tub Outlet
28. Inlet
29. Sludge Outlet Assembly
30. Sludge Hose
WCL-10S_30S-0M10 FEATURES 072414
-Water Inlet Flow Control Valve 1
-Waste Oil Release Valve 2
-Solids Drain Valve 3
-Clean Out Valve 4

Mi-T-M
WCL-SERIES Operator's Manual 11
INSTALLATION
ASSEMBLY OF WCL-10/30S-0M10:
First unpack all components and check for damage. Contact the freight line if a damage claim is required on any
component. The new style WCL-10S and 30S will come with sump pump mounted and most of the plumbing
installed. Ensure all union connections with unit are tight.
ATTIRE:
1. Proper attire is essential to your safety. It is advised to utilize whatever means necessary to protect eyes, ears, and
skin.
INSTALLATION:
1. A Collection Pit System must already be an established structure before installing the Clarier Type Solids Separator.
A well designed pit system is critical for the proper operation of the treatment system. Consult your Mi-T-M dealer
for installation requirements.
2. Place the Clarier Type Solids Separator on a hard, level surface in an area free of ammable vapors, combustible
dust, gases or other combustible materials. Set the unit so your have access to the Water Inlet Flow Control Valve
1 and the Solids Drain Valve 3. Place a level on the Clarier Type Solids Separator to ensure it is level.
3. Do not place unit in an area:
-with insufcient ventilation.
-where environmental hazards (i.e. rain and snow) can come in contact with the oil water separator system.
-in a freezing environment.
4. The oil water separator system may be shipped with union connections loosened to protect the unit from shipping
damage. Tighten all union connections at this time.
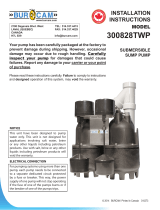
5. The unit comes with the sump pump mounted to the tank stand. Use the following guidelines before plumbing in
the sump pump. (Also see diagram on next page.
- Install the unit with the sump pump as near the pit as possible. The sump pump has a maximum suction
head of 25 ft. This includes the vertical lift plus the friction losses on the inlet of the pump. Consult factory with
questions.
- If the suction head is over the maximum, uninstall the sump pump from unit and install as close to the pit as
reasonable still being sure to be below the maximum suction head allowed. Additional plumbing will be required
to attach to the inlet plumbing of the clarier.
- Keep in mind also, the shorter the suction piping is, the quicker the pump will be able to prime.
6. Use schedule 80 PVC connections. At least 2” suction plumbing is recommended.
a. Install a check valve and/or foot valve in the suction piping.
b. Keep piping high enough off the bottom of the pit to avoid the solids that will collect.
c. Install oat w/ plug 10” above the inlet of the suction pipe. The 230V plug will be plugged into a 230V outlet. Allow
a 2” tether and enough room to freely move without interfering with plumbing.
NOTE: The above information is for reference only. Professional installers or architects may use this guideline to meet
specic site requirements.
7. Connect the Sludge Hose (30) to the Sludge Outlet Assembly (29) and the Sludge Tub (14).
8. Install the return plumbing from the Oil Decanter Outlet (25) and the Sludge Tub Outlet (27) to the Wash Water
Catch Pit (1) using 1-1/2” minimum connection sizes.
9. Install plumbing from Outlet Tee (18) or product tank (optional) (19) to a secondary treatment system for further
processing or disposal. Do not send the water back to the Sump Pit (3).
10. A pressurized water source may also be installed into the Clean Out Valve 4 to assist in purging the system of built
of solids.
NOTE: In most cases, you must have a permit to legally dispose discharged water.

12 Mi-T-M
®
WCL-SERIES Operator's Manual
INSTALLATION
SUMP PIT LAYOUT - WCL 071114

Mi-T-M
WCL-SERIES Operator's Manual 13
PRE-START PROCEDURES:
1. Turn Water Inlet Flow Control Valve 1 one rotation short of completely closed.
2. Ensure the Sump Pit (3) is lled with water.
3. Be certain all hoses and plumbing connections are secure.
WARNING
RISK OF ELECTROCUTION! TO REDUCE THE RISK OF ELECTROCUTION, KEEP ALL
ELECTRICAL CONNECTIONS DRY AND OFF THE GROUND.
START-UP:
1. To prime the Sump Pump (4), remove the lid over the basket strainer and ll the basket strainer and the plumbing
from the Sump Pit (3) with water and replace the lid.
2. Turn on the Sump Pump (4) by plugging the sump pump plug into the piggyback plug of the oat and into a
grounded 230V outlet.
3. Flow can be increased by opening the Water Inlet Flow Control Valve 1 and reading the Flow Meter (5).
4. As the water lls the Solids Separation Chamber (9), it will begin to ow through the Top Separator Cone (10)
and ll the Oil Separation Chamber (11).
5. When the Oil Separation Chamber (11) is full, the water will begin to ow through the Outlet Ring (17) and into
the Outlet Tee (18).
6. The Outlet Tee (18) directs the water into the optional Product Tank (19) where it is ready for further processing.
PRE-OPERATION CHECKLIST
STOP
TO ENSURE YOUR WATER RECYCLE TREATMENT SYSTEM OPERATES SAFELY AND
EFFICIENTLY, COMPLETE THE PRE-OPERATION CHECKLIST BEFORE PROCEEDING.
PREPARATION
Before proceeding, answer all the questions on this checklist. YES NO
CODES:
1. Does the electrical wiring meet all codes?
2. Does plumbing meet all codes?
LOCATION:
1. Is the unit located on a hard level surface free of ammable vapors,
combustible dust, gases or other combustible materials?
2. Is the unit located in a large ventilated area?
ELECTRICAL:
1. Is the unit properly grounded?
2. Does the power supply, voltage and amperage match the data plate?
PLUMBING:
1. Is the plumbing sized correctly?
2. Is the check valve installed near the Sump Pump (4)?
3. Are all unions tightened?
GENERAL:
1. Have all operators using this unit read and understood this entire manual?
2. Has the unit been installed by qualied service people who followed the
instructions listed in this manual?
IF "NO" WAS MARKED TO ANY OF THESE QUESTIONS, CORRECT THE SITUATION BEFORE OPERATING.

14 Mi-T-M
®
WCL-SERIES Operator's Manual
MAINTENANCE
WASTE OIL DECANTER:
1. The Oil Skimmer (12) removes the top layer of oil and water from Oil Separation Chamber (11) and sends it to
the Waste Oil Decanter (13).
2. As the Waste Oil Decanter (13) lls with the oil/water mixture, the oil will oat to the top while the water remains
on the bottom.
3. The water then moves up the standpipe, through the Oil Decanter Outlet (25), and back to the Wash Water
Catch Pit (1) to be recycled again.
4. As oil accumulates, it will have to periodically be removed from the Waste Oil Decanter (13).
a. Place a 5 gallon bucket below Waste Oil Release Valve 2.
b. Open the Waste Oil Release Valve 2 and allow oil to ow into the 5 gallon bucket. Turn off the valve
when water begins owing into the bucket.
c. Dispose of oil according to EPA Standards.
WCL-0026-030100-JJ
OPERATION
1. The Clarier Type Solids Separator is ready to operate.
2. With the sump pump running, set Water Inlet Flow Control Valve 1 so that the Flow Meter (5) reads the rated ow
rate of the system.
3. Oil Skimmer (12) positioning must be done when water is owing into the Clarier Type Solids Separator at the
rated ow rate.
a. Ensure the Waste Oil Decanter (13) is connected to the pit return line.
b. Tilt the Oil Skimmer (12) so that it just breaks the surface of the water.
4. Monitor the system closely the rst few days to ensure smooth operation.

Mi-T-M
WCL-SERIES Operator's Manual 15
SLUDGE TUB OPERATION:
The solids collection area of the Solids Separation Chamber (9) will need to be cleaned occasionally to prevent
overow of solids into the Product Tank (optional) (19). Do not use pressure washers while performing this
maintenance.
1. Ensure the Sludge Hose (30) is connected to the Sludge Tub (14) and the Sludge Outlet Assembly (29) and a
Filter Bag (15) is secured in the Sludge Tub (14).
2. By opening Solids Drain Valve 3, sludge from the Solids Separation Chamber (9) will enter the Sludge Tub (14).
3. If there is no ow from the Sludge Outlet Assembly (29), open Clean Out Valve 4 and use a stiff wire to break up
blockage.
4. The sludge is forced into the disposable Filter Bag (15), Solids in the Sludge are retained by the disposable
Filter Bag (15) and uids drain out into the area created by the Riser Plate.
5. The remaining water drains out of the bottom of the Sludge Tub (14) through Sludge Tub Outlet (27) and back to
the Wash Water Catch Pit (1).
6. When the Filter Bag (15) is lled with accumulated solids, close the Solids Drain Valve 3 and loosen the Hose
Clamp used to retain the Filter Bag (15). Tie the Filter Bag (15) off and dispose of in a manner consistent with
local and federal regulations.
7. To replace the Filter Bag (15), bunch up the neck and feed it through the Hose Clamp, place the Hose Clamp
and Filter Bag (15) over the inside nipple on the inlet coupling and tighten the Hose Clamp.
WCL-0027-030700-JJ
WINTERIZING:
If you must store your unit in an area where the temperature may fall below 32°F/0°C, you can protect your Clarier
Type Solids Separator system by draining all water from the system.
1. Unplug the unit.
2. Open the check valve near the Sump Pit (3) and drain the water transport line. Remove the Sump Pump (4) from
the Sump Pit (3).
3. Ensure all oil has been skimmed from the surface of the Oil Separation Chamber (11) by the Oil Skimmer (12).
4. Remove the sludge from the bottom of the Solids Separation Chamber (9) as described in SLUDGE TUB
OPERATION.
5. Open Solids Drain Valve 3 and drain the Clarier Type Solids Separator and clean the tank.
6. Remove the oil from the Waste Oil Decanter (12) and drain.
7. Empty the Product Tank (19) and wipe down the Sludge Tub (14).
MAINTENANCE

16 Mi-T-M
®
WCL-SERIES Operator's Manual
TROUBLESHOOTING
SYMPTOM PROBABLE CAUSE REMEDY
SUMP PUMP
Sump Pump (4) will not run. Floats are not adjusted correctly in Readjust.
the Sump Pit (3).
Not enough water in the Sump Pit (3). Add water to the Sump Pit (3).
Float 1 is defective. Replace.
Circuit overload/breaker has tripped. Reset breaker or replace fuse at
power source.
Motor overload. Allow motor to cool. Motor will
automatically restart when cool.
Motor is defective. Replace motor.
Sump Pump (4) motor starts and This is a common occurrence on Allow pits to ll.
stops frequently. initial start-up while pits are lling.
Excessive water ow to water Turn valve clockwise to reduce ow.
treatment system.
Sump Pump (4) impeller is clogged. Disconnect power and unclog
impeller.
Motor overload. Allow motor to cool. Motor will
automatically restart when cool.
Sump Pit (3) is not large enough. Expand size of pit.
Sump Pump (4) runs, but there is Strainer basket in Sump Pump (4) Clean, repair or replace.
little or no water discharge. is clogged.
Water level is below pump inlet. Ensure Float 1 is not caught in
plumbing.
There is an air lock in the Sump Manually ll the inlet pipe with water.
Pump (4). Turn the Sump Pump (4) on and off
several times.
Low voltage. Ensure wire size is capable of
handling the rated amperage of the
unit. If wire size is correct, contact
your distributor.
Clogged impeller or worn pump parts. Contact your distributor.
Sump Pump (4) will not turn off. Defective switch inside the Float (1). Replace.
Pump is air locked. Cycle pump in one minute
increments several times to clear
air from pump. If system includes a
check valve, a 3/16" hole should be
drilled in the discharge pipe
approximately 2" above the
discharge connections.

Mi-T-M
WCL-SERIES Operator's Manual 17
TROUBLESHOOTING
SYMPTOM PROBABLE CAUSE REMEDY
SEPARATOR TANK
Water will not ow into the Separator Sump Pump (4) is not plugged in. Plug in Sump Pump (4).
Circuit breaker has tripped or is "OFF". Reset or turn breaker "ON".
Dirt is lodged in the pit check valve. Clean.
Sump Pump (4) impeller is clogged. Disconnect power and clean.
Lines or valves contain frozen water. Allow to thaw. Inject with warm
water if necessary.
SHAFT SEALS
Water is leaking at pumps. Damaged stationary shaft seal. Seal ran dry. Ensure seal chamber
is lled with liquid.
Short seal life. Unexpected temperature and Replace.
chemical usage.

18 Mi-T-M
®
WCL-SERIES Operator's Manual
STATEMENT OF WARRANTY
Mi-T-M warrants all parts (except those referred to below) of your new Clarier type solids separator to be
free from defects in materials and workmanship for one year from the date of original purchase.
Defective parts not subject to normal wear and tear will be repaired or replaced at Mi-T-M's option during
the warranty period. In any event, reimbursement is limited to the purchase price paid.
EXCLUSIONS
1. The motor is covered under separate warranty by its respective manufacturer and is subject to the terms
set forth therein.
2. Normal wear parts:
Seals Gaskets
O-rings Packings
Valve Assembly Brushes
3. Parts damaged due to:
-normal wear, misapplication, modications/alterations, abuse,
-operation at other than recommended speeds, pressures or temperature,
-the use of caustic liquids,
-chloride corrosion or chemical deterioration,
-uctuations in electrical or water supply,
-operating unit in an abrasive, corrosive or freezing environment.
4. Parts damaged by failure to follow recommended:
-installation, operating and maintenance procedures.
5. This warranty does not cover the cost of:
-normal maintenance or adjustments,
-labor charges,
-transportation charges to Service Center,
-freight damage.
6. The use of other than genuine Mi-T-M parts will void warranty.
Parts returned, prepaid to Mi-T-M's factory or to an Authorized Service Center will be inspected and
replaced free of charge if found to be defective and subject to warranty. There are no warranties
which extend beyond the description of the face hereof. Under no circumstances shall Mi-T-M bear
any responsibility for loss of use of the unit, loss of time or rental, inconvenience, commercial loss or
consequential damages.

Mi-T-M
WCL-SERIES Operator's Manual 19

20 Mi-T-M
®
WCL-SERIES Operator's Manual
Manufactured by Mi-T-M
50 Mi-T-M Drive, Peosta IA 52068
563-556-7484/ Fax 563-556-1235
/