Page is loading ...

Product Serial #
UDI Label (if applicable)
USA
401 York Avenue
Duryea, PA 18642
www.quantumrehab.com
Canada
5096 South Service Road
Beamsville, Ontario L0R 1B3
www.quantumrehab.com
Australia
20-24 Apollo Drive
Hallam, Victoria 3803
www.quantumrehab.com.au
New Zealand
38 Lansford Crescent
Avondale
Auckland, New Zealand 1007
www.pridemobility.co.nz
UK
32 Wedgwood Road
Bicester, Oxfordshire OX26 4UL
www.quantumrehab.co.uk
B.V.
(Authorised EU Representative)
De Zwaan 3
1601 MS Enkhuizen
The Netherlands
www.quantumrehab.eu
Italy
Via del Progresso, ang. Via
del Lavoro
Loc. Prato della Corte
00065 Fiano Romano (RM)
www.quantumrehab-italia.it
France
26 rue Monseigneur Ancel
69800 Saint-Priest
www.quantumrehab.fr
Spain
Avda de las Flores 19
Parque Empresarial El Molino
28970 Humanes (Madrid)
Owner’s Manual

Copyright © 2020
INFMANU4778/Rev B/February 2020
Safety Guidelines
WARNING! A Quantum Rehab Provider or a qualified technician must perform the initial setup of this power
chair and must perform all of the procedures in this manual.
The symbols below are used throughout this owner’s manual and on the power chair to identify warnings and
important information. It is very important for you to read them and understand them completely.
WARNING! Indicates a potentially hazardous condition/situation. Failure to follow designated procedures can
cause either personal injury, component damage, or malfunction. On the product, this icon is represented as a
black symbol on a yellow triangle with a black border.
MANDATORY! These actions should be performed as specified. Failure to perform mandatory actions can
cause personal injury and/or equipment damage. On the product, this icon is represented as a white symbol
on a blue dot with a white border.
PROHIBITED! These actions are prohibited. These actions should not be performed at any time or in any
circumstances. Performing a prohibited action can cause personal injury and/or equipment damage. On the
product, this icon is represented as a black symbol with a red circle and red slash.
Intended Use
The intended use of the Pride Mobility Products device is to provide mobility to persons limited to a
seated position that have the capability of operating a powered wheelchair.
Regarding Devices for Prescription Use
CAUTION! Federal law restricts this device to sale by or on the order of a physician or other certified personnel
licensed by the law of the State (US only) or region in which this personnel practices to use or order the use
of the device.
NOTE: This owner’s manual is compiled from the latest specifications and product information
available at the time of publication. We reserve the right to make changes as they become
necessary. Any changes to our products may cause slight variations between the illustrations
and explanations in this manual and the product you have purchased. The latest/current version
of this manual is available on our website.
NOTE: This product is compliant with WEEE, RoHS, and REACH directives and requirements.
NOTE: This product meets IPX4 classification (IEC 60529).
NOTE: This product and its components are not made with natural rubber latex. Consult with the
manufacturer regarding any after-market accessories.
Quick Reference Information
Quantum Rehab Provider:
Address:
Phone Number:
Purchase Date:

Introduction .......................................................................................................................................... 6
Safety .................................................................................................................................................... 7
Your Power Chair ................................................................................................................................. 9
Assembly ............................................................................................................................................ 13
Comfort Adjustments ........................................................................................................................ 17
Batteries and Charging ..................................................................................................................... 22
Care and Maintenance ...................................................................................................................... 26
Language Usage
This owner’s manual is intended for distribution in all English-speaking countries where our Power Chairs
are sold. We have chosen to compose this manual using language and spellings common to the USA.
Since we recognize that not all English-speaking countries use the same words or spellings, please
refer to the following chart for some common word variations that may be encountered throughout this
manual.
Contents
USA Variation USA Variation USA Variation
asphalt tarmac backward(s) rearward(s) center centre
color colour cord lead curb kerb
elevator lift meter metre provider dealer; agent
sidewalk pavement tire tyre trunk boot
turn signal turn indicator yard grounds wrench spanner
caster castor pocketbook handbag counterclockwise anticlockwise
authorized authorised path footpath path bridleway
labor labour

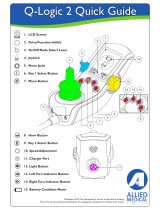
Identification Key
A
B
1
3
4
12
13
5
6
2
10
7
8 9
11

A 1 2
3 4 5
B 6 7
8 9 10
11 12 13
Seat Assembly Seatback Armrest
Seat Base Joystick Controller
Power Base Assembly Rear Cover Drive Wheel
Manual Freewheel Lever Transit Securement Bracket Caster Wheel
Front Rigging Light Front Cover
Identification Key

Introduction
Safety
WELCOME to Quantum Rehab. The power chair you have purchased combines state-of-the-art
components with safety, comfort, and styling in mind. We are confident that these design features will
provide you with the conveniences you expect during your daily activities. Once you understand how
to safely operate and care for your power chair, it should give you years of trouble-free operation and
service.
Read and follow all instructions, warnings, and notes in this manual before attempting to operate
your power chair for the first time. You must also read all instructions, warnings, and notes contained
in any supplemental instructional booklets for the controller, front riggings, and/or seating system that
accompanied your power chair before initial operation. Your safety depends upon you, as well as your
provider, caretaker, or healthcare professional in using good judgement.
If there is any information in this manual which you do not understand, or if you require additional
assistance for setup or operation, please contact your Quantum Rehab Provider. Failure to follow the
instructions in this manual and those located on your power chair can lead to personal injury
and/or damage to the power chair, including voiding the warranty.
Purchaser’s Agreement
By accepting delivery of this product, you promise that you will not change, alter, or modify this product
or remove or render inoperable or unsafe any guards, shields, or other safety features of this product;
fail, refuse, or neglect to install any retrofit kits from time to time provided by Quantum Rehab to enhance
or preserve the safe use of this product.
Shipping and Delivery
Before using your power chair, make sure your delivery is complete as some components may be
individually packaged. If you do not receive a complete delivery, please contact your Quantum Rehab
Provider immediately. Where damage has occurred during transport, either to the packaging or content,
please contact the delivery company responsible or your Quantum Rehab Provider.
NOTE: If you ever lose or misplace your copy of this manual, contact us and we will be glad to
send you a new one immediately.

Product Safety Symbols
The symbols below are used on the power chair to identify warnings, mandatory actions, and prohibited
actions. It is very important for you to read and understand them completely.
NOTE: There are more warnings identified and explained in the Consumer Safety Guide that
is included with your power chair. Please become familiar with all the warnings and safety
information found in the Consumer Safety Guide and refer to this resource often.
Locked and in drive mode.
Place unit on level ground and stand to one side when changing from drive mode to freewheel mode or
freewheel mode to drive mode.
Unlocked and in freewheel mode.
Read and follow the information in the owner’s manual.
Indicates power chair securement points.
Do not remove the anti-tip wheels.
Power chair information label
Manufactured in
Class II Equipment
Indicates that power chair, with similarly labeled seating system, conforms to ISO 7176-19 for transport of an
occupied power chair in a motor vehicle.
Safety
XXXXXXX:
XX XX (XX XX)
XXXXXX: XXXXXXX
XXXXXXX:
XX XX (XX XX)
XXXXXXX: XXXXXXX
182 Susquehanna Avenue
Exeter, PA 18643

General Guidelines
MANDATORY! Do not operate your new power chair for the first time without completely reading and
understanding this owner’s manual.
Your power chair is a state-of-the-art life-enhancement device designed to increase mobility. We provide
an extensive variety of products to best fit the individual needs of the power chair user. Please be aware
that the final selection and purchasing decision regarding the type of power chair to be used is the
responsibility of the power chair user, who is capable of making such a decision, and his/her healthcare
professional (i.e., medical doctor, physical therapist, etc.).
The contents of this manual are based on the expectation that a mobility device expert has properly
fitted the power chair to the user and has assisted the prescribing healthcare professional and/or the
Quantum Rehab Provider in the instruction process for the use of the product.
There are certain situations, including some medical conditions, where the power chair user will need
to practice operating the power chair in the presence of a trained attendant. A trained attendant can
be defined as a family member or care professional specially trained in assisting a power chair user in
various daily living activities.
As you begin using your power chair during daily activities, you will probably encounter situations in
which you will need some practice. Simply take your time and you will soon be in full and confident
control as you maneuver through doorways, on and off of elevators, up and down ramps, and over
moderate terrain.
Below are some precautions, tips, and other safety considerations that will help you become accustomed
to operating your power chair safely.
Pre-Ride Safety Check
Get to know the feel of your power chair and its capabilities. We recommend that you perform a safety
check before each use to make sure your power chair operates smoothly and safely.
Perform the following inspections prior to using your power chair:
Check for proper tire inflation. Maintain but do not exceed the psi/bar/kPa air pressure rating indicated
on each tire if equipped with pneumatic tires.
Check all electrical connections. Make sure they are tight and not corroded.
Check all controller connections to the power base. Make sure they are secured properly.
Check the brakes. See “Care and Maintenance.”
Check battery charge. See “Batteries and Charging.”
Ensure the manual freewheel levers are in drive mode before sitting on the power chair.
NOTE: If you discover a problem, contact your Quantum Rehab Provider for assistance.

Your Power Chair
The Aspen Power Chair
Your power chair has two main assemblies: the seat and the power base. Typically, the seat assembly
includes the armrests, seatback, and seat base. The power base assembly includes two motor/brake
assemblies, two drive wheels, two caster wheels, two anti-tip wheels, two batteries, and wiring harnesses.
See Identification Key (pages 4-5) and figure 1.
Electrical Components
The electrical components consist of the controller assembly, the batteries, and the motors. The
batteries, motors, and controller power module (if equipped) are located on the power base assembly.
The controller is located on the seat assembly. Connectivity between the controller and the motors,
batteries, and the battery charger is provided by one or more wiring harnesses. See figure 1.
Figure 1. Aspen Electrical Components
Identification Key
1. To Motor Connectors
2. Controller Power Module
3. Controller Connector
4. To Battery Connectors
5. Main Circuit Breaker
3
2
1
4
1
5

Controller Harness Connector: The controller harness connector is where the controller plugs into
the power base. Each controller uses a different type of harness. Regardless of which type of controller
is used, the harness must be secured to the seat assembly and not allowed to drag on the floor.
Motor Connectors: This is where the controller connects to the motors.
Battery Connector: This is where the controller connects to the batteries.
Controller Power Module: This enables the controller to communicate with the batteries and the motors.
Main Circuit Breaker (located the left side on the main frame): The main circuit breaker is a safety
feature built into your power chair. When the batteries and the motors are heavily strained (e.g., from
excessive loads), the main circuit breaker trips to prevent damage to the motors and the electronics.
If the circuit trips, allow your power chair to “rest” for approximately one minute. Next, push in the
circuit breaker button, turn on the controller, and continue normal operation. If the main circuit breaker
continues to trip repeatedly, contact your Quantum Rehab Provider.
Curb Climber (Optional)
Your power chair may be equipped with a curb climbing mechanism designed to work with your built-in
suspension system to further stabilize your power chair when climbing curbs or other obstacles. See
figure 2. The curb climber is bolted to the front of the power chair and equipped with a spring-loaded
foot that acts as a lever to lift the power chair over obstacles.
As the spring-loaded foot comes into contact with the curb or obstacle, the momentum of the chair
causes it to pivot downward, lifting the front caster wheels over the obstacle. Once the casters are
clear, the drive wheels gain the leverage they need to maneuver over the obstacle. When the chair is
once again on level ground and the spring-loaded foot no longer senses an obstacle, it will return to its
normal position and will not drag or scrape the ground.
NOTE: For more information regarding the curb climber feature, please contact your Quantum
Rehab Provider.
Figure 2. Curb Climber
Curb Climber

Manual Freewheel Levers
For your convenience, your power chair is equipped with a manual freewheel lever mounted on each
motor. The levers allow you to disengage the drive motors and maneuver the chair manually.
WARNING! Do not use the power chair while the drive motors are disengaged! Do not disengage
the drive motors when the power chair is on an incline, as the unit could roll on its own! Only
engage the freewheel mode when on a level surface.
WARNING! It is important to remember that when your power chair is in freewheel mode, the
braking system is disengaged.
To operate the manual freewheel levers:
1. Locate the lever on the side of each motor.
2. Push down both manual freewheel levers for freewheel mode (drive motor disengaged). See figure 3.
3. Pull up both manual freewheel levers for drive mode (drive motor engaged). See figure 4.
NOTE: If the lever is difficult to move in either direction, rock your power chair back and forth
slightly. The level should then move to the desired position.
NOTE: The power chair will be significantly easier to push with the power off.
WARNING! Avoid applying excessive force to the manual freewheel levers.
WARNING! Do not use your foot to operate the manual freewheel levers. Do not stand on the manual freewheel
levers. Applying excessive force to the manual freewheel levers may result in damage to the freewheel levers,
motors, and brakes.
WARNING! Do not use the freewheel lever handles as tie-down points to secure this product.
Manual
Freewheel
Lever
Manual
Freewheel
Lever
Figure 3. Freewheel Mode (Drive Disengaged) Figure 4. Drive Mode (Drive Engaged)

Lights (Optional)
Your power chair may be equipped with lights mounted on your power base. The two rear lights are
located on the rear cover and are attached to the rear battery door. The rear lights include turn signals,
hazard lights, and taillights. If your power chair is not equipped with lights, reflectors will be located on
the rear cover. The front lights are mounted on the frame of the power base. The front lights include turn
signals, hazard lights, and headlights. The lights are operated through the controller.
NOTE: For more information on the light buttons on the controller, refer to the basic operations
instructions for your controller.
To activate the lights using the controller:
1. Turn on the power to the controller.
2. Press the light button on the controller.
To deactivate the lights using the controller:
1. Press the light button on the controller.
The power chair must remain powered on for the lights to stay illuminated. When the power chair is
turned off, the lights will turn off.
Figure 5. Aspen Lights
Identification Key
1. Rear Lights or Reflectors
2. Front Lights
1
2
2

Initial Assembly
Your power chair may require some assembly either before initial use or after transportation. It may also
require disassembly to make some comfort adjustments. Figure 6 details those parts of the power chair
that are designed to be disassembled and assembled by an end user or by a qualified caregiver before
using the product or making comfort adjustments.
NOTE: If your power chair is equipped with a TB-Flex Seat, a Synergy Seat, or a TRU-Balance® 3
Power Positioning System, refer to the information provided in separate manuals.
NOTE: Any nylon insert lock nut removed during the disassembly or adjustment of the power
chair must be replaced with a new nut. Nylon insert lock nuts should not be reused as it may
cause damage to the nylon insert, resulting in a less secure fit. Replacement nylon insert lock
nuts are available at local hardware stores or through your Quantum Rehab Provider.
Seat Installation
It may be necessary to install the seat either prior to initial operation or after transporting your power
chair. Contour seats are attached to the power base with the Universal Mounting System (UMS). The
UMS consists of universal parts that may be attached to the seat, regardless of seat width or seat
depth. The two main components are aluminum extrusions mounted to the seat base. These extrusions
attach to a pair of trapeze bars that are mounted to the power base. See figure 7.
WARNING! Do not pick up the seat frame by the armrests. They are free to pivot, and you may lose control of
the seat if they do so.
To install the seat:
1. Tilt the seat back and slide the rear extrusion onto the rear trapeze bar. See figure 7.
2. Lower the front extrusion onto the front trapeze bar until the seat latches into place.
3. Flip the seat latch safety down.
WARNING! Make sure the seat latch safety is flipped down before using your power chair.
4. Install the controller and route the harness to the back of the power base. See figure 8.
MANDATORY! Prevent controller harness damage! Avoid routing the controller harness on the outside of the
armrest pad. Route the harness under the armrest or toward the inside of the armrest pad. Use correct tie-down
points for controller harness to prevent the harness from getting caught in the drive tires, pinched in the seat
frame, or damaged when passing through doorways.
5. Plug the controller connector into the rear of the power base. See figure 1.
6. Secure the controller harness to the armrest receiver with wire ties. See figure 8.
Assembly

Figure 6. Aspen Assembly View
3
1
2
Identification Key
1. Seat
2. Seat Interface Weldment
3. Power Base

Transit Securement System
If your power chair is equipped with a transit
securement system, it is equipped with
manufacturer-installed front and rear securement
brackets and may be equipped with positioning
belt anchoring brackets. See figure 9. Refer
to the supplement provided with your power
chair for information on how to use the transit
securement system.
Power Chair Securement Points
The power chair is equipped with four (4) tie-
down points for the purpose of securing the
unoccupied power chair during motor vehicle
transport. Each tie-down point is clearly labeled
for this purpose.
To secure a power chair equipped with tie-
down points:
Always secure the power chair in a forward-
facing position in the vehicle.
Attach the four tie-down straps to only
designated, labeled transit securement
points indicated by anchor symbols on the
power chair. See figures 9 and 10. Tighten
the straps to sufficiently remove all slack.
Never attach tie-downs to adjustable, moving,
or removable parts of the power chair such
as armrests, front riggings, and wheels.
Figure 8. Controller Harness Routing on a
Contour Seat
Identification Key
1. Wire Ties
2. To Power Base
1
2
1
Figure 9. Transit System Securement Brackets
Identification Key
1. Securement Brackets
1
1
Figure 7. Universal Mounting System and Contour Seat
Identification Key
1. Rear Extrusion
2. Seat Latch Safety
3. Front Extrusion
4. Trapeze Bars
3
1
4
2

Figure 10. Unoccupied Transit System Securement Points
Front of vehicle
Position the anchor points for the rear tie-down straps directly behind the rear securement points on
the power chair. The front tie-down straps should be anchored to floor points that are spaced wider
than the power chair to provide increased stability. See figure 10.
MANDATORY! The power chair should be used as indicated in the manufacturer’s instructions. If you have any
questions about the proper use of your power chair, contact your Quantum Rehab Provider.

Comfort Adjustments
Comfort Adjustments
After becoming familiar with your power chair’s operation, you may find the need to make some
adjustments to increase your comfort, such as seat height and angle, armrest width, angle and height,
and controller position.
NOTE: If your power chair is equipped with a TB-Flex Seat, a Synergy Seat, or TRU-Balance® 3
Power Positioning System, refer to the seat adjustment information contained in separate
manuals.
WARNING! The center of gravity of your power chair was factory set to a position that meets the needs of the
demographic majority of users. Your Quantum Rehab Provider has evaluated your power chair and made any
necessary adjustments to suit your specific requirements. Do not change your seating configuration without
first contacting Quantum Rehab or your Quantum Rehab Provider.
WARNING! Some power chair components are heavy. You may need assistance to lift or carry them. Please
refer to the product specifications sheet for specific component weights before you disassemble the
power chair.
WARNING! Remove the occupant from the power chair before making any adjustments.
You may need the following to make comfort adjustments:
metric/standard socket set and ratchet
adjustable wrench
metric/standard hex key set
thread lock
Seat Height and Seat Angle Adjustment
If your power chair is not equipped with a transit securement system, you can change the seat height to
one of three positions by raising the front and rear trapeze bars. If you raise or lower only one trapeze
bar (front or rear), you can also change the seat base angle (dump).
MANDATORY! If your power chair is equipped with a transit securement system and any adjustment to the seat
height or seat angle is necessary, contact your Quantum Rehab Provider. These comfort adjustment can only
be made by a Quantum Rehab Provider.
To change the seat height:
1. Turn off the power to the controller.
2. Make sure the power chair is in drive mode.
3. Unplug the controller connector(s) from the power base. See figure 1.
4. Flip up the seat latch safety. See figure 7.
5. Squeeze the seat latch and release the seat from the front trapeze bar.
6. Slide the seat forward and remove it from the power base.
7. Remove the hardware that attaches the trapeze bars to the seat interface weldments. See figure 11.
8. Move the trapeze bars up or down to the desired height.
NOTE: Change the seat dump by raising or lowering only one trapeze bar (front or rear).
9. Reinstall the hardware.
10. Reinstall the seat.
11. Reconnect the controller to the power base.

Seat Position
You can move the seat forward or rearward by changing the extrusion mounting position.
To change the position:
1. Turn off the power to the controller.
2. Make sure the power chair is in drive mode.
3. Unplug the controller connector(s) from the power base.
4. Remove the seat from the power base.
5. Remove both extrusions from the bottom of the seat.
6. Reposition the extrusions on a different set of mounting holes. You must move both extrusions the
same number of holes either forward or backwards. See figure 12.
7. Fasten the extrusions back onto the bottom of the seat.
8. Reinstall the seat.
9. Reconnect the controller to the power base.
Manual Recline Seatback Adjustment
If your power chair is equipped with a reclining seat, you can adjust the seatback angle with the seatback
release lever. The lever is located on the right side of the seat base.
To adjust the recline angle:
1. Pull up on the seatback release lever.
2. Lean forward or backward to the desired position.
3. Release the lever.
Figure 11. Seat Height and Angle Adjustments for
Contour Seat
Figure 12. Seat Position Adjustment for Contour Seat
Identification Key Identification Key
1. Seat Interface Weldments
2. Trapeze Bars
3. Hardware
1. Seat Mounting Holes
1
2
3
3
1

Seatback Angle Adjustment
If your power chair is equipped with an adjustable seatback, you can adjust it to four (4) different angles:
90°, 102°, 105°, or 107°.
To adjust the seatback angle:
1. Remove the adjusting screws from each seat hinge. See figure 13.
2. Set the seatback at the desired angle.
3. Reinstall the adjusting screws to each seat hinge and tighten.
Armrest Width Adjustment
You can change each armrest’s width independently of the other.
NOTE: Changing the armrest width may increase the overall width of your power chair.
To change the armrest width:
1. Locate the two armrest knobs on each side of the armrest receiver bracket. See figure 13.
2. Loosen the knobs.
3. Slide the armrests in or out to the desired width.
4. Tighten the knobs.
Armrest Angle Adjustment
To change the armrest angle:
1. Lift the armrest straight up so that it is perpendicular to the floor. See figure 13.
2. Loosen the jam nut.
3. Turn the adjusting screw to raise or lower the front of the armrest.
4. Tighten the jam nut to lock the adjusting screw into place.
Figure 13. Seatback and Armrest Adjustments for Contour Seat
Identification Key
1. Jam Nut
2. Armrest Angle Adjusting Screw
3. Armrest Height Adjusting Screws
4. Seatback Angle Adjusting Screw
5. Armrest Knob
6. Controller Bracket
7. Setscrew
1
3
2
4
5
6
7

Armrest Height Adjustment
To change the armrest height:
1. Loosen the two setscrews located on the armrest receiver. See figure 13.
2. Raise or lower the armrest to the desired height.
3. Tighten the setscrews to secure the armrest.
Controller Position
You can move the controller in toward or out away from the armrest, or change the position of the
controller for either left-hand or right-hand use.
WARNING! Do not place the controller harness so that it can be pinched in the seat frame or the power base
frame.
To extend the controller:
1. Flip up the armrest so it is perpendicular to the floor.
2. Loosen the setscrew on the controller bracket. See figure 13.
3. Slide the controller into or out of the armrest to the desired position.
4. Tighten the setscrew to secure the controller.
To change the controller position:
1. Turn off the power to the controller.
2. Unplug the controller connector(s) from the power base.
3. Remove any wire ties securing the controller harness to the armrest.
4. Flip up the armrest so it is perpendicular to the floor.
5. Loosen the setscrew on the controller bracket.
6. Slide the controller out of the armrest.
7. Loosen the setscrew in the other armrest.
8. Place the controller in the other armrest.
9. Tighten the setscrews in both armrests.
10. Route the controller harness to the back of the power base and plug in the controller.
11. Secure the controller harness to the armrest with wire ties. See figure 13.
NOTE: If your power chair is equipped with a TB-Flex Seat, a Synergy Seat or TRU-Balance® 3
Power Positioning System, refer to the information provided in supplemental manuals provided
with your seating system.
/