Page is loading ...

Hitch-Mounted Motorcycle Carrier
Support pour transport de motocyclettes
TMC201 man v.150323
Model / Modèle :
STOP!
Questions, problems, missing parts? DO NOT RETURN TO YOUR RETAILER.
Please call our customer service department at: 1(888) 277-6960. Our customer service staff are ready to provide
assistance. If a part is damaged or missing, replacement parts can be shipped from our facility. For immediate help
with assembly, or for additional product information, call our North American toll-free number: 1(888) 277-6960.C
Save this manual
You will need this manual for safety instructions, operating procedures, and warranty.
Put it and the original sales invoice in a safe, dry place for future reference.
ARRÊTER!
Questions, problèmes, des pièces manquantes? NE RETOURNEZ PAS CHEZ VOTRE DÉTAILLANT.
S’il vous plaît d’appeler notre département de service à la clientele au: 1 (888) 277-6960
Notre personnel du service à la clientèle est prêt à vous fournir assistance. Si une pièce est endommagée ou
manquante, une pièce de remplacement peut vous être expédiés rapidement de nos installations.
Conservez ce manuel
Ce manuel vous offre des instructions sur la sécurité, des procédures opérationnelles et votre garantie.
Garder le ainsi que votre facture originale dans un endroit sec et sécurisé pour des références futures.
DETAIL K2 INC.
TMC201

N
o
de
pièce
Description Qté.
1 Goupille d'ancrage 1
2 Étrier d'ancrage 1
3 Barrure type R 1
4 Boulon en U ½ po. 2
5 Tube transversal
principal
1
6 Gaine de plastique 1
7 Boulon 3/8 po. 4
8 Plaque inférieur 1
9 Butée de roue 4
10 Écrou ½ po. insertion
de nylon
8
11 Boulon 1/2 po. (A) 2
12 Glissière coulissante
latérale
2
13 Berceau de roue 1
14 Goupille de sécurité 2
15 Écrou 3/8po. insertion
de nylon
4
16 Boulon 1/2 po. (B) 2
17 Tube coulissant
arrimage
1
18 Goupille de
verrouillage
1
19 Support principal 1
20 Tube d'ancrage à
écrou
1
21 Chaîne 1
22 Goupille en L de 5/8
po.
1
2
TMC201 man
ENGLISH FRANÇAIS
Please read through these
instructions BEFORE you
begin to assemble and
install your DK2 Hitch-Mount
Motorcycle Rack.
S’il vous plaît lire
attentivement ces instructions
AVANT d’assembler et
d’installer votre Attachement
d’attelage pour motos DK2
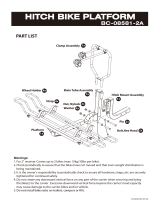
Part
No.
Description Qty.
1 WedgeLock pin 1
2 WedgeLock bracket 1
3 R-clip 1
4 1/2" U-bolt 2
5 Main cross tube 1
6 Plastic tube slip 1
7 3/8" bolt 4
8 Bottom plate 1
9 Wheel stop 4
10 1/2" nylon insert nut 8
11 1/2" bolt (A) 2
12 Sliding side channel 2
13 Wheel cradle 1
14 Safety pin 2
15 3/8" nylon insert nut 4
16 1/2" bolt (B) 2
17 Sliding tiedown tube 1
18 Lock pin 1
19 Main channel 1
20 WedgeLock nut tube 1
21 Chain 1
22 5/8" "L" hitch pin 1

SCHEMATIC DRAWING
SCHÉMA
g 1
v.150323 3
ENGLISH FRANÇAIS

4 TMC201 man
ENGLISH FRANÇAIS
WARNING!
z There is an inherent risk involved
in the use of, loading, unloading
and transport of cargo. Detail
K2 Inc. assumes no liability
whatsoever for damage or injury
incurred during the use of this
product.
z Inspect the Hitch-Mounted
Motorcycle Carrier before each
use. Tighten any loose hardware
and replace any worn or
damaged parts. Check that brake
lights, turn signals, and tail-lights
all function properly.
z Ensure that 5/8” hitch receiver
pin is attached and locked with
“R” clip. All other pins must be
securely fastened and locked.
Safety chains must be attached
at all times. WedgeLock Nut must
be tightened securely.
z Do not overload. Maximum
capacity is 350 lb. / 159 kg. on
a hitch receiver with maximum
tongue weight rating of 500 lb. /
227 kg. Maximum capacity is 400
lb. / 181 kg. on a hitch receiver
with maximum tongue weight
rating of 750 lb. / 340 kg. See
chart below.
z Ensure bike is securely fastened
to the carrier. Detail K2 Inc.
assumes no liability whatsoever
for damage caused by bikes that
were not properly secured. Never
ride bike onto the carrier.
z Do not obstruct your licence plate
from view. If necessary, re-locate
licence plate as per local laws.
z Do not exceed the tongue
weight limit for your vehicle or
the tongue weight limit for your
hitch receiver. These may be
two different gures. It is your
responsibility to ensure that your
hitch receiver tongue weight
limit is equal to or less than the
limit for the vehicle. This should
have been determined at the
time the hitch receiver was
installed. Detail K2 Inc. assumes
no responsibility whatsoever for
hitch receivers that are damaged,
improperly installed, or have a
weight capacity which exceeds
the safe limit for the vehicle.
AVERTISSEMENT!
z Il y a un risque inhérent impliqué
dans l’utilisation du chargement/
du déchargement et du transport
de la cargaison. Detail K2 Inc.
n’assume aucune responsabilité
pour des dommages ou des
dommages encourus pendant
l’utilisation de ce produit.
z Inspectez le support de moto
avant chaque utilisation. Vériez
et resserrez tous boulons et
écrous qui pourraient être lâche
et remplacez toutes les pièces
usées ou endommagées. Vériez
que les lumières de frein, feux de
positions soient fonctionnels.
z Assurez-vous que la goupille en
L de 5/8 po est bien en place et
sécurisé avec la barrure en “R”.
Toutes autres goupilles doivent
être solidement attachées et
sécurisées. Des chaînes de
sûreté doivent être jointes et
utilisées à tout moment. L`écrou
du tube d’ancrage doit être serré
solidement.
z Ne surchargez pas. La capacité
maximum est de 350 lb / 159
kg sur un récepteur avec une
estimation maximum de poids de
l’attelage de 500 lb / 227 kg. La
capacité maximum est de 400 lb
/ 181 kg sur un récepteur avec
l’estimation maximum de poids
de l’attelage de 750 lb / 340 kg.
z Assurez vous que la moto
est solidement attachée au
support. Detail K2 Inc. n’assume
aucune responsabilité pour
des dommages provoqués
par les motos qui n’ont pas
été correctement xées.
N’enfourchez jamais la moto sur
le support.
z N’obstruez pas votre plaque
d’immatriculation. Si nécessaire,
relocalisez la plaque.
z Ne dépassez pas la limite de
poids de l’attache de votre
véhicule ou la limite de poids
du support d’attelage. Celle-
ci peuvent être deux gures
différentes. Il est de votre
responsabilité d’assurer que vos
limites de poids sont respectées.
Ceci devrait avoir été déterminé
lors de l’installation du récepteur
d’attache. Détail K2 Inc.
n’assume aucune responsabilité
pour les récepteurs d’attelage qui
sont endommagés, mal installés,
ou avoir une capacité de poids
qui dépasse la limite de sécurité
pour le véhicule.

MAXIMUM WEIGHT
To determine the maximum weight
capacity of your Hitch-Mounted
Motorcycle Carrier, see the chart
below.
Hitch / Vehicle
Tongue Weight
Limit
(use lowest
gure)
Maximum
Weight Capacity
of Carrier
(your
motorcycle
must not weigh
more than this)
300 lb. 136 kg 180 lb. 82 kg
350 lb. 159 kg 225 lb. 102 kg
500 lb. 227 kg 350 lb. 159 kg
750 lb.
or more
340 kg
or more
400 lb.
max.
204 kg
max.
CAUTION! Do not use the
Hitch Mounted Motorcycle Carrier
if it sits at a dangerously low height
relative to the ground. The Carrier
and/or front wheel of the loaded bike
may “bottom out” while driving and
damage may occur. It is up to the
operator to determine what is a safe
height for the Carrier, and to drive
accordingly.
CAUTION! Ensure tie-down
straps utilized are in good condition
and of the proper strength.
ASSEMBLY
STEP 1
1. Be sure the R-clip (3, g 1,2,& 3)
and hitch pin (22, g 1, 2, 3 & 4)
are removed from the WedgeLock
bracket assembly. (g 2 & 3 show
the entire WedgeLock bracket
assembly.)
v.150323 5
ENGLISH FRANÇAIS
POIDS MAXIMUM
Pour déterminer la capacité de poids
maximum de votre attelage, voir le
tableau ci-dessous.
Poids limite
de l’attelage
/ attache du
véhicule (utilisé
le nombre le
plus bas)
Capacité
maximale de
transport du
support (votre
moto ne doit
pas peser plus
de ce poids)
300 lb 136 kg 180 lb 82 kg
350 lb 159 kg 225 lb 102 kg
500 lb 227 kg 350 lb 159 kg
750 lb
ou plus
340 kg
ou plus
max.
400 lb
max.
204 kg
MISE EN GARDE! Assurez
vous que le support se trouve a une
hauteur sufsante par rapport au sol.
Le support et /ou la roue avant de
la moto pourrait toucher le sol lors
de la conduite du véhicule et des
dommages pourraient se produire. Il
appartient à l’opérateur de déterminer
la hauteur sécuritaire du support
et aussi de conduire le véhicule en
fonction du fait que vous transportez
une moto.
MISE EN GARDE! Assurez-
vous que les arrimages utilisés sont
en bon état et de la force appropriée.
ASSEMBLAGE
ETAPE 1
1. S’assurer que la barrure de type
R (3, g 1, 2 et 3) et la goupille
d’attelage (22, g 1, 2, 3 et 4)
sont retirées de l’étrier d’ancrage.
Ensemble du support. (g 2 et
3 montrent le support de l’étrier
d’ancrage entier.)

2. Insert the WedgeLock Bracket
assembly into the vehicle’s hitch
receiver (R, g 4).
STEP 2
1. Line up hole in hitch receiver with
that of the WedgeLock Bolt (located
inside WedgeLock Bracket).
2. Insert the 5/8” Hitch Pin (22, g 4)
completely through the vehicle’s
hitch receiver (at hh, g 4), the
WedgeLock receiver (2, g 4), the
WedgeLock pin (1, g 4) and out
again through the other side of the
receiver. To accomplish this,
the
WedgeLock Nut tube (20, g 4)
may
have to be tightened or loosened
(turned clockwise or counter-
clockwise).
3. Replace the R clip on the end of
the Hitch Pin.
4. Hand-tighten (turn clockwise) the
WedgeLock Nut (20, g 4).
5. Further tighten the WedgeLock
Nut using the Lock Pin (18, g 5).
Remove the pin from its location
in the motorcycle carrier and
insert it through the holes in the
WedgeLock Nut tube, using it to
help turn the nut. The WedgeLock
Bracket should snug up tightly into
the vehicle’s hitch receiver. If this
does not happen, please call our
customer service at 289-878-9520.
6. When tight, replace the pin in the
motorcycle carrier’s main channel.
STEP 3
1. Fit the Carrier Assembly (shown in
g 6) onto cradle on WedgeLock
Bracket, centre it, and attach with
1/2” U-Bolts (4, g 6). If you have
difculty, this may be more easily
accomplished with the Bracket
and Carrier off the vehicle, on the
ground.
2. Fasten the U-bolts with the four
1/2” nylon insert nuts (10, g 6).
6 TMC201 man
ENGLISH FRANÇAIS
2. Insérez l’étrier d’ancrage dans
l’attelage du véhicule (R, g 4).
ÉTAPE- 2
1. Aligner trou dans attelage avec
celle de l’étrier d’ancrage (situé à
l’intérieur de l’étrier d’ancrage).
2. Insérez la goupille en L de 5/8 po.
(22, g 4) complètement à travers
l’attelage du véhicule (à hh, g
4), l’étrier d’ancrage (2, g 4), le
goupille de l’étrier d’ancrage (1, g
4) et à travers l’autre côté de du
récepteur. Pour ce faire, tourner
l’écrou du tube d’ancrage (20, g
4) pour serrée ou desserrés (dans
le sens horaire ou dans le sens
antihoraire).
3. Insérer la barrure en R dans la
goupille.
4. Serrez à la main (tourner dans le
sens horaire) l’écrou d’ancrage (20,
g 4).
5. Serrer d’avantage l’écrou de
la goupille d’ancrage avec la
goupille de verrouillage (18, gure
5). Retirez la goupille de son
emplacement dans le support de
la moto et insérer dans les trous
du tube de l’étrier d’ancrage
utiliser pour aider à tourner l’écrou.
Le support de l’étrier d’ancrage
devrait s’adapter dans attelage
du véhicule. Si ça n’arrive pas, s’il
vous plaît communiquer avec notre
service à la clientèle au 289-878-
9520.
6. Lorsque serré, remplacer l’axe
dans le tube principal du support de
moto.
7. Branchez les lumières au véhicule
ETAPE 3
1. 1. Adapter l’ensemble de support
(tel que dans g 6) sur le berceau
de l’étrier d’ancrage centrer le et
xez avec le boulon ½ po. en U
(4, gure 6). Si vous avez de la
difculté, cette opération peut être
plus facilement accompli avec le
support décrocher du véhicule, sur
la sol.
2. Fixer les boulons en U avec les
quatre écrous à insertion de nylon
½ po. (10, g 6).
FRANÇAIS

3. If your vehicle’s hitch-height is
quite high off the ground (more
than approx. 24” / 61 cm), you may
wish to ip the WedgeLock Bracket
around 180° and attach the Carrier
from underneath as in the photo (g
7). This will lower the Carrier.
STEP 4
1. If you plan to install the optional
lighting package, do it at this point.
2. Plug lights into vehicle trailer-hitch
receptacle temporarily to determine
left and right sides.
3. Unplug wiring and attach lights as
shown (g 8).
4. Secure the wiring with zip-ties
where appropriate.
STEP 5
1. Attach Sliding Side Channels and
Wheel Cradle as shown in g 9.
2. Position the Sliding Side Channels
such that the gap for the front tire is
slightly smaller than the diameter of
the front tire.
NOTE: the bolt heads (16, g 10)
should be inside the channel and the
nuts on the outside (g 10).
3. Later, once the bike is loaded, the
size of the gap between the wheel
stop (9, g 11) and the wheel cradle
(13, g 11) can be examined and
adjusted as necessary. Be aware
of the side channels coming into
contact with your disc brakes or
forks.
v.150323 7
ENGLISH FRANÇAIS
3. Si la hauteur de votre attache sur
le véhicule est assez élevé du sol
(plus à env. 24 po / 61 cm), vous
pouvez retourner l’étrier d’ancrage
de 180 ° et xer le transporteur par
en dessous comme sur la photo,
(g 7). Cela permettra de diminuer
la hauteur.
ÉTAPE 4
1. Si vous prévoyez d’installer l’option
de système d’éclairage, le faire à
ce stade ci.
2. Déterminer le feu coté droit
et gauche en branchant
temporairement dans le réceptacle
électrique .
3. Débranchez le câblage et xez des
lumières tel que représenté (g 8).
4. Fixez le câblage avec des attaches
de serrage (tie wraps) le cas
échéant.
ÉTAPE 5
1. Fixez les glissières coulissantes
latérales et le berceau de roue
comme le montre la gure 9.
2. Placez les glissières coulissantes
latérales de telle sorte que l’écart
de la roue avant est légèrement
plus petit que le diamètre de le
pneu avant.
REMARQUE: les têtes de vis (16,
gure 10) doit être à l’intérieur du
canal et le écrous à l’extérieur (gure
10).
3. Plus tard, une fois la moto chargée,
la taille de l’écart entre la roue
arrêter (9, gure 11) et le berceau
de roue (13, gure 11) peut être
examiné et ajustée si nécessaire.
Assurez vous que les glissières
latérales ne viennent pas en
contact avec les freins à disque ou
la fourche de la moto.

Fig 12 outlines the spacing
compensations for large-wheeled
(A) and smaller-wheeled (B) bikes.
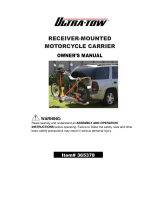
4. Consult g 13 for correct
dimensions and measurements
of the carrier when mounted on a
vehicle.
NOTE: UR shows the distance from
the face of the receiver on the vehicle
and the closest part of the U-bolts
holding the main cross tube.
4
.5"
114.3 mm
6"
152.4 mm
12½"
317.5 mm
1¾"
44.5 mm
fig 13
UR
OPERATION
1. Release Sliding Tie-Down Tube by
removing snapper-pin.
2. Pull the Sliding Tie-Down Tube
outward (g 14).
3. Re-insert snapper-pin into Tie-
Down Tube at opposite end (g 15).
4. Attach tie-down straps (not
supplied) to the handlebars of
your bike and set them to the
approximate length.
5. Tilt the Carrier down by removing
the Carrier Pin (18, g 16- the
Carrier Pin should not be
completely withdrawn - just enough
to release the platform). You
can use it to tighten WedgeLock
Bracket though, if not already done.
6. Carefully push your bike onto the
Carrier.
7. Allow the front wheel to drop into
the cradle.
8. Check that the back tire is lined up
and centred on Carrier.
9. While balancing your bike, attach
your tie-down straps: one on the
end of the Tie-Down Tube, the
other to the hole (located on the
Carrier) on the other side.
10. Tighten the straps.
11. Raise the Carrier with one hand,
and x horizontally by re-inserting
the Carrier Pin with the other hand.
12. Attach snapper-pin to Carrier Pin.
13. Strap down the back wheel to the
Carrier. Check straps.
CAUTION! Ensure tie-down
straps utilized are in good condition
and of the proper strength.
14. Plug in lights if needed.
8 TMC201 man
ENGLISH FRANÇAIS
La gure 12 décrit l’espacement
pour les grandes roues(A) et
petites roues (B).
4. Consultez la gure 13 pour les
dimensions et mesures du support
lorsqu’il est monté sur un véhicule.
REMARQUE: UR (fig 3) montre
la distance de la face du récepteur
sur le véhicule et la partie la plus
proche des boulons en U et du tube
transversale principale.
MODE D’EMPLOI
1. Libérer le tube de barrage en
enlevant la goupille de sécurité
2. Tirez le tube coulissant d’arrimage
vers l’extérieur (gure 14).
3. Réinsérer la goupille de sécurité
à broche dans le tube à l’extrémité
opposée (gure 15).
4. Attachez les sangles d’arrimage
(non fourni) au guidon de votre
moto et installer les à la longueur
approximative depuis les guidons.
5. Inclinez le transporteur par la
suppression de la goupille (18,
g 16) du support. La goupille de
verrouillage ne devrait pas être
complètement retirée - juste assez
pour libérer la plate-forme. Vous
pouvez l’utiliser pour serrer l’étrier
d’ancrage si ce ne est déjà fait.
6. Poussez doucement votre moto sur
le support.
7. Laisser la roue avant de tomber
dans le berceau.
8. Vérifiez que le pneu arrière est
aligné et centré sur le support.
9. Avec votre moto en équilibre ,
xez vos sangles d’arrimage: une
sur l’extrémité du tube bas, l’autre
(situé sur le transporteur) de l’autre
côté.
10. Serrez les sangles.
11. Soulevez le transporteur avec une
main, à un niveau horizontal et
réinsérer la goupille de verrouillage
avec l’autre main.
12. Fixez la goupille de sécurité à
broche en place
13. Attacher avec une sangle la roue
arrière au support. Vériez les
courroies.
ATTENTION! Assurez-vous que
l’arrimage des sangles utilisées soit
en bon état.
14. Branchez les lumières si
nécessaire.
/