Page is loading ...

VS50 Installation Guide V1.0
Installation Guide for
VS50 ANPR Camera

VS50 Installation Guide V1.0
Contents
................................................................................................................. Error! Bookmark not defined.
Installation Guide for VS50 ANPR Camera .............................................................................................. 1
1. Component List ................................................................................................................................... 4
1.1 Standard Components ............................................................................................................ 4
1.2 Optional Components ............................................................................................................. 4
2. Introduction ........................................................................................................................................ 4
3. Connections ........................................................................................................................................ 5
4. Connection to PSU .............................................................................................................................. 6
5. Network Connection ........................................................................................................................... 6
6. Relay Connection ................................................................................................................................ 6
7. Camera Configuration (Software) ....................................................................................................... 7
7.1 First time run and setup wizard .................................................................................................... 7
7.1.1 Setup Wizard – Navigating between the pages ..................................................................... 7
7.1.2 Setup Wizard – System Use ................................................................................................... 8
7.1.3 Setup Wizard – Device Setup ................................................................................................. 9
7.1.4 Setup Wizard – Lane Settings ................................................................................................. 9
7.1.5 Setup Wizard – Regions ....................................................................................................... 10
7.1.6 Setup Wizard – Detection .................................................................................................... 11
7.1.7 Setup Wizard – Stream to JetParking Server ....................................................................... 12
7.1.8 Setup Wizard – TCP/IP XML ................................................................................................. 13
7.1.9 Setup Wizard – Software Trigger ......................................................................................... 15
7.1.10 Setup Wizard – Relay Control ............................................................................................ 16
7.1.11 Setup Wizard – Email ......................................................................................................... 16
7.1.12 Setup Wizard – BOF ........................................................................................................... 17
7.1.13 Setup Wizard – Wiegand .................................................................................................... 18
7.1.14 Setup Wizard – LED Sign .................................................................................................... 19
7.1.15 Setup Wizard – Parking Logic ............................................................................................. 20
7.1.16 Setup Wizard – PlateTech .................................................................................................. 21
7.1.17 Setup Wizard completion................................................................................................... 22
7.2 Camera Viewer and Camera Alignment ...................................................................................... 23
7.3 Database and Alarms Setup ........................................................................................................ 24
7.3.1 Manually adding a database through the webpage ............................................................ 24
7.4 The Event Viewer Page ............................................................................................................... 25
7.5 Maintenance ............................................................................................................................... 26

VS50 Installation Guide V1.0
7.5.1 Upload / Download Manager............................................................................................... 26
7.5.2 Diagnostics ........................................................................................................................... 26
7.5.3 System Restore .................................................................................................................... 27
7.5.4 System Function - Test Outputs and Shutdown .................................................................. 28
7.5.5 Passwords ............................................................................................................................ 28
7.5.6 Date / Time Management .................................................................................................... 29
8. Mounting the Camera ....................................................................................................................... 30
9. Troubleshooting ................................................................................................................................ 30
10. Camera Specification (Subject to change) ...................................................................................... 31

VS50 Installation Guide V1.0
1. Component List
1.1 Standard Components
VS50 ANPR Camera
RJ45 Mating Kit
1.2 Optional Components
PSU 24v Dc ( VS50-PSU )
I/O Relay Cable ( VS50-IO-CBL)
2. Introduction
The ANPR camera comes pre‐aligned and set up for a stated distance. These distances relate to
standard UK number plates for use with ANPR software. The system is designed to provide an image
4m wide at the stated distance.
When not using standard UK plates please allow for difference in font size and adjust distance
accordingly.
For help or assistance with your particular installation please contact our technical support team.
The ANPR camera is a combination of camera(s), lens and cool running Infra‐Red technology – all in a
protected housing, and calibrated for immediate use. The unit is supplied ready to run from a 24V
DC input.
The system is designed so that the camera and infra-red or white light illumination work in
conjunction to provide high quality pictures of the number plate on a 24 hour basis. In overcast days
and in low light – the system will still provide excellent images of the number plate. The LED’s are
pulsed at a very high frequency to achieve maximum performance with minimal power
consumption.
The ANPR camera is designed to work with retro‐reflective number plates found in the UK, the
majority of Europe and most parts of US and Canada. For non-retro-reflective plates, such as found
in the Middle East, the white-light version should be used. If you are unsure about the nature of your
number plates, please do not hesitate to contact us.

VS50 Installation Guide V1.0
Figure 1: Pin assignments 3-pin front-view
Figure 2: Pin assignments 8-pin front-view
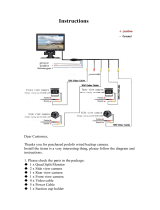
3. Connections
There are three connectors on the underside of the VS 50 camera:
1. 24VDC, three pin standard male M12, IP68 rated power connector.
Pin 1 = 24V DC
Pin 3 = 0V DC
Pin 4 = Ground
2. An RJ45, IP67 rated network connector.
A mating kit is provided with the unit and must be used to maintain the IP rating of the
camera. A complete shielded network cable with RJ45 should be fed through the mating
connector, and then the sealing nut tightened to create a secure, weather proof grip onto
the cable.
Please see section 5 below for detailed network configuration.
3. An 8-pin standard female M12, IP68 rated connector
for relays and Wiegand
Pin 1 = Ground
Pin 2 = Card Load (Wiegand)
Pin 3 = Data 1 (Wiegand)
Pin 4 = Data 2 (Wiegand)
Pin 5 = Input -ve
Pin 6 = Input +ve
Pin 7 = Output 2 ‘Lights’
Pin 8 = Output 1 ‘Barrier’
A 5m cable with a pre-fitted M12 cable connector, can be purchased from Norbain (VS50-IO-
CBL). Alternatively, a standard M12 female connector can be independently purchased. It is
recommended that the IP68 rating should be used to preserve the rating of the unit. For
reference, the manufacturer’s part number for the M12 connector on the housing is 12-
08PMMS-SF8001.

VS50 Installation Guide V1.0
4. Connection to PSU
The VS50 camera requires 24V DC power. Its power consumption is less than 25W under all
conditions. An appropriate power supply unit can be purchased from Norbain SD (VS50-PSU), please
contact your account manager for more details.
When using the power cable to connect to the PSU, the cable colours are as per below:
Red = 24V DC
Blue = 0V DC
Green = Ground
5. Network Connection
The VS50 camera must be connected to a 10/100/1000 Base-T(X) to allow communication to the
device through a web-browser or a computer running Vista Number plate recognition server
software.
The default IP address of the VS50 camera is:
192.168.127.10
The address of every VS50 camera on a given network must be unique and appropriate for
communication with the ANPR computer.
6. Relay Connection
When using the relay cable supplied by Norbain as an option, one end will be fitted with an M12 8-
pin male connector which should be securely fitted to the camera housing. The other end will have
8, different-coloured, cables which are assigned as per the table below:
Pin Number
Description
Wire colour
1
Ground
Brown
2
Card Load (Wiegand)
Green
3
Data 1 (Wiegand)
White
4
Data 2 (Wiegand)
Yellow
5
Input -ve
Blue
6
Input +ve
Red
7
Output 2 ‘Lights’
Violet
8
Output 1 ‘Barrier’
Black

VS50 Installation Guide V1.0
7. Camera Configuration (Software)
The VS50 camera runs a webpage to enable easy setup and configuration of the device. All settings
are controlled from here so there is no need to connect through remote desktop or other viewing
software.
7.1 First time run and setup wizard
To connect to the VS50, first ensure that your computer is on the same network range (i.e.
192.168.127.n, where ‘n’ is any number from 1 to 255 except 10).
Once your network settings are configured launch a web browser, such as Internet Explorer 11,
Chrome v51, or Firefox v47, and enter the camera’s IP address http://192.168.127.10
This will bring you to the VS50 homepage (Figure 3 below).
Figure 3: CS-50 Camera Homepage
In the ‘Username’ box, type administrator and in the ‘Password’ box, leave [blank]. To go to the
‘Event Viewer’ page you can click ‘Enter’ however for first run, it is recommended that you click ‘Run
Setup Wizard’.
7.1.1 Setup Wizard – Navigating between the pages
To move to the next menu in the Wizard click on the ‘Next’ button.
To go back to a previous page, click the ‘Previous’ button.
To cancel out of the wizard without making any changes, click the ‘Cancel’ button.

VS50 Installation Guide V1.0
Once you reach the final page for configuration of your system, click the ‘Finish’ button to save and
deploy the settings.
7.1.2 Setup Wizard – System Use
After clicking to run the setup wizard, a new window for the ‘VS50 Configuration Wizard’ will open
showing the ‘System Use’ page (Figure 4 below). On this first page, there are 5 options for the
system use available to you:
Bespoke Setup – All menus can be selected for configuration
Wiegand Device – For when only a Wiegand output is required from the camera
Standalone Access Control – For basic access control features (streaming to JetParking
server; relay control; Email setup; LED sign integration
Parking Logic Integration – For the SkiData UK integration including additional stream relay
and BOF communications
PlateTech Interface Integration – For the SkiData Plate-Tech integration including additional
stream relay and BOF communications
Figure 4: Configuration Wizard System Use Page
Once you have selected your main system use, you can further configure this to suit your specific
system requirements.
By unchecking items which are not required, you can skip steps in the wizard process. In the example
on the next page (Figure 5), ‘Standalone Access Control’ has been selected in the first menu and
then ‘LED Sign’ and ‘Stream to JetParking Server’ have been removed by unchecking their adjacent
boxes.

VS50 Installation Guide V1.0
Figure 5: Access Control with Stream and LED sign removed
For the purpose of this guide, the following pages will be structured around the Bespoke Setup with
all of the items checked (As per figure 4 on previous page). Parking protocols (Parking Logic &
PlateTech) will be covered at the end of the section in 7.1.15 and 7.1.16.
7.1.3 Setup Wizard – Device Setup
This page enables you to configure a new IP address for the camera. Simply fill in the IP address,
subnet and gateway (if required) as shown in Figure 6 below, then click ‘Next’.
Figure 6: Setup Wizard Device Setup
NOTE: Changing an IP address requires a reboot of the camera to commit the changes. This will be
performed automatically by the wizard after clicking the ‘Finish’ button on the final configuration
page.
7.1.4 Setup Wizard – Lane Settings
This page configures key lane details, namely ‘Lane ID’; ‘Lane Description’ and ‘Lane Type’ (Figure 7).
Lane ID - Enter a numeric value which will act as a unique identifier for the lane. Here the lane ID
must be unique within an enclosed ANPR system.
Lane Description - Here you can input a user-friendly alphanumeric string to describe the lane type
and location. In the example below, it describes the lane as the ‘Main Car Park Exit’

VS50 Installation Guide V1.0
Lane Type - The ‘lane type’ is for use in car parking systems where you would like to monitor or
manage car park capacity and dwell-times in a JetParking Server. The options are:
In – classes all vehicles passing this camera as entering a car park
Out – classes all vehicles passing this camera as leaving a car park
Standard – No definition is given as to whether vehicles passing the camera are entering or
exiting.
Figure 7: Setup Wizard Lane Settings
Once the lane has been configured, click ‘Next’
7.1.5 Setup Wizard – Regions
The VS50 has an on-board engine capable of reading plates from all over the World. In the ‘Regions’
page, you should select the region of installation from the drop-down list and any countries which
are likely to be seen by the camera.
Figure 8: Setup Wizard Regions
Use the arrows to move countries to and from the ‘Excluded List’ and ‘Included List’.

VS50 Installation Guide V1.0
Countries in the ‘Included List’ should be ranked according to the most common plate expected. To
change the rank of a country in the list, select the country so that it is highlighted blue (see Northern
Ireland in Figure 8 above) and then move it up and down the list using the ‘Up’ and ‘Down’ buttons
respectively.
Once your list is complete, click ‘Next’
7.1.6 Setup Wizard – Detection
The VS50 should normally recognise plates without user intervention. Site specific settings to
optimise the engine can be entered in the Detection page (Figure 9).
Figure 9: Setup Wizard Detection
Traffic Type:
Automatic – automatically detects traffic flow and optimises settings for the camera
Free-flow – forces the camera to use free-flow settings
Barrier – forces the camera to use barrier settings (here extra frames are used before a plate
is output for slightly slower recognition speeds but higher accuracies)
Maximum Traffic Speed:
Here select the maximum anticipated traffic speeds on site, grouped in 10mph intervals.
Traffic Direction Filter:
Off – Reports vehicles regardless of their travel direction through the camera’s field of view
Left-to-Right – Only reports vehicles travelling left to right through the camera’s field of view
Right-to-Left – Only reports vehicles travelling right to left through the camera’s field of view
Top-to-Bottom – Only reports vehicles travelling top to bottom through the camera’s field of
view
Bottom-to-Top – Only reports vehicles travelling bottom to top through the camera’s field of
view
Camera Exposure (IR Camera)

VS50 Installation Guide V1.0
In the majority of installations the ANPR camera is optimised to work out of the box. Where some
regions have less reflective licence plates, or very bright environmental conditions, the target
exposure can be adjusted to compensate.
Darkest – Reduces the target brightness to the minimum level, not normally recommended
Dark – Reduces the target brightness from ‘Normal’, should be used if the majority of plates
are over-exposed
Normal (Default) – Best setting for most sites
Light – Increases the target brightness from ‘Normal’, should be used if plates look overly
dark and grubby due to poor reflectivity
Lightest – Increases the target brightness to the maximum level, not normally recommended
Camera Exposure (Overview Camera)
In the majority of installations the overview camera is optimised to work out of the box. Where
environmental conditions cause the overview to look too dark or over-exposed, the target exposure
can be adjusted to compensate. The settings range from darkest to brightest.
Once the Detection settings are complete, click ‘Next’.
7.1.7 Setup Wizard – Stream to JetParking Server
The VS50 works well as a standalone ANPR device. However, for car park analytics and more
advanced access control and database setup, the JetParking server software is a valuable add-on.
The Stream to JetParking Server menu (Figure 10) configures the camera to manage this connection
and dataflow. First enable the interface by checking the box next to ‘Enable’
Figure 10: Setup Wizard Stream Settings
Car Park # - You can allocate VS50 cameras to specific car parks in a larger ANPR system. Identify
here the car park number to which the camera is associated.
ANPR Station ID - This is a number used as a unique identifier when a number of ANPR cameras or
PCs are transmitting data to a JetParking Server. It must be unique on the ANPR network.
My Server is - Here you enter the IP address of the JetParking Server.

VS50 Installation Guide V1.0
Backlog send order - The VS50 camera is able to backlog data in an internal buffer if the connection
is lost with the JetParking server. The Backlog send order configures whether the oldest or most
recent data is prioritised when the network comes back online.
LiveNet – Enabling ‘LiveNet’ allows the JetParking Server to edit aspects of the VS50 camera
remotely. One key feature is that it allows the user to remotely open barriers, through the VS50
connection, from the JetParking server.
Once you have configured the stream, click ‘Next’.
7.1.8 Setup Wizard – TCP/IP XML
The VS50 camera is able to easily integrate with 3
rd
party systems thanks to the new, flexible xml
interface. First, you need to configure where the data will be sent (Figure 11 below).
Figure 11: Setup Wizard xml communications
Protocol – Select between off or Simple XML.
Port – Enter here the communications port to use.
Encoding – Use the drop box to configure whether the xml string is encoded in ASCII or Unicode
Once you have configured, the communications, you have options on which ANPR data and images
to send through the xml protocol. Simply check or uncheck the tick boxes next to the data and
images you would like to send from the ‘Protocol Options’ (as per Figure 12 below).
Host Machine – Enter the IP address of the machine you would like to send the ANPR data to.

VS50 Installation Guide V1.0
Next you can choose the backlogging options which instructs the VS50 camera what to do if the
communications link to the xml host machine is down.
Figure 12: Setup Wizard XML Protocol Options
Figure 13: Setup Wizard XML Backlogging

VS50 Installation Guide V1.0
Only send images for Hotlist hits - When ticked, the selected images will only be sent with the event
data when the event is a hotlist hit. When the event is not a hotlist hit, just the textual data will be
sent.
Mode – Turns on or off backlogging of data.
Backlog send order – Select whether, on resumption of communications between the camera and
the host computer, the oldest data or most recent data is prioritised.
Max backlog - The maximum number of events to keep in the backlog (purges oldest records to
make room for newer ones when max is reached).
If a backlog has been stored, when the network reconnects the system will wait up to 60 seconds
before starting to send the backlog.
Once you have configured the XML, click ‘Next’.
7.1.9 Setup Wizard – Software Trigger
This module has two functions:
It can send an ANPR event (as binary data) to another application via TCP/IP;
It can set recognition to occur only when it receives a binary data trigger via TCP/IP.
The module uses a proprietary binary data format for send and receive of data. If you wish to use
this protocol, you will need to write an application that sends/receives the required data.
Figure 14: Setup Wizard Software Trigger
Enable Socket Server Interface - Select this checkbox to enable the Socket Server Interface.
Triggered Operation - When unticked, the socket interface will send an ANPR event to the specified
port. When ticked, it will wait for a trigger to be received from the specified port to activate
recognition.
Format - Choose your required data format from the dropdown list.
Port Number - The port number that the ANPR event data will be sent to / the trigger will be
received from. The default port number is 4200.
Note: Information on the schema for the software triggering can be found by contacting

VS50 Installation Guide V1.0
Vista Technical support 01189 125 125
Once you have configured the trigger, click ‘Next’.
7.1.10 Setup Wizard – Relay Control
The VS50 has two separate relay outputs labelled as ‘Output1 - Barrier’ and ‘Output2 - Lights’. The
labels are advisory and do not necessarily mean the output from the camera should be connected to
these devices. The outputs could equally be used for sirens, alarm system inputs, road blockers and
many other items.
To enable the interface, first tick the ‘Enable Relay Control Card’ checkbox.
Figure 15: Setup Wizard Relay Control
Next, select the relay you would like to fire and how many milliseconds the relay should fire for.
Note: For information on physical installation, refer back to sections 3 and 6 in the guide.
Once you have configured the relays, click ‘Next’.
7.1.11 Setup Wizard – Email
The ‘Email’ menu allows you to configure where emails are sent when a database match occurs with
an appropriate category. The email can be configured to send a combination of specific plate event
data, images and free-form text (Figure 16).

VS50 Installation Guide V1.0
Figure 16: Setup Wizard Email Setup
The email menu contains a number of configurable fields and check boxes which should be
completed accordingly. To add specific event information (e.g. Licence plate number) to the email
message body, use the relevant buttons on the right of the page.
From - Enter here the address of the email account the alert should be sent from.
To - Populate this box with the email address or addresses which should be sent the email alert.
Subject - Enter here the subject of the email alert
Message Body - Enter the body of the message which will be sent. This can contain a mixture of
free-form text and character codes which will be populated with ANPR event, or database
information. E.g. ‘Plate number %p has arrived at %L, %m’ could read as ‘Plate number BF53ZBD has
arrived at West Entrance, Meet them at the car park’.
Next, select if any images which should be attached to the email alert by using the appropriate check
boxes.
Finally, enter all relevant SMTP information. An SMTP server must be available on the
network/Internet for the VS50 camera to send emails through. Once you have configured the emails,
click ‘Next’.
7.1.12 Setup Wizard – BOF
The VS50 also comes complete with a BOF web services interface allowing data to be sent to the
Safety back office system (See Figure 17). To begin configuration, first click ‘Enable BOF Web
Service’.

VS50 Installation Guide V1.0
Figure 17: Setup Wizard BOF Settings
Location / Source ID - Specify the unique BOF location ID for this device (numeric only)
Feed/Force ID - For UK police forces only, this is the force PNC code of the police force using BOF.
For others, please leave blank.
Web Server Name or IP Address - The IP address or server name of the BOF server to connect to.
Port - The TCP port to connect to the BOF server over.
Next, use check-boxes to select which images are sent and any advanced data transfer. Once you
have configured the BOF communications, click ‘Next’.
7.1.13 Setup Wizard – Wiegand
The VS50 can output Wiegand strings to interface with 3
rd
party security systems. The Wiegand
output can be quickly configured using 8 standard formats or a custom one. The interface works
through the vehicle database (list of allowed and alarm vehicles). If a Wiegand output is required for
a vehicle in the table, the specific access code is to be added in the ‘Wiegand’ field. When the VS50
reads a plate with a Wiegand code associated in the database it will output this according to the
options set below (See Figure 18).
First, enable the interface and make the appropriate selection from the ‘Output Formats’ drop-down
box.

VS50 Installation Guide V1.0
Figure 18: Setup Wizard Wiegand Interface
To use a ‘Custom Format’ select it from the drop-down box and then type in the required encoding
in the adjacent text box.
After filling in the rest of the boxes, click ‘Next’.
7.1.14 Setup Wizard – LED Sign
The LED sign interface is tested with LED Synergy signs through Ethernet communications. Other LED
sign interfaces may not be available, please contact your account manager.
Figure 19: Setup Wizard LED Sign Menu
To enable the interface, tick the ‘Enable LED Sign’ check box, then enter the IP address of the sign
and communication port number (default 5200).

VS50 Installation Guide V1.0
Next fill in the boxes with text and Message codes to apply to the appropriate scenarios.
Message Codes - Brings up a box showing which mark-up codes can be used in the LED sign
messages. The codes are as follows:
Generic codes:
[plate] - The vehicle numberplate
[time] - The time at which the vehicle was seen (hh:mm)
[date] - The date on which the vehicle was seen (dd/mm/yy)
[cp-status] - Status of the carpark (e.g. ‘SPACES’)
[cp-spaces] - Number of spaces left in the carpark
[lt] - Left arrow (‘[‘)
[gt] - Right arrow (‘]‘)
[cr] - New line
Code for vehicles found in the database:
[title] - Driver's title
[name] - Driver's first name
[surname] - Driver's last name
[carshare] - Carshare group name
[cp-catstatus] - Status of the category's allowed carpark spaces (e.g. ‘FULL’)
[cp-catspaces] - Number of spaces left in the category's allowed carpark spaces
Example:
Welcome [title] [surname]![cr][date] [time]
becomes:
Welcome Mr Smith!
01/01/2012 12:00
Display Vehicle Message For - Specify here the number of seconds you would like the message
displayed for before returning back to the default. If you untick the checkbox, the vehicle message
will remain until another vehicle is seen.
LED Message for Vehicles Found in Database - These boxes should contain default messages to be
output to the LED Sign when a vehicle is seen that is in the database, but there is no LED message
specified in that vehicle's database entry. The When allowed access setting applies when the vehicle
has been granted access by the system, and the When denied access applies when the vehicle has
been denied access.
LED Message for Vehicles Not in Database - These boxes should contain default messages to be
output when a vehicle is seen that isn't in the database. The When allowed access setting applies
when the vehicle has been granted access by the system, and the When denied access applies when
the vehicle has been denied access. Only generic mark-up codes should be used here; any database-
specific mark-up codes will have no effect (they will be replaced with an empty string for each code
used).
Once the sign has been configured click ‘Next’.
7.1.15 Setup Wizard – Parking Logic
VS50 Integrates with SkiData systems through both a PlateTech and Parking Logic interfaces. As a
general rule, the UK and Ireland use the Parking Logic and the rest of the World tends to use the
/