Page is loading ...

ENGLISH
IMPORTANT SAFEGUARDS
When using electrical appliances, basic safety precautions should always
be followed including the following:
1 Read all instructions.
2 Do not touch hot surfaces. Use handles or knobs.
3 To protect against electrical shock do not immerse cord, plugs or
appliance in water or other liquid.
4 Close supervision is necessary when any appliance is used by or near
children.
5 Unplug from outlet when not in use and before cleaning. Allow to
cool before putting on or taking off parts.
6 Do not operate any appliance with a damaged cord or plug or after
the appliance malfunctions or has been damaged in any manner.
For assistance in the U.S. and Canada only, call 1-866-309-8817.
7 The use of accessory attachments not recommended by the appliance
manufacturer may cause injuries.
8 Do not block any ventilation openings. Install in accordance with the
manufacturer’s instructions.
9 Do not use outdoors.
10 Do not let cord hang over edge of table or counter, or touch hot
surfaces.
11 Do not place on or near a hot gas or electric burner, or in a heated
oven.
12 Extreme caution must be used when moving an appliance containing
hot oil or other hot liquids.
13 Plug the cord into the wall outlet. To disconnect, turn any control to
“off”, then remove plug from wall outlet.
14 Use extreme caution when removing the pan, basket and disposing
hot grease.
15 Do not clean with metal scouring pads. Pieces can break off the pad
and touch electrical parts, creating a risk of electric shock.
16 Use only on properly grounded outlet.
17 A short power-supply cord (or detachable power-supply cord) should
be used to reduce the risk resulting from becoming entangled in or
tripping over a longer cord.
18 Extension cords may be used if care is exercised in their use. If an
extension cord is used:
The marked electrical rating of the cord must be as great as the rating
of the appliance.
The cord should be arranged so that it will not drape over the edge
of the counter or table top where it could be pulled by children or
tripped over unintentionally.
19 This appliance has a polarized plug (one blade is wider than the
other). To reduce the risk of electric shock, this plug is intended to t
into a polarized outlet only one way.If the plug does not t fully into
the outlet, reverse the plug. If it still does not t, contact a qualied
electrician. Do not attempt to modify the plug in any way.
20 Oversize foods or metal utensils must not be inserted in the appliance
as they may create a re or risk of electric shock.
21 A re may occur if the appliance is covered or touching ammable
material, including curtains, draperies, walls, and the like, when in operation.
Do not store any item on top of the appliance when in operation.
22 Do not place any of the following materials in the appliance: paper,
cardboard, plastic, and the like.
SAVE THESE INSTRUCTIONS
Consuming raw or undercooked meats, poultry, seafood, shellsh or eggs
may increase your risk of foodborne illness.
Introduction
Congratulations on your purchase and welcome to Philips! To fully benet
from the support that Philips offers, register your product at
www.philips.com/welcome.
Your new airfryer allows you to prepare your favorite ingredients and snacks
in a healthier way.
The airfryer uses hot air in combination with high-speed air circulation
(Rapid Air) and a top grill to prepare a variety of tasty dishes in a healthy,
fast and easy way. Your ingredients are heated from all sides at once and
there is no need to add oil to most of the ingredients.
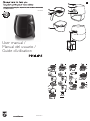
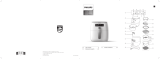
General description (Fig. 1)
1 Basket
2 Basket release button
3 Basket handle
4 Pan
5 Air inlet
6 Temperature control knob (180-390°F / 80°C-200°C)
7 Timer (0-30 min.)/power-on knob
8 Power-on indicator
9 Air outlet openings
10 Cord storage compartment
11 Power cord
Before first use
1 Remove all packaging material.
2 Remove any stickers or labels from the appliance.
3 Thoroughly clean the basket and the pan with hot water, some
dishwashing liquid and a non-abrasive sponge.
Note: You can also clean these parts in the dishwasher.
4 Wipe the inside and outside of the appliance with a moist cloth.
This is an airfryer that works on hot air. Do not ll the pan with oil or
frying fat.
Preparing for use
1 Place the appliance on a stable, horizontal and level surface.
Do not place the appliance on non-heat-resistant surfaces.
2 Place the basket in the pan properly (Fig. 2).
3 Pull the power cord out of the cord storage compartment in the
bottom of the appliance.
Do not ll the pan with oil or any other liquid.
Do not put anything on top of the appliance. This disrupts the airow and
affects the hot air frying result.
Using the appliance
The airfryer can prepare a large range of ingredients. The recipe booklet
included helps you get to know the appliance.
Hot air frying
1 Put the power plug in a grounded wall outlet.
2 Carefully pull the pan out of the airfryer (Fig. 3).
3 Put the ingredients in the basket (Fig. 4).
Note: Never ll the basket beyond the MAX indication or exceed the amount
indicated in the table (see section ‘Settings’ in this chapter), as this could affect
the quality of the end result.
4 Slide the pan back into the airfryer (Fig. 5).
Never use the pan without the basket in it.
Caution: Do not touch the pan during and for some time after use, as it
gets very hot. Only hold the pan by the basket handle.
5 Turn the temperature control knob clockwise to the required
temperature. See section ‘Settings’ in this chapter to determine
the right temperature (Fig. 6).
Note: If you want to prepare different ingredients at the same time, make sure
you check the preparation time and the temperature required for the different
ingredients before you start to prepare them simultaneously. Home-made fries
and drumsticks, for example, can be prepared simultaneously because they
require the same settings.
6 Determine the required preparation time for the ingredient
(see section ‘Settings’ in this chapter).
7 To turn on the appliance, turn the timer knob to the
required preparation time (Fig. 7).
Add 3 minutes to the preparation time when the appliance is cold.
Note: If you want, you can also let the appliance preheat without any
ingredients inside. In that case, turn the timer knob to more than 3 minutes.
Then ll the basket and turn the timer knob to the required preparation time.
, The power-on indicator goes on (Fig. 8).
, The timer starts counting down the set preparation time.
, Excess oil from the ingredients is collected on the bottom of the pan.
8 Some ingredients require shaking halfway through the preparation
time (see section ‘Settings’ in this chapter). To shake the ingredients,
pull the pan out of the appliance by the handle and shake it. Then slide
the pan back into the airfryer (Fig. 9).
Caution: Do not press the basket release button during shaking (Fig. 10).

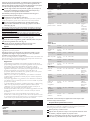
Min-max
Amount
(oz/g)
Time
(min.)
Temperature
(°F /°C)
Shake Extra
information
Home-made
potato
wedges
10 a 25 /
300-800
18-22 355 / 180 Shake add 1/2
tbsp of
oil to the
wedges
Home-
made potato
cubes
10 a 25 /
300-700
12-18 355 / 180 Shake add 1/2
tbsp of
oil to the
cubes
Meat &
Poultry
Steak 4 a 18 /
100-500
8-12 355 / 180
Pork chops 4 a 18 /
100-500
10-14 355 / 180
Hamburger 4 a 18 /
100-500
7-14 355 / 180
Chicken
wings
4 a 18 /
100-500
13-15 355 / 180
Drumsticks 4 a 18 /
100-500
18-22 355 / 180
Chicken
breast
4 a 18 /
100-500
10-15 355 / 180
Snacks
Onion rings 10 a 25 /
300-700
12-16 390 / 200 Shake Use oven-
ready
Frozen
chicken
nuggets
4 a 18 /
100-500
6-10 390 / 200 Shake Use oven-
ready
Frozen sh
sticks
4 a 16 /
100-400
6-10 390 / 200 Use oven-
ready
Frozen
cheese sticks
4 a 16 /
100-400
8-10 355 / 180 Use oven-
ready
Mixed
vegetables
4 a 16 /
100-400
10 320 / 160
Note: Add 3 minutes to the preparation time when you start frying while the
airfryer is still cold.
Making home-made fries
For the best results, we advise to use pre-baked (e.g. frozen) fries. If you
want to make home-made fries, follow the steps below.
1 Peel the potatoes and cut them into sticks.
2 Soak the potato sticks in a bowl for at least 30 minutes, take them
out and dry them with paper towel.
3 Pour ½ tablespoon of olive oil in a bowl, put the sticks on top and
mix until the sticks are coated with oil.
4 Remove the sticks from the bowl with your ngers or a kitchen
utensil so that excess oil stays behind in the bowl. Put the sticks in
the basket.
Note: Do not tilt the bowl to put all the sticks in the basket in one go, to prevent
excess oil from ending up on the bottom of the pan.
5 Fry the potato sticks according to the instructions in this chapter.
Cleaning
Clean the appliance after every use. Remove oil from the bottom of the
pan after every use to prevent smoke.
Let the basket, pan and the inside of the appliance cool completely before
you start cleaning. The pan, basket and the inside of the appliance have a
non-stick coating. Do not use metal kitchen utensils or abrasive cleaning
materials to clean them, as this may damage the non-stick coating.
1 Remove the power plug from the wall outlet, turn timer control knob
to 0 and let the appliance cool down.
Note: Remove the pan to let the airfryer cool down more quickly.
2 Wipe the outside of the appliance with a moist cloth.
Tip: To reduce the weight, you can remove the basket from the pan and shake
the basket only. To do so, pull the pan out of the appliance, place it on a
heat-resistant surface and press the basket release button.
Tip: If you set the timer to half the preparation time, you hear the timer bell
when you have to shake the ingredients. However, this means that you have to
set the timer again to the remaining preparation time after shaking.
9 When you hear the timer bell, the set preparation time has elapsed.
Pull the pan out of the appliance and place it on a heat-resistant surface.
Note: You can also turn off the appliance manually. To do this, turn the timer
control knob to 0 (Fig. 11).
10 Check if the ingredients are ready.
If the ingredients are not ready yet, simply slide the pan back into the
appliance and set the timer to a few extra minutes.
11 To remove small ingredients (e.g. fries), press the basket release
button (1) and lift the basket out of the pan (2). (Fig. 12)
Do not turn the basket upside down with the pan still attached to it,
as any excess oil that has collected on the bottom of the pan will leak
onto the ingredients.
After hot air frying, the pan and the ingredients are hot. Depending on
the type of ingredients in the airfryer, steam may escape from the pan.
12 Empty the basket into a bowl or onto a plate. (Fig. 13)
Tip: To remove large or fragile ingredients, use a pair of tongs to lift the
ingredients out of the basket (Fig. 14).
13 When a batch of ingredients is ready, the airfryer is instantly ready
for preparing another batch.
Settings
The table below helps you to select the basic settings for the ingredients
you want to prepare.
Note: Keep in mind that these settings are indications. As ingredients differ in
origin, size, shape as well as brand, we cannot guarantee the best setting for
your ingredients.
Because the Rapid Air technology instantly reheats the air inside the
appliance, pulling the pan briey out of the appliance during hot air
frying barely disturbs the process.
Tips
- Smaller ingredients usually require a slightly shorter preparation time
than larger ingredients.
- A larger amount of ingredients only requires a slightly longer
preparation time, a smaller amount of ingredients only requires a slightly
shorter preparation time.
- Shaking smaller ingredients halfway through the preparation time
optimizes the end result and can help prevent unevenly fried ingredients.
- Add some oil to fresh potatoes for a crispy result. Fry your ingredients
in the airfryer within a few minutes after you added the oil.
- Do not prepare extremely greasy ingredients such as sausages in the airfryer.
- Snacks that can be prepared in an oven can also be prepared in the airfryer.
- The optimal amount for preparing crispy fries is 1lb/0,45kg.
- Use pre-made dough to prepare lled snacks quickly and easily. Pre-made
dough also requires a shorter preparation time than home-made dough.
- You can also use the airfryer to reheat ingredients. To reheat ingredients,
set the temperature to 300°F / 150°C for up to 10 minutes.
- Make sure the ingredients that come out of this appliance have a light to
medium brown color instead of a dark brown color. Remove burnt food
remnants. Do not fry fresh potatoes at a temperature above 356°F /
180°C to minimize the production of acrylamide.
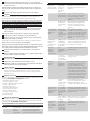
Min-max
Amount
(oz/g)
Time
(min.)
Temperature
(°F /°C)
Shake Extra
information
Potatoes &
fries
Thin frozen
fries
10 a 25 /
300-700
12-16 390 / 200 Shake
Thick frozen
fries
10 a 25 /
300-700
12-20 390 / 200 Shake
Home-
made fries
(1/4 inch /
8x8 mm)
10 a 25 /
300-800
18-25 355 / 180 Shake add 1/2
tbsp of oil
to the fries

Problem Possible cause Solution
White
smoke comes
out of the
appliance.
You are
preparing greasy
ingredients.
When you fry greasy ingredients in
the airfryer, a large amount of oil
or rendered fat will leak into the
pan. The oil or fat produces white
smoke and the pan may heat up
more than usual. This does not
affect the appliance or the end
result. Midway through the cooking
process you can carefully pour off
any excess oil or rendered fat from
the pan and then continue cooking.
The pan still
contains grease
residues from
previous use.
White smoke is caused by
grease heating up in the pan. Be
sure you clean the pan properly
after each use.
Home-made
fries are fried
unevenly in the
airfryer.
You did not soak
the potato sticks
properly before
you fried them.
Soak the potato sticks in a bowl for
at least 30 minutes, take them out
and dry them with paper towel.
You did not use
the right potato
type.
Use fresh potatoes and be sure
they stay rm during frying.
Home-made
fries are not
crispy when
they come out
of the airfryer.
The crispiness
of the fries
depends on the
amount of oil
and water in the
fries.
Be sure you dry the potato sticks
properly before you add the oil.
Cut the potato sticks smaller for a
crispier result.
Add slightly more oil for a crispier
result.
One Year Limited Warranty
Philips warrants that this product shall be free from defects in material,
workmanship and assembly, under normal use, in accordance with the
specications and warnings, for a period of one year from the date of
purchase. This warranty extends only to the original purchaser of the
product, and is not transferable. To exercise your rights under this warranty,
you must provide proof of purchase in the form of an original sales receipt
that shows the product name and the date of purchase. For customer
support or to obtain warranty service, please visit our website
www.philips.com/support. THERE ARE NO OTHER EXPRESS OR
IMPLIED WARRANTIES. Philips’ liability is limited to repair or, at its sole
option, replacement of the product. Incidental, special and consequential
damages are disclaimed where permitted by law. This warranty gives you
specic legal rights. You may also have other rights that vary from state to
state or province to province.
Manufactured for: Philips Consumer Lifestyle
A Division of Philips Electronics North America Corporation
P.O. Box 10313, Stamford, CT 06904 USA
Manufactured for: Philips Electronics Ltd
281 Hillmount Road
Markham, ON L6C2S3 Canada
ESPAÑOL
PRECAUCIONES
IMPORTANTES
Si utiliza un aparato eléctrico siempre debe tomar medidas de seguridad
básicas, tales como:
1 Lea todas las instrucciones.
2 No toque supercies calientes. Use las manijas o las perillas.
3 No sumerja el cable de alimentación, los conectores ni el aparato en
agua u otros líquidos para evitar descargas eléctricas.
4 Realice una estricta supervisión si el aparato es utilizado por niños o
personas con discapacidad o en su cercanía.
5 Desconecte el aparato del tomacorriente cuando no lo utilice y antes
de limpiarlo. Deje que se enfríe antes de añadir o retirar piezas.
6 Nunca use ningún aparato si el cable de alimentación o el conector
están dañados, si funciona mal o si sufrió algún tipo de daño.
7 Evite el uso de accesorios no recomendados por el fabricante del
aparato para prevenir lesiones.
3 Clean the pan and basket with hot water, some dishwashing liquid and
a non-abrasive sponge.
You can use a degreasing liquid to remove any remaining dirt.
Note: The pan and basket are dishwasher-safe.
Tip: If dirt sticks to the basket, or the bottom of the pan, ll the pan with hot
water with some dishwashing liquid. Put the basket in the pan and let the pan
and the basket soak for approximately 10 minutes.
4 Clean the inside of the appliance with hot water and a non-abrasive
sponge.
5 If necessary clean the heater with a cleaning brush to remove any
food residues.
Storage
1 Unplug the appliance and let it cool down.
2 Be sure all parts are clean and dry.
3 Push the cord into the cord storage compartment. Secure the
cord by inserting it into the cord xing slot.
Environment
- Do not throw away the appliance with the normal household waste
at the end of its life, but hand it in at an ofcial collection point for
recycling. By doing this, you help to preserve the environment (Fig. 15).
Warranty and service
If you need service or information or if you have a problem, please visit
the Philips website at www.philips.com/support or call in the U.S. and
Canada only, 1-866-309-8817 for assistance.
Troubleshooting
This chapter summarizes the most common problems you could encounter
with the appliance. If you are unable to solve the problem with the
information below, visit www.philips.com/support or call in the U.S. and
Canada only, 1-866-309-8817 for assistance.
Problem Possible cause Solution
The airfryer
does not work.
The appliance is
not plugged in.
Put the power plug in an grounded
wall outlet.
You have not set
the timer.
Turn the timer knob to the
required preparation time to turn
on the appliance.
The ingredients
fried with
the airfryer are
not done.
The amount of
ingredients in
the basket is too
big.
Put smaller batches of ingredients in
the basket. Smaller batches are fried
more evenly.
The set
temperature is
too low.
Turn the temperature control knob
to the required temperature setting
(see section ‘Settings’ in chapter
‘Using the appliance’).
The preparation
time is too short.
Turn the timer knob to the
required preparation time
(see section ‘Settings’ in chapter
‘Using the appliance’).
The ingredients
are fried
unevenly in the
airfryer.
Certain types of
ingredients need
to be shaken
halfway through
the cooking time.
Ingredients that lie on top of or
across each other (e.g. fries) need
to be shaken halfway through the
cooking time. See section ‘Settings’
in chapter ‘Using the appliance’.
Fried foods are
not crispy when
they come out
of the airfryer.
You used a type
of food to be
prepared in a
traditional deep
fryer.
Use food intended to be cooked
in an oven or lightly brush some oil
onto the food for a crispier result.
I cannot slide
the pan into
the appliance
properly.
There are too
many ingredients
in the basket.
Do not ll the basket beyond the
MAX indication.
The basket is not
placed in the pan
correctly.
Push the basket down into the pan
until you hear a click.
Page is loading ...
Page is loading ...
Page is loading ...
Page is loading ...
Page is loading ...
Page is loading ...
Page is loading ...
-
 1
1
-
 2
2
-
 3
3
-
 4
4
-
 5
5
-
 6
6
-
 7
7
-
 8
8
-
 9
9
-
 10
10
-
 11
11


Ask a question and I''ll find the answer in the document
Finding information in a document is now easier with AI
in other languages
- français: Philips HD9220/51 Manuel utilisateur
- español: Philips HD9220/51 Manual de usuario
Related papers
-
Philips HD9240/31 User manual
-
Philips HD9230/56 User manual
-
-
Philips HD9210/94 User manual
-
-
Philips HD9252/70 User manual
-
-
-
Philips HD9220/43 User manual
-
Other documents
-
Kogan KAFRYARBLK User manual
-
Costway EP22270BK User guide
-
-
Sytech SYAF500 Owner's manual
-
Campomatic AF20W Owner's manual
-
Tefal EY120850 User manual
-
-
-
 Philips Kitchen Appliances HD9641/96 User guide
-
Princess 183039 User manual
