
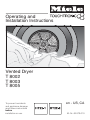
Operating and
Installation Instructions
Vented Dryer
T 8002
T 8003
T 8005
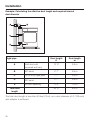
To prevent accidents
and appliance damage
read these instructions
before
installation or use.
M.-Nr. 06 879 010
en - US, CA

IMPORTANT SAFETY INSTRUCTIONS. . . . . . . . . . . . . . . . . . . . . . . . . . . . . . . . . 3
Control panel . . . . . . . . . . . . . . . . . . . . . . . . . . . . . . . . . . . . . . . . . . . . . . . . . . . . . 5
Before loading the dryer . . . . . . . . . . . . . . . . . . . . . . . . . . . . . . . . . . . . . . . . . . . . 6
Using the dryer. . . . . . . . . . . . . . . . . . . . . . . . . . . . . . . . . . . . . . . . . . . . . . . . . . . . 7
1. Turn on the dryer and load the laundry ................................7
2. Select a program .................................................7
3. Select a drying option (if needed) ....................................9
4. Select the dryness level...........................................10
5. Select the buzzer (if desired).......................................10
6. Start the program................................................11
7. At the end of a program...........................................11
Canceling or changing a program ....................................12
Adding or removing laundry during a program...........................12
Child lock . . . . . . . . . . . . . . . . . . . . . . . . . . . . . . . . . . . . . . . . . . . . . . . . . . . . . . . 13
Dryer care . . . . . . . . . . . . . . . . . . . . . . . . . . . . . . . . . . . . . . . . . . . . . . . . . . . . . . . 14
Cleaning the lint filters ..............................................14
Cleaning the exterior and the control panel .............................16
Cleaning the drum .................................................16
Changing the light bulb .............................................17
Frequently asked questions . . . . . . . . . . . . . . . . . . . . . . . . . . . . . . . . . . . . . . . . 18
After sales service . . . . . . . . . . . . . . . . . . . . . . . . . . . . . . . . . . . . . . . . . . . . . . . . 20
Quick Guide . . . . . . . . . . . . . . . . . . . . . . . . . . . . . . . . . . . . . . . . . . . . . . . . . . . . . 21
Installation instructions . . . . . . . . . . . . . . . . . . . . . . . . . . . . . . . . . . . . . . . . . . . 25
IMPORTANT SAFETY INSTRUCTIONS. . . . . . . . . . . . . . . . . . . . . . . . . . . . . . . . 22
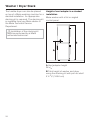
Washer / Dryer Stack . . . . . . . . . . . . . . . . . . . . . . . . . . . . . . . . . . . . . . . . . . . . . . 24
Electrical connection. . . . . . . . . . . . . . . . . . . . . . . . . . . . . . . . . . . . . . . . . . . . . . 25
Installation . . . . . . . . . . . . . . . . . . . . . . . . . . . . . . . . . . . . . . . . . . . . . . . . . . . . . . 26
Installation site ....................................................27
Installation beneath a counter ........................................28
Leveling the dryer .................................................29
Determining the position of the exhaust connection .......................29
Installation tips ....................................................30
Exhaust connection ................................................31
Direct wall connection ..............................................32
How to calculate the effective duct length ..............................33
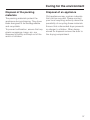
Caring for the environment. . . . . . . . . . . . . . . . . . . . . . . . . . . . . . . . . . . . . . . . . 37
Contents
2

,
WARNING - To reduce the risk of
fire, electric shock, or injury to
persons when using your appliance,
follow basic precautions, including
the following:
~
It is essential to read all instructions
before using the appliance.
~
Do not allow children to play on or in
the appliance. Close supervision is
necessary when the appliance is used
near children. Always close the door
after use to prevent child hazards.
~
Before this appliance is removed for
service or discarded, remove the door
to the drying compartment.
~
Do not reach into the dryer if the
drum is moving.
~
Do not install or store this appliance
where it will be exposed to the weather.
~
Do not tamper
with the controls.
~
Do not repair or replace any part of
the appliance or attempt any servicing
unless specifically recommended in
these operating instructions. Repairs to
electrical appliances should only be
performed by qualified personnel.
Incorrectly repaired machines may
pose a considerable risk to the user.
~
Do not use fabric softeners or
products to eliminate static unless
recommended by the fabric
manufacturer.
~
To prevent the risk of fire, the
following textiles must not be dried in
this dryer:
–
items which have not been washed.
–
items, such as work-wear, exposed
to grease, oils, or other deposits
(such as lotions or cosmetics) in your
dryer. If these items have not been
thoroughly cleaned there is a danger
that they may contribute to a
chemical reaction that could cause
the laundry to ignite when heated
even after being removed from the
dryer.
– items that have been previously
cleaned, washed, soaked or spotted
with gasoline, dry-cleaning solvents
or other flammable or explosive
substances. They may give off
vapors that could ignite or explode.
– items treated with flammable
cleaning agents or items containing
acetone, alcohol, petrol, stain
remover, wax or chemicals from
buffing, etc.
–
items which have been splashed with
hair spray, nail polish remover, etc.
When washing heavily soiled items
ensure that sufficient detergent is
used with a high temperature. If in
doubt wash the item several times.
–
items containing foam rubber or
similarly textured rubber-like
materials.
–
items with padding or filling (e.g.
pillows or jackets) which have been
damaged. Loose filling could catch
fire.
IMPORTANT SAFETY INSTRUCTIONS
3

~
Allow the dryer to complete each
stage of the program selected,
including the cooling down phase. This
will ensure that the items being
removed are not too hot to handle
~
Clean the lint filter before or after
each load.
~
Keep the area around the air intake
(toe-kick) and adjacent surrounding
areas free from lint, dust and dirt.
~
The interior of the machine and
exhaust duct should be cleaned
periodically by qualified personnel.
This dryer is intended for
residential use only!
~
GROUNDING INSTRUCTIONS
This appliance must be grounded. In
the event of malfunction or breakdown,
grounding will reduce the risk of
electric shock by providing a path of
least resistance for electric current.
This appliance is equipped with a cord
having an equipment-grounding
conductor and a grounding plug. The
plug must be inserted into a
appropriate outlet that is properly
installed and grounded in accordance
with all local codes and ordinances.
~
WARNING – Improper connection of
the equipment grounding conductor
can result in a risk of electric shock.
Contact a qualified electrician if you are
in doubt as to whether the appliance is
properly grounded.
~
Do not modify the plug provided
with the appliance: if it will not fit the
outlet, have a proper outlet installed by
a qualified electrician.
SAVE THESE INSTRUCTIONS
IMPORTANT SAFETY INSTRUCTIONS
4

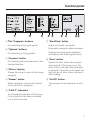
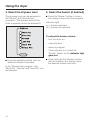
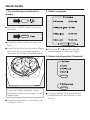
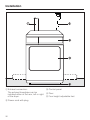
a e- "Programs" buttons
For selecting a drying program.
b "Options" buttons
For selecting a drying option.
c "Dryness" button
For selecting the dryness level of the
finished laundry.
d "Status" display
Shows the current cycle of the drying
program.
e "Buzzer" button
When selected, a buzzer will sound
at the end of the program.
f "FAULT" indicators
An illuminated indicator will alert you
if the child lock has been activated
or if a fault occurred.
g "Start/Stop" button
Starts and stops a program.
Interrupts a program when pressed.
Flashes during program selection
and lights once the program starts.
h "Door" button
Opens the door when the program
has finished. If the dryer is on, the
drum interior will light when the door
is opened. If the door is left open, the
light will go off after a few minutes to
save energy.
i "On/Off" button
Turns power to the machine on and
off.
Control panel
5

The dryer must be correctly installed
and connected before the first use.
Please refer to the "Installation
Instructions".
^
Before using for the first time, clean
the drum with a cloth.
Before drying, check fabric care
labels for special drying instructions.
q Dry with normal temperature
r Dry with low temperature
(select "Gentle" option)
s Do not dry in a tumble dryer
– Do not overload the drum!
Overloading the dryer will result in
poor drying results and wrinkling.
– Knitted fabrics and flannel tend to
shrink when washed and dried for
the first time. Do not over dry these
fabrics.
–
To prevent discoloration, do not dry
new, dark-colored fabrics with
light-colored items.
–
Close zippers and tie up fabric belts
and apron ties to prevent tangles
and damage to clothing.
–
Do not dry items that may melt or
ignite in the dryer, such as plastics,
rubber or sneakers.
Program recommendations
Normal
–
Cottons and Permanent Press blends
Wrinkle-free
–
Permanent Press:
select the Hand Iron dryness level
and reduce the load size for best
drying results
–
Delicate fabrics, such as polyester:
select the Gentle option to reduce
creasing
– Pure linen and down filled items
Woolens
– Wool and wool blends
Smooth
– Linen
– Permanent Press (cottons, blends
and synthetics)
Sturdy
–
Durable Cottons and Permanent
Press
Fluff / 20 min / 45 min
–
All fabric types
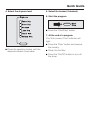
Before loading the dryer
6

1. Turn on the dryer and load
the laundry
^
Press the "On/Off" button to turn on
the dryer.
^
Press the "Door" button to open the
door.
^
Load the laundry loosely into the
drum.
^
Make sure the lint filters are in place.
^
Close the door.
For best results use liquid fabric
softener when washing laundry.
To prevent fabric damage, check
that laundry will not be caught in the
closed door.
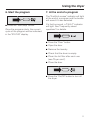
2. Select a program
^ Press the e or - button until the
desired program indicator lights.
Using the dryer
7

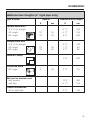
Program When to use Note
Normal Available drying options: Turbo, Full load, Gentle, Anti-crease
Extra Dry Multi-layer, mixed loads of sturdy cottons,
e.g. jeans, towels.
The "Extra Dry" program should not be
selected for jersey materials.
Items may shrink.
More Dry Uniform loads of cottons,
e.g. sheets, underwear, socks.
-
Normal Knitted items that may shrink,
e.g. jersey material or lightweight cottons.
If items are still damp, dry again using
"More Dry".
Less Dry Cotton or linen fabrics to be left damp for
ironing.
-
Hand Iron If fabrics are too damp, dry again using
"Less Dry".
Rotary Iron Cotton or linen fabrics which will be ironed
with a rotary iron.
To prevent moisture loss, roll up the
laundry until ready to iron.
Wrinkle-free Available drying options: Turbo, Gentle, Anti-crease
More Dry Synthetic permanent press items
e.g. pants and shirts.
-
Normal Permanent press and blended fabrics,
e.g. cotton/synthetic.
Less Dry Permanent press and blended fabrics
requiring an ironed finish.
Reduce load size for fabrics that wrinkle
easily.
Special Programs Available drying options: Anti-crease only available in Fluff,
Sturdy
Woolens Delicate items which allow machine
drying.
Remove items immediately at the end of
the program, while still slightly damp.
Allow items to air dry.
Smooth Program for reducing creasing of cotton,
linen or permanent press fabrics made of
cotton, blends or synthetics.
-
Sturdy Mixed loads of cotton and permanent
press items.
-
Fluff Individual items to be freshened and
fluffed with cool air.
Reduce load size.
TIMED CYCLES Available drying options: Gentle, Anti-crease
20 min For individual items or very small loads,
e.g. beach towels, swimsuits.
-
45 min
Using the dryer
8

3. Select a drying option
(if needed)
^ A drying option can be selected or
deselected with each press of the
button.
OPTIONS
Turbo
Fast drying for sturdy fabrics with
increased temperature and a reduced
program length.
Full load
Select this option for efficient drying of
a standard size load.
Gentle
For drying delicate fabrics at a lower
temperature with an extended program
time.
Anti-crease
Prevents wrinkles if laundry is not
removed immediately after the end of a
program. The drum periodically rotates
for about 1 hour.
Using the dryer
9

4. Select the dryness level
The dryness level can be selected in
the "Normal" and "Wrinkle-free"
programs. (The dryness level of the
other programs cannot be adjusted.)
^ Press the selection button until the
desired indicator illuminates.
In the "Wrinkle-free" program, only
"More Dry", "Normal" and "Less Dry" can
be selected.
5. Select the buzzer (if desired)
^
Press the "Buzzer" button to have a
tone beep at the end of the program.
Indicator light:
on = buzzer selected
off = buzzer not selected
To adjust the buzzer volume:
–
turn the dryer on
–
close the door
– select a program
– if the indicator is lit, press the
"Buzzer" button so the indicator light
goes out.
^ Press and hold the "Buzzer" button
until its indicator is lit and you hear
the desired volume and tone.
Using the dryer
10

6. Start the program
^
Press the "Start/Stop" button.
Once the program starts, the current
cycle of the program will be indicated
in the "STATUS" display.
7. At the end of a program
The "End/Anti-crease" indicator will light
at the end of a program and the buzzer
will sound if it was selected.
If a fault occurred, a "FAULT" indicator
will light. See "Frequently asked
questions" for details.
^
Press the "Door" button.
^
Open the door.
^ Remove the laundry.
^ Check that the drum is empty.
^ Clean the lint filter after each use
(see "Dryer care").
^ Close the door.
^
Press the "On/Off" button to turn off
the dryer.
Using the dryer
11

Canceling or changing a
program
^
Press and release the "Start/Stop"
button to stop the drying program.
To continue drying:
^
Select the new program by pressing
the e or - button.
^
Select any desired options.
^
Select a dryness level (available in
the "Normal" and "Wrinkle-free"
programs).
^
Press and release the "Start/Stop"
button to start the new program.
Adding or removing laundry
during a program
^
Turn off the dryer using the "On/Off"
button.
^
Press the "Door" button.
^
Open the door.
,
CAUTION - Do not touch the rear
of the drum while adding or
removing items! There is a danger of
burns due to high temperatures in
the drum.
^ Add or remove items.
^ Close the door.
^ Turn the dryer back on with the
"On/Off" button.
Using the dryer
12

Child lock
When activated, the child lock prevents
the dryer from being operated by
locking the control panel functions.
The dryer can be turned on but not
started. The "Child lock" indicator will
flash.
The door can be opened.
To activate the child lock
1. Make sure the dryer is turned off and
the door is closed.
2. Press and hold the "Anti-crease" and
"DRYNESS" buttons at the same time,
hold until step 5.
3. Turn on the dryer with the "On/Off"
button.
4. Press the "OPTIONS" button 3 times.
5. Release the "Anti-crease" and
"DRYNESS" buttons.
The "Child lock" indicator will flash and
the dryer is now locked.
6. Turn off the dryer using the "On/Off"
button.
To deactivate the child lock
Repeat steps 1. to 5.
The "Child lock" indicator will go out.
The control panel is now unlocked.
6. Turn off the dryer using the "On/Off"
button.
Child lock
13

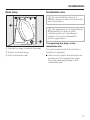
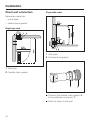
Cleaning the lint filters
,
A clogged filter is a fire hazard!
The lint filter must be cleaned after
every program.
^ Open the door and remove the lint
filter, 1, by gently lifting it upwards.
^
Wipe the lint off the filter with your
hand (do not use sharp objects).
^ Any lint remaining in the hollow part
of the door can be removed through
the gap at the bottom with a dust
brush or vacuum.
^ Clean the gasket, 2, with a damp
cloth.
^ Return the lint filter and close the
door.
The lint filter can be rinsed with hot
water if necessary. The filter must be
dried thoroughly before being
returned to the dryer door.
Dryer care
14

Cleaning the grille filters
^
Clean the grille filters in the door
opening regularly. While the filters
are removed also clean the opening
beneath the filters with a dust brush
or vacuum.
^
Take the grille filters out by turning
the knob at the top of the filter, a,
until it clicks and pull them out, b.
^ The grille filters can be rinsed with
hot water if necessary. The filters
must be dried thoroughly before
being returned to the door opening.
^ Any lint remaining in the hollow part
beneath the grille filters can be
removed with a dust brush or
vacuum.
^
Return the grille filters and make sure
the knob clicks into place when
locking it by turning it clockwise.
Dryer care
15

Cleaning the exterior and the
control panel
,
To reduce the risk of electric
shock, disconnect the dryer from the
power supply by shutting off the
power main, tripping the circuit
breaker or unplugging the power
cord before performing
maintenance.
Never use abrasive cleaners,
scouring pads, steel wool or caustic
(oven) cleaners on the dryer. They
will damage the surface.
^ The exterior and the control panel
can be cleaned with warm water and
liquid dish soap applied with a soft
sponge.
^ Wipe dry.
Cleaning the drum
^
The stainless steel surfaces of the
drum can be cleaned using a
non-abrasive stainless steel cleaner.
^
Wipe clean with a soft cloth.
Dryer care
16

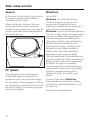
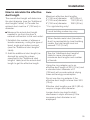
Changing the light bulb
,
To reduce the risk of electric
shock, disconnect the dryer from the
power supply by shutting off the
power main, tripping the circuit
breaker or unplugging the power
cord before performing
maintenance.
^
Open the door.
The bulb cover is located along the
upper rim of the drum opening.
^
Slide a screwdriver with a wide head
underneath the side edge of the bulb
cover and twist (see illustration).
^
Flip down the bulb cover.
^
Replace the light bulb with a
temperature proof bulb, available
from Miele.
The light bulb must not exceed the
maximum wattage listed on the data
plate.
^
Flip up the light bulb cover and press
it firmly until it clicks into place.
,
Make sure the bulb cover is
securely closed to prevent a short
circuit or penetrating moisture.
^ Restore power.
Dryer care
17

What if the dryer will not run?
Possible fault Solution
The "Start/Stop" button was not
pressed.
Make sure the dryer is on. Press the "Start/
Stop" button to begin the drying program.
The circuit breaker tripped or
the dryer is unplugged.
Make sure the dryer is plugged in or reset the
circuit breaker.
The door is not closed. Close the door properly.
How do I prevent static cling?
Add fabric softener to laundry when washing or select the "Less Dry" setting on
the dryer.
What if the drum light does not come on?
Possible fault Solution
The bulb may be bad or burned
out.
See "Changing the light bulb."
What if the "Child Lock" indicator flashes after turning the dryer on and a
program cannot be started?
Possible fault Solution
The child lock is activated. Deactivate the child lock. See "Child Lock."
What if the program stops, the "Anti-crease / End" indicator lights and the
buzzer sounds?
Possible fault Solution
The drum is empty. Load laundry into the dryer. The dryer will not
operate if the drum is empty. Single items
should be dried with "Sturdy" or a timed
program. For dry items use the "Fluff" program.
What if the "Filter/Vent" fault indicator is lit?
Possible fault Solution
The lint filter is clogged. Clean the lint filters. See "Dryer care".
The exhaust hose or the
connection is clogged with lint.
Remove lint and check the exhaust system for
blockages.
The air supply in the room is
insufficient.
Open a window or door to increase airflow.
Frequently asked questions
18

What if the "Filter/Vent" indicator lights after cleaning the exhaust system?
Possible fault Solution
The dryer is not operating efficiently
because the duct hose is too long.
Check the exhaust length and diameter
(see "How to calculate the effective
duct length"). A long exhaust hose will
increase program times and energy
consumption.
If the exhaust hose cannot be
shortened, the indicator can be turned
off by a service technician.
What if the program runs too long or stops?
Possible fault Solution
The airflow is insufficient in the area of
the dryer.
Open a window or door to increase
airflow.
The lint filters are clogged. Clean the lint filters (see "Dryer care").
The laundry was not spun sufficiently in
the washer.
Select a higher spin speed in the wash
program.
The dryer is overloaded. Reduce the load size.
Metal zippers interfere with the dryer’s
moisture sensors.
Select a timed program to avoid over
drying.
An airflow gap of 3/8" (10 mm) must be
provided between the machine and the
floor.
This gap must not be blocked by a
toe-kick or thick piled carpets for
sufficient airflow.
What if the laundry is not dry enough?
Possible fault
The load contained too many dissimilar items (size and fabric.)
What if water has collected around the drum opening?
Possible fault
This is condensed moisture from the laundry.
Frequently asked questions
19

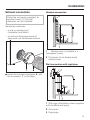
Repairs
In the event of a fault which you cannot
fix yourself, please contact Miele's
Technical Service Dept.
When contacting Technical Service,
please quote the model and serial
number of your appliance. They can be
found on the data plate located below
the drum opening.
PC Update
The indicator on the control panel
marked # allows a technician to
update the dryer with new technology.
For example, if new programs or fabrics
are developed, a service technician will
be able to modify the existing program
cycles accordingly.
MieleCare
(only USA)
MieleCare, our Extended Service
Contract program; gives you the
assurance of knowing that your
appliance investment is covered by 5
years of worry free ownership.
MieleCare is the only Extended Service
Contract in the industry that guarantees
repairs by a Miele Authorized Service
Provider using genuine Miele parts.
Only genuine Miele parts installed by
factory trained professionals can
guarantee the safety, reliability and
longevity of your Miele appliance.
Please note that unless expressly
approved in writing by the Miele
Service department, Extended Service
Contracts offered by other providers for
Miele products will not be recognized
by Miele. Our goal is to prevent
unauthorized (and untrained) service
personnel from working on your Miele
products, possibly doing further
damage to them, you and/or your
home.
To learn more about MieleCare
Extended Service Contracts, please
contact your appliance dealer or visit
us online at:
http://miele.com/mielecare
After sales service
20
Page is loading ...
Page is loading ...
Page is loading ...
Page is loading ...
Page is loading ...
Page is loading ...
Page is loading ...
Page is loading ...
Page is loading ...
Page is loading ...
Page is loading ...
Page is loading ...
Page is loading ...
Page is loading ...
Page is loading ...
Page is loading ...
Page is loading ...
Page is loading ...
Page is loading ...
Page is loading ...
Page is loading ...
Page is loading ...
Page is loading ...
Page is loading ...
-
 1
1
-
 2
2
-
 3
3
-
 4
4
-
 5
5
-
 6
6
-
 7
7
-
 8
8
-
 9
9
-
 10
10
-
 11
11
-
 12
12
-
 13
13
-
 14
14
-
 15
15
-
 16
16
-
 17
17
-
 18
18
-
 19
19
-
 20
20
-
 21
21
-
 22
22
-
 23
23
-
 24
24
-
 25
25
-
 26
26
-
 27
27
-
 28
28
-
 29
29
-
 30
30
-
 31
31
-
 32
32
-
 33
33
-
 34
34
-
 35
35
-
 36
36
-
 37
37
-
 38
38
-
 39
39
-
 40
40
-
 41
41
-
 42
42
-
 43
43
-
 44
44


Ask a question and I''ll find the answer in the document
Finding information in a document is now easier with AI
Related papers
-
Miele T 8005 VENT ED DRYER - OPERATING AND User manual
-
-
-
-
-
-
-
-
-
Other documents
-
 GLOBALFLEX Global009 Operating instructions
-
 GLOBALFLEX Global006 Operating instructions
-
 GLOBALFLEX Global008 Operating instructions
-
 GLOBALFLEX Global007 Operating instructions
-
Bosch WTV76100US/06 Owner's manual
-
Equator EZ 4000 CV Merlot Quick start guide
-
-
LG TD-V75120E Owner's manual
-
LG TD-V70125E Owner's manual
-


