GE JES1145WTC Owner's manual
- Category
- Microwaves
- Type
- Owner's manual
This manual is also suitable for
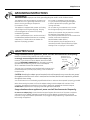
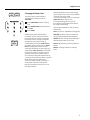
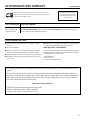
GE JES1145WTC microwave oven offers various features for convenient and efficient cooking. It has multiple power levels, allowing you to adjust the cooking intensity for different foods. The time features, including auto and multi-stage cooking, enable precise control over cooking duration. The microwave also includes convenience features like a kitchen timer and a child lock for added safety. Additionally, it provides helpful information through its microwave terms and troubleshooting tips, making it user-friendly and reliable for your daily cooking needs.
GE JES1145WTC microwave oven offers various features for convenient and efficient cooking. It has multiple power levels, allowing you to adjust the cooking intensity for different foods. The time features, including auto and multi-stage cooking, enable precise control over cooking duration. The microwave also includes convenience features like a kitchen timer and a child lock for added safety. Additionally, it provides helpful information through its microwave terms and troubleshooting tips, making it user-friendly and reliable for your daily cooking needs.


-
 1
1
-
 2
2
-
 3
3
-
 4
4
-
 5
5
-
 6
6
-
 7
7
-
 8
8
-
 9
9
-
 10
10
-
 11
11
-
 12
12
-
 13
13
-
 14
14
-
 15
15
-
 16
16
-
 17
17
-
 18
18
-
 19
19
-
 20
20
-
 21
21
-
 22
22
-
 23
23
-
 24
24


GE JES1145WTC Owner's manual
- Category
- Microwaves
- Type
- Owner's manual
- This manual is also suitable for
GE JES1145WTC microwave oven offers various features for convenient and efficient cooking. It has multiple power levels, allowing you to adjust the cooking intensity for different foods. The time features, including auto and multi-stage cooking, enable precise control over cooking duration. The microwave also includes convenience features like a kitchen timer and a child lock for added safety. Additionally, it provides helpful information through its microwave terms and troubleshooting tips, making it user-friendly and reliable for your daily cooking needs.
Ask a question and I''ll find the answer in the document
Finding information in a document is now easier with AI
Related papers
-
GE JTP90DP4WW Owner's manual
-
GE JVM1635SFC Operating instructions
-
GE JE740DR2BB Owner's manual
-
GE JVM6175 Owner's manual
-
-
-
-
GE JE1550GW Owner's manual
-
-
General Electric JES1142 User manual
Other documents
-
 Cafe CVM519P2PS1 User guide
-
Danby DOM16A1SDB Installation guide
-
Toastmaster TMW3504W User manual
-
Midea EM925A2GK-P0RA Owner's manual
-
mabe JVM1635 User manual
-
Hitachi MDS023 BLANC Owner's manual
-
-
Samsung 350A4502P648 User manual
-
Samsung ME86V-BBH User manual
-
Samsung ME731K User manual
