Technoline WS 9140-IT User manual
- Category
- Weather stations
- Type
- User manual
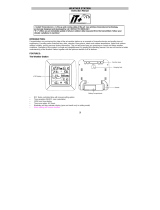
Technoline WS 9140-IT wireless weather station provides precise indoor and outdoor temperatures, making it ideal for home or office use. Its 868 MHz transmission ensures a stable connection, while the DCF-77 radio-controlled clock keeps you on schedule with accurate time. The alarm function with snooze option adds convenience to your mornings.
Technoline WS 9140-IT wireless weather station provides precise indoor and outdoor temperatures, making it ideal for home or office use. Its 868 MHz transmission ensures a stable connection, while the DCF-77 radio-controlled clock keeps you on schedule with accurate time. The alarm function with snooze option adds convenience to your mornings.


-
 1
1
-
 2
2
-
 3
3
-
 4
4
-
 5
5
-
 6
6
-
 7
7
-
 8
8
-
 9
9
-
 10
10
-
 11
11
-
 12
12
-
 13
13
-
 14
14
-
 15
15
-
 16
16
-
 17
17
-
 18
18
-
 19
19
-
 20
20
-
 21
21
-
 22
22
-
 23
23
-
 24
24
-
 25
25
-
 26
26
-
 27
27
-
 28
28
-
 29
29


Technoline WS 9140-IT User manual
- Category
- Weather stations
- Type
- User manual
Technoline WS 9140-IT wireless weather station provides precise indoor and outdoor temperatures, making it ideal for home or office use. Its 868 MHz transmission ensures a stable connection, while the DCF-77 radio-controlled clock keeps you on schedule with accurate time. The alarm function with snooze option adds convenience to your mornings.
Ask a question and I''ll find the answer in the document
Finding information in a document is now easier with AI
Related papers
-
Techno line WS 9130-IT Owner's manual
-
Technoline Model User manual
-
Techno line WS 9032 Owner's manual
-
Techno line WS 9273-IT Owner's manual
-
-
Techno line WS9040 Owner's manual
-
-
Technoline WT 188 User manual
-
Technoline Model User manual
-
Technoline WS 9611-IT User manual
Other documents
-
La Crosse DCF-77 Owner's manual
-
TFA 35.1089.IT User manual
-
La Crosse Technology wireless weather station User manual
-
-
TFA Weather Station Owner's manual
-
-
 La Crosse Technology wireless weather station User manual
-
 La Crosse Technology WS9611 User manual
-
 La Crosse Technology WS6158 Owner's manual
-


