Page is loading ...

ProForm
®
BRAND
Drywall Finishing Products
Construction Guide
09 29 00/NGC

2
SECTION PAGE
GREENGUARD Indoor Air Quality Certified
®
. . . . . . . . . . .2
Ready Mix Products . . . . . . . . . . . . . . . . . . . . . . . . . . . . . . . . . . .3
Effects of Environmental Conditions on Drying Times . . . . . .7
Setting Compounds . . . . . . . . . . . . . . . . . . . . . . . . . . . . . . . . . . . .8
Tapes . . . . . . . . . . . . . . . . . . . . . . . . . . . . . . . . . . . . . . . . . . . . . . .10
Materials Estimating & Coverage Information . . . . . . . . . . . .11
Texture Products . . . . . . . . . . . . . . . . . . . . . . . . . . . . . . . . . . . . .12
Five Levels of Finish . . . . . . . . . . . . . . . . . . . . . . . . . . . . . . . . . .14
Problems and Solutions . . . . . . . . . . . . . . . . . . . . . . . . . . . . . . .16
Glossary . . . . . . . . . . . . . . . . . . . . . . . . . . . . . . . . . . . . . . . . . . . .21
Submittal Sheet information . . . . . . . . . . . . . . . . . . . . . . . . . . .23
Table of Contents
Research indicates American
adults spend up to 90 percent
of their time indoors, and that
indoor air is two to five times
more polluted than outdoor air.
That’s why National Gypsum has
achieved GREENGUARD Indoor
Air Quality Certified
®
status
and/or GREENGUARD Children &
Schools Certification
SM
for its
complete line of ProForm
®
BRAND
ready-mixed joint compounds.
The GREENGUARD Certification
Program
SM
is an industry indepen-
dent, third-party program that
has been certifying products for
low non-toxic emissions since
2001. To achieve GREENGUARD
Indoor Air Quality Certified status,
National Gypsum’s products
passed rigorous sample testing
and review of the manufacturing
processes to meet strict standards
set by the GREENGUARD
Environmental Institute (GEI) – a
globally recognized leader in indoor
air quality – to determine their
impact on indoor air pollution.
The GREENGUARD Indoor Air Quality Certified Mark is a registered certification mark
used under license through the GREENGUARD Environmental Institute.
Improving indoor air quality to protect the health and
safety of building occupants and meeting the criteria for
L
EED certification requires a higher standard of quality
and performance. National Gypsum is focused on providing
innovative solutions for sustainable design and green
building practices.

3
ProForm
®
BRAND
Ready Mix Products
ProForm
®
All Purpose
Description
Premixed vinyl-based
compound for the professional
that can be used directly from
the container.
Applications
Taping
Finishing joints
Finishing cornerbead
Spotting fasteners
Repairing cracks in plaster
walls
Skimming/texturing
Features/Benefits
Excellent adhesion/bond
Durable surface
Less pocking and pinholing
Easy to spread
Ready to use
Packaging
61.7 lb. (28 kg) pails
50 lb. (22.7 kg) cartons
61.7 lb. (28 kg) cartons
12 lbs./1 gal. (5.4 kg) pails
West Coast only:
47 lb. (21.3 kg) cartons
Southwest only:
48 lb. (21.8 kg) cartons
Midwest only:
61.7 lb. (28 kg) cartons
Approx. Coverage:
130-140 lbs./1000 sq. ft.
(59-63 kg/93 sq. m)
Availability:
Nationwide
ProForm
®
XP
®
with Dust-Tech
TM
Description
An all purpose joint compound
formulated to reduce airborne
dust by 60% when sanded,
while offering superior mold
resistance and has been
awarded the certification of
GREENGUARD Children &
Schools for indoor air quality
Applications
Taping
Finishing joints
Finishing cornerbead
Spotting fasteners
Repairing cracks in
plastered walls
Skimming/texturing
Features/Benefits
Excellent adhesion/bond
Reduces airborne dust by
60%, saving time with
quick, easy clean-up
Resists the growth of mold
per ASTM G 21 with a score
of 0, the best possible score
Resists the growth of mold per
ASTM D 3273 with a score of
10, the best possible score
Sands without clogging
sandpaper
Visit dust-tech.info for more
information
Packaging
61.7 lb. (28 kg) pails
50 lb. (22.7 kg) cartons
Approx. Coverage:
130-140 lbs./1000 sq. ft.
(59-63 kg/93 sq. m)
Availability:
Nationwide
ProForm
®
Lite Blue
Description
A lightweight joint compound
that is 30% lighter than
conventional All Purpose.
Applications
Finishing joints
Spotting fasteners
Finishing cornerbead
Texturing
Features/Benefits
Reduces shrinkage by up
to 33%
Less pocking and pinholing
Pulls and sands easier
Coats metal beads in only
two coats
Ready to use
Packaging
4.5 gal. (17 L) pails
3.5 gal. (13.2 L) cartons
4.5 gal. (17 L) cartons
Approx. Coverage:
8.2 gals./1000 sq. ft.
(33 L/93 sq. m)
Availability:
Atlantic Region
Northeast Region
Central Region
Midwest Region
ProForm
®
Lite with Dust-Tech
TM
Description
A lightweight joint compound
formulated to reduce airborne
dust by 60% when sanded
and is 30% lighter than con-
ventional All Purpose.
Applications
Finishing joints
Spotting fasteners
Finishing cornerbead
Texturing
Features/Benefits
Reduces shrinkage by up
to 33%
Less pocking and pinholing
Reduces airborne dust by
60%, saving time with
quick, easy clean-up
Sands without clogging
sandpaper
Visit dust-tech.info for more
information
Packaging
4.5 gal. (17 L) pails
3.5 gal. (13.2 L) cartons
4.5 gal. (17 L) cartons
Approx. Coverage:
8.2 gals./1000 sq. ft.
(33 L/93 sq. m)
Availability:
Nationwide
ProForm
®
BRAND is a family of ready to use, drying type joint compounds formulated specifically for the professional drywall finisher. All ProForm joint
compounds deliver high performance relative to less shrinkage, sandability, workability with less “pull,” greater crack resistance, wet edge and open
time, and hand or tool application. All ProForm ready-mixed joint compounds have achieved GREENGUARD Indoor Air Quality Certification status.
ProForm XP with Dust-Tech Ready Mix Joint Compound
has achieved GREENGUARD Children & Schools Certification.
To achieve GREENGUARD Children & Schools Certification, XP Ready Mix met even more stringent emissions
limits that take into account the added sensitivity of children and adults with compromised immune systems.

4
ProForm
®
BRAND
Ready Mix Products
ProForm
®
Lite
Description
A lightweight joint compound
that is 30% lighter than con-
ventional All Purpose.
Applications
Finishing joints
Spotting fasteners
Finishing cornerbead
Texturing
Features/Benefits
Reduces shrinkage by up
to 20%
Less pocking and pinholing
Pulls and sands easier
Coats metal beads in only
two coats
Ready to use
Packaging
4.5 gal. (17 L) pails
3.5 gal. (13.2 L) cartons
4.5 gal. (17 L) cartons
West Coast only:
3.59 gal. (13.6 L) cartons
Approx. Coverage:
8.2 gals./1000 sq. ft.
(33 L/93 sq. m)
Availability:
Nationwide
(excluding Atlantic Region)
ProForm
®
Multi-Use
Description
Designed for all phases of
drywall finishing: taping,
fasteners, finishing, texturing,
trims and cornerbead.
Applications
Taping
Finishing joints
Spotting fasteners
Texturing
Repairing cracks
Finishing cornerbead
Features/Benefits
Less pocking and pinholing
Less shrinkage
Excellent bond for taping
Easy to spread
Ready to use
Packaging
4.5 gal. (17 L) pails
3.5 gal. (13.2 L) cartons
4.5 gal. (17 L) cartons
West Coast only:
46 lb. (20.8 kg) cartons
58 lb. (26.3 kg) pails
Approx. Coverage:
8.2 gal./1000 sq. ft.
(33 L/93 sq. m)
Availability:
Nationwide
ProForm
®
Topping
Description
Designed specifically as a
finish coating used over joint
compound.
Applications
Floating/finishing taped
joints
Spotting nail or screw heads
Finish coat over cornerbead
Texturing
Features/Benefits
Easy working/spreading
Excellent sanding qualities
Ready to use
Packaging
61.7 lb. (28 kg) pails
50 lb. (22.7 kg) cartons
61.7 lb. (28 kg) cartons
West Coast only:
49 lb. (22.2 kg) cartons
Approx. Coverage:
65-70 lbs./1000 sq. ft.
(33 kg/93 sq. m)
Availability:
Southwest Region
Central Region
Midwest Region
Western Region
ProForm
®
Taping
Description
A joint compound specifically
designed to enhance bond
when embedding joint tape or
when applying cornerbeads
and accessories. Taping com-
pound is also an excellent
product for enhanced bond
when laminating wallboard.
Applications
Taping
Adhering cornerbeads
Laminating wallboard
Features/Benefits
Needs no water. Can be
used directly from the
container, saving time
Factory mixed for uniform
consistency
Increased bond when
embedding tape, first coating
cornerbead and laminating
wallboard
Excellent for use with
automatic taping tools
Packaging
61.7 lb. (28 kg) pails
46 lb. (20.8 kg) cartons
Approx. Coverage:
65-70 lbs./1000 sq. ft.
(33 kg/93 sq. m)
Availability:
Central Region
Midwest Region
Western Region

5
ProForm
®
BRAND
Ready Mix Products
ProForm
®
All Purpose Machine Grade
Description
Premixed vinyl-based compound
for the professional that can
be used in automatic taping
and finishing tools directly
from the container.
Applications
Taping
Finishing joints
Spotting fasteners
Repair cracks in plaster walls
Skimming/texturing
Features/Benefits
Designed for use in taping
and finishing tools
Excellent adhesion/bond
Durable surface
Less pocking and pinholing
Easy to spread
Ready to use
Packaging
61.7 lb. (28 kg) pails
50 lb. (22.7 kg) cartons
Approx. Coverage:
130-140 lbs./1000 sq. ft.
(59-63 kg/93 sq. m)
Availability:
Central Region
Midwest Region
Southeast Region
ProForm
®
All Purpose Orange
Description
Premixed vinyl-based compound
for the professional that can
be used in automatic taping
and finishing tools directly
from the container.
Applications
Taping
Finishing joints
Spotting fasteners
Repairing cracks in plaster
walls
Skimming/texturing
Features/Benefits
Designed for use in taping
and finishing tools
Excellent adhesion/bond
Durable surface
Less pocking and pinholing
Easy to spread
Ready to use
Packaging
61.7 lb. (28 kg) pails
Approx. Coverage:
130-140 lbs./1000 sq. ft.
(59-63 kg/93 sq. m)
Availability:
Northeast Region
Atlantic Region
ProForm
®
Heavy Viscosity
Description
An all purpose compound
formulated for the professional
that prefers a heavier viscosity
than standard All Purpose. It
may be used directly from the
container.
Applications
Taping
Finishing joints
Spotting fasteners
Repairing cracks in plaster
walls
Skimming/texturing
Features/Benefits
Excellent adhesion/bond
Durable surface
Less pocking and pinholing
Easy to spread
Ready to use
Packaging
61.7 lb. (28 kg) pails
50 lb. (22.7 kg) cartons
Approx. Coverage:
130-140 lbs./1000 sq. ft.
(59-63 kg/93 sq. m)
Availability:
Southeast Region
Gulf Region
ProForm
®
Taping Lite
Description
A lightweight joint compound
that is 40% lighter than
conventional Taping compound.
Applications
Taping
Adhering cornerbeads
Laminating wallboard
Features/Benefits
Lightweight. Approximately
40% lighter than standard
taping compound.
Excellent adhesion/bond.
Great for use in taping tools.
Ready to use right from
the container.
Packaging
3.5 gal. (13.2 L) cartons
4.5 gal. (17 L) pails
4.5 gal. (17L) cartons
Approx. Coverage:
8.2 gals./1000 sq. ft.
(33 L/93 sq. m)
Availability:
Central Region
Midwest Region

6
ProForm
®
Texture Grade
Description
An all-purpose, ready-to-use
material specially formulated
for texturing walls and ceilings.
Bonds well with many surfaces
including gypsum panels,
concrete, primed plaster, interior
masonry and non-staining
wood surfaces.
Applications
Any non-aggregated texture
Stipple texture
Knockdown
Orange Peel
Skip Trowel
Features/Benefits
Ready-mixed, easy to apply
Allows great pattern
versatility
Conceals minor cracks and
other minor imperfections
Packaging
61.7 lb. (28 kg) pails
50 lb. (22.7 kg) cartons
Approx. Coverage:
61.7 lbs./500-1,250 sq. ft.
(28 kg/45-112 sq. m)
Availability:
Southwest Region
– carton only
ProForm
®
Concrete Cover Compound
Description
A premixed vinyl base com-
pound specifically formulated
for enhanced bond when
skimming to interior above
grade monolithic concrete
walls, ceilings and columns.
It can be sprayed, brushed,
rolled, trowel-applied or
applied with drywall finishing
boxes and/or taping tools.
Applications
Smoothing or texturing
monolithic concrete ceilings
or columns
Taping
Laminating
First-fill coat on drywall
fasteners beads or trim.
Features/Benefits
Excellent adhesion/bond.
Creates a variety of textures.
Can be sprayed, brushed,
rolled, trowel-applied or
applied with drywall finishing
boxes and/or taping tools.
Dries white.
Ready to use right from
the container.
Packaging
61.7 lb. (28 kg) pails
61.7 lb. (28 kg) cartons
48 lb. (21.8 kg) cartons
Approx. Coverage:
@ 1/16" thickness
48 lbs./64-100 sq. ft.
(21.8 kg/5.9-9.2 sq. m)
61.7 lbs./95-120 sq. ft.
(28 kg/8.8-11 sq. m)
Availability:
Atlantic Region
Gulf Region
Central Region
Midwest Region
ProForm
®
BRAND
Ready Mix Products
Choose The Best ProForm Products For Your Project.
When you want to: Embed Fill or Trim Finish Spot Nails Texture Skim Coat Do Repair
Tape Cornerbeads Joints & Screws Work
You want: Good Tape Low Low Low Shrinkage, Good Bond, Smooth Float, Quick Dry,
Bond Shrinkage Shrinkage Easy Sanding Low Shrinkage Easy Sanding Low Shrinkage
ProForm All Purpose BEST GOOD GOOD GOOD BETTER BETTER BETTER
ProForm XP w/Dust-Tech BEST GOOD GOOD GOOD BETTER BETTER BEST
ProForm Lite Blue GOOD BEST BETTER BEST GOOD BETTER GOOD
ProForm Lite w/Dust-Tech GOOD BEST BETTER BEST GOOD BETTER BEST
ProForm Lite GOOD BEST BETTER BEST GOOD BETTER GOOD
ProForm Multi-Use BETTER BETTER BETTER BETTER GOOD BETTER BETTER
ProForm Topping
Not Recommended
BETTER BEST BETTER BETTER BEST
Not Recommended
ProForm Taping BEST
Not Recommended Not Recommended Not Recommended
GOOD GOOD
Not Recommended
ProForm Taping Lite BEST
Not Recommended Not Recommended Not Recommended Not Recommended Not Recommended Not Recommended
ProForm Machine Grade BEST GOOD GOOD GOOD GOOD GOOD GOOD
All Purpose Orange BEST GOOD GOOD GOOD GOOD GOOD GOOD
ProForm Texture Grade GOOD
Not Recommended Not Recommended Not Recommended
BEST GOOD GOOD

7
Environmental
Conditions
Varying weather conditions can
impact both the quality and
appearance of taped drywall joints.
Relative humidity, plus temperature,
will affect the working characteristics
of all joint compounds.
For bonding of adhesive, joint
treatment, texturing and decorative
finishes, temperatures within the
building should be maintained at
minimum 50˚F (10˚C), both day and
night, during joint finishing and
drying. Adequate ventilation should
be provided to eliminate excess
moisture.
For example, cool wet weather
will slow down the drying process
while hot, dry weather hastens the
drying process. Exposure to winds,
breezes or drafts while drying can
also affect the performance of joint
compounds. Typical problems from
improper drying can be cracking,
excessive shrinkage, ridging and
beading, banding or bond failure.
A further explanation of these condi-
tions is outlined in the “Problems
and Solutions” section of this guide.
Proper precautions at the job site
should always be taken to minimize
the adverse effects of weather on
drying. These precautions will
ultimately reduce the application
time and expense from call backs
a
nd rework.
Storage, Ready Mix
Storage life varies with climatic
conditions, up to 6 months under
good conditions. Store compound
away from extreme cold or heat to
avoid accelerated aging. Regularly
check production dates and rotate
inventory on a first-in, first-out plan.
Ready Mix freezes, allow material
to thaw at room temperature for at
least 24 hours. When thawed, turn
the container upside-down for at
least 15 minutes. Turn pail right side
up, remove lid and immediately
remix with an electric drill. Ready
Mix should be lump free and ready
to use within 1 minute. Discard all
Ready Mix that does not remix to a
lump-free consistency.
Stacking
Ready Mix pails or cartons should
not be stacked more than two
pallets in height.
Note: To ensure best results, only National Gypsum products
should be used together in construction systems. Mixing with
other brands is not recommended.
All National Gypsum joint compounds are formulated without
asbestos and therefore comply with Consumer Product Safety
Standards.
Relative Temperature
Humidity 32° 40° 50° 60° 70° 80° 100°
0% 38/H 28/H 19/H 13/H 9/H 6/H 3/H
20% 2/D 34/H 23/H 16/H 11/H 8/H 4/H
40% 2.5/D 44/H 29/H 20/H 14/H 10/H 5/H
50% 3/D 2/D 36/H 24/H 17/H 12/H 6/H
60% 3.5/D 2.5/D 42/H 29/H 20/H 13.5/H 8/H
70% 4.5/D 3.5/D 2.25/D 38/H 26/H 19.5/H 10/H
80% 7/D 4.5/D 3.25/D 2.25/D 38/H 27/H 14/H
90% 13/D 9/D 6/D 4.5/D 3/D 49/H 26/H
98% 53/D 37/D 26/D 18/D 12/D 9/D 5/D
Note: D = Days (24 hour period) H = Hours
The chart above is a helpful guide in determining approximate drying times for joint
compounds under a variety of humidity/temperature conditions. Shaded area is
below the minimum application temperature requirement of 50°F and is not recom-
mended for the application of joint compound.
Approximate Drying Times: All Purpose/Lite Ready Mix Joint Compound
Joint Compound Drying Times
Mold and Mildew
Growth
ProForm BRAND XP
®
Ready Mix
with Dust-Tech
TM
ProForm BRAND XP
®
Ready Mix with
Dust-Tech
TM
was designed to pro-
vide extra protection against mold
and mildew compared to standard
ready mix compound. When tested
by an independent lab per ASTM D
3273 (“Standard Test Method for
Resistance to Growth of Mold on
the Surface of Interior Coatings
in an Environmental Chamber”),
XP Ready Mix with Dust-Tech
achieved a score of 10, the best
possible score for this test.
ProForm XP with Dust-Tech also
resists the growth of mold per
ASTM G 21 (Standard Practice for
Determining Resistance of
Synthetic Polymeric Materials to
Fungi) with a score of 0, the best
possible score.
When tested in a system with
ProForm
BRAND Paper Joint Tape,
Gold Bond
®
BRAND XP
®
Gypsum
Board or Gold Bond
®
BRAND e
2
XP
®
Interior Extreme
TM
Gypsum Panels,
the XP
®
system achieves a score of
“10” for ASTM D 3273 and a score
of “0” for ASTM G 21. These are
the best possible mold resistant
scores for these tests.
Planning and Prevention
Mold and Mildew Resistance
Planning and prevention is the
most effective way to avert the
growth of mold or mildew. Gypsum
wallboard and finishing products
should be delivered to projects as
near to the time it will be used as
possible. Wallboard delivered to a
job site must be placed under
cover immediately, properly pro-
tected and not exposed to outside
elements such as rain, snow or
other high moisture conditions.
If building materials get wet from
any moisture source, that source
must first be identified and correct-
ed. If mold or mildew growth
occurs, or if you suspect it might
occur due to environmental condi-
t
ions and moisture, a determina-
tion must be made to either
attempt to dry and clean the
affected areas or to replace the
affected materials. Care must be
taken in this evaluation, and if you
do not have the training or experi-
ence to recognize and to make
proper decisions about repair or
removal, you should consult a pro-
fessional.
No material can be considered
“mold proof,” nor is it certain that
any material will resist mold or
mildew indefinitely. When used in
conjunction with good design, han-
dling and construction practices, XP
Ready Mix with Dust-Tech can pro-
vide increased mold resistance ver-
sus standard ready-mixed com-
pounds. As with any building
material, avoiding water exposure
during handling, storage and
installation and after installation is
complete is the best way to avoid
the formation of mold or mildew.

8
ProForm
®
BRAND
Quick Set
T
M
Setting Compounds
ProForm
®
Quick Set
T
M
Compound
Description
Quick setting/hardening com-
pound that is not affected by
humidity once it has set and
dried. Available in 20, 45, 90
and 210 minute set times.
Applications
Use in poor drying conditions
Heavy fills, beads and trims
Can recoat as soon as
previous coat sets
Allows same-day joint
finishing
Features/Benefits
Unaffected by humidity
once set/dried
Low shrinkage
Greater scheduling flexibility
Resists ridging and beading
Visit quick-set.info for more
information
Packaging
25 lb. (11.3 kg) bags
Approx. Coverage:
45-55 lbs./1000 sq. ft.
(22-29 kg/100 sq. m)
Mixing:
Mix 13-14 pts. (6.2-6.6 L)
clean, room temperature,
drinkable water per bag.
Availability:
Nationwide
ProForm
®
Quick Set
TM
Lite Compound
Description
A lightweight setting compound
offering the advantages of a
setting type compound that is
30% lighter and also sandable.
Available in 5, 20, 45, 90 and
210 minute set times.
Applications
Use in poor drying conditions
Heavy fills, beads and trims
Can recoat as soon as
previous coat sets
Allows same-day joint
finishing
Features/Benefits
30% lighter than regular
Quick Set
Easier sanding
Unaffected by humidity
once set/dried
Low shrinkage
Greater scheduling flexibility
Resists ridging and beading
Visit quick-set.info for more
information
Packaging
18 lb. (8.2 kg) bags
Approx. Coverage:
45-55 lbs./1000 sq. ft.
(22-27 kg/100 sq. m)
Mixing:
Mix 11-12 pts. (5.2-5.7 L)
clean, room temperature,
drinkable water per bag.
Availability:
Nationwide
ProForm
®
BRAND Quick Set
TM
Setting Compounds are quick setting (hardening) type compounds that are not affected by humidity once they have set and dried.
They were developed to reduce joint deformities such as ridging and beading and provide shortened joint finishing time. ProFormQuick Set Compounds are
suitable for filling voids left in above-grade interior concrete. Required for finishing joints on exterior soffit board.
ProForm
®
Fire-Shield
®
90 Compound
Description
A setting type compound
designed to provide protection
in fire-stopping penetrations
through fire-rated partitions or
assemblies in both new and
retrofit construction. ProForm
FS 90 seals out smoke, toxic
gas and water, plus it provides
a seal to stop sound and dust
infiltration.
Applications
Seals out smoke, toxic gas
and water
Provides seal to stop sound
and dust infiltration
Features/Benefits
Tinted reddish/pink to
distinguish from other joint
treatment products
Comes in powder form so
that only amount needed
can be mixed (less waste)
Packaging
25 lb. (11.3 kg) bags
Approx. Coverage:
25 lb. bag/850 cu. in.
Mixing:
Mix 12-13 pts. (5.7-6.2 L)
clean drinkable water per
bag. If less than a full bag
will be needed, then plan
on a ratio of 2 parts dry
powder to 1 part water.
Availability:
Nationwide

9
Mixing
M
ix no more compound than can
be applied in the designated set
time. Place the amount of water
recommended on the compound
packaging in a clean 5-gallon pail.
A plastic container is recommended
because of its ease in cleaning
between batches. Add the com-
pound gradually to room tempera-
ture clean, drinkable water. Mix the
compound until it is smooth and
free of lumps. Allow to stand
(soak) for one minute, then remix
until consistency is smooth and
uniform. If a thinner or thicker mix
is desired, add water or powder
sparingly. When power mixing is
used, the motor speed should not
exceed 600 RPM since high speed
and prolonged mixing will shorten
the working time of the product.
Estimated
Working Times
One of the most crucial things for
selecting the proper ProForm
Quick Set Joint Compound is
matching its working time and
setting time ranges to the project.
It should be noted that working
time and setting time are not
the same.
Working Time refers to the
period during which the ProForm
Quick Set is usable for application.
At the end of this time, the material
begins to stiffen and can no longer
be spread easily. Working time
should correspond to the required
time for actual application.
Setting Time refers to the time
after which the applied ProForm
Quick Set Compound will become
adequately hardened so that
another layer can be applied. For
manufactured or modular builders,
the setting time should match your
timetable for moving a floor along
the line.
ProForm
®
BRAND
Quick Set
T
M
Setting Compounds
Limitations
N
ot to be applied over moist
surfaces or surfaces subject to
direct moisture.
Do not mix with any other
material. Use only clean, room
temperature, drinkable water.
Mixing equipment and tools
must be thoroughly cleaned
between batches.
Each fresh batch of compound
must be kept free of previous
batches; otherwise the working
time will be shortened.
High-speed mixing or excessive
mixing will shorten the working
time of the ProForm Quick Set
Compounds.
Do not add water or remix after
compound begins to thicken
and harden.
Cleanup difficulties with
automatic taping tools may
occur when using a setting-type
compound.
Close opened bag as tight as
possible for storage or setting
time may be affected.
Storage life in high humidity
area is 6 months; other areas up
to 12 months maximum.
In cold weather, temperatures
within the building should be
maintained at a minimum 50˚F
(10˚C), both day and night,
during joint finishing. Adequate
ventilation should be provided
to eliminate excess moisture.
Frequently Asked
Questions
1) Why is the product
lumpy after mixing?
Water was added to the ProForm
Quick Set, rather than the com-
p
ound being added to
the water.
ProForm Quick Set was not
allowed to soak (for approximately
one minute) after initial mix
before remixing was initiated.
2) Why is the product
setting much faster than
the advertised range?
Dirty mixing water and/or
application tools.
Excessive mixing of the
compound.
Foreign material (accidentally or
deliberately) added to the mixture.
Mixing water too hot.
3) Why is the product
setting much slower than
the advertised range?
Too much water was used.
Impure water source
(dissolved organics in the water
generally retard the set time).
Foreign material (accidentally or
deliberately) added to the mixture.
Water too cold.
Product was remixed after initial
stiffening began.
4) Why does the product
display weak strength?
Too much water was used.
Foreign material (accidentally or
deliberately) added to the mixture.
APPROXIMATE WORKING TIME VS. SET/HARDENING TIME
Quick Set/ Working Time Set/Hardening Time
Quick Set Lite (Minutes) (Minutes)
5 3–7 10–20
20 15–20 20–40
45 35–45 45–70
90 70–90 90–125
210 180–210 210–280

10
ProForm
®
BRAND
Joint Tapes
ProForm
®
Paper Joint Tape
Description
Conceals and reinforces
wallboard joints. Tape is 2-1/6"
wide and is buffed on both
sides to ensure the best
working qualities and bond.
Center crease allows easy
folding for use in corners.
Can be used with all ProForm
Ready Mix and Quick Set
Setting Compounds.
Packaging
Available in:
75' rolls (22.9 m)
20 rolls per carton
250' rolls (76.2 m)
20 rolls per carton
500' rolls (152.4 m)
10 rolls per carton
Approx. Coverage:
375 ft./1000 sq. ft.
of wallboard
(114 m/93 sq. m)
Availability:
Nationwide
ProForm
®
Fiberglass Joint Tape
Description
A 1.9" wide, self-adhering
fiberglass tape for use with
Quick Set setting compounds.
For use with setting-type
compounds only.
Not recommended for use with
veneer plaster.
Packaging
Available in:
300' rolls (91.4 m)
12 rolls per carton
Approx. Coverage:
375 ft./1000 sq. ft.
of wallboard
(114 m/93 sq. m)
Availability:
Nationwide
ProForm
®
Multi-Flex Tape
Description
A 2" wide combination of joint
tape and metal strips laminated
to form an outside or inside
corner for gypsum wallboard.
It is particularly recommended
for inside corners on cathedral
ceilings, kneewalls, stairways,
or any outside or inside corner
less or greater than 90°. It is
applied with the metal side
to the face of the gypsum
wallboard and is embedded
into the joint compound.
Packaging
Available in:
100' rolls (30.5 m)
10 rolls per carton
Approx. Coverage:
100 linear feet per roll
Availability:
Nationwide
ProForm BRAND Joint Tape is designed for use with ready mixed or setting type compounds to conceal and reinforce joints of interior walls and ceilings.

11
Joint & Corner
Finishing Application
1. ProForm BRAND Quick Set
compounds should be mixed in
accordance with the printed
instructions on the package.
2. A uniformly thin layer of joint
compound should be applied over
the joint approximately 4" wide.
Tape should be centered over the
joint and embedded into the
compound leaving sufficient joint
compound under the tape for
proper bond. Ceiling and wall
angles plus all inside corner angles
should be reinforced with tape
folded to conform to angles and
embedded into the compound.
3. After compound is thoroughly
dry or hard (approximately 24
hours for Regular compound or
2 hours for Quick Set), joint tape
should be covered with a coat of
joint or topping compound. The
compound should be spread over
the tape approximately 3" on each
side and feathered out at edges.
After thoroughly dry, another coat
of joint or topping compound
should be applied with a slight
uniform crown over the joint. This
coat should be smoothed and
feathered approximately 3" beyond
the preceding coat.
4. All inside corners should be
coated with at least one coat of
joint or topping compound and
the edges feathered out.
5. All nail or screw head dimples
should receive three coats. This
may be applied along with each
joint coat.
6. Flanges of wallboard cornerbead
should be concealed by at least
two coats of compound. The second
coat should be feathered out
approximately 9" on both sides
of the exposed metal nose.
7. For joint and corner treatment
with Quick Set Compound, fill joint
and bed tape simultaneously.
After Quick Set Compound has
hardened, apply any ProForm Joint
Compound.
8. For wet sanding, allow each
application of compound to dry or
harden. If dry sanding is performed,
ventilate work area and/or use a
NIOSH/MSHA-approved respirator.
Safety glasses are also recom-
mended. Caution should be used
to avoid roughing the wallboard
paper. All wallboard and treated
areas should be smooth and ready
for decoration.
ESTIMATING TABLE
Perfect Perfect Spray Wall & Ceiling
Ready Mix* Quick Set Spray EM & HF Spray Joint Tape
Quantity per 1,000 sq. ft. of Gypsum Board 140 lbs. 55 lbs. 120 lbs. 50-100 lbs. 50-100 lbs. 350 ft.
ESTIMATING TABLE
Sq. Ft. of Gypsum Board Size
Wall/Ceiling 4’x8’ 4’x10’ 4’x12’ Ready Mix*/lbs. Joint Tape/ft. Quick Set/lbs. Nails/ct. Screws/ct.
100 433 14 35 6 168 90
200 755 28 70 11 294 150
300 10 87 42 105 17 420 240
400 13 10 9 56 140 22 546 300
500 16 13 11 70 175 28 672 390
600 19 15 13 84 210 33 798 456
700 22 18 15 98 245 39 924 528
800 25 20 17 112 280 44 1050 600
900 29 23 19 126 315 50 1218 696
1000 32 25 21 140 350 55 1344 768
1100 35 28 23 154 385 61 1470 840
1200 38 30 25 168 420 66 1596 912
1300 41 33 28 182 455 72 1722 984
1400 44 35 30 196 490 77 1848 1056
1500 47 38 32 210 525 83 1974 1128
*Based on ProForm B
RAND
All Purpose
Materials Estimating & Coverage Guide

12
ProForm
®
BRAND
Texture Products
ProForm
®
Perfect Spray
Description
A decorative texture product
with shredded polystyrene
aggregate for fast spray
application to interior ceiling
surfaces. Available in fine,
medium and coarse textures.
Applications
Interior ceilings that are
formed of new, primed or
previously painted gypsum
wallboard or monolithic
concrete or plaster
Features/Benefits
Easy mixing, low fallout
Works with standard spray
equipment
Greater whiteness, better
hide and bold accent
Provides innovative time/
money savings option to
ordinary painting
Packaging
40 lb. (18.2 kg) bags
Approx. Coverage:
300-400 sq. ft.
(27-37 sq. m)/bag
Mixing:
3-4 gal. (11.3-15.1 L)
water/bag
Availability:
Nationwide
ProForm
®
Perfect Spray EM
Description
A non-aggregated texture
product used to create a wide
range of wall and ceiling
surfaces. When spraying walls,
can be applied without
overspray affecting ceiling.
By adjusting mixture consistency
and/or varying the pressure,
creates an endless variety of
textures – Spray Spatter,
Spatter Knockdown and
Orange Peel.
Applications
Used for both walls and
ceilings
Wall surface should be
finished with a coat of paint
Concrete should be coated
with an alkali-resistant
primer/sealer prior to
texturing
Features/Benefits
Time and money-saving
option to ordinary painted
ceilings
Textures available in several
light-reflecting finishes
Formulated for easy mixing
and easy pumping
Surface can be finished with
a coat of paint
Packaging
50 lb. (22.7 kg) bags
Approx. Coverage:
500-1,500 sq. ft.
(46-139 sq. m)/bag
Mixing:
4-5 gal. (15-19 L)
water/bag
Availability:
Nationwide
(excluding Western Region)
ProForm
®
Wall & Ceiling Spray
Description
A non-aggregated texture
product used to create a wide
range of wall and ceiling
surfaces. When spraying walls,
can be applied without
overspray affecting ceiling.
By adjusting mixture consistency
and/or varying the pressure,
creates an endless variety of
textures – Spray Spatter,
Spatter Knockdown and
Orange Peel.
Applications
Used for both walls and
ceilings
Wall surface should be
finished with a coat of paint
Concrete should be coated
with an alkali-resistant
primer/sealer prior to
texturing
Features/Benefits
Time and money-saving
option to ordinary painted
ceilings
Textures available in several
light-reflecting finishes
Formulated for easy mixing
and easy pumping
Surface can be finished with
a coat of paint
Packaging
50 lb. (22.7 kg) bags
Approx. Coverage:
500-1,500 sq. ft.
(46-139 sq. m)/bag
Mixing:
4-5 gal. (15-19 L)
water/bag
Availability:
Nationwide
For new construction or remodeling, ProForm
®
BRAND offers a complete line of interior ceiling and wall textures. Textures provide an innovative time and
money-saving option to ordinary painting. Textures are available in several light-reflecting finishes which provide a wide range of texturing possibilities
on surfaces such as drywall, concrete, plaster, wood and metal. (Surfaces must be primed with a good quality primer recommended for the substrate.)
ProForm
®
Perfect Spray HF
Description
A non-aggregated texture
product used to create a wide
range of wall and ceiling
surfaces. When spraying walls,
can be applied without
overspray affecting ceiling.
By adjusting mixture
consistency and/or varying the
pressure, creates an endless
variety of textures – Spray
Spatter, Spatter Knockdown
and Orange Peel.
Applications
Used for both walls and
ceilings
Wall surface should be
finished with a coat of paint
Concrete should be coated
with an alkali-resistant
primer/sealer prior to
texturing
Features/Benefits
Time and money-saving
option to ordinary painted
ceilings
Textures available in several
light-reflecting finishes
Formulated for easy mixing
and easy pumping
Surface can be finished with
a coat of paint
Packaging
50 lb. (22.7 kg) bags
Approx. Coverage:
500-1,500 sq. ft.
(46-139 sq. m)/bag
Mixing:
4-5 gal. (15-19 L)
water/bag
Availability:
Central Region
Midwest Region

13
Recommended
Construction
Practices
APPLICATION GYPSUM
WALLBOARD:
Surfaces, including joint-treated areas,
must be smooth, clean and dry.
First apply a coat of sealing primer.
Allow primer to dry thoroughly,
and maintain adequate drying
conditions after application. Primer
is to minimize sagging of gypsum
wallboard and discoloration or
difference in sheen on ceiling
surface. Add dry texture to water.
Use a piston pump or Mono-type
pump with a texture gun.
Minimum 3/4" I.D. material hose.
A hopper-type gun with adequate
air supply is also suitable. Typical
coverage is 8-10 sq. ft. per lb. for
aggregated and 10-30 sq. ft. per
lb. for nonaggregated textures.
Mask appropriate areas before
spraying and promptly remove
overspray from unprotected surfaces
afterward. Follow the instructions of
the spray equipment manufacturer
for adjusting controls and cleaning.
If a second coat is desired, allow
the first coat to dry thoroughly.
Note: Gypsum wallboard ceiling
surfaces to be decorated with
water-thinned spray texture shall
be 1/2" or 5/8" thick and applied
perpendicular to the framing.
Framing shall not exceed 16" o.c.
for Gold Bond
®
BRAND 1/2" Regular
Wallboard and 24" o.c. for 1/2"
High Strength™ Ceiling Board and
Gold Bond
®
BRAND 5/8" Wallboard.
CONCRETE:
Allow concrete to cure for at least
28 days. Clip protruding wire ends
and spot with rust-inhibitive
primer. Remove all form oil, grease
and dirt, or any loose or water-
soluble material. Grind down any
form ridges, and level any remaining
unevenness with ProForm
®
Quick Set Joint Compound. Apply
a coat of alkali-resistant sealing
primer over the entire surface to
be textured.
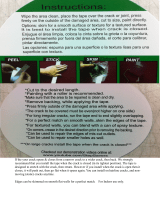
SPRAY TEXTURES
Mixing Water Typical Coverage
ProForm BRAND Application Aggregate Bag Size per Bag per Bag
Perfect Spray ceilings shredded polystyrene 40 lbs. 3–4.5 gal. 300– 400 sq. ft.
Perfect Spray EM walls & ceilings none 50 lbs. 4–5 gal. 500–1,500 sq. ft.
Wall & Ceiling Spray
Perfect Spray HF walls & ceilings none 40 lbs. 3.5–4.5 gal. 400–1,200 sq. ft.
NOTE: Burning Characteristics: Flame Spread–10, Smoke Developed–25
Perfect Spray Fine
Perfect Spray Medium
Perfect Spray Coarse
Perfect Spray EM, HF and Wall & Ceiling Spray
– Spatter + Knockdown
Perfect Spray EM, HF and Wall & Ceiling Spray
– Orange Peel
Perfect Spray EM, HF and Wall & Ceiling Spray
– Spatter

14
to as “fire-taping.” Where a fire-
resistance rating is required for the
gypsum board assembly, details of
construction shall be in accordance
with reports of fire tests of assem-
blies that have met the fire-rating
r
equirement.
Level 2
All joints and interior angles shall
have tape embedded in joint
compound and wiped with a joint
knife, leaving a thin coating of joint
compound over all joints and interior
angles. Fastener heads and acces-
sories shall be covered with a coat
of joint compound. Surface shall
be free of excess joint compound.
Tool marks and ridges are accept-
able. Joint compound applied over
the body of the tape at the time
of tape embedment shall be
considered a separate coat of joint
compound and shall satisfy the
conditions of this level.
Specified where water resistant
gypsum backing board (ASTM
C 1396) is used as a substrate for
tile; may be specified in garages,
warehouse storage or other similar
areas where surface appearance
is not of primary concern.
LEVELS OF FINISH
The following levels of finish are
e
stablished as a guide for specific
final decoration. The minimum
requirements for each level shall
be as described herein.
Level 0
No taping, finishing, or accessories
required.This level of finish may be
useful in temporary construction or
whenever the final decoration
has not been determined.
Level 1
All joints and interior angles shall
have tape set in joint compound.
Surface shall be free of excess joint
compound. Tool marks and ridges
are acceptable.
Frequently specified in plenum areas
above ceilings, in attics, in areas
where the assembly would generally
be concealed, or in building service
corridors, and other areas not
normally open to public view.
Accessories optional at specifier
discretion in corridors and other
areas with pedestrian traffic.
Some degree of sound and smoke
control is provided; in some geo-
graphic areas this level is referred
Levels of Gypsum
Board Finish
The following has been excerpted
from a consensus document
prepared by the Association of the
Wall and Ceiling Industries –
International (AWCI), Ceilings &
Interior Systems Construction
Association (CISCA), Gypsum
Association (GA), Drywall Finishing
Council (DWFC) and Painting and
Decorating Contractors of America
(PDCA) as a guide to gypsum board
finishing. The members of these
international trade organizations
are dedicated to providing the best
possible job for the most reasonable
cost. By incorporating the appropri-
ate sections of this recommended
specification into the project
documents, the architect, general
contractor, and building owner
can better anticipate the final
appearance of the decorated wall
and ceiling system.
This has also been issued by the
Gypsum Association as document
GA-214.
SCOPE
This recommended specification
describes various levels of finish of
gypsum board surfaces prior to the
application of specific types of final
decoration. The recommended level
of finish of gypsum board wall and
ceiling surfaces varies with the final
decoration to be applied and can
also be dependent on their location
in a structure and the type of illu-
mination striking the surface. Each
recommended level of finish is
described with typical applications.
TERMINOLOGY
The following definitions are
a
pplicable to this document.
Accessories: Metal or plastic
beads, trim, or moulding used to
protect or conceal corners, edges,
or abutments of the gypsum
board construction.
C
ritical Lighting:
Strong
sidelighting from windows or
surface-mounted light fixtures
(severe lighting).
Joint Photographing: The
shadowing of the finished joint
areas through the surface
decoration (telegraphing).
Drywall Primer: A paint material
specifically formulated to fill the
pores and equalize the suction
difference between gypsum board
surface paper and the compound
used on finished joints, angles,
fastener heads, and accessories
and over skim coatings.
Skim Coat: A thin coat of joint
compound, or a material manufac-
tured especially for this purpose,
applied over the entire surface to
fill imperfections in the joint work,
smooth the paper texture, and
provide a uniform surface for
decorating. Excess compound is
immediately sheared off, leaving
a film of skim coating compound
completely covering the paper.
Spotting: To cover fastener heads
with joint compound.
Texture: A decorative treatment
of gypsum board surfaces.
Texturing: Regular or irregular
patterns typically produced by
applying a mixture of joint com-
pound and water, or proprietary
texture materials including latex
base texture paint, to a gypsum
board surface previously coated
with primer/sealer.
Five Levels of Finish
Setting Types Drying Types
Quick Set Ready Mix
Level 1
Tape Embedded
Level 2
Tape
Cover
Level 3
Tape
Cover
Fill
Primer
Level 4
Tape
Cover
Fill
Finish
Primer
Level 5
Tape
Cover
Fill
Finish
Primer
National Gypsum Joint Treatment Products
Used To Achieve The Levels Of Finish
Lite
Regular
All Purpose
Topping
Compound
Lite
Multi-Use

15
specified for new gypsum board
surfaces prior to the application
of texture materials and gloss,
semi-gloss and flat latex wall paints.
An alkali and moisture-resistant
primer and a tinted enamel
undercoat may be required under
enamel paints. Consult with the
finish paint manufacturer for
specific recommendations.
For wallcoverings: White, selfsizing,
water base, “universal” (all purpose)
wallcovering primers have recently
been introduced into the market-
place for use on new gypsum
board surfaces. These products are
claimed to minimize damage if
wallcoverings are subsequently
removed, bind poor latex paint,
allow hanging over glossy surfaces
and existing vinyls, hide wall colors,
and to be water washable.
TEXTURING
Texture material is applied by brush,
roller, spray, or trowel, or a combi-
nation of these tools, depending on
the desired result. Textured wall
surfaces are normally overpainted
with the desired finish; overpainting
of textured ceiling surfaces may
not be deemed necessary where an
adequate amount of material is
applied to provide sufficient hiding
properties.
Tool, Marks and Ridges
A smooth surface may be achieved
by lightly sanding or wiping joint
compound with a dampened
sponge. Care shall be exercised to
ensure that the nap of the gypsum
board facing paper is not raised
during sanding operations. For
additional information on the
finishing of gypsum board surfaces
consult ASTM Standard C 840.
A Word About Drywall Primer
The guidelines for these levels of fin-
ishing were prepared by AWCI, CISCA,
GA and PDCA. The specification
describes a drywall primer as “a
paint material specifically formulated
to fill the pores and equalize the
suction difference between gypsum
board surface paper and the
compound used on finished joints,
angles, fastener heads and
accessories over skim coatings.”
are specified or where severe
lighting conditions occur.
This highest quality finish is the
most effective method to provide a
uniform surface and minimize the
possibility of joint photographing
and of fasteners showing through
the final decoration.
COMMENTS
Critical (Severe) Lighting Areas
Wall and ceiling areas abutting
window mullions or skylights, long
hallways, or atriums with large
surface areas flooded with artificial
and/or natural lighting are a few
examples of critical lighting areas.
Strong sidelighting from windows
or surface-mounted light fixtures
may reveal even minor surface
imperfections. Light striking the
surface obliquely, at a very slight
angle, greatly exaggerates surface
irregularities. If critical lighting
cannot be avoided, the effects can
be minimized by skim coating the
gypsum board surfaces, by decorat-
ing the surface with medium to
heavy textures, or by the use of
draperies and blinds which soften
shadows. In general: gloss, semi-
gloss, and enamel finishes high-
light surface defects; textures hide
minor imperfections.
Manufacturer
Recommendations
The recommendations of individual
manufacturers of gypsum board,
joint tapes and compounds, acces-
sories, drywall primers, wallcoverings,
adhesives, texture materials, and
paints may vary from what is
recommended herein and as such
are not a part of this recommended
specification.
DRYWALL PRIMER
Applied as a first coat to the entire
prepared gypsum board surface
with brush, roller, or spray, prior to
decoration. Where final appearance
is critical, the application of high
quality, high solids, drywall primer
will minimize most decorating
problems.
For finish paints: A good quality,
white, latex drywall primer formu-
lated with higher binder solids,
applied undiluted, is typically
Level 3
All joints and interior angles shall
have tape embedded in joint
compound and one additional coat
of joint compound applied over all
joints and interior angles. Fastener
heads and accessories shall be
covered with two separate coats of
joint compound. All joint compound
shall be smooth and free of tool
marks and ridges. Note: It is
recommended that the prepared
surface be coated with a drywall
primer prior to the application
of final finishes. See painting/
wallcovering specification in this
regard.
Typically specified in appearance
areas which are to receive heavy-
or medium- texture (spray or
hand applied) finishes before final
painting, or where heavy-grade
wallcoverings are to be applied as
the final decoration. This level of
finish is not recommended where
smooth painted surfaces or light to
medium wallcoverings are specified.
Level 4
All joints and interior angles shall
have tape embedded in joint
compound and two separate coats
of joint compound applied over all
flat joints and one separate coat of
joint compound applied over interior
angles. Fastener heads and acces-
sories shall be covered with three
separate coats of joint compound.
All joint compound shall be smooth
and free of tool marks and ridges.
Note: It is recommended that the
prepared surface be coated with a
drywall primer prior to the application
of final finishes. See painting/ wall-
covering specification in this regard.
This level should be specified
where flat paints, light textures, or
wallcoverings are to be applied.
In critical lighting areas, flat paints
applied over light textures tend to
reduce joint photographing. Gloss,
semi-gloss, and enamel paints are not
recommended over this level of finish.
The weight, texture, and sheen
level of wallcoverings applied
over this level of finish should be
carefully evaluated. Joints and
fasteners must be adequately con-
cealed if the wallcovering material
is lightweight, contains limited
pattern, has a gloss finish, or any
combination of these finishes is
present. Unbacked vinyl wall-
coverings are not recommended
over this level of finish.
Level 5
All joints and interior angles shall
have tape embedded in joint
compound and two separate coats
of joint compound applied over all
flat joints and one separate coat of
joint compound applied over interior
angles. Fastener heads and acces-
sories shall be covered with three
separate coats of joint compound. A
thin skim coat of joint compound, or
a material manufactured especially
for this purpose, shall be applied to
the entire surface. The surface shall
be smooth and free of tool marks
and ridges. Note: It is recommended
that the prepared surface be coated
with a drywall primer prior to the
application of finish paint. See
painting specification in this regard.
This level of finish is highly recom-
mended where gloss, semi-gloss
enamel or nontextured flat paints

16
Conditions
JOINT PROBLEMS
Tape Photographing
S
tarved Joint
High Joint
Beading/Ridging
NAIL PROBLEMS
Nail Pops
Depressed Nails
Probable Cause
Slow drying of finishing coats. Too
much compound under tape. Joint
compound too thin.
Compound applied too thin in
viscosity and thickness. Too little
compound over joint. Excessive
sanding.
Excess joint compound under the
tape. Excess joint compound over
the tape and improper feathering.
Poor framing. Improper wallboard
application. Improper sanding. Use
of compound too heavy.
Lumber expansion and contraction.
Improper heating and ventilation.
Cold weather with high humidity.
Improper application of wallboard.
Excess compound over joints and
needless wide joints. Rough or
poorly cut butt joint.
Framing out of alignment. Lumber
shrinkage. Improper wallboard
application. Improper heating and
ventilation.
Framing out of alignment.
Lumber expansion due to moisture
absorption. Improper wallboard
application. Too few nails, improper
furring, structural movement.
Nails dimpled too deeply.
Preventive Action
Correct drying conditions. Embed
tape properly. Use joint compound
thicker. Use ProForm
BRAND Joint
Tape.
Use finishing compound at heavier
viscosity and proper thickness of
coats. Do not over-sand.
Proper thickness of compounds
for taping and finishing. Feather
finishing coats wider than previous
coats. Correct poor framing and
improper wallboard application to
ensure proper alignment. Sand
properly.
Use Quick Set System to
minimize beading or ridging.
Alternatives include: double-layer
lamination system.
Provide heat and ventilation to dry
framing lumber. Align framing
lumber. Nail center of wallboard
first. Hold wallboard firm to nailing
member when nailing. Use proper
nails. Check all nails before nail
spotting. Systems recommended to
reduce or eliminate nail pops
include: double-layer lamination,
double nailing system, floating
angle system, adhesive nail-on
system and screw application.
Align framing lumber. Allow dry
lumber to become acclimated.
Correct wallboard application as
described for nail pops. Use proper
nail spacing. When furring, use no
less than 2" x 2". Use systems
recommended to reduce or elimi-
nate nail pops. Avoid fracturing
paper when driving nails.
Corrective Action
Sand down the tape outline and
seal. Refloat if necessary before
decoration. Prevent finish coat
moisture from re-wetting the tape
by applying a thinner coat for fast
drying.
Allow to thoroughly dry, then apply
an additional coat of topping or
joint compound.
Sand joint to near flush without
sanding into tape. Apply a wider
finishing coat properly feathered, if
necessary. Apply a second finishing
coat or skim coat.
Allow one full heating cycle -- six
months to one year -- before
repairing, then sand ridge flush
and apply one or more finishing
coats of joint or topping com-
pound. Use critical lighting to
determine if bead is eliminated
prior to decoration.
When nail pops occur before deco-
ration, repair immediately. If problem
occurs after decoration, repair after
framing lumber is dry (usually one
heating cycle). To repair, drive a
GWB-54 nail 1-1/2" from each
side of popped nail while holding
wallboard firm to the nailing
member. Countersink popped nail,
remove loose joint compound,
then apply finishing coats of joint
or topping compound.
Repair as described for nail pops,
unless most nails are depressed
and wallboard is loose (usually
ceilings). Re-nail entire surface
using proper spacing. Dimple
depressed nails and apply finishing
coats of joint or topping com-
pound.
Problems and Solutions

17
Conditions
PAPER PROBLEMS
Joint Blisters
Wallboard Blisters
End Ply Separation
CRACKING PROBLEMS
Edge Cracking
Cracking
Inside Corner Cracking
Probable Cause
Too little joint compound under
tape. Joint compound too dry
before embedding tape. Improper
bedding of the tape into the joint
compound. Loss of bond (see bond
failure). End ply separation.
Ruptured wallboard ends or edges.
Joints too wide and unfilled.
Usually caused by ruptured board.
Mishandling of wallboard,
especially when damp or wet.
Fast drying with low humidity.
Rapid temperature and humidity
changes. Improper application.
Joint compound too thin or too
heavy under tape. Edges of tape
too thick. Excessive wet expansion
and contraction of joint tape. Poor
bond (see Bond Failure).
Adverse drying conditions. High
temperatures and low humidity
and drafts or low temperature and
high humidity. Joint or topping
compound applied in excessive
thickness.
Joint too wide or not filled.
Improper drying between coats.
Excess thickness of compound over
tape at apex of corner. Extremely
fast or slow drying conditions.
Applying compound to both sides
of inside corner at same time.
Preventive Action
Follow joint compound mixing and
application instructions. Embed
tape properly into ample joint
compound. Cut out any ruptured
ends or edges of wallboard and fill
all wide holes and joints with
Quick Set prior to taping (see end
ply separation).
Check field of board prior to deco-
ration for imperfections. Make any
necessary repairs.
Allow wallboard to thoroughly
dry, tear back all loose face paper
prior to taping.
Correct drying conditions to avoid
rapid surface drying. Keep tempera-
tures and humidity as consistent as
possible by controlling ventilation.
Use roller to wet joints with water
prior to each joint treatment opera-
tion. Use Quick Set or ProForm
joint compounds and tape. Embed
tape properly, avoiding excessive
compound under tape (maximum
of 1/32" thickness of compound
under edges of tape) and wipe
down tape immediately. Use job
prevention for bond problems.
Fill all wide wallboard joints
with Quick Set. Correct drying con-
ditions. Apply thinner layers of joint
or topping compound. Allow thor-
ough drying between layers.
Fill wide joints with Quick Set prior
to taping. Embed tape properly,
allow to dry. Apply compound to
one side and allow to dry, then
treat other side.
Corrective Action
Repair tape blisters by slitting and
filling with joint compound and
smooth out with finishing knife.
Cut out other loose areas, fill with
joint compound when necessary.
Let dry, then re-tape and finish.
Before decoration, cut out loose
area, fill flush with joint compound,
if deep. Tape and finish.
After joints are finished, determine
the distance of looseness from the
mill end. Make a cut on each side
of the tape across the wallboard
and a cut at each end, forming a
rectangle around the loose area.
Peel off loose paper, tape joint.
Once dry, fill flush with joint
compound. After compound dries,
finish with one or more coats of
joint or topping compound, feath-
ering beyond the cutout area.
Correct drying conditions during
repairs and painting when edge
cracks appear before second finish-
ing coat. Brush one or two coats
of good quality flat latex paint about
4" wide over tape, then apply finish-
ing coat. When cracks appear after
finishing coat or painting, apply two
or more coats of good quality flat
latex paint over cracks that are flush
with surface to bridge them before
decoration. Where cracks are curled,
groove out cracks and apply one
coat of flat latex paint. Once dry,
fill with Quick Set or ProForm
joint compound.
Additional coats of joint or topping
compound will fill the cracks with-
out reoccurrence.
Fill wide cracks with joint or top-
ping compound. For hairline cracks,
run a pointed object (10D or 16D
nail) along the apex of corner with
adequate pressure to close crack.

18
Conditions
CRACKING PROBLEMS (cont.)
Bond Failure
Discoloration/Banding
Dirt Collection
Variation in
Surface Textures
Joint Darkening
or Lightening
Joint Yellowing
TEXTURING PROBLEMS
Lumping
Mix Too Thin
Aggregate Fallout
(During Spraying)
Aggregate Floatout
Probable Cause
Improper heating and drying condi-
tions. Old stock. Excessive thinning
of compounds. Too little compound
under tape. Unbuffed joint tape.
Oily surfaces. Mixing with dirty or
excessively cold water. Compound
too dry before embedding tape.
Dirt collection may occur more
rapidly over nail or screw heads,
nailing members or over voids in
insulation due to a greater heat
loss and condensation.
Failure to sand properly, causing
scratching of compound and
scuffing of the wallboard paper.
No primer or poor quality primer.
Over-thinning of primer. Spray
application of primer.
Joints not dry when painted.
Painting under humid conditions.
Painting with low-grade latex and
paints. Suction variations of joint
compounds.
Slow drying. Fumes from partially
combusted gases. Painting over wet
joints and high alkaline material.
Too much water added to initial
mix. Adding water to powder.
Too much water added in initial
mix or inadequate soaking time in
cold water.
Spray gun too close to surface
and/or excessive air pressure at
nozzle.
Too much water added during ini-
tial mix and/or inadequate mixing
after initial water is added.
Preventive Action
Proper drying conditions. Mix in
clean container with clean tap water.
Rotate stocks. Avoid over-thinning
of compound and removing too
much compound from under tape.
Use Quick Set or ProForm
compounds and tape.
Two-layer laminated system.
Foil-backed gypsum board. Proper
insulation. Eliminate protrusion of
nails through wood furring on
exterior walls and ceiling.
Use finer grit sandpaper with care
to prevent raising nap of paper. Use
wet sanding method. Prime all sur-
faces with a quality drywall primer
as directed. Brush or roll primer.
Back roll after spray application.
Allow joints to thoroughly dry.
Avoid painting under extremely
high humidity conditions. Use
National Gypsum Joint Treatment
products. Prime entire surface with
quality drywall primer prior to
applying texture finish as finish
decoration. Apply two coats of
good quality latex paint.
Use permanent heat in cold
weather. Avoid painting over wet
joints. Avoid painting in high
humidity conditions.
Add powder to water using less
water than initially specified. After
mix is smooth and lump-free, add
remaining water to adjust mix to a
workable viscosity.
Use recommended water require-
ments in initial mix. Allow mixed
ingredients to soak for several
minutes, when necessary, if using
cold water.
Hold spray gun at proper distance
and angle from surface to
prevent aggregate fallout.
Use recommended water require-
ments and make sure water is
properly blended into mix.
Corrective Action
Remove all loose joint tape and
compounds by sanding or scraping
and repair as necessary.
Wash or repaint. Decrease dust
particles in the air by filtration in
forced air heating and exhaust
fans in kitchen.
When condition exists after paint-
ing, sand as necessary and prime
before finish coat of paint.
Allow thorough drying. Select test
area where condition is most
prevalent and repaint with good
quality sealing latex primer. If con-
dition persists, apply a good quality
primer/sealer, then repaint.
Apply a good quality primer/sealer,
then repaint.
Add powder until mix thickens.
Continue mixing until lumps
disappear.
Add powder until mix thickens.
Lower air pressure. Hold spray gun
at proper distance and angle from
surface to prevent excessive fallout.
Add powder until mix thickens.

19
Conditions
TEXTURING PROBLEMS (cont.)
Poor Coverage
P
oor Hide
Poor Bond or Hardness
Clogged Spray Equipment
Material Pumping Problems
Unsatisfactory Spray Pattern
Texture Buildup
Joint Show-Through
Joint Shows Through
As White Band
Probable Cause
Mix too thick for proper spray vis-
cosity and/or improper application
such as spraying too slow, over-
loading surface with spray material
and using incorrect spray pressures.
Over-thinned mix causing a reduc-
tion in both wet and dry hide. Mix
too thick causing poor atomization
resulting in surface show-through.
Improper application/over-extending
spray. Selecting improper spray
pressures. No primer used prior to
texturing.
Over-thinned mix results in
over-dilution of latex binder in
spray texture. Improper surface
preparation. Contamination with
other materials.
Contamination of mix with over-
sized particles can sometimes clog
spray nozzle orifice.
Mixed spray material too heavy.
Pump equipment old and worn.
Equipment improper size for spray
product.
Worn spray equipment (either fluid
or spray nozzle) and/or improper
air pressure. Improper spray
technique and/or poor spray mix
consistency.
Spraying or texturing over surfaces
with major differences in surface
porosity or suction (improperly
primed). Thin texture will tend to
build up over high suction surfaces.
Over-extended and over-thinned
primer won’t adequately hide the
contrast between finished joints
and gypsum wallboard paper.
Spraying over unprimed surfaces
during cool, humid, slow drying
conditions. Joint stays white, water
solubles in gypsum wallboard
paper bleed through.
Preventive Action
Use recommended water volume
for mixing to ensure sprayable vis-
cosity. Use proper spray application
to ensure uniform dispersion of
aggregate and proper coverage.
Use recommended water volume
for mixing to ensure sprayable vis-
cosity. Use proper spray application
to ensure uniform dispersion of
aggregate and proper coverage.
Use a good quality drywall primer.
Use recommended water volume
for mixing. Remove all loose
material, dust, grease, oil and prime
surface with a quality drywall primer.
Do not intermix with other products.
Always use a clean mixing contain-
er and clean water.
Prevent contamination during
mixing and spraying. Use correct
nozzle size for aggregate being
sprayed.
Use recommended water volume
for mixing. Make sure proper
equipment is being used and that
spray machine is in good repair.
Inspect spray nozzles to ensure
good working condition. Replace
any worn parts.
Prime entire surface with a good
quality drywall primer. Follow
mixing instructions.
Use recommended water volume
when mixing texture and apply at
recommended coverage rates.
Prime surface with a good quality
drywall primer prior to application
of spray texture.
Prime surface with a good quality
drywall primer before applying
texture.
Corrective Action
Carefully add water to mix. Use
proper spray techniques. Adjust
spray pressure.
Add powder or water depending
on mix consistency. Adjust spray
pressure. Use proper spray
technique. Apply finished paint
over textured surface.
Scrape down surface and repeat
application following recommenda-
tions under “Prevention.”
Check mix for contamination and/or
oversized particles. If contaminated,
screen out contaminants or discard
and remix new batch.
Thin mix if too heavy for pumping.
Improve spraying technique. Add
recommended water volume to
ensure proper spraying consistency.
Remove all texture from sprayed
surface and re-apply following
instructions under “Prevention.”
Allow spray to thoroughly dry, then
prime with a quality drywall primer
and re-spray or paint textured
surface.
Allow spray to thoroughly dry, then
paint textured surface.

20
Conditions
SHRINKAGE PROBLEMS
Shrinkage
Delayed Shrinkage
Misinterpreted
Shrinkage
MISCELLANEOUS PROBLEMS
Pock Marking
Probable Cause
Compound used too thin or
watery. Applied too soon after
mixing. Improper drying between
coats. Painting before joints are
thoroughly dry. Too deep fills in
one coat. Slow drying.
Improper drying conditions.
Painting before compound and
wallboard are thoroughly dry.
Under high humidity, slow drying
conditions, joints and wallboard
may hold moisture for weeks.
Improper wallboard application
including: nails dimpled too deep,
fractured core of wallboard,
fractured face paper, corner bead
applied improperly, tape photo-
graphing.
Entrapment of air in the mixed
compound and in application.
Over-mixing of compound.
Compound mixed too thin. Heavy
fills. Improper application technique.
Compound applied too loosely.
Preventive Action
Use compound at heaviest
workable consistency. Allow to
stand before using. Allow thorough
drying of compound between
coats and prior to painting. Apply
additional coats on deep fills.
Provide proper drying.
Provide proper drying conditions.
Allow complete drying before each
coat of joint treatment and before
repainting.
Less dimple of nails. Press wallboard
snug to nailing member before
dimpling nail. Use Gold Bond
Gypsum Wallboard. Re-nail where
necessary. Use Quick Set com-
pound for at least the first coat on
nails and corner bead. (See tape
photographing.)
Mix compound as quickly as possible
and let stand until binder is in solu-
tion before remixing. Mechanical
mixers should have 500 RPM
maximum. Use heavier mix. Make
additional passes over joints and
bead with hand or mechanical
tools. File trowel edges square
regularly to avoid entrapment in
application. Apply compound
thinly and use more pressure on
finish coat.
Corrective Action
Allow to thoroughly dry and re-coat.
Provide proper drying.
Allow to thoroughly dry and re-coat
affected joints.
Nails: re-nail where necessary. Cut
out any loose areas and fill with
two or more coats of Quick Set or
regular joint compound. Re-coat
corner bead. (See tape photo-
graphing.)
Remove sanding dust that may
collect in “pocks” prior to painting
and refloat joint as necessary. When
condition exists after painting, float
with compound and repaint.
/