Whynter CBM-815WS User manual
- Category
- Drink coolers
- Type
- User manual
This manual is also suitable for
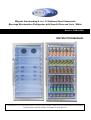
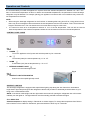
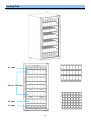
Whynter CBM-815WS is a freestanding commercial beverage merchandiser refrigerator with a capacity of 231 standard 12 oz. cans, featuring a stainless steel trimmed glass door, a luxurious curved handlebar, and digital temperature control with a range of 34°F - 43°F. It also includes a superlit door lighting strip with energy-efficient LED soft white light bulbs, internal fan-forced circulation, and wheel rollers for easy mobility.
Whynter CBM-815WS is a freestanding commercial beverage merchandiser refrigerator with a capacity of 231 standard 12 oz. cans, featuring a stainless steel trimmed glass door, a luxurious curved handlebar, and digital temperature control with a range of 34°F - 43°F. It also includes a superlit door lighting strip with energy-efficient LED soft white light bulbs, internal fan-forced circulation, and wheel rollers for easy mobility.


-
 1
1
-
 2
2
-
 3
3
-
 4
4
-
 5
5
-
 6
6
-
 7
7
-
 8
8
-
 9
9
-
 10
10
-
 11
11
-
 12
12
-
 13
13
-
 14
14
-
 15
15
-
 16
16
-
 17
17


Whynter CBM-815WS User manual
- Category
- Drink coolers
- Type
- User manual
- This manual is also suitable for
Whynter CBM-815WS is a freestanding commercial beverage merchandiser refrigerator with a capacity of 231 standard 12 oz. cans, featuring a stainless steel trimmed glass door, a luxurious curved handlebar, and digital temperature control with a range of 34°F - 43°F. It also includes a superlit door lighting strip with energy-efficient LED soft white light bulbs, internal fan-forced circulation, and wheel rollers for easy mobility.
Ask a question and I''ll find the answer in the document
Finding information in a document is now easier with AI
Related papers
Other documents
-
DeLOCK 46113 Datasheet
-
Summit SCR2466PNR User manual
-
-
-
Avanti BCA5105SG-1 Instruction Manual: Model BCA5105SG-1 - Beverage Cooler with Glass Door
-
-
Avallon ABR151BLSS User manual
-
-
-
Vinotemp VT-DSODREF Owner's manual