Estate IS25AFXRD02 Owner's manual

Category
Fridges
Type
Owner's manual

This manual is also suitable for

by Whirlpool Corporation
REFRIGERATORUSE &CAREGUIDE
MANUALDEUSOYCUIDADODELREFRIGERADOR
p p
GUIDED'UTILISATIONETffENTRET N DUREFRIGERATEUR
Table of Contents /Indice / Table des matibres
ASSISTANCE OR SERVICE ............................ 1
REFRIGERATOR SAFETY ............................... 2
INSTALLATION INSTRUCTIONS ................... 3
REFRIGERATOR USE ..................................... 6
REFRIGERATOR CARE ................................... 8
TROUBLESHOOTING ...................................... 9
WATER FILTER CERTIFICATIONS .............. 11
PRODUCT DATA SHEETS ............................ 12
WARRANTY .................................................... 13
AYUDA O SERVICIO TECNICO .................... 14
SEGURIDAD DEL REFRIGERADOR ............ 14
INSTRUCCIONES DE INSTALACION .......... 15
USO DE SU REFRIGERADOR ...................... 18
CUIDADO DE SU REFRIGERADOR ............. 21
SOLUCION DE PROBLEMAS ....................... 22
HOJA DE DATOS DEL PRODUCTO ............ 25
GARANTIA ...................................................... 26
ASSISTANCE OU SERVICE .......................... 27
SleCURITle DU RleFRIGleRATEUR ................ 27
INSTRUCTIONS D'INSTALLATION .............. 28
UTILISATION DU RleFRIGleRATEUR ........... 31
ENTRETIEN DU RleFRIGleRATEUR ............. 34
DlePANNAGE .................................................. 35
FEUILLES DE DONNleES SUR
LE PRODUlT ................................................... 38
GARANTIE ...................................................... 39
Assistance or Service
If you need assistance or service, first see the "Troubleshooting"
section. Additional help is available by calling us at
1-800-253-1301 from anywhere in the U.S.A., or write:
Whirlpool Corporation
Customer eXperience Center
553 Benson Road
Benton Harbor, MI 49022-2692
Please include a daytime phone number in your correspondence.
Keep this book and your sales slip together for future
reference. You must provide proof of purchase or installation
date for in-warranty service.
Write down the following information about your appliance to help
you obtain assistance or service if you ever need it. You will need
to know your complete model number and serial number. You can
find this information on the model and serial number label, located
on the inside wall of the refrigerator compartment.
Dealer name
Serial number
Address
Phone number
Model number
Purchase date
Toorder replacement filters, call 1-800-442-9991 and ask for the
part number listed below or contact your authorized Whirlpool
dealer.
Stainless Steel Cleaner and Polish: Order Part #4396095
Standard Base Filter Cartridge:
Order Part #4396508 (NL240/L400)
2318598
REFRIGERATORSAFETY
Your safety and the safety of others are very important.
We have provided many important safety messages in this manual and on your appliance. Always read and obey all safety
messages.
This is the safety alert symbol.
This symbol alerts you to potential hazards that can kill or hurt you and others.
All safety messages will follow the safety alert symbol and either the word "DANGER" or "WARNING."
These words mean:
You can be killed or seriously injured if you don't immediately
follow instructions.
You can be killed or seriously injured if you don't follow
instructions.
All safety messages will tell you what the potential hazard is, tell you how to reduce the chance of injury, and tell you what can
happen if the instructions are not followed.
IMPORTANT SAFETY INSTRUCTIONS
WARNING: To reduce the risk of fire, electric shock, or injury when using your refrigerator, follow these basic precautions:
Plug into a grounded 3 prong outlet.
Do not remove ground prong.
Do not use an adapter.
Do not use an extension cord.
Disconnect power before servicing.
Replace all parts and panels before operating.
Remove doors from your old refrigerator.
Use nonflammable cleaner.
Keep flammable materials and vapors, such as gasoline,
away from refrigerator.
Use two or more people to move and install refrigerator.
Disconnect power before installing ice maker (on ice maker
kit ready models only).
Use a sturdy glass when dispensing ice (on some models).
SAVE THESE INSTRUCTIONS
ProperDisposal ofYourOldRefrigerator
Suffocation Hazard
Remove doors from your old refrigerator.
Failure to do so can result in death or brain damage.
IMPORTANT: Child entrapment and suffocation are not problems
of the past. Junked or abandoned refrigerators are still dangerous
- even if they will sit for "just a few days." Ifyou are getting rid of
your old refrigerator, please follow these instructions to help
prevent accidents.
Before You Throw Away Your Old Refrigerator or Freezer:
Take off the doors.
Leave the shelves in place so that children may not easily
climb inside.
INSTALLATIONINSTRUCTIONS
Excessive Weight Hazard
Use two or more people to move and install
refrigerator.
Failure to do so can result in back or other injury.
If the ice storage bin is located on the door, remove the
temporary shield from underneath the ice storage bin. See
"Ice Maker and Storage Bin."
Remove packaging materials. Do not use sharp instruments,
rubbing alcohol, flammable fluids, or abrasive cleaners to
remove tape or glue. These products can damage the surface
of your refrigerator. For more information, see "Refrigerator
Safety."
NOTE: It is recommended that you do not install the refrigerator
near an oven, radiator, or other heat source. Do not install in a
location where the temperature will fall below 55°F (13°C).
/
1/2" (1.25 crn)
II -- I_;I
JL
/
,Z
/
/
/
/
/
2" {5.08 cm)
When Moving Your Refrigerator:
Your refrigerator is heavy. When moving the refrigerator
for cleaning or service, be sure to protect the floor.
Always pull the refrigerator straight out when moving it.
Do not wiggle or "walk" the refrigerator when trying to move
it, as floor damage could occur.
important information to know about glass shelves
and covers:
Do not clean glass shelves or covers with warm water when
they are cold. Shelves and covers may break if exposed to
sudden temperature changes or impact, such as bumping.
For your protection, tempered glass is designed to shatter
into many small, pebble-size pieces. This is normal. Glass
shelves and covers are heavy. Use special care when
removing them to avoid impact from dropping.
Explosion Hazard
Keep flammable materials and vapors, such as
gasoline, away from refrigerator.
Failure to do so can result in death, explosion, or fire.
To ensure proper ventilation for your refrigerator, allow for W'
(1.25 cm) space on each side and at the top. When installing your
refrigerator next to a fixed wall, leave 2" (5.08 cm) minimum on
each side (depending on your model) to allow for the door to
swing open. If your refrigerator has an ice maker, allow extra
space at the back for the water line connections.
Electrical Shock Hazard
Plug into a grounded 3 prong outlet.
Do not remove ground prong.
Do not use an adapter.
Do not use an extension cord.
Failure to follow these instructions can result in death,
fire, or electrical shock.
Before you move your refrigerator into its final location, it is
important to make sure you have the proper electrical connection.
Recommended Grounding Method
A 115 Volt, 60 Hz., AC only 15- or 20-amp fused, grounded
electrical supply is required. It is recommended that a separate
circuit serving only your refrigerator be provided. Use an outlet
that cannot be turned off by a switch. Do not use an
extension cord.
NOTE: Before performing any type of installation, cleaning, or
removing a light bulb, turn the control (Thermostat, Refrigerator or
Freezer Control depending on the model) to OFF and then
disconnect the refrigerator from the electrical source. When you
are finished, reconnect the refrigerator to the electrical source and
reset the control (Thermostat, Refrigerator or Freezer Control
depending on the model) to the desired setting.
_1_ __O_)_ L;_._<-_,,,_, _,.._.....
, <
Gather the required tools and parts before starting installation.
Read and follow the instructions provided with any tools listed
here.
TOOLS NEEDED:
Flat-blade screwdriver %" Drill bit
7A6"and _A"Open-end or two Hand drill or electric drill
adjustable wrenches (properly grounded)
_/4"nut driver
NOTE: Your refrigerator dealer has a kit available with a 1/4"
(6.35 mm) saddle-type shutoff valve, a union, and copper tubing.
Before purchasing, make sure a saddle-type valve complies with
your local plumbing codes. Do not use a piercing-type or 3/_6"
(4.76 mm) saddle valve which reduces water flow and clogs more
easily.
IMPORTANT:
All installations must meet local plumbing code requirements.
Use copper tubing and check for leaks. Install copper tubing
only in areas where the household temperatures will remain
above freezing.
Water Pressure
A cold water supply with water pressure of between 30 and
120 psi (207 and 827 kPa) is required to operate the water
dispenser and ice maker. Ifyou have questions about your water
pressure, call a licensed, qualified plumber.
Reverse Osmosis Water Supply
IMPORTANT: The pressure of the water supply coming out of a
reverse osmosis system going to the water inlet valve of the
refrigerator needs to be between 30 and 120 psi (207 and
827 kPa).
If a reverse osmosis water filtration system is connected to your
cold water supply, the water pressure to the reverse osmosis
system needs to be a minimum of 40 to 60 psi (276 to 414 kPa).
If the water pressure to the reverse osmosis system is less than
40 to 60 psi (276 to 414 kPa):
Check to see whether the sediment filter in the reverse
osmosis system is blocked. Replace the filter if necessary.
Allow the storage tank on the reverse osmosis system to refill
after heavy usage.
If your refrigerator has a water filter, it may further reduce the
water pressure when used in conjunction with a reverse
osmosis system. Remove the water filter. See "Water Filtration
System."
If you have questions about your water pressure, call a licensed,
qualified plumber.
Read all directions before you begin.
IMPORTANT: Ifyou turn the refrigerator on before the water line is
connected, turn the ice maker OFR
Connect to Water Line
1. Unplug refrigerator or disconnect power.
2. Turn OFF main water supply. Turn ON nearest faucet long
enough to clear line of water.
3. Locate a _" (12.70 mm) to I_A'' (3.18 cm) vertical cold water
pipe near the refrigerator.
IMPORTANT:
4.
5.
Make sure it is a cold water pipe.
Horizontal pipe will work, but drill on the top side of the
pipe, not the bottom. This will help keep water away from
the drill and normal sediment from collecting in the valve.
Determine the length of copper tubing you need. Measure
from the connection on the lower rear corner of refrigerator to
the water pipe. Add 7 ft (2.1 m) to allow for cleaning. Use V4"
(6.35 mm) O.D. (outside diameter) copper tubing. Be sure both
ends of copper tubing are cut square.
Using a grounded drill, drill a V4"(6.35 mm) hole in the cold
water pipe you have selected.
A. Cold waterpipe E.Compressionsleeve
B.Pipe clamp F.Shutoff valve
C.Copper tubing G.Packing nut
D. Compressionnut
6. Fasten the shutoff valve to the cold water pipe with the pipe
clamp. Be sure the outlet end is solidly in the 1/4"(6.35 mm)
drilled hole in the water pipe and that the washer is under the
pipe clamp. Tighten the packing nut. Tighten the pipe clamp
screws slowly and evenly so the washer makes a watertight
seal. Do not overtighten or you may crush the copper tubing.
7. Slip the compression sleeve and compression nut on the
copper tubing as shown. Insert the end of the tubing into the
outlet end squarely as far as it will go. Screw the compression
nut onto outlet end with adjustable wrench. Do not
overtighten.
8. Place the free end of the tubing in a container or sink, and turn
ON the main water supply. Flush the tubing until water is clear.
Turn OFF the shutoff valve on the water pipe. Coil the copper
tubing.
Connect to Refrigerator
Style 1
1. Unplug refrigerator or disconnect power.
2. Attach the copper tube to the valve inlet using a compression
nut and sleeve as shown. Tighten the compression nut. Do not
overtighten.
3. Use the tube clamp on the back of the refrigerator to secure
the tubing to the refrigerator as shown. This will help prevent
damage to the tubing when the refrigerator is pushed back
against the wall.
4. Turn shutoff valve ON.
5. Check for leaks. Tighten any connections (including
connections at the valve) or nuts that leak.
A
Style 3
1. Unplug refrigerator or disconnect power.
2. Remove and discard the shipping tape and the black nylon
plug from the gray, coiled water tubing on the rear of the
refrigerator.
3. Thread the provided nut onto the water valve as shown.
NOTE: Tighten the nut by hand. Then tighten it with a wrench
two more turns. Do not overtighten.
A
r/ II
B
6=
A. Tube clamp
B. Copper tubing
C. Compression nut
D. Valve inlet
The ice maker is equipped with a built-in water strainer. Ifyour
water conditions require a second water strainer, install it in
the 1/4"(6.35 mm) water line at either tube connection. Obtain
a water strainer from your nearest appliance dealer.
Style 2
1. Unplug refrigerator or disconnect power.
2. Remove and discard the shipping tape and the black nylon
plug from the gray, coiled water tubing on the rear of the
refrigerator.
3. If the gray water tube supplied with the refrigerator is not long
enough, a 1/4"x 1/4"(6.35 mm x 6.35 mm) coupling is needed in
order to connect the water tubing to an existing household
water line. Thread the provided nut onto the coupling on the
end of the copper tubing.
NOTE: Tighten the nut by hand. Then tighten it with a wrench
two more turns. Do not overtighten.
4.
5.
A B C
A. Refrigerator water tubing
B. Nut (provided)
C. Bulb
D. Coupling (purchased)
Turn shutoff valve ON.
Check for leaks. Tighten any nuts or connections (including
connections at the valve) that leak.
D E F G
E.Ferrule (purchased)
F. Nut (purchased)
G. Household water line
A.Bulb
B.Nut (provided)
4. Turn shutoff valve ON.
5. Check for leaks. Tighten any nuts or connections (including
connections at the valve) that leak.
Complete the Installation
Electrical Shock Hazard
Plug into a grounded 3 prong outlet.
Do not remove ground prong.
Do not use an adapter.
Do not use an extension cord,
Failure to follow these instructions can result in death,
fire, or electrical shock.
1. Plug into a grounded 3 prong outlet.
2. Flush the water system. See the "Water and Ice Dispensers"
section.
NOTE: Allow 24 hours to produce the first batch of ice. Allow
3 days to completely fill ice container.
REFRIGERATORUSE
For your convenience, your refrigerator controls are preset at the
factory. When you first install your refrigerator, make sure that the
controls are still preset. The Refrigerator Control and the Freezer
Control should both be set to the "mid-settings."
COLD
FREEZER
n
COLDER COLD
REFRIGERATOR
!
3 4
1" COLDER
IMPORTANT:
Your product will not cool when the REFRIGERATOR Control
is set to OFR
The Refrigerator Control adjusts the refrigerator compartment
temperature. The Freezer Control adjusts the freezer
compartment temperature. Settings to the left of the mid-
setting make the temperature less cold. Settings to the right of
the mid-setting make the temperature colder.
Wait 24 hours before you put food into the refrigerator. If you
add food before the refrigerator has cooled completely, your
food may spoil.
NOTE: Adjusting the Refrigerator and Freezer Controls to a higher
(colder) than recommended setting will not cool the
compartments any faster.
Adjusting Controls
Give the refrigerator time to cool down completely before adding
food. It is best to wait 24 hours before you put food into the
refrigerator. The settings indicated in the previous section should
be correct for normal household refrigerator usage. The controls
are set correctly when milk or juice is as cold as you like and when
ice cream is firm.
If you need to adjust temperatures in the refrigerator or freezer,
use the settings listed in the chart below as a guide. Wait at least
24 hours between adjustments.
CONDITION/REASON: ADJUSTMENT:
REFRIGERATOR too warm REFRIGERATOR Control
one setting higher
FREEZER too warm/ FREEZER Control
too little ice one setting higher
REFRIGERATOR too cold REFRIGERATOR Control
one setting lower
FREEZER too cold FREEZER Control
one setting lower
The control can be adjusted to properly chill meats or vegetables.
The air inside the pan is cooled to prevent "spot" freezing and can
be set to keep meats at the National Livestock and Meat Board
recommended storage temperatures of 28° to 32°F (-2° to 0°C).
The convertible vegetable/meat drawer control comes preset at
the lowest meat setting.
To store meat:
Set the control to one of the three MEAT settings to store meat at
its optimal storage temperature.
To store vegetables:
Set the control to VEG to store vegetables at their optimal storage
temperatures.
NOTE: If food starts to freeze, move the control to the left (less
cold). Remember to wait 24 hours between adjustments.
You can control the amount of humidity in the moisture-sealed
crisper. Adjust the control to any setting between LOW and HIGH.
LOW (open) for best storage of fruits and vegetables with skins.
HIGH (closed) for best storage of fresh, leafy vegetables.
Depending on your model, you may have one or more of the
following options: the ability to select either crushed or cubed ice,
a special light that turns on when you use the dispenser, or a lock
option to avoid unintentional dispensing.
NOTES:
The dispensing system will not operate when the freezer door
is open.
After connecting the refrigerator to a water source, flush the
water system by dispensing water into a sturdy container until
you draw and discard 1.5 gal. (5.4 L) of water, or for
approximately 3 minutes after the water begins dispensing.
The flushing process cleans the water system and clears air
from the lines. As the air is cleared from the lines, water may
spurt out of the dispenser.
Allow 24 hours for the refrigerator to cool down and chill
water.
Allow 24 hours to produce the first batch of ice. Discard the
first three batches of ice produced.
The Water Dispenser
IMPORTANT: Dispense enough water every week to maintain a
fresh supply.
To Dispense Water:
1. Press a sturdy glass against the water dispenser lever.
2. Remove the glass to stop dispensing.
The Ice Dispenser
The dispensing system will not operate when the freezer door is
open. Ice dispenses from the ice maker storage bin in the freezer
when the dispenser lever is pressed.
NOTE: Some models dispense both cubed and crushed ice.
Before dispensing ice, select which type of ice you prefer.
For crushed ice, cubes are crushed before being dispensed. This
may cause a slight delay when dispensing crushed ice. Noise
from the ice crusher is normal, and pieces of ice may vary in size.
When changing from crushed to cubed, a few ounces of crushed
ice will be dispensed along with the first cubes.
To Dispense Ice:
1. If the ice storage bin is located on the door, remove the
temporary shield from underneath the ice storage bin. See
"Ice Maker and Storage Bin."
2. Press the button to select the desired type of ice.
Cut Hazard
Use a sturdy glass when dispensing ice.
Failure to do so can result in cuts.
3. Press a sturdy glass against the ice dispenser lever. Hold the
glass close to the dispenser opening so ice does not fall
outside of the glass.
IMPORTANT: You do not need to apply a lot of pressure to the
lever in order to activate the ice dispenser. Pressing hard will
not make the ice dispense faster or in greater quantities.
4. Remove the glass to stop dispensing.
The Dispenser Light
Style 1: The dispenser light can be turned on by pressing the ON
button.
Style 2: When you use the dispenser, the lever will automatically
turn the light on. Ifyou want the light to be on continuously, you
may choose either ON or NIGHT LIGHT.
ON: Press the LIGHT button to turn on the dispenser light.
NIGHT LIGHT: Press the LIGHT button a second time to select
the Night Light. The dispenser light will automatically adjust to
become brighter as the room brightens, dimmer as the room
darkens.
OFF: Press the LIGHT button athird time to turn off the dispenser
light.
The dispenser lights are LEDs which should not need to be
changed. If it appears that your dispenser lights are not working,
be sure that the light sensor is not blocked (in Night Light mode).
See "Troubleshooting" for more information.
The Dispenser Lock (on some models)
Your dispenser can be turned off for easy cleaning or to prevent
unintentional dispensing by small children and pets.
NOTE: The lock feature does not shut off power to the product, to
the ice maker, or to the dispenser light. It simply deactivates the
dispenser levers. The ice and water dispensers will not work.
Style 1: Press the LOCK button to lock the dispenser. Press the
UNLOCK button to unlock the dispenser.
Style 2: Press and hold the LOCK OUT button to lock the
dispenser. Press and hold the LOCK OUT button a second time to
unlock the dispenser.
Turning the Ice Maker On/Off
Toturn ON the ice maker, simply lower the wire shutoff arm.
To manually turn off the ice maker, lift the wire shutoff arm to the
OFF (arm up) position and listen for the click.
NOTE: Your ice maker has an automatic shutoff. As ice is made,
the ice cubes will fill the ice storage bin, and the ice cubes will
raise the wire shutoff arm to the OFF (arm up) position. Do not
force the wire shutoff arm up or down.
REMEMBER:
Allow 24 hours to produce the first batch of ice. Discard the
first three batches of ice produced.
The quality of your ice will be only as good as the quality of the
water supplied to your ice maker. Avoid connecting the ice
maker to a softened water supply. Water softener chemicals
(such as salt) can damage parts of the ice maker and lead to
poor quality ice. If asoftened water supply cannot be avoided,
make sure the water softener is operating properly and is well
maintained.
Do not use anything sharp to break up the ice in the storage
bin. This can cause damage to the ice container and the
dispenser mechanism.
Do not store anything on top of or in the ice maker or storage
bin.
Removing and Replacing Ice Storage Bin
1. Pull the covering panel up from the bottom and then slide it
back toward the rear.
2. Lift the wire shutoff arm so it clicks into the OFF (up) position.
Ice can still be dispensed, but no more can be made.
3. Lift up the front of the storage bin and pull it out.
4.
Replace the bin by pushing it in all the way or the dispenser
will not work. Push the wire shutoff arm down to the ON
position to restart ice production. Make sure the door is
closed tightly.
, _i?_ _/_
I
Do not use with water that is microbiologically unsafe or of
unknown quality without adequate disinfection before or
after the system.
Water Filter Status Light (on some models)
The water filter status light will help you know when to change
your water filter. The light will change from green to yellow. This
tells you that it is almost time to change the filter. It is
recommended that you replace the water filter when the status
light changes to red OR water flow to your water dispenser or ice
maker decreases noticeably.
After changing the water filter, reset the water filter status light.
The status light will change from red to green when the system is
reset.
Non-indicator Water Filter (on some models)
If your refrigerator does not have the status light, you should
change the water filter every 6 months depending upon your
usage. If the water flow to the water dispenser or ice maker
decreases noticeably before 6 months have passed, replace the
water filter more often.
Using the Dispenser Without the Water Filter
You can run the dispenser without a water filter. Your water will not
be filtered.
1. Remove the water filter.
2. Slide the cap off the end of the filter and replace the cap in the
base grille.
IMPORTANT: Do not discard the cap. It is part of your
refrigerator. Keep the cap to use with the replacement filter.
REFRIGERATORCARE
Explosion Hazard
Use nonflammable cleaner.
Failure to do so can result in death, explosion, or fire.
Both the refrigerator and freezer sections defrost automatically.
However, clean both sections about once a month to prevent
odors from building up. Wipe up spills immediately.
IMPORTANT: Because air circulates between both sections, any
odors formed in one section will transfer to the other. You must
thoroughly clean both sections to eliminate odors. To prevent
odor transfer and drying out of food, wrap or cover foods tightly.
To Clean Your Refrigerator:
NOTE: Do not use abrasive or harsh cleaners such as window
sprays, scouring cleansers, flammable fluids, cleaning waxes,
concentrated detergents, bleaches or cleansers containing
petroleum products on plastic parts, interior and door liners or
gaskets. Do not use paper towels, scouring pads, or other harsh
cleaning tools.
1. Unplug refrigerator or disconnect power.
2. Hand wash, rinse, and dry removable parts and interior
surfaces thoroughly. Use a clean sponge or soft cloth and a
mild detergent in warm water.
3. Wash stainless steel and painted metal exteriors with a clean
sponge or soft cloth and a mild detergent in warm water.
4.
5=
There is no need for routine condenser cleaning in normal
home operating environments. If the environment is
particularly greasy or dusty, or there is significant pet traffic in
the home, the condenser should be cleaned every 2 to
3 months to ensure maximum efficiency.
If you need to clean the condenser:
Removethe base grille.
Use a vacuum cleaner with a soft brush to clean the grille,
the open areas behind the grille and the front surface area
of the condenser.
Replace the base grille when finished.
Plug in refrigerator or reconnect power.
NOTE: Not all bulbs will fit your refrigerator. Be sure to replace the
bulb with one of the same size, shape and wattage. On some
models, the dispenser light requires a heavy duty 10-watt bulb. All
other lights require a 40-watt bulb. Replacement bulbs are
available from your dealer.
1. Unplug refrigerator or disconnect power.
2. Remove light shield when applicable.
NOTE: To clean the light shield, wash it with warm water and
liquid detergent. Rinse and dry the shield well.
3. Remove light bulb and replace with one of the same size,
shape and wattage.
4. Replace light shield when applicable.
5. Plug in refrigerator or reconnect power.
TROUBLESHOOTING
Try the solutions suggested here first in order to avoid the cost of an unnecessary service call.
The refrigerator will not operate
Electrical Shock Hazard
Plug into a grounded 3 prong outlet.
Do not remove ground prong.
Do not use an adapter.
Do not use an extension cord.
Failure to follow these instructions can result in death,
fire, or electrical shock.
Power cord unplugged? Plug into a grounded 3 prong outlet,
Is outlet working? Plug in a lamp to see if the outlet is
working.
Household fuse blown or circuit breaker tripped? Replace
the fuse or reset the circuit breaker. Ifthe problem continues,
call an electrician,
Are controls on? Make sure the refrigerator controls are on,
See "Using the Controls."
New installation? Allow 24 hours following installation for the
refrigerator to cool completely.
NOTE: Adjusting the temperature controls to coldest setting
will not cool either compartment more quickly.
The motor seems to run too much
Your new refrigerator may run longer than your old one due to its
high-efficiency compressor and fans. The unit may run even
longer if the room is warm, a large food load is added, doors are
opened often, or if the doors have been left open.
The refrigerator is noisy
Refrigerator noise has been reduced over the years. Due to this
reduction, you may hear intermittent noises from your new
refrigerator that you did not notice from your old model. Below are
listed some normal sounds with an explanation.
Buzzing - heard when the water valve opens to fill the ice
maker
Pulsating - fans/compressor adjusting to optimize
performance
Rattling - flow of refrigerant, water line, or from items placed
on top of the refrigerator
Sizzling/Gurgling - water dripping on the heater during
defrost cycle
Popping - contraction/expansion of inside walls, especially
during initial cool-down
Water running - may be heard when water melts during the
defrost cycle and runs into the drain pan
Creaking/Cracking - occurs as ice is being ejected from the
ice maker mold,
The doors will not close completely
Door blocked open? Move food packages away from door.
Bin or shelf in the way? Push bin or shelf back in the correct
position.
The doors are difficult to open
Explosion Hazard
Use nonflammable cleaner.
Failure to do so can result in death, explosion, or fire.
Are the gaskets dirty or sticky? Clean gaskets with mild soap
and warm water.
The lights do not work
Is a light bulb loose in the socket or burned out? See
"Changing the Light Bulbs."
Is the dispenser light set to ON? The dispenser light will
operate only when the levers are pressed. If you want the
dispenser light to stay on continuously, set the dispenser light
to ON, or NIGHT LIGHT or AUTO. See "Water and Ice
Dispensers."
Is the dispenser light set to NIGHT LIGHT or AUTO? If the
dispenser is set to the NIGHT LIGHT or AUTO mode, be sure
the dispenser light sensor is not blocked. See "Water and Ice
Dispensers."
Temperature is too warm
New installation? Allow 24 hours following installation for the
refrigerator to cool completely.
Door(s} opened often or left open? Allows warm air to enter
refrigerator. Minimize door openings and keep doors fully
closed.
Large load of food added? Allow several hours for
refrigerator to return to normal temperature.
Controls set correctly for the surrounding conditions?
Adjust the controls a setting colder. Check temperature in
24 hours. See "Using the Controls."
There is interior moisture buildup
NOTE: Some moisture buildup is normal.
Humid room? Contributes to moisture buildup.
Door(s) opened often or left open? Allows humid air to enter
refrigerator. Minimize door openings and keep doors fully
closed.
The ice maker is not producing ice or not enough ice
Refrigerator connected to a water supply and the supply
shutoff valve turned on? Connect refrigerator to water
supply and turn water shutoff valve fully open.
Kink in the water source line? A kink in the line can reduce
water flow. Straighten the water source line.
Ice maker turned on? Make sure wire shutoff arm or switch
(depending on model) is in the ON position.
New installation? Wait 24 hours after ice maker installation
for ice production to begin. Wait 72 hours for full ice
production.
Large amount of ice recently removed? Allow 24 hours for
ice maker to produce more ice.
Ice cube jammed in the ice maker ejector arm?
Remove ice from the ejector arm with a plastic utensil.
Reverse osmosis water filtration system connected to
your cold water supply? This can decrease water pressure.
See "Water Supply Requirements" in either the Installation
Instruction booklet or the Use & Care Guide.
The ice cubes are hollow or small
NOTE: This is an indication of low water pressure.
Water shutoff valve not fully open? Turn the water shutoff
valve fully open.
Kink in the water source line? A kink in the line can reduce
water flow. Straighten the water source line.
Reverse osmosis water filtration system connected to
your cold water supply? This can decrease water pressure.
See "Water Supply Requirements."
Questions remain regarding water pressure? Call a
licensed, qualified plumber.
Off-taste, odor or gray color inthe ice
New plumbing connections? New plumbing connections
can cause discolored or off-flavored ice.
Ice stored too long? Discard ice. Wash ice bin. Allow
24 hours for ice maker to make new ice.
Odor transfer from food? Use airtight, moisture proof
packaging to store food.
Are there minerals (such as sulfur) in the water? A water
filter may need to be installed to remove the minerals.
Is there a water filter installed on the refrigerator? Gray or
dark discoloration in ice indicates that the water filtration
system needs additional flushing.
The ice dispenser will not operate properly
If the ice storage bin is located on the door, remove the
temporary shield from underneath the ice storage bin. See
"Ice Maker and Storage Bin."
Freezer door closed completely? Close the door firmly. If it
does not close completely, see "The doors will not close
completely."
Ice bin installed correctly? Be sure the ice bin is firmly in
position.
New installation? Wait 24 hours after ice maker installation
for ice production to begin. Wait 72 hours for full ice
production.
Ice stuck in the delivery chute? Use a plastic utensil to clear
the delivery chute.
Has the wrong ice been added to the bin? Use only cubes
produced by the current ice maker.
Has the ice melted around the auger (metal spiral} in the
ice bin? Dump the ice cubes and clean the ice bin.
Cut Hazard
Use a sturdy glass when dispensing ice.
Failure to do so can result in cuts.
Is the ice dispenser stalling while dispensing "crushed"
ice? Change the ice button from "crushed" to "cubed." If
cubed ice dispenses correctly, depress the button for
"crushed" ice and begin dispensing again.
Has the dispenser arm been held in too long? Ice will stop
dispensing when the arm is held in too long. Wait 3 minutes
for dispenser motor to reset before using again.
10
The water dispenser will not operate properly
Freezer door closed completely? Close the door firmly. If it
does not close completely, see "The doors will not close
completely."
Refrigerator connected to a water supply and the supply
shutoff valve turned on? Connect refrigerator to water
supply and turn water shutoff valve fully open.
Is the water pressure at least 30 psi (207 kPa)? The water
pressure to the home determines the flow from the dispenser.
See "Water Supply Requirements."
Kink in the home water source line? Straighten the water
source line.
New installation? Flush and fill the water system.
Water filter installed on the refrigerator? The filter may be
clogged or incorrectly installed.
Is a reverse osmosis water filtration system connected to
your cold water supply? See "Water Supply Requirements"
in either the Installation Instructions or the Use & Care Guide.
Water is leaking from the dispenser
NOTE: One or two drops of water after dispensing is normal.
Glass not being held under the dispenser long enough?
Hold the glass under the dispenser 2 to 3 seconds after
releasing the dispenser lever.
New installation? Flush the water system. See "Water and
Ice Dispensers."
Recently changed water filter? Flush the water system. See
"Water and Ice Dispensers."
The dispenser water is not cool enough
NOTE: Water from the dispenser is chilled to only 50°F (10°C).
New installation? Allow 24 hours after installation for the
water supply to cool completely.
Recently dispensed large amount of water? Allow 24 hours
for water supply to cool completely.
Water not been recently dispensed? The first glass of water
may not be cool. Discard the first glass of water.
Refrigerator connected to a cold water pipe? Make sure
the refrigerator is connected to a cold water pipe. See "Water
Supply Requirements."
WATERFILTERCERTIFICATIONS
Stare ul Cah_ornla
Department of Health Services
Water Treatment Device
Certificate Number
03 - 1550
Date )_suvd Jamlary 21.2003
Trademark/Model Desi_lation RePlacement Elements Rated Caac_
WhMpool WF-NL24/ NL24() !40 ga
4O0 gal
I'he water treatment device(s) hsted on tMs c_'tif_catb iia_e met the testi*tg reflilirements pursuant to beetiog
116830 ol the Health _nd S_|y Code for the _ollo_ia_ health rela#ed con_aminams;
P,licr(_hi_lotiicat C(mt amlnam_ and Turbidity Ino r_a_i_Radi oto_ica_ Contaminant_
Organic Contaminants
f_atefl Sere'ice Flow: 05gpm
no not use with water that is microbiologically unsafe or oI unknown quality, without adequate disinfection
be_)re or after the system.
11
PRODUCTDATASHEETS
Base Grille Water Filtration System
Model WF-NL240/NL240 Capacity 240 Gallons (908 Liters)
Model WF-L400/L400 Capacity 400 Gallons (1514 Liters)
Tested and certified by NSF International against ANSI/NSF
Standard 42 for the reduction of Chlorine Taste and Odor,
Particulate Class II*; and against ANSl/NSF Standard 53 for the
reduction of Lead.
This system has been tested according to ANSl/NSF 42/53 for the reduction of the substances listed below. The concentration of
the indicated substances in water entering the system was reduced to a concentration less than or equal to the permissible limit for
water leaving the system, as specified in ANSI/NSF 42/53.
Substance Reduction NSF Reduction Average InfluentChallenge Maximum Average Minimum % Average %
Aesthetic Effects Requirements Influent Concentration Effluent Effluent Reduction Reduction
Chlorine Taste/Odor _50% 1.9 mg/L 2.0 mg/L _+10% 0.05 mg/L 0.05 mg/L 97.4% 97.4%
Particulate Class II* _85% 833,333/mL Atparticles/mLleast10,000 100,000/mL** 40,667/mL 88.0% 95.1%
Contaminant NSF Reduction Average InfluentChallenge Maximum Average Minimum % Average %
Reduction Requirements Influent Concentration Effluent Effluent Reduction Reduction
Lead: @ pH 6.5 0.01 mg/L 0.15 mg/L*** 0.15 mg/L_+ 10% 0.001 mg/L 0.001 mg/L 99.3% 99.3%
Lead: @ pH 8.5 0.01 mg/L 0.15 mg/L*** 0.15 mg/L_+ 10% 0.003 mg/L 0.001 mg/L 97.9% 99.0%
Test Parameters: pH = 7.5 _+0.5 unless otherwise noted. Flow = 0.5 gpm (1.9 Lpm). Pressure = 60 psig (413.7 kPa).
Temp. = 63°F (17.2°C).
It is essential that operational, maintenance, and filter
replacement requirements be carried out for the product to
perform as advertised.
Model WF-NL240: Change cartridge at least every 6 months.
Use replacement cartridge NL240, part #4396508.
2006 suggested retail price of $32.99. Prices are subject to
change without notice.
Model WF-L400: The filter monitor system measures the amount
of water that passes through the filter and alerts you to replace
the filter. When 90% of the filter's rated life is used, the filter
indicator light changes from green to yellow. When 100% of the
filter's rated life is used, the filter indicator light changes from
yellow to red, and it is recommended that you replace the filter.
Use replacement cartridge L400, part #4396508.2006 suggested
retail price of $32.99. Prices are subject to change without notice.
The product is for cold water use only.
Do not use with water that is microbiologically unsafe or of
unknown quality without adequate disinfection before or after the
system.
Refer to the front cover or "Assistance or Service" section for the
Manufacturer's name, address and telephone number.
Refer to the "Warranty" section for the Manufacturer's limited
warranty.
Application Guidelines/Water Supply Parameters
Water Supply City or Well
Water Pressure 30 - 120 psi (207 - 827 kPa)
Water Temperature 33 ° - 100°F (0.6 ° - 37.8°C)
Service Flow Rate 0.5 gpm (1.9 Lpm) @ 60 psi.
* Class II particle size: >1 to <5
** Test requirement is at least 100,000 particles/mL of AC Fine Test Dust.
*** These contaminants are not necessarily in your water supply. Performance may vary based on local water conditions.
® NSF is a registered trademark of NSF International.
12
WHIRLPOOLCORPORATIONMAJORAPPLIANCEWARRANTY
ONE YEAR LIMITED WARRANTY
For one year from the date of purchase, when this major appliance is operated and maintained according to instructions attached to or
furnished with the product, Whirlpool Corporation or Whirlpool Canada LP (hereafter "Whirlpool") will pay for Factory Specified Parts
and repair labor to correct defects in materials or workmanship. Service must be provided by a Whirlpool designated service company.
This limited warranty applies only when the major appliance is used in the country in which it was purchased.
ITEMS WHIRLPOOL WILL NOT PAY FOR
1. Service calls to correct the installation of your major appliance, to instruct you how to use your major appliance, to replace or repair
house fuses or to correct house wiring or plumbing.
2. Service calls to repair or replace appliance light bulbs, air filters or water filters. Those consumable parts are excluded from warranty
coverage.
3. Repairs when your major appliance is used for other than normal, single-family household use.
4. Damage resulting from accident, alteration, misuse, abuse, fire, flood, acts of God, improper installation, installation not in
accordance with electrical or plumbing codes, or use of products not approved by Whirlpool.
5. Any food loss due to refrigerator or freezer product failures.
6. Replacement parts or repair labor costs for units operated outside the United States or Canada.
7. Pickup and delivery. This major appliance is designed to be repaired in the home.
8. Repairs to parts or systems resulting from unauthorized modifications made to the appliance.
9. Expenses for travel and transportation for product service in remote locations.
10. The removal and reinstallation of your appliance if it is installed in an inaccessible location or is not installed in accordance with
published installation instructions.
11. Replacement parts or repair labor costs when the major appliance is used in a country other than the country in which it was
purchased.
DISCLAIMER OF IMPLIED WARRANTIES; LIMITATION OF REMEDIES
CUSTOMER'S SOLE AND EXCLUSIVE REMEDY UNDER THIS LIMITED WARRANTY SHALL BE PRODUCT REPAIR AS PROVIDED
HEREIN. IMPLIED WARRANTIES, INCLUDING WARRANTIES OF MERCHANTABILITY OR FITNESS FOR A PARTICULAR PURPOSE,
ARE LIMITED TO ONE YEAR OR THE SHORTEST PERIOD ALLOWED BY LAW. WHIRLPOOL SHALL NOT BE LIABLE FOR
INCIDENTAL OR CONSEQUENTIAL DAMAGES. SOME STATES AND PROVINCES DO NOT ALLOW THE EXCLUSION OR LIMITATION
OF INCIDENTAL OR CONSEQUENTIAL DAMAGES, OR LIMITATIONS ON THE DURATION OF IMPLIED WARRANTIES OF
MERCHANTABILITY OR FITNESS, SO THESE EXCLUSIONS OR LIMITATIONS MAY NOT APPLY TO YOU. THIS WARRANTY GIVES
YOU SPECIFIC LEGAL RIGHTS AND YOU MAY ALSO HAVE OTHER RIGHTS, WHICH VARY FROM STATETO STATE OR PROVINCE
TO PROVINCE.
Outside the 50 United States and Canada, this warranty does not apply. Contact your authorized Whirlpool dealer to determine if
another warranty applies.
If you need service, first see the "Troubleshooting" section of the Use & Care Guide. After checking "Troubleshooting," additional help
can be found by checking the "Assistance or Service" section or by calling Whirlpool. Inthe U.S.A., call 1-800-253-1301. In Canada,
call 1-800-807-6777. 12/05
13
MANUALDEUSOYCUIDADODELREFRIGERADOR
Ayuda oServicio T(!cnico
Si necesita ayuda o servicio tecnico, vea primero la secci6n
"Soluci6n de Problemas". Puede obtener asistencia adicional
Ilamandonos al 1-800-253-1301 desde cualquier lugar de los
EE.UU., o escriba a:
Whirlpool Corporation
Customer eXperience Center
553 Benson Road
Benton Harbor, MI 49022-2692
Favor de incluir un nL_merotelef6nico de dia en su
correspondencia.
Guarde este libro y su comprobante de compra juntos para
referencia futura. Usted debera proporcionar evidencia de la
compra o una fecha de instalaci6n para obtener servicio bajo
la garantia.
Escriba la siguiente informacidn acerca de su electrodomestico
para ayudarle a obtener asistencia o servicio tecnico si alguna vez
Ilegara a necesitarlo. Debera tenet a mano el nL_merocompleto
del modelo y de la serie, Puede encontrar esta informaci6n en la
etiqueta con el nQmero de modelo y de serie que esta ubicada en
la pared interior del compartimiento del refrigerador.
Nombre del distribuidor
Numero de serie
Direcci6n
Numero de tel6fono
Numero del modelo
Fecha de compra
Para pedir filtros de repuesto, Ilame al 1-800-442-9991 y solicite
el nQmero de pieza que se detalla a continuacidn o pdngase en
contacto con su distribuidor autorizado de Whirlpool.
Limpiador de Acero Inoxidable: Pida la pieza No. 4396095
Cartucho del filtro de la base estandar: Pida la pieza
No. 4396508 (NL240/L400)
SEGURIDADDELREFRIGERADOR
Su seguridad y la seguridad de los demas es muy importante.
Hemos incluido touches mensajes importantes de seguridad en este manual yen su electrodomestico. Lea y obedezca siempre
todos los mensajes de seguridad.
Este es el sfmbolo de advertencia de seguridad.
Este simbolo le llama la atencion sobre peligros potenciales que pueden ocasionar la muerte o una lesion a
usted y a los demas.
Todos los mensajes de seguridad iran a continuaci6n del simbolo de advertencia de seguridad y de la palabra
"PELIGRO" o "ADVERTENCIA". Estas palabras significan:
Si no sigue las instrucciones de inmediato, usted puede
morir o sufrir una lesion grave.
Si no sigue las instrucciones, usted puede morir o sufrir
una lesion grave.
Todos los mensajes de seguridad le diran el peligro potencial, le diran como reducir las posibilidades de sufrir una lesion y Io que
puede suceder si no se siguen las instrucciones.
14
INSTRUCCIONES IMPORTANTES DE SEGURIDAD
ADVERTENCIA: Para reducir el riesgo de incendio, choque electrico, o lesiones personales al usar su refrigerador siga
estas precauciones basicas:
Conecte a un contacto de pared de conexi6n a tierra de
3 terminales.
No use un adaptador.
No quite la terminal de conexi6n a tierra.
No use un cable electrico de extensi6n.
Desconecte el suministro de energia antes de darle servicio.
Vuelva a colocar todos los componentes y paneles antes de
hacerlo funcionar.
Remueva las puertas de su refrigerador viejo.
Use un limpiador no inflamable.
Mantenga los materiales y vapores inflamables, tales como
gasolina, alejados del refrigerador.
Use dos o mas personas para mover e instalar el
refrigerador.
Desconecte el suministro de energia antes de instalar la
fabrica de hielo (en aquellos modelos que incluyen el juego
de instalaci6n de la fabrica de hielo).
Use un vaso resistente para recibir hielo del despachador
(en algunos modelos).
CONSERVAR ESTAS INSTRUCCIONES
CSmodeshacerse adecuadamentede su
refrigeradorviejo
Peligro de Asfixia
Remueva las puertas de su refrigerador viejo.
No seguir esta instrucci6n puede ocasionar la muerte
o dafio al cerebro.
IMPORTANTE: El atrapamiento y asfixia de nihos no es un
problema del pasado. Los refrigeradores tirados y abandonados
son un peligro, alan si van a quedar ahi "por unos pocos dias". Si
Ud. esta por deshacerse de su refrigerador viejo, per favor siga
las instrucciones que se dan a continuaci6n para prevenir
accidentes.
Antes de tirar su viejo refrigerador o congelador:
Saquelas puertas.
Deje los estantes en su lugar para que los nir3os no puedan
meterse con facilidad.
#
INSTRUCCIONESDEINSTAIACION
Peligro de Peso E×cesivo
Use dos o mas personas para mover e instalar
el refrigerador,
No seguir esta instrucei6n puede ocasionar una
lesi6n en la espalda u otto tipo de lesiones.
Si el dep6sito de hielo esta ubicado en la puerta, quite la
pantalla temporaria que se encuentra debajo del mismo. Vea
"Fabrica de hielo y dep6sito".
Quite los materiales de empaque. No use instrumentos
filosos, alcohol para fricciones, Ifquidos inflamables, o
productos de limpieza abrasivos para eliminar los restos de
cinta o goma. Estos productos pueden dar_ar la superficie de
su refrigerador. Para mas informaci6n, vea "Seguridad del
refrigerador".
C6mo mover su refrigerador:
Su refrigerador es muy pesado. Cuando mueva su
refrigerador para limpiarlo o darle servicio, proteja el piso.
AI mover el refrigerador, siempre tire directamente hacia
afuera. No menee el refrigerador de lado a lade ni Io haga
"caminar" cuando Io trate de mover ya que podria dahar
el piso.
Informaci6n importante para saber acerca de los estantes
y tapas de vidrio:
No limpie los estantes y tapas de vidrio con agua caliente
mientras estan fifes. Los estantes y tapas pueden romperse
si se exponen a cambios bruscos de temperatura o impacto,
como serfa un golpe brusco. Para su protecci6n, el vidrio
templado se ha disehado para hacerse ahicos. Esto es normal.
Los estantes y tapas de vidrio son muy pesados. Tenga
mucho cuidado al sacarlos para evitar que se dahen al caer.
15
Peligro de Explosion
Mantenga los materiales y vapores inflamables,
tales come gasolins, slejados del refrigersdor.
No seguir esta instruccion puede ecssionar Is muerte,
explosion, e incendio.
Para asegurar la adecuada ventilaci6n para su refrigerador, deje
un espacio de 1/2"(1,25 cm) a cada lade y per encima. Si Ud.
instala el refrigerador pr6ximo a una pared fija, deje come minimo
2" (5,08 cm) a cada lade (dependiendo del modelo) para permitir
que la puerta abra bien. Si su refrigerador tiene una fabrica de
hielo, asegQrese de que haya espacio adicional atras para la
conexi6n de la linea de agua.
NOTA: No se recomienda instalar el refrigerador cerca de un
homo, radiador u otra fuente de calor. No instale el refrigerador
cerca de una ubicaci6n en la que la temperatura puede bajar de
los 55°F (13°C).
__1
/'
/
/
1/2" (1,25 cm)(
ii i]
/
/
/
2" (5_08cm)
,,, ..,,% L<_. _, ...... ¢ . .
Peligro de Cheque Electrico
Conecte a un contacto de pared de conexion s tierrs de
3 terminsles.
No quite Is terminal de conexion s tierra.
No use un adsptador.
No use un cable electrico de extensi6n.
No seguir estas instrucciones puede ocasionsr
Is muerte, incendio o cheque electrico.
Antes de mover el refrigerador a su ubicaci6n final, es importante
asegurarse de que tiene la conexi6n electrica adecuada.
M_todo de conexibn a tierra recomendado
Se requiere una fuente de energia electrica de 115 Voltios, 60 Hz.,
CA solamente y con fusibles de 15 6 20 amperios, debidamente
conectada atierra. Se recomienda que use un circuito separado
s61opara su refrigerador. Use un tomacorriente que no se pueda
apagar con un interrupter. No use un cable electrico de extensi6n.
NOTA: Antes de realizar cualquier tipo de instalaci6n, limpieza o
de quitar un foco de luz, ponga el control (del termostato, del
refrigerador o del congelador dependiendo del modelo) en la
posici6n OFF (Apagado) y luego desconecte el refrigerador de la
fuente de energia. Cuando haya terminado, reconecte el
refrigerador a la fuente de energfa electrica y vuelva a poner el
control (del termostato, del refrigerador o del congelador
dependiendo del modelo) en la posici6n deseada.
Ret]na las herramientas y piezas necesarias antes de comenzar la
instalaci6n. Lea y siga las instrucciones provistas con cualquiera
de las herramientas enlistadas aquf.
HERRAMIENTAS NECESARIAS:
Destornillador de hoja plana Broca de _/4"
Llaves de boca de 7_6"y 1/2"o Taladro manual o
dos Ilaves ajustables electrico (debidamente
conectado atierra)
Llave para tuercas de 1/4"
NOTA: El distribuidor de su refrigerador tiene un juego disponible
con una valvula de cierre tipo montura de _¼"(6,35 mm), una
uni6n y tuber[a de cobre. Antes de comprar, asegQrese que la
valvula tipo montura cumpla con los c6digos de plomeria de su
Iocalidad. No use una valvula perforadora o una valvula de
montura de _/_6"(4,76 mm) que reduce el flujo de agua y se
obstruye con mas facilidad.
IMPORTANTE:
Todas las instalaciones deben hacerse de acuerdo a los
requerimientos locales de plomer[a.
Use tuberias de cobre y revise si hay fugas. Instale tuberia de
cobre s61o en Areas donde la temperatura va a permanecer
per encima del punto de congelaci6n.
16
Presibn del agua
Se necesita un suministro de agua fria con presi6n de agua entre
30 y 120 Ibs/pulg _(207 y 827 kPa) para hacer funcionar el
despachador de agua y la fabrica de hielo, Si usted tiene
preguntas acerca de la presi6n de agua, Ilame a un plomero
competente autorizado.
Suministro de agua de 6smosis inversa
IMPORTANTE: La presi6n del suministro de agua que sale de un
sistema de 6smosis inversa y va a la valvula de entrada de agua
del refrigerador necesitara set entre 30 y 120 Ibs/pulg 2(207 y
827 kPa).
Si se conecta un sistema de filtraci6n de agua de 6smosis inversa
al suministro de agua fria, la presi6n de agua al sistema de
6smosis inversa necesitara set de un minimo de 40 a 60 Ibs/pulg 2
(276 a 414 kPa),
Si la presi6n del agua del sistema de 6smosis inversa es menor de
40 a 60 Ibs/pulg 2(276 a 414 kPa):
Fijese si el filtro de sedimentos en el sistema de 6smosis
inversa esta bloqueado y reemplacelo si fuera necesario.
Deje que se vuelva a Ilenar el tanque de almacenaje del
sistema de 6smosis inversa despues del uso intense.
Si su refrigerador tiene un filtro de agua, se podra reducir la
presi6n ann mas si se usa en conjunto con un sistema de
6smosis inversa. Quite elfiltro de agua; vea "Sistema de
filtraci6n de agua",
Si tiene preguntas acerca de la presi6n del agua, Ilame a un
plomero competente autorizado.
Lea todas las instrucciones antes de comenzar.
IMPORTANTE: Si usa el refrigerador antes de instalar la conexi6n
del agua, ponga la fabrica de hielo en la posici6n apagado (OFF),
Conexi6n a la linea de agua
1. Desenchufe el refrigerador o desconecte el suministro de
energfa.
2. CIERRE el suministro principal de agua. ABRA la Ilave de agua
mas cercana el tiempo suficiente para que la tuberfa de agua
se vacie totalmente.
3. Busque una tuberia vertical de agua frfa de V2"a I_A''
(12,70 mm a 3,18 cm) cercana al refrigerador.
IMPORTANTE:
4.
Asegt_rese de que sea una tuberia de agua frfa,
Una tuberia horizontal funcionara, pete taladre per el lade
superior de la tuberia, no por debajo. Esto ayudara a
mantener el agua alejada del taladro. Esto tambien evita
que se junte sedimento normal en la valvula.
Para determinar la Iongitud de la tuberfa de cobre que va a
necesitar, mida desde la conexi6n de la parte trasera inferior
del refrigerador hasta la tuberfa de agua. Agregue 7 pies
(2,1 m) para permitir la limpieza. Use tuberfa de cobre de V4"
(6,35 mm) de diametro externo, AsegL_reseque ambos
extremes de la tuberia de cobre esten cortados rectos.
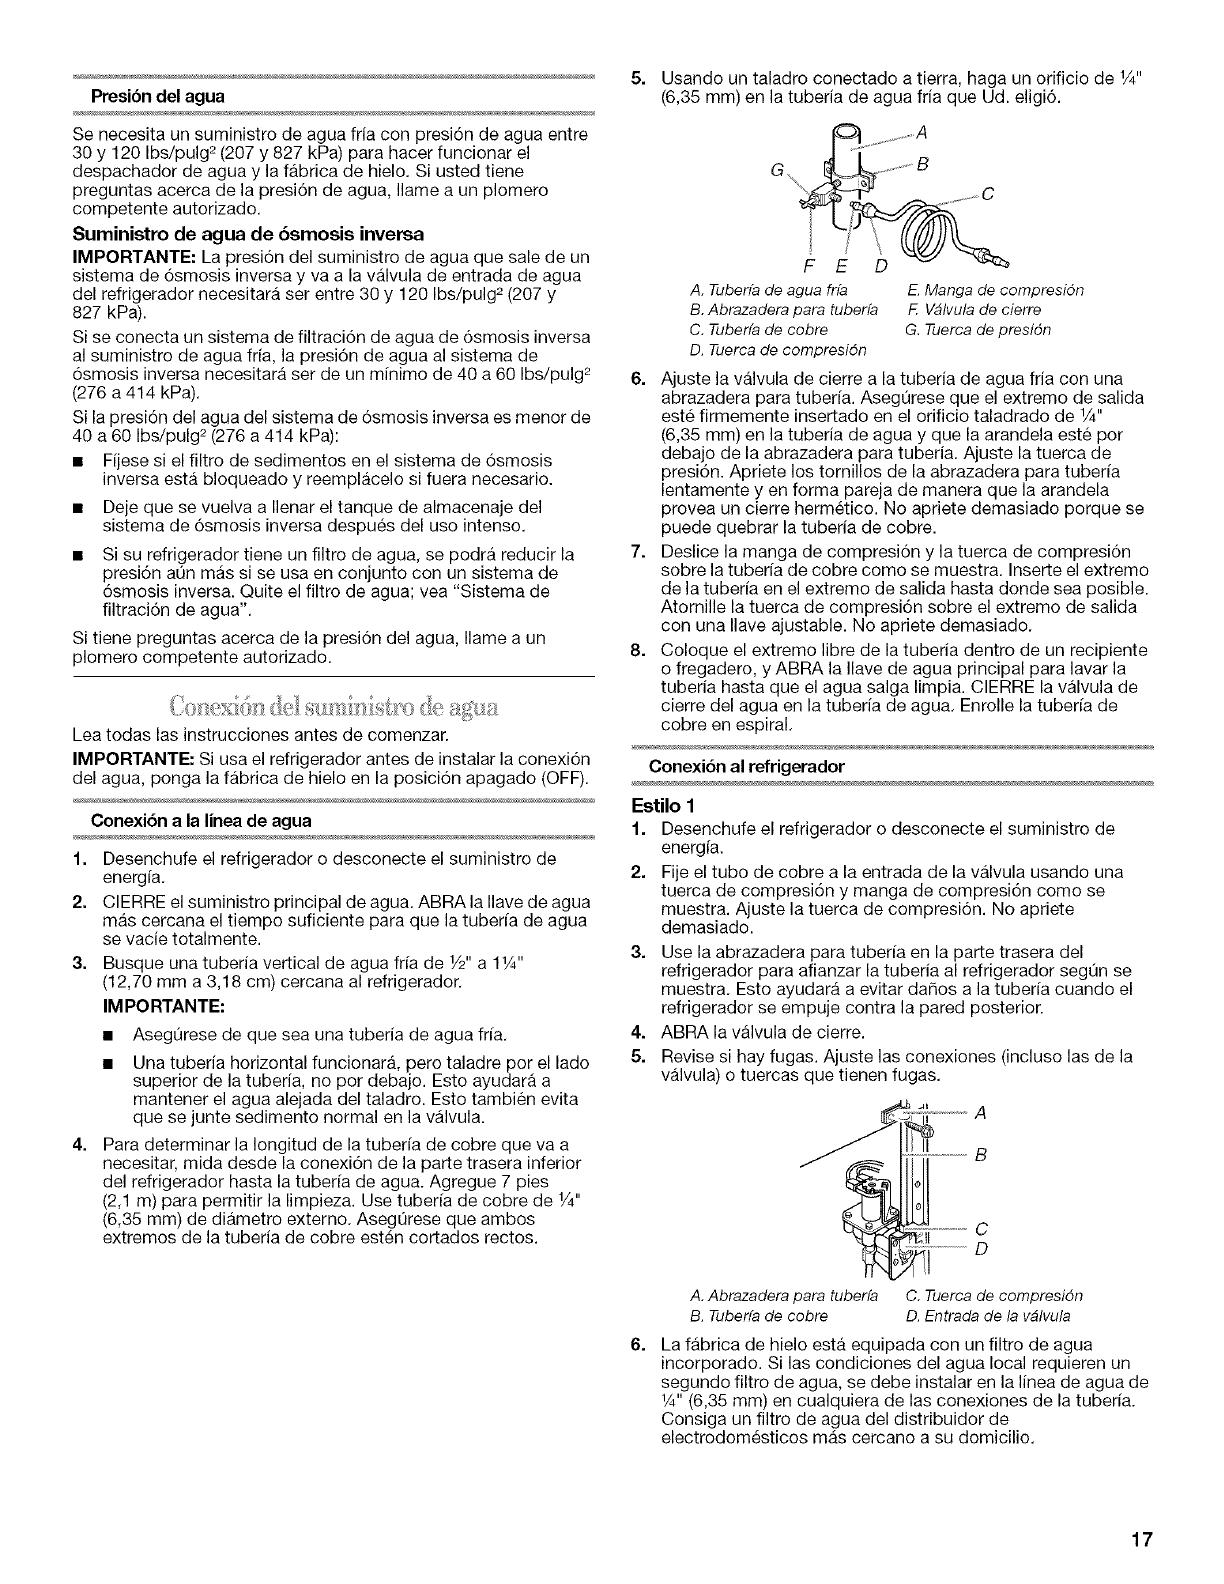
5=
Usando un taladro conectado atierra, haga un orificio de _A"
(6,35 mm) en la tuberia de agua fria que Ud. eligi6.
G %_a
A, Tuberfade aguafrfa E.Manga de compresidn
B,Abrazaderapara tuberfa F. Vblvulade cierre
C, Tuberfade cobre G.Tuercade presidn
D. Tuercade compresidn
6. Ajuste la valvula de cierre a la tuberia de agua fria con una
abrazadera para tuberfa. Asegt]rese que el extremo de salida
este firmemente insertado en el orificio taladrado de _¼"
(6,35 mm) en la tuberia de agua y que la arandela este per
debajo de la abrazadera para tuberia. Ajuste la tuerca de
presi6n. Apriete los tornillos de la abrazadera para tuberfa
lentamente yen forma pareja de manera que la arandela
provea un cierre hermetico. No apriete demasiado porque se
puede quebrar la tuberia de cobre.
7. Deslice la manga de compresi6n y la tuerca de compresi6n
sobre la tuberfa de cobre como se muestra. Inserte el extremo
de la tuberia en el extremo de salida hasta donde sea posible.
Atornille la tuerca de compresi6n sobre el extreme de salida
con una Ilave ajustable. No apriete demasiado,
8. Coloque el extremo libre de la tuberia dentro de un recipiente
o fregadero, y ABRA la Ilave de agua principal para lavar la
tuberia hasta que el agua salga limpia. CIERRE la valvula de
cierre del agua en la tuberia de agua, Enrolle la tuberfa de
cobre en espiral,
Conexi6n al refrigerador
Estilo 1
1. Desenchufe el refrigerador o desconecte el suministro de
energfa.
2. Fije el tubo de cobre a la entrada de la valvula usando una
tuerca de compresi6n y manga de compresi6n como se
muestra. Ajuste la tuerca de compresi6n. No apriete
demasiado.
3. Use la abrazadera para tuberfa en la parte trasera del
refrigerador para afianzar la tuberia al refrigerador segt]n se
muestra, Esto ayudara a evitar daBos a la tuberfa cuando el
refrigerador se empuje contra la pared posterior.
4. ABRA la valvula de cierre.
5. Revise si hay fugas. Ajuste las conexiones (incluso las de la
valvula) o tuercas que tienen fugas.
6=
A. Abrazadera para tuberfa C. Tuerca de compresidn
B. Tuberfa de cobre D. Entrada de la vblvula
La fabrica de hielo esta equipada con un filtro de agua
incorporado. Si las condiciones del agua local requieren un
segundo filtro de agua, se debe instalar en la linea de agua de
V4"(6,35 mm) en cualquiera de las conexiones de la tuberfa.
Consiga un filtro de agua del distribuidor de
electrodomesticos mas cercano a su domicilio,
17
Estilo 2
1. Desenchufe el refrigerador o desconecte el suministro de
energia.
2. Quite y deseche la cinta de empaque y el tap6n de nailon
negro de la tuberia gris de agua enrollada en la parte trasera
del refrigerador.
3. Si el tubo de agua gris suministrado con el refrigerador no es
suficientemente largo, se necesita un acoplamiento de
1A"x 1/4"(6,35 mm x 6,35 mm) para conectar la tuberia de
agua a una linea domestica de agua existente. Enrosque la
tuerca provista sobre el acoplamiento en el extremo de la
tuberia de cobre.
NOTA: Apriete la tuerca a mano. Luego aprietela dos vueltas
mas con una Ilave de tuercas. No apriete demasiado.
A B C D E F G
A. Tuberfa de agua al D. Acoplamiento (adquirido)
refrigerador E.F_rula (adquirida)
B. Tuerca (provista) E Tuerca (adquirida)
C. Bulbo G. Lfnea de agua de la casa
4. ABRA la valvula de cierre.
5. Revise si hay fugas. Apriete aquellas tuercas o conexiones
que tengan fugas (incluidas las conexiones en la valvula).
Estilo 3
1. Desenchufe el refrigerador o desconecte el suministro de
energfa.
2. Quite y deseche la cinta de empaque y el tap6n de nailon
negro de la tuberia gris de agua enrollada en la parte trasera
del refrigerador.
3. Enrosque la tuerca provista sobre la valvula de agua como se
muestra.
NOTA: Apriete la tuerca a mano. Luego aprietela dos vueltas
mas con una Ilave de tuercas. No apriete demasiado.
A
J/ II
B
4.
5.
A. Bulbo
B. Tuerca (provista)
ABRA la valvula de cierre.
Revise si hay fugas. Apriete aquellas tuercas o conexiones
que tengan fugas (incluidas las conexiones en la valvula).
C6mo terminar la instalaci6n
Peligro de Choque Electrico
Conecte a un contaeto de pared de conexi6n s tierrs de
3 terminsles.
No quite Is terminal de conexi6n s tierra.
No use un adaptador.
No use un cable el6ctrico de extensi6n.
No seguir estas instruccionee puede ocaeionsr
Is muerte, incendio o choque el6etrieo.
1. Conecte a un contacto de pared de conexi6n a tierra de
3 terminales.
2. Enjuague el sistema de agua. Vea "Despachadores de agua y
hielo".
NOTA: Deje transcurrir 24 horas para la producci6n de la primera
tanda de hielo. Deje pasar 3 dias para que se Ilene
completamente el recipiente para hielo.
USODESUREFRIGERADOR
Para su comodidad, los controles de su refrigerador han sido
programados en la fabrica. Cuando instale su refrigerador por
primera vez asegQrese que los controles tengan la programaci6n
original. El control del refrigerador y el control del congelador
deberian estar en la "posici6n intermedia".
COLD
FREEZER
n
COLDER COLD
REFRIGERATOR
I
IMPORTANTE:
Su unidad no enfria cuando el control del REFRIGERADOR
esta en la posici6n OFF (Apagado).
El control del refrigerador ajusta la temperatura del
compartimiento del refrigerador. El control del congelador
ajusta la temperatura del compartimiento del congelador. Los
ajustes hacia la izquierda de la posici6n intermedia hacen que
la temperatura sea menos frfa. Los ajustes hacia la derecha de
la posici6n intermedia hacen que la temperatura sea mas fria.
Espere 24 horas antes de guardar alimentos en el refrigerador.
Si usted introduce alimentos antes de que el refrigerador se
haya enfriado completamente, los alimentos pueden
descomponerse.
NOTA: Poner los controles del refrigerador y del congelador en un
ajuste mas alto (mas frfo) que el recomendado no enfriara mas
rapido los compartimientos.
18
Ajuste de los controles
Permita que el refrigerador se enfrie completamente antes de
introducir los alimentos. Lo mejor es esperar 24 horas antes de
guardar alimentos en el refrigerador. Los ajustes indicados en la
secci6n anterior deberian ser los correctos para el use normal del
refrigerador en una casa. Los controles esMn ajustados
correctamente cuando la leche o los jugos esMn tan fries como
Ud. desea y cuando el helado tiene consistencia firme.
Si necesita regular las temperaturas en el refrigerador o en el
congelador, utilice come guia los ajustes que se enumeran en la
tabla siguiente. Espere por Io menos 24 horas entre ajustes.
CONDICION/MOTIVO: AJUSTE:
REFRIGERADOR demasiado caliente Control del
REFRIGERADOR
un ajuste mas alto
CONGELADOR demasiado caliente/ Control del
muy poco hielo CONGELADOR
un ajuste mas alto
REFRIGERADOR demasiado frio Control del
REFRIGERADOR
un ajuste mas bajo
CONGELADOR demasiado frio Control del
CONGELADOR
un ajuste mas bajo
Puede ajustarse el control para que enfrie de manera apropiada
las carnes o los vegetales. El aire dentro de la charola se enfria
para prevenir que partes de los alimentos se congelen y puede
ajustarse para mantener la came alas temperaturas de
almacenaje recomendadas per el National Livestock and Meat
Board (Consejo Nacional de Ganado y Carnes): 28 ° a 32°F (-2° a
0°C). El control del caj6n convertible para verduras/carne viene
ajustado de fabrica en la posici6n menos fria para carnes.
Para guardar la carrie:
Fije el control en uno de los tres ajustes para MEAT (Came), para
guardar la came en su temperatura ideal de almacenaje.
Para guardar verduras:
Fije el control en VEG (Verduras) para guardar las verduras en sus
temperaturas 6ptimas de almacenaje.
NOTA: Si los alimentos se empiezan a congelar, mueva el control
hacia la izquierda (menos frio). Recuerde que debe esperar
24 horas entre ajustes.
Usted puede controlar el nivel de humedad en el caj6n hermetico
para verduras. Regule el control a cualquier ajuste entre Bajo
(LOW) y Alto (HIGH).
LOW (bajo - posici6n abierta) para el mejor almacenamiento de
frutas y verduras con cascaras.
HIGH (Alto - posici6n cerrada) para el mejor almacenamiento de
vegetales de hoja frescos.
Dependiendo de su modelo, usted puede tenet una o mas de las
opciones siguientes: la posibilidad de seleccionar hielo picado o
en cubos, una luz especial que se enciende cuando usted utiliza
el despachador o una opci6n de cierre para evitar que salga hielo
o agua involuntariamente.
NOTAS:
El sistema de distribuci6n no funcionara cuando la puerta del
congelador este abierta.
Despues de haber conectado el refrigerador en un suministro
de agua, enjuague el sistema de agua dispensando agua en
un recipiente resistente hasta que haya enjuagado y
descartado 1,5 gal. (5,4 L) de agua, o aproximadamente per
3 minutos despu_s de que el agua comience a salir. El agua
que usted saca y descarta limpia el sistema y ayuda a
despejar el aire de las lineas. A medida que sale aire de las
lineas, es posible que salgan chorros de agua repentinos del
despachador.
Deje transcurrir 24 horas para que el refrigerador se enfrie y
pueda enfriar el agua.
Deje transcurrir 24 horas para la producci6n del primer Iote de
hielo. Deshagase de los tres primeros Iotes de hielo
producidos.
El despachador de agua
IMPORTANTE: Haga salir suficiente agua cada semana para
mantener un suministro fresco.
Para despachar agua:
1. Oprima un vaso resistente contra la barra del despachador de
agua.
2. Retire el vase para detener la salida del agua.
El despachador de hielo
El sistema de distribuci6n no funcionara cuando la puerta del
congelador este abierta. El hielo se distribuye del dep6sito de la
Mbrica de hielo en el congelador cuando se presione la barra del
despachador.
NOTA: Algunos modelos despachan hielo en cubes y hielo
picado. Antes de sacar hielo, seleccione el tipo de hielo que
desea.
Para obtener hielo picado, el hielo es triturado antes de set
despachado. Esto puede retrasar un poco la distribuci6n del hielo
picado. El ruido proveniente del triturador de hielo es normal y los
trozos de hielo pueden variar en tamale. Cuando cambia de la
posici6n de hielo picado a la posici6n de hielo en cubes, caen
unas onzas de hielo picado junto con los primeros cubes.
Para despachar hielo:
1. Si el dep6sito de hielo esta ubicado en la puerta, quite la
pantalla temporaria que se encuentra debajo del mismo. Vea
"Fabrica de hielo y dep6sito".
2. Oprima el bot6n del tipo de hielo que desee.
19
Peligro de Cortadurae
Use un vaeo reeietente para recibir hielo del
despachador.
No eeguir eeta instruccion puede ocaeionar
cortaduras.
3. Oprima con un vaso resistente la barra del despachador de
hielo. Sostenga el vaso junto al orificio del despachador para
que el hielo no caiga fuera del vaso.
IMPORTANTE: No necesita aplicar mucha presi6n a la barra
para activar el despachador de hielo. Oprimir mucho no hara
que el despachador funcione con mas rapidez o produzca
mayor cantidad de hielo.
4. Retire el vase para detener la salida del hielo.
La luz del despachador
Estilo 1: La luz del despachador puede encenderse oprimiendo el
bot6n de ON (Encendido).
Estilo 2: Cuando use el despachador, la palanca encendera
automaticamente la luz. Si usted quiere que la luz este encendida
continuamente, puede elegir ON (Encendida) o NIGHT LIGHT (Luz
nocturna).
ON (Encendida}: Presione el bot6n de luz (LIGHT) para encender
la luz del despachador.
NIGHT LIGHT (Luz Nocturna): Presione el bot6n de luz (LIGHT)
por segunda vez para seleccionar el modo de luz nocturna. La luz
del despachador se ajustara automaticamente para ponerse mas
brillante a medida que la habitaci6n se ilumine mas y mas tenue a
medida que la habitaci6n se oscurezca.
OFF (Apagada): Presione el bot6n de luz (LIGHT) por tercera vez
para apagar la luz del despachador.
Las luces del despachador son del tipo LED y no deberian
necesitar cambiarse. Si le parece que las luces del despachador
no funcionan, fijese si no esta bloqueado el detector de luz (en el
modo de Luz nocturna). Para obtener mas informaci6n, yea
"Soluci6n de problemas".
El bloqueo del despachador (en algunos modelos)
Su despachador puede apagarse para facilitar la limpieza o para
evitar que sea activado accidentalmente per niSos o animales
domesticos.
NOTA: La funci6n de bloqueo no interrumpe el flujo electrico a la
unidad, a la fabrica de hielo o a la luz del despachador.
0nicamente desactiva las barras del despachador. Los
despachadores de agua y hielo no funcionaran.
Estilo 1: Presione el bot6n LOCK (Bloqueo) para bloquear el
despachador. Presione el bot6n UNLOCK (Desbloqueo) para
desbloquear el despachador.
Estilo 2: Presione y sostenga el bot6n LOCK OUT (Bloqueo
activado) para bloquear el despachador. Presione y sostenga el
bot6n LOCK OUT una segunda vez para desbloquear el
despachador.
Para encender y apagar lafabrica de hielo
Para poner a funcionar (ON) la fabrica de hielo, sencillamente baje
el brazo de control de alambre.
Para apagar (OFF) la fabrica de hielo manualmente, levante el
brazo de control de alambre a la posici6n OFF (apagado - brazo
elevado) y escuche el chasquido.
NOTA: Su fabrica de hielo tiene un apagado automatico. A
medida que se produce el hielo, los cubitos de hielo Ilenaran el
dep6sito para hielo y estos levantaran el brazo de control de
alambre a la posici6n de apagado (OFF - brazo elevado). No
fuerce el brazo de control de alambre hacia arriba o hacia abajo.
RECUERDE:
Deje transcurrir 24 horas para la producci6n del primer Iote de
hielo. Deshagase de los tres primeros Iotes de hielo
producidos.
La calidad del hielo dependera de la calidad del agua que
suministre a su fabrica de hielo. Evite la conexi6n de su
fabrica de hielo a un suministro de agua blanda. Los quimicos
para ablandar el agua (como la sal) pueden daSar ciertos
componentes de la fabrica de hielo y producir un hielo de muy
baja calidad. Si no se puede evitar el uso de un suministro de
agua blanda, asegL_resede que el ablandador de agua este
funcionando correctamente y que goce de un buen
mantenimiento.
No use instrumentos afilados para romper el hielo en el
dep6sito. Esto puede daSar el recipiente de hielo y el
mecanismo de despachado.
No guarde nada encima ni dentro de la fabrica de hielo ni en el
dep6sito de hieIo.
Para quitar y volver a colocar el dep6sito de hielo
1. Levante desde abajo el panel que cubre el dep6sito y
deslicelo hacia atras.
2. Eleve el brazo de control de alambre hasta que enganche en
la posici6n OFF (apagado - brazo elevado). AOn se puede
sacar hielo del despachador pero no se puede hacer mas.
3. Levante y jale de la parte delantera del dep6sito de hielo para
sacarlo.
4.
Vuelva a colocar el dep6sito empujandolo hasta el fondo o de
Io contrario el despachador de hielo no funcionara. Empuje el
brazo de control de alambre hacia abajo a la posici6n ON
(encendido) para reiniciar la producci6n de hielo. Cerci6rese
de que la puerta este bien cerrada.
2O
  • Page 1 1
  • Page 2 2
  • Page 3 3
  • Page 4 4
  • Page 5 5
  • Page 6 6
  • Page 7 7
  • Page 8 8
  • Page 9 9
  • Page 10 10
  • Page 11 11
  • Page 12 12
  • Page 13 13
  • Page 14 14
  • Page 15 15
  • Page 16 16
  • Page 17 17
  • Page 18 18
  • Page 19 19
  • Page 20 20
  • Page 21 21
  • Page 22 22
  • Page 23 23
  • Page 24 24
  • Page 25 25
  • Page 26 26
  • Page 27 27
  • Page 28 28
  • Page 29 29
  • Page 30 30
  • Page 31 31
  • Page 32 32
  • Page 33 33
  • Page 34 34
  • Page 35 35
  • Page 36 36
  • Page 37 37
  • Page 38 38
  • Page 39 39
  • Page 40 40

Estate IS25AFXRD02 Owner's manual

Category
Fridges
Type
Owner's manual
This manual is also suitable for

Ask a question and I''ll find the answer in the document

Finding information in a document is now easier with AI