Black & Decker v 1999 Owner's manual

Category
Battery chargers
Type
Owner's manual
1
www.blackanddecker.eu
English 4
Deutsch 8
Français 13
Italiano 18
Nederlands 23
Español 28
Português 33
Svenska 38
Norsk 42
Dansk 46
Suomi 50
Ελληνικά 54
Türkçe 59
23 1 4
2
B
C D
F
5
6
A
5
6
8
7
9
1
2
3
E
10
10
3
G H
4
ENGLISH
Intended use
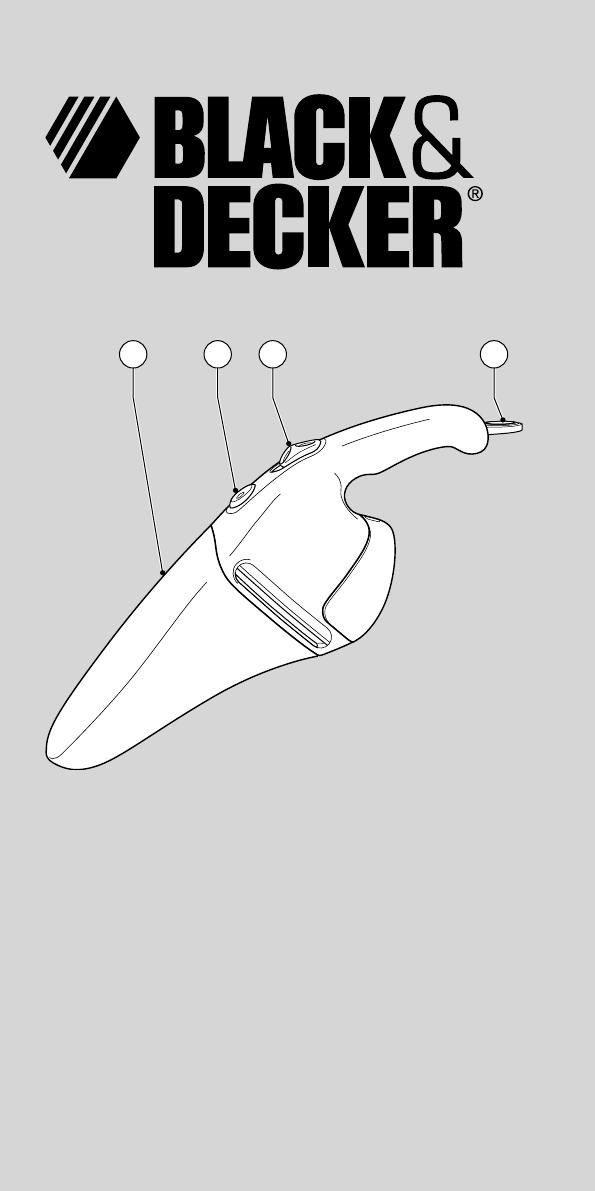
Your Black & Decker Dustbuster
®
hand
held vacuum cleaner has been designed
for light dry vacuum cleaning purposes.
This product is intended for household
use only.
Safety instructions
Warning! When using battery-
powered appliances, basic safety
precautions, including the following,
should always be followed to reduce
the risk of fire, leaking batteries,
personal injury and material damage.
Read this manual carefully before
using the appliance.
The intended use is described in this
manual. The use of any accessory or
attachment or the performance of
any operation with this appliance
other than those recommended in
this instruction manual may present a
risk of personal injury.
Retain this manual for future reference.
Using your appliance
Do not use the appliance to pick up
liquids or any materials that could
catch fire.
Do not use the appliance near water.
Do not immerse the appliance in water.
Never pull the charger lead to
disconnect the charger from the
socket. Keep the charger lead away
from heat, oil and sharp edges.
After use
Unplug the charger before cleaning it.
When not in use, the appliance
should be stored in a dry place.
Children should not have access to
stored appliances.
Inspection and repairs
Before use, check the appliance for
damaged or defective parts. Check
for breakage of parts, damage to
switches and any other conditions
that may affect its operation.
Do not use the appliance if any part
is damaged or defective.
Have any damaged or defective parts
repaired or replaced by an authorised
repair agent.
Regularly check the charger lead for
damage. Replace the charger if the
lead is damaged or defective.
Never attempt to remove or replace
any parts other than those specified
in this manual.
Battery and charger
Never attempt to open the battery.
Do not expose the battery to water.
Do not incinerate the battery.
Do not expose the charger to water.
Do not open the charger.
Electrical safety
Your charger has been designed for a
specific voltage. Always check that the
mains voltage corresponds to the voltage
on the rating plate. Never attempt to
replace the charger unit with a regular
mains plug.
Symbols on the charger
#
Your charger is double
insulated; therefore no earth
wire is required.
Fail safe isolating transformer.
The mains supply is electrically
separated from the transformer
output.
The charger automatically shuts
off if the ambient temperature
becomes too high. As a
consequence the charger will
be inoperable. The unit must be
disconnected from the mains
supply and taken to an
authorised service centre for
repair.
The charger is intended for
indoor use only.
Read the manual carefully
before using the appliance.
5
ENGLISH
Features (fig. A)
1. On/off switch
2. Release button
3. Dust bowl
4. Hanging loop
Fig. A
5. Crevice tool (V2401/V2405/V3605/
V4890C/V4890CN/V4899/V6090C)
6. Brush tool (V2401/V2405/V3605/
V4890C/V4890CN/V4899/V6090C)
Assembly
V2401/V2405/V3605/V4890C/
V4890CN/V4899/V6090C -
Fitting the accessories (fig. A & B)
These models are supplied with the
following accessories:
a crevice tool (5) for confined spaces
a brush tool (6) for furniture and stairs
To fit an accessory, proceed as follows:
Take the accessories from the
appliance.
Insert the appropriate accessory into
the front of the appliance.
You may refit the other accessory by
clicking it into the accessory holder.
To refit both accessories:
Slide the crevice tool into the brush.
Push the accessories down until they
click into place.
Use
The appliance can be charged while
placed on a worktop or hung on the
wall using the wall hook provided.
The wall hook is not provided with
V1999 and V1999N.
Before first use, the battery must be
charged for at least 16 hours.
Leave the appliance connected to the
charger whenever it is not in use.
Charging the battery (fig. A)
Make sure that the appliance is
switched off. The battery will not be
charged with the on/off switch in the
on position.
Insert the charger plug (8) into the
charger connector (9) at the rear of
the appliance.
Plug in the charger (7).
Switch on at the mains.
Leave the appliance to charge for at
least 16 hours.
Whilst charging, the charger may
become warm. This is normal and does
not indicate a problem. The appliance
can be left connected to the charger
indefinitely.
Warning! Do not charge the battery at
ambient temperatures below 10 °C or
above 40 °C.
Switching on and off (fig. D)
To switch on, slide the on/off switch
(1) forward.
To switch off, slide the on/off switch
back.
Cleaning and maintenance
Warning! Regularly clean the filters.
Cleaning the dust bowl and filters
(fig. E & F)
The filters are re-usable and should be
cleaned regularly.
Press the release button (2) and
remove the dust bowl (3).
Empty the dust bowl.
Remove the filter assembly (10) by
twisting it clockwise.
Wash the filters in warm, soapy
water. The bowl can also be washed
if necessary. Do not immerse the
appliance in water.
Make sure the dust bowl and filters
are dry.
Refit the filter assembly (10) onto the
appliance, twisting it
counterclockwise until it locks into
place.
Refit the dust bowl onto the
appliance. Make sure the dust bowl
clicks into place.
Warning! Never use the appliance
without the filters. Optimum dust
collection will only be achieved with clean
filters and an empty dust bowl.
6
ENGLISH
Replacing the filters
The filters should be replaced every 6 to
9 months and whenever worn or
damaged. Replacement filters are
available from your Black & Decker
dealer (cat. no. VF30).
Remove the old filters as described
above.
Fit the new filters as described above.
Protecting the environment
Z
Separate collection. This
product must not be disposed
of with normal household waste.
Should you find one day that your Black
& Decker product needs replacement,
or if it is of no further use to you, do not
dispose of it with household waste.
Make this product available for separate
collection.
z
Separate collection of used
products and packaging allows
materials to be recycled and
used again. Re-use of recycled
materials helps prevent
environmental pollution and
reduces the demand for raw
materials.
Local regulations may provide for
separate collection of electrical products
from the household, at municipal waste
sites or by the retailer when you
purchase a new product.
Black & Decker provides a facility for the
collection and recycling of Black & Decker
products once they have reached the
end of their working life. To take
advantage of this service please return
your product to any authorised repair
agent who will collect them on our behalf.
You can check the location of your nearest
authorised repair agent by contacting
your local Black & Decker office at the
address indicated in this manual.
Alternatively, a list of authorised
Black & Decker repair agents and full
details of our after-sales service and
contacts are available on the Internet at:
www.2helpU.com
Battery (fig. G & H)
NiCd/NiMH
If you want to dispose of the product
yourself, the battery must be removed as
described below and disposed of in
accordance with local regulations.
Warning! Disconnect the appliance from
the power supply before removing the
battery.
Preferably discharge the battery by
operating the appliance until the
motor stops.
Remove the dust bowl (3).
Using a flat-blade screwdriver, push
the battery cover (12) in at the notch
above the charger connector (9), so
that it unclips and can be removed.
Take hold of the battery casing to pull
the battery out of the appliance.
Place the battery in suitable
packaging to ensure that the
terminals cannot be short-circuited.
Take the battery to your service
agent or a local recycling station.
Warning! Once removed, the battery
cannot be refitted.
7
ENGLISH
Technical data
V1999 V2401
V1999N V2405
Voltage V 2.4 2.4
Battery type NiCd/NiMH NiCd/NiMH
Weight kg 0.9 0.9
V3601 V4890C
V3605 V4890CN
V4899
Voltage V 3.6 4.8
Battery type NiCd/NiMH NiCd/NiMH
Weight kg 0.9 0.9
V6090C
Voltage V 6.0
Battery type NiCd
Weight kg 1.0
Charger
Input voltage V
AC
230
Approx. charging time h 16
EC declaration of conformity
V1999 H 1/V1999N H 1/V2401 H 1/
V2405 H 1/V3601 H 1/V3605 H 1/
V4890C H 1/V4890CN H 1/V4899 H 1/
V6090C H 1
Black & Decker declares that these
products conform to:
73/23/EEC, EN 60335
The undersigned is responsible for
compilation of the technical file and
makes this declaration on behalf
of Black & Decker.
_
Kevin Hewitt
Director of Consumer Engineering
Spennymoor, County Durham DL16 6JG,
United Kingdom
1-12-2008
Guarantee
Black & Decker is confident of the quality
of its products and offers an outstanding
guarantee. This guarantee statement is
in addition to and in no way prejudices
your statutory rights.
The guarantee is valid within the territories
of the Member States of the European
Union and the European Free Trade Area.
If a Black & Decker product becomes
defective due to faulty materials,
workmanship or lack of conformity, within
24 months from the date of purchase,
Black & Decker guarantees to replace
defective parts, repair products subjected
to fair wear and tear or replace such
products to ensure minimum
inconvenience to the customer unless:
The product has been used for trade,
professional or hire purposes;
The product has been subjected to
misuse or neglect;
The product has sustained damage
through foreign objects, substances
or accidents;
Repairs have been attempted by
persons other than authorised repair
agents or Black & Decker service
staff.
To claim on the guarantee, you will need
to submit proof of purchase to the seller
or an authorised repair agent. You can
check the location of your nearest
authorised repair agent by contacting
your local Black & Decker office at the
address indicated in this manual.
Alternatively, a list of authorised
Black & Decker repair agents and full
details of our after-sales service and
contacts are available on the Internet at:
www.2helpU.com
Please visit our website
www.blackanddecker.co.uk to register
your new Black & Decker product and to
be kept up to date on new products and
special offers. Further information on the
Black & Decker brand and our range of
products is available at
www.blackanddecker.co.uk
11
DEUTSCH
Akku (Abb. G & H)
NiCd/NiMH
Falls Sie das Gerät selbst entsorgen
möchten, ist der Akku wie nachfolgend
beschrieben zu entfernen und gemäß
den örtlichen Vorschriften zu entsorgen.
Achtung! Trennen Sie das Gerät vom
Stromnetz, bevor Sie den Akku entfernen.
Der Akku sollte entladen werden,
indem das Gerät solange betrieben
wird, bis der Motor stehen bleibt.
Entfernen Sie den
Schmutzfangbehälter (3).
Verwenden Sie einen
Schraubendreher mit flacher Spitze
und drücken Sie den Akkudeckel (12)
an der Kerbe oberhalb der
Ladegerätebuchse (9) hinein, so daß
er sich löst und entfernt werden kann.
Halten Sie das Akkugehäuse fest, um
den Akku aus dem Gerät
herauszuziehen.
Legen Sie den Akku in eine geeignete
Verpackung, um sicherzustellen, daß
die Akkuanschlüsse nicht
kurzgeschlossen werden können.
Zur Wiederverwertung oder
umweltverträglichen Entsorgung ist
der Akku bei Ihrem Händler oder
einer kommunalen Sammelstelle
abzugeben.
Achtung! Ist der Akku erst einmal
ausgebaut, kann er nicht wieder
eingebaut werden.
Technische Daten
V1999 V2401
V1999N V2405
Spannung V 2,4 2,4
Akkutyp NiCd/NiMH NiCd/NiMH
Gewicht kg 0.9 0.9
V3601 V4890C
V3605 V4890CN
V4899
Spannung V 3,6 4,8
Akkutyp NiCd/NiMH NiCd/NiMH
Gewicht kg 0,9 0,9
V6090C
Spannung V 6,0
Akkutyp NiCd
Gewicht kg 1,0
Ladegerät
Netzspannung V
AC
230
Ladezeit (ca.) h 16
EU-Konformitätserklärung
V1999 H 1/V1999N H 1/V2401 H 1/
V2405 H 1/V3601 H 1/V3605 H 1/
V4890C H 1/V4890CN H 1/V4899 H 1/
V6090C H 1
Black & Decker erklärt hiermit, daß diese
Geräte entsprechend folgenden
Richtlinien und Normen konzipiert
wurden:
73/23/EWG, EN 60335
Der Unterzeichnete ist für die
Zusammenstellung der technischen
Datei verantwortlich und gibt diese
Erklärung im Namen von Black & Decker
ab.
_
Kevin Hewitt
Director of Consumer Engineering
Spennymoor, County Durham DL16 6JG,
United Kingdom
1-12-2008
14
FRANÇAIS
L’unité doit être débranchée du
secteur puis apportée à un
centre d’entretien agréé pour
réparation.
Le chargeur a été conçu pour
être utilisé uniquement
à l’intérieur.
Lisez et observez attentivement
les instructions avant d'utiliser
l'appareil.
Caractéristiques (fig. A)
1. Interrupteur marche/arrêt
2. Bouton de verrouillage
3. Réservoir à poussières
4. Boucle d'attache
Fig. A
5. Suceur plat (V2401/V2405/V3605/
V4890C/V4890CN/V4899/V6090C)
6. Brosse (V2401/V2405/V3605/
V4890C/V4890CN/V4899/V6090C)
Montage
V2401/V2405/V3605/V4890C/
V4890CN/V4899/V6090C - Mise en
place des accessoires (fig. A & B)
Ces modèles sont fournis avec les
accessoires suivants:
un suceur plat (5) pour les espaces
difficiles d’accès
une brosse (6) pour les meubles et
les escaliers
Procédez comme suit pour la mise en
place d'un accessoire :
Retirez les accessoires de l'appareil.
Insérez l'accessoire approprié à
l'avant de l'appareil.
Vous pouvez remettre l'autre accessoire
en place en l'enclenchant dans le porte-
accessoires.
Pour remettre les deux accessoires en
place :
Glissez le suceur plat dans la brosse.
Poussez les accessoires vers le bas
jusqu'à ce qu'ils s'enclenchent.
Utilisation
L’appareil peut être rechargé tout en
étant posé sur le plan de travail ou
suspendu au mur à l’aide du crochet
fourni. Le crochet fourni n’est pas
fourni avec V1999 et V1999N.
Chargez la batterie pendant au moins
16 heures avant la première utilisation.
Laissez le chargeur connecté à
l'appareil lorsque ce dernier n'est pas
utilisé.
Chargement de la batterie (fig. A)
Assurez-vous que l'appareil est
éteint. La batterie ne se chargera pas
si le bouton marche/arrêt est sur la
position marche.
Insérez la prise de charge (8) dans le
connecteur (9) à l’arrière de l'appareil.
Branchez le chargeur (7).
Mettez sous tension.
Laissez l'appareil se charger pendant
au moins 16 heures.
Le chargeur peut chauffer pendant la
charge. C’est normal et n'indique pas
une défaillance. L'appareil peut rester
branché indéfiniment au chargeur.
Attention ! Ne chargez pas la batterie
à une température ambiante inférieure
à 10 °C ou supérieure à 40 °C.
Démarrage et arrêt (fig. D)
Pour mettre l'appareil en marche,
faites glisser le bouton marche/arrêt
(1) vers l'avant.
Pour éteindre l'appareil, faites glisser
le bouton marche/arrêt vers l'arrière.
Entretien et nettoyage
Attention ! Nettoyez régulièrement les
filtres.
Nettoyage du réservoir à
poussières et des filtres
(fig. E & F)
Les filtres sont réutilisables et doivent
être nettoyés régulièrement.
Appuyez sur le bouton d'ouverture (2)
et retirez le réservoir à poussières (3).
Videz le réservoir à poussières.
16
FRANÇAIS
Placez la batterie dans un emballage
adapté pour éviter toute possibilité de
court-circuit entre les bornes.
Apportez-la à votre distributeur ou
à un centre de recyclage local.
Attention ! Une fois retirée, la batterie
ne peut plus être remise en place.
Caractéristiques techniques
V1999 V2401
V1999N V2405
Tension V 2,4 2,4
Type de batterie NiCd/NiMH NiCd/NiMH
Poidst kg 0,9 0,9
V3601 V4890C
V3605 V4890CN
V4899
Tension V 3,6 4,8
Type de batterie NiCd/NiMH NiCd/NiMH
Poids kg 0,9 0,9
V6090C
Tension V 6,0
Type de batterie NiCd
Poids kg 1,0
Chargeur
Tension secteur V
AC
230
Temps de chargement approx. h 16
Déclaration de conformité CE
V1999 H 1/V1999N H 1/V2401 H 1/
V2405 H 1/V3601 H 1/V3605 H 1/
V4890C H 1/V4890CN H 1/V4899 H 1/
V6090C H 1
Black & Decker déclare que ces outils
sont conformes aux normes:
73/23/CEE, EN 60335
Le soussigné est responsable de la
compilation du fichier technique et
effectue cette déclaration au nom
de Black & Decker.
_
Kevin Hewitt
Directeur du Développement
Spennymoor, County Durham DL16 6JG,
Royaume-Uni
1-12-2008
Garantie
Black & Decker est confiant dans la
qualité de ses produits et vous offre une
garantie très étendue. Ce certificat de
garantie est un document supplémentaire
et ne peut en aucun cas se substituer à
vos droits légaux. La garantie est valable
sur tout le territoire des Etats Membres
de l'Union Européenne et de la Zone de
Libre Echange Européenne.
Si un produit Black & Decker s'avère
défectueux en raison de matériaux en
mauvaises conditions, d'une erreur
humaine, ou d'un manque de conformité
dans les 24 mois suivant la date d'achat,
Black & Decker garantit le remplacement
des pièces défectueuses, la réparation
des produits usés ou cassés ou remplace
ces produits à la convenance du client,
sauf dans les circonstances suivantes :
Le produit a été utilisé dans un but
commercial, professionnel, ou a été
loué.
Le produit a été mal utilisé ou avec
négligence.
Le produit a subi des dommages à
cause d'objets étrangers, de
substances ou à cause d'accidents.
21
ITALIANO
Utilizzando un cacciavite a taglio,
spingere il copribatteria (12) fino alla
tacca sopra il connettore per
caricabatteria (9) in modo che si
sblocchi e possa essere rimosso.
Sostenere l’involucro della batteria
per estrarre la batteria stessa
dall’elettrodomestico.
La batteria deve essere imballata in
modo da garantire che i terminali non
possano essere cortocircuitati.
Portare la batteria presso il
concessionario o un impianto
di riciclaggio locale.
Attenzione! Una volta rimossa, la
batteria non può essere più rimontata.
Dati tecnici
V1999 V2401
V1999N V2405
Tensione V 2,4 2,4
Tipo di batteria NiCd/NiMH NiCd/NiMH
Peso kg 0,9 0,9
V3601 V4890C
V3605 V4890CN
V4899
Tensione V 3,6 4,8
Tipo di batteria NiCd/NiMH NiCd/NiMH
Peso kg 0,9 0,9
V6090C
Tensione V 6,0
Tipo di batteria NiCd
Peso kg 1,0
Caricabatteria
Tensione di rete V
AC
230
Tempo approssimativo
di carica h 16
Dichiarazione CE di
conformità
V1999 H 1/V1999N H 1/V2401 H 1/
V2405 H 1/V3601 H 1/V3605 H 1/
V4890C H 1/V4890CN H 1/V4899 H 1/
V6090C H 1
Black & Decker dichiara che questi
utensili sono stati costruiti in conformità a:
73/23/CEE, EN 60335
Il sottoscritto è responsabile della
compilazione del file tecnico e rilascia la
presente dichiarazione per conto
di Black & Decker.
_
Kevin Hewitt
Direttore di Ricerca e Sviluppo
Spennymoor, County Durham DL16 6JG,
United Kingdom
1-12-2008
Garanzia
Certa della qualità dei suoi prodotti,
Black & Decker offre una garanzia
eccezionale. Il presente certificato di
garanzia è complementare ai diritti
statutari e non li pregiudica in alcun
modo. La garanzia è valida entro il
territorio degli Stati membri dell'Unione
Europea e dell'EFTA (European Free
Trade Area).
Se un prodotto Black & Decker risulta
difettoso per qualità del materiale, della
costruzione o per mancata conformità
entro 24 mesi dalla data di acquisto,
Black & Decker garantisce la sostituzione
delle parti difettose, provvede alla
riparazione dei prodotti se ragionevolmente
usurati oppure alla loro sostituzione, in
modo da ridurre al minimo il disagio del
cliente a meno che:
Il prodotto non sia stato destinato ad
usi commerciali, professionali o al
noleggio;
Il prodotto non sia stato usato in
modo improprio o scorretto;
Il prodotto non abbia subito danni
causati da oggetti o sostanze
estranee oppure incidenti;
24
NEDERLANDS
Dit stelt de oplader buiten
werking. Koppel het apparaat
eenheid los van de netspanning
en breng het voor reparatie
naar een erkend servicecentrum.
De oplader is uitsluitend bedoeld
voor gebruik binnenshuis.
Lees de gehele
gebruiksaanwijzing aandachtig
door voordat u het apparaat
gaat gebruiken.
Onderdelen (fig. A)
1. Aan/uit-schakelaar
2. Ontgrendelknop
3. Neus
4. Hanglus
Fig. A
5. Spleetzuigmondstuk (V2401/V2405/
V3605/V4890C/V4890CN/V4899/
V6090C)
6. Borstelzuigmondstuk (V2401/V2405/
V3605/V4890C/V4890CN/V4899/
V6090C)
Assemblage
V2401/V2405/V3605/V4890C/
V4890CN/V4899/V6090C -
Bevestigen van de accessoires
(fig. A & B)
Deze modellen worden geleverd met de
volgende accessoires:
een spleetzuigmondstuk (5) voor
nauwe ruimtes
een borstelzuigmondstuk (6) voor
meubels en trappen
Ga als volgt te werk bij het plaatsen van
een accessoire:
Haal de accessoires van het apparaat.
Plaats het juiste accessoire op de
voorkant van het apparaat.
U kunt het andere accessoire weer
terugplaatsen door dit in de
accessoirehouder te klikken.
Voor het terugplaatsen van beide
accessoires:
Schuif de spleetzuigmond in de
borstel.
Duw de accessoires omlaag tot deze
op de plaats klikken.
Gebruik
Het apparaat kan worden opgeladen
terwijl het op een werkbank is
geplaatst of aan een muur is
gehangen met behulp van de
meegeleverde wandhaak.
De wandhaak wordt niet
meegeleverd met V1999 en V1999N.
Voor het eerste gebruik moet de accu
ten minste 16 uur worden opgeladen.
Laat het apparaat altijd aangesloten
op de oplader wanneer het niet wordt
gebruikt.
Opladen van de accu (fig. A)
Controleer of het apparaat is
uitgeschakeld. De accu wordt niet
opgeladen als de aan/uitschakelaar
op aan staat.
Steek de stekker van de oplader (8)
in de aansluiting (9) aan de
achterzijde van het apparaat.
Steek de stekker van de oplader (7)
in het stopcontact.
Schakel het apparaat in.
Laat het apparaat ten minste 16 uur
opladen.
Tijdens het opladen kan de oplader warm
worden. Dit is normaal en duidt niet op
problemen. Het apparaat kan voor
onbepaalde tijd op de oplader
aangesloten blijven.
Waarschuwing! Laad de accu niet op bij
omgevingstemperaturen onder 10 °C of
boven 40 °C.
Aan- en uitschakelen (fig. D)
Om in te schakelen schuift u de aan/
uit-schakelaar (1) naar voren.
Om uit te schakelen schuift u de aan/
uitschakelaar naar achteren.
Reiniging en onderhoud
Waarschuwing! Reinig de filters
regelmatig.
26
NEDERLANDS
Druk met behulp van een
schroevendraaier met vlakke kop het
accudeksel aan de inkeping boven
de connector zodanig in dat het
deksel loskomt en kan worden
verwijderd.
Trek met behulp van de accubehuizing
de accu uit het apparaat.
Berg de accu in een geschikte
verpakking op, zodat de polen niet
kunnen worden kortgesloten.
Breng de accu naar uw handelaar of
naar een plaatselijk
verwerkingscentrum voor klein
chemisch afval.
Waarschuwing! Eenmaal verwijderd kan
de accu niet worden teruggeplaatst.
Technische gegevens
V1999 V2401
V1999N V2405
Spanning V 2,4 2,4
Accutype NiCd/NiMH NiCd/NiMH
Gewicht kg 0,9 0,9
V3601 V4890C
V3605 V4890CN
V4899
Spanning V 3,6 4,8
Accutype NiCd/NiMH NiCd/NiMH
Gewicht kg 0,9 0,9
V6090C
Spanning V 6,0
Accutype NiCd
Gewicht kg 1,0
Caricabatteria
Netspanning V
AC
230
Oplaadtijd (bij benadering): h 16
EG-verklaring van
overeenstemming
V1999 H 1/V1999N H 1/V2401 H 1/
V2405 H 1/V3601 H 1/V3605 H 1/
V4890C H 1/V4890CN H 1/V4899 H 1/
V6090C H 1
Black & Decker verklaart dat deze
machines in overeenstemming zijn met:
73/23/EEG, EN 60335
De ondergetekende is verantwoordelijk
voor de samenstelling van de technische
gegevens en geeft deze verklaring
namens Black & Decker.
_
Kevin Hewitt
Director of Consumer Engineering
Spennymoor, County Durham DL16 6JG,
United Kingdom
1-12-2008
Garantie
Black & Decker heeft vertrouwen in zijn
producten en biedt een uitstekende
garantie. Deze garantiebepalingen
vormen een aanvulling op uw wettelijke
rechten en beperken deze niet.
De garantie geldt in de lidstaten van de
Europese Unie en de Europese
Vrijhandelsassociatie.
Mocht uw Black & Decker product binnen
24 maanden na datum van aankoop
defect raken tengevolge van materiaal-
of constructiefouten, dan garanderen wij
de kosteloze vervanging van defecte
onderdelen, de reparatie van het product
of de vervanging van het product, tenzij:
Het product is gebruikt voor
handelsdoeleinden, professionele
toepassingen of verhuurdoeleinden;
Het product onoordeelkundig is
gebruikt;
Het product is beschadigd door
invloeden van buitenaf of door een
ongeval;
Reparaties zijn uitgevoerd door
anderen dan onze servicecentra of
Black & Decker personeel.
29
ESPAÑOL
La unidad debe desconectarse
del suministro de red y llevarse
a un centro de servicio técnico
autorizado para su reparación.
El cargador está pensado
únicamente para su uso en
interiores.
Lea completamente el manual
antes de utilizar el aparato.
Características (fig. A)
1. Interruptor de encendido/apagado
2. Botón de liberación
3. Depósito de polvo
4. Anilla de colgar
Fig. A
5. Útil con hendidura (V2401/V2405/
V3605/V4890C/V4890CN/V4899/
V6090C)
6. Cepillo (V2401/V2405/V3605/
V4890C/V4890CN/V4899/V6090C)
Montaje
V2401/V2405/V3605/V4890C/
V4890CN/V4899/V6090C -
Instalación de los accesorios
(fig. A & B)
Estos modelos se suministran con los
accesorios siguientes:
un útil con hendidura (5) para
espacios reducidos
un cepillo (6) para muebles
y escaleras.
Para colocar un accesorio, proceda de la
forma siguiente:
Saque los accesorios del aparato.
Introduzca el accesorio
correspondiente en la parte delantera
del aparato.
Tendrá que volver a colocar el otro
accesorio encajándolo en el
portaaccesorios hasta que escuche un
clic.
Para recolocar ambos accesorios:
Deslice el útil con hendidura dentro
del cepillo.
Presione los accesorios hasta que
escuche un clic cuando encajen en
su posición.
Uso
El aparato puede cargarse colocado
sobre una mesa de trabajo o colgado
en la pared utilizando los ganchos de
pared suministrados. El gancho de
pared no se suministra con 1999 y
V1999N.
Antes del primer uso, cargue la batería
durante 16 horas como nimo.
Deje el aparato conectado al cargador
siempre que éste no se esté utilizando.
Carga de la batería (fig. A)
Asegúrese de que el aparato esté
apagado. La batería no carga
cuando el interruptor de encendido/
apagado está en la posición de
encendido.
Inserte el enchufe del cargador (8)
en el conector (9) de la parte trasera
del aparato.
Enchufe el cargador (7).
Conecte la corriente de red.
Deje que el aparato se cargue
durante al menos 16 horas.
Durante la carga, el cargador puede
llegar a calentarse. Esto es normal y no
constituye ningún problema. El aparato
puede dejarse conectado al cargador
indefinidamente.
¡Atención! No cargue la batería a una
temperatura ambiente inferior a 10 °C o
superior a 40 °C.
Encendido y apagado (fig. D)
Para encender el aparato, deslice el
interruptor de encendido/apagado (1)
hacia delante.
Para apagarlo, deslice el interruptor
de encendido/apagado hacia atrás.
Limpieza y mantenimiento
¡Atención! Limpie periódicamente los
filtros.
31
ESPAÑOL
¡Atención! Desconecte el aparato del
suministro de corriente antes de retirar la
batería.
Preferiblemente, descargue la
batería haciendo funcionar el aparato
hasta que se pare el motor.
Retire el depósito de polvo (3).
Utilizando un destornillador de punta
plana, empuje la tapa de la batería
(12) hacia dentro en la ranura por
encima del conector del cargador (9),
para soltarla y retirarla.
Sujete la cubierta de la batería para
sacarla del aparato.
Coloque la batería en un embalaje
adecuado para garantizar que sus
bornes no puedan entrar en
cortocircuito.
Entregue las baterías al servicio
posventa de Black & Decker o
deposítelas en un punto local de
reciclado.
¡Atención! Una vez extraída, no se
puede volver a montar la batería.
Características técnicas
V1999 V2401
V1999N V2405
Voltaje V 2,4 2,4
Tipo de batería NiCd/NiMH NiCd/NiMH
Peso kg 0,9 0,9
V3601 V4890C
V3605 V4890CN
V4899
Voltaje V 3,6 4,8
Tipo de batería NiCd/NiMH NiCd/NiMH
Peso kg 0,9 0,9
V6090C
Voltaje V 6,0
Tipo de batería NiCd
Peso kg 1,0
Caricabatteria
Tensión de la red V
AC
230
Tiempo aproximado de carga h 16
Declaración CE de
conformidad
V1999 H 1/V1999N H 1/V2401 H 1/
V2405 H 1/V3601 H 1/V3605 H 1/
V4890C H 1/V4890CN H 1/V4899 H 1/
V6090C H 1
Black & Decker certifica que estas
herramientas han sido construidas de
acuerdo a las normas siguientes:
73/23/CEE, EN 60335
El abajo firmante es responsable de la
compilación del archivo técnico y hace
esta declaración en nombre
de Black & Decker.
_
Kevin Hewitt
Director de Ingeniería
Spennymoor, County Durham DL16 6JG,
United Kingdom
1-12-2008
Garantía
Black & Decker confía plenamente en la
calidad de sus productos y ofrece una
garantía extraordinaria. Esta declaración
de garantía es una añadido, y en ningún
caso un perjuicio para sus derechos
estatutarios. La garantía es válida dentro
de los territorios de los Estados
Miembros de la Unión Europea y de los
de la Zona Europea de Libre Comercio.
Si un producto Black & Decker resultará
defectuoso debido a materiales o mano
de obra defectuosos o a la falta de
conformidad, Black & Decker garantiza,
dentro de los 24 meses de la fecha de
compra, la sustitución de las piezas
defectuosas, la reparación de los
productos sujetos a un desgaste y rotura
razonables o la sustitución de tales
productos para garantizar al cliente el
mínimo de inconvenientes, a menos que:
El producto haya sido utilizado con
propósitos comerciales,
profesionales o de alquiler;
El producto haya sido sometido a un
uso inadecuado o negligente;
34
PORTUGUÊS
A unidade deve ser desligada
da fonte de alimentação de
rede e levada para ser
reparada num centro de
reparação autorizado.
O carregador destina-se
apenas a ser utilizado no
interior.
Leia atentamente o manual
antes de utilizar o aparelho.
Características (fig. A)
1. Interruptor de ligar/desligar
2. Botão de libertação
3. Reservatório de pó
4. Presilha de pendurar
Fig. A
5. Bico estreito (V2401/V2405/V3605/
V4890C/V4890CN/V4899/V6090C)
6. Escova (V2401/V2405/V3605/
V4890C/V4890CN/V4899/V6090C)
Montagem
V2401/V2405/V3605/V4890C/
V4890CN/V4899/V6090C -
Colocação dos acessórios
(fig. A & B)
Esses modelos são fornecidos com os
seguintes acessórios:
um bico estreito (5) para espaços
limitados
uma escova (6) para móveis e
escadas
Para encaixar os acessórios, proceda da
seguinte forma:
Retire os acessórios do aparelho.
Insira o acessório adequado na parte
frontal do aparelho.
Poderá recolocar o outro acessório
encaixando-o no suporte para acessórios.
Para recolocar ambos acessórios:
Encaixe o bico estreito na escova.
Empurre-os até que encaixem no lugar.
Utilização
O aparelho pode ser carregado
colocado sobre uma mesa de
trabalho ou colocado na parede
utilizando o gancho de parede
fornecido. O gancho de parede não
é fornecido com os modelos V1999 e
V1999N.
Antes da primeira utilização,
carregue a bateria pelo menos
durante 16 horas seguidas.
Deixe o aparelho ligado ao
carregador sempre que este não
estiver a ser utilizado.
Carregamento da bateria (fig. A)
Assegure-se de que o aparelho está
desligado. A bateria não se carregará
com o interruptor de ligar/desligar na
posição de ligado.
Insira a ficha do carregador (8) no
conector (9) na parte traseira do
aparelho.
Ligue o carregador à corrente
eléctrica (7).
Ligue-o no interruptor.
Deixe o aparelho a carregar pelo
menos durante 16 horas seguidas.
É possível que o carregador aqueça um
pouco durante o processo de carga. Isso
é normal e não indica qualquer
problema. É possível deixar o aparelho
ligado ao carregador indefinidamente.
Advertência! Não carregue a bateria em
ambientes com temperatura inferior
a 10 °C ou superior a 40 °C.
Como ligar e desligar a
ferramenta (fig. D)
Para ligar o aparelho, empurre o
interruptor de ligar/desligar (1) para a
frente.
Para desligá-lo, empurre o interruptor
de ligar/desligar para trás.
Limpeza e manutenção
Advertência! Limpe os filtros
regularmente.
36
PORTUGUÊS
Utilizando uma chave de fendas
plana, empurre a tampa da bateria
(12) para dentro no entalhe acima do
conector do carregador (9), para
soltá-la e removê-la.
Agarre o corpo da bateria para retirá-
la do aparelho.
Coloque a bateria numa embalagem
apropriada para garantir que os
terminais não possam entrar em
curto-circuito.
Leve-a ao seu distribuidor ou a uma
estação local de reciclagem.
Advertência! Uma vez removida, não
será possível recolocar a bateria.
Dados técnicos
V1999 V2401
V1999N V2405
Voltagem V 2,4 2,4
Tipo de bateria NiCd/NiMH NiCd/NiMH
Peso kg 0,9 0,9
V3601 V4890C
V3605 V4890CN
V4899
Voltagem V 3,6 4,8
Tipo de bateria NiCd/NiMH NiCd/NiMH
Peso kg 0,9 0,9
V6090C
Voltagem V 6,0
Tipo de bateria NiCd
Peso kg 1,0
Carregador
Voltagem V
AC
230
Tempo aproximado
de carregamento h 16
Declaração de conformidade
V1999 H 1/V1999N H 1/V2401 H 1/
V2405 H 1/V3601 H 1/V3605 H 1/
V4890C H 1/V4890CN H 1/V4899 H 1/
V6090C H 1
A Black & Decker declara que estas
ferramentas foram concebidas em
conformidade com:
73/23/CEE, EN 60335
O signatário é responsável pela
compilaçao do ficheiro técnico e
apresenta esta declaraçao em nome
da Black & Decker.
_
Kevin Hewitt
Engenheiro Responsável
Spennymoor, County Durham DL16 6JG,
United Kingdom
1-12-2008
Garantia
A Black & Decker confia na qualidade
de seus produtos e oferece um programa
de garantia excelente. Esta declaração
de garantia soma-se aos seus direitos
legais e não os prejudica em nenhum
aspecto. A garantia será válida nos
territórios dos Estados Membros da
União Europeia e na Área de Livre
Comércio da Europa.
Caso algum produto da Black & Decker
apresente avarias devido a defeitos de
material, mão-de-obra ou ausência de
conformidade no prazo de 24 meses a
partir da data de compra, a
Black & Decker garantirá a substituição
das peças defeituosas, a reparação dos
produtos que foram submetidos a uso
adequado e remoção ou substituição dos
mesmos para assegurar o mínimo de
inconvenientes ao cliente a menos que:
O produto tenha sido utilizado para
fins comerciais, profissionais ou
aluguer;
O produto tenha sido submetido a
uso incorrecto ou descuido;
39
SVENSKA
Läs bruksanvisningen innan du
använder apparaten.
Detaljbeskrivning (fig. A)
1. Strömbrytare
2. Låsknapp
3. Dammbehållare
4. Upphängningsögla
Fig. A
5. Fogmunstycke (V2401/V2405/
V3605/V4890C/V4890CN/V4899/
V6090C)
6. Borstmunstycke (V2401/V2405/
V3605/V4890C/V4890CN/V4899/
V6090C)
Montering
V2401/V2405/V3605/V4890C/
V4890CN/V4899/V6090C -
Montering av tillbehör (fig. A & B)
Dessa modeller är försedda med följande
tillbehör:
ett fogmunstycke (5) för
svåråtkomliga ställen
ett borstmunstycke (6) för möbler och
trappsteg
Montera tillbehör så här:
Ta loss tillbehören från apparaten.
Sätt in önskat tillbehör framtill på
apparaten.
Du kan sätta tillbaks det tidigare
tillbehöret genom att klicka fast det på
tillbehörshållaren.
Sätta tillbaks bägge tillbehören:
Skjut in det smala munstycket i
borsten.
Tryck ner tillbehören tills de klickar
fast på plats.
Användning
Apparaten kan laddas medan den
står på en arbetsbänk eller hänger på
väggen med den bifogade
väggkroken. Väggkroken
tillhandahålles inte med V1999 och
V1999N.
Före den första användningen måste
batteriet laddas i minst 16 timmar.
Lämna alltid apparaten ansluten till
laddaren när den inte används.
Laddning av batteriet (fig. A)
Kontrollera att apparaten är
avstängd. Batteriet laddas inte om
strömbrytaren står i det påslagna
läget.
Sätt laddarkontakten (8) i
laddningsuttaget (9) på apparatens
baksida.
Nätanslut laddaren (7).
Sätt på huvudströmmen.
t apparaten laddas i minst 16 timmar.
Laddaren kan bli varm under laddningen.
Det är normalt och tyder inte på något
problem. Apparaten kan vara ansluten till
laddaren under obegränsad tid.
Varning! Ladda inte batteriet vid
temperaturer på under 10 °C eller över
40 °C.
Start och stopp (fig. D)
Skjut strömbrytaren (1) framåt för att
starta apparaten.
Skjut den bakåt för att slå av
apparaten.
Rengöring och underhåll
Varning! Rengör filtren regelbundet.
Rengöring av dammbehållaren
och filtren (fig. E & F)
Filtren är återanvändbara och ska
rengöras regelbundet.
Tryck på frikopplingsknappen (2) och
ta bort dammbehållaren (3).
Töm dammbehållaren.
Ta ut filterenheten (10) genom att
vrida den medurs.
Tvätta filtren i varmt vatten och tvål.
Om det skulle behövas, går också
dammbehållaren att tvätta.
Doppa aldrig apparaten i vatten.
Se till att dammbehållaren och filtren
har torkat helt.
Sätt tillbaka filterenheten(10) i
apparaten, och vrid moturs tills den
låses fast.
Sätt tillbaka dammbehållaren på
apparaten. Se till att dammbehållaren
knäpper fast.
41
SVENSKA
V6090C
Spänning V 6,0
Batterityp NiCd
Vikt kg 1,0
Laddare
Spänning V
AC
230
Laddningstid (ca.) h 16
CE-försäkran om
överensstämmelse
V1999 H 1/V1999N H 1/V2401 H 1/
V2405 H 1/V3601 H 1/V3605 H 1/
V4890C H 1/V4890CN H 1/V4899 H 1/
V6090C H 1
Black & Decker förklarar att dessa
verktyg är konstruerade i
överensstämmelse med:
73/23/EEG, EN 60335
Undertecknad är ansvarig för
sammanställningen av den tekniska filen
och gör denna försäkran som
representant för Black & Decker.
_
Kevin Hewitt
Director of Consumer Engineering
Spennymoor, County Durham DL16 6JG,
United Kingdom
1-12-2008
Reservdelar / reparationer
Reservdelar finns att köpa hos
auktoriserade Black & Decker verkstäder,
som även ger kostnadsförslag och
reparerar våra produkter.
Förteckning över våra auktoriserade
verkstäder finns på Internet, vår hemsida
www.blackanddecker.se samt
www.2helpU.com
Garanti
Black & Decker garanterar att produkten
är fri från material- och/eller
fabrikationsfel vid leverans till kund.
Garantin är i tillägg till konsumentens
lagliga rättigheter och påverkar inte
dessa. Garantin gäller inom
medlemsstaterna i Europeiska Unionen
och i det Europeiska Frihandelsområdet.
Om en Black & Decker produkt går
sönder på grund av material- och/eller
fabrikationsfel eller brister i
överensstämmelse med specifikationen,
inom 24 månader från köpet, åtar sig
Black & Decker att reparera eller byta ut
produkten med minsta besvär för
kunden.
Garantin gäller inte för fel som beror på:
normalt slitage
felaktig användning eller skötsel
att produkten skadats av främmande
föremål, ämnen eller genom
olyckshändelse
Garantin gäller inte om reparation har
utförts av någon annan än en
auktoriserad Black & Decker verkstad.
För att utnyttja garantin skall produkten
och inköpskvittot lämnas till
återförsäljaren eller till en auktoriserad
verkstad senast 2 månader efter det att
felet har upptäckts. För information om
närmaste auktoriserad verkstad; kontakta
det lokala Black & Decker kontoret på
den adress som är angiven i
bruksanvisningen. En lista på alla
auktoriserade verkstäder samt
servicevillkor finns även tillgängligt på
Internet, adress: www.2helpU.com
Besök vår webbplats
www.blackanddecker.se för att
registrera din nya Black & Decker-
produkt samt för att erhålla information
om nya produkter och specialerbjudanden.
Vidare information om märket
Black & Decker och vårt produktsortiment
kan återfinnas på
www.blackanddecker.se
45
NORSK
V6090C
Spenning V 6,0
Batteritype NiCd
Vekt kg 1,0
Lader
Spenning V
AC
230
Ladetid (ca.) h 16
CE-sikkerhetserklæring
V1999 H 1/V1999N H 1/V2401 H 1/
V2405 H 1/V3601 H 1/V3605 H 1/
V4890C H 1/V4890CN H 1/V4899 H 1/
V6090C H 1
Black & Decker erklærer at disse
verktøyer er konstruert i henhold til:
73/23/EØF, EN 60335
Undertegnede er ansvarlig for
sammenstillingen av den tekniske filen
og avgir denne erlæringen på vegne
av Black & Decker.
_
Kevin Hewitt
Director of Consumer Engineering
Spennymoor, County Durham DL16 6JG,
United Kingdom
1-12-2008
Reservdeler / reparasjoner
Reservdeler kan kjøpes hos autoriserte
Black & Decker serviceverksteder, som
også gir kostnadsoverslag og reparerer
våre produkter.
Oversikt over våre autoriserte
serviceverksteder finnes på Internet, vår
hjemmeside www.blackanddecker.no
samt www.2helpU.com
Garanti
Black & Decker garanterer at produktet
ikke har material- og/eller fabrikasjonsfeil
ved levering til kunde. Garantien er
i tillegg til kundens lovlige rettigheter og
påvirker ikke disse. Garantien gjelder
innen medlemsstatene i den Europeiske
Unionen og i det Europeiske
Frihandelsområdet.
Hvis et Black & Decker produkt går i
stykker på grunn av material- og/eller
fabrikasjonsfeil eller har mangler i forhold
til spesifikasjonene, innen 24 måneder
fra kjøpet, påtar Black & Decker seg
å reparere eller bytte ut produktet med
minst mulig vanskelighet for kunden.
Garantien gjelder ikke for feil som
kommer av:
normal slittasje
feilaktig bruk eller vedlikehold
(mislighold)
at produktet har blitt skadet av
fremmede gjenstander, emner eller
ved et uhell
Det gjøres oppmerksom på at produktet
ikke er beregnet på industriell/
profesjonell/yrkesmessig bruk, men til
hus- og hjemmebruk.
Garantien gjelder ikke om reparasjoner
har blitt utført av noen andre enn et
autorisert Black & Decker serviceverksted.
For å ta garantien i bruk skal produktet
og kjøpekvittering leveres til forhandleren
eller til et autorisert serviceverksted
senest 2 måneder etter at feilen har blitt
oppdaget. For informasjon om nærmeste
autoriserte serviceverksted; kontakt det
lokale Black & Decker kontoret på den
adressen som er angitt i bruksanvisningen.
En oversikt over alle autoriserte
serviceverksteder samt servicevilkår
finnes også tilgjengelig på Internet,
adresse: www.2helpU.com
Vennligst stikk innom våre nettsider på
www.blackanddecker.no for å registrere
ditt nye Black & Decker-produkt og for å
holde deg oppdatert om nye produkter og
spesialtilbud. Du finner mer informasjon
om Black & Decker og produktutvalget
vårt på www.blackanddecker.no
  • Page 1 1
  • Page 2 2
  • Page 3 3
  • Page 4 4
  • Page 5 5
  • Page 6 6
  • Page 7 7
  • Page 8 8
  • Page 9 9
  • Page 10 10
  • Page 11 11
  • Page 12 12
  • Page 13 13
  • Page 14 14
  • Page 15 15
  • Page 16 16
  • Page 17 17
  • Page 18 18
  • Page 19 19
  • Page 20 20
  • Page 21 21
  • Page 22 22
  • Page 23 23
  • Page 24 24
  • Page 25 25
  • Page 26 26
  • Page 27 27
  • Page 28 28
  • Page 29 29
  • Page 30 30
  • Page 31 31
  • Page 32 32
  • Page 33 33
  • Page 34 34
  • Page 35 35
  • Page 36 36
  • Page 37 37
  • Page 38 38
  • Page 39 39
  • Page 40 40
  • Page 41 41
  • Page 42 42
  • Page 43 43
  • Page 44 44
  • Page 45 45
  • Page 46 46
  • Page 47 47
  • Page 48 48
  • Page 49 49
  • Page 50 50
  • Page 51 51
  • Page 52 52
  • Page 53 53
  • Page 54 54
  • Page 55 55
  • Page 56 56
  • Page 57 57
  • Page 58 58
  • Page 59 59
  • Page 60 60
  • Page 61 61
  • Page 62 62
  • Page 63 63
  • Page 64 64
  • Page 65 65
  • Page 66 66
  • Page 67 67
  • Page 68 68

Black & Decker v 1999 Owner's manual

Category
Battery chargers
Type
Owner's manual

Ask a question and I''ll find the answer in the document

Finding information in a document is now easier with AI