Ryobi ERO2412VN Owner's manual
- Category
- Power sanders
- Type
- Owner's manual

ERO-2412VN
F
GB
D
E
I
P
NL
S
DK
N
FIN
GR
H
CZ
RUS
RO
PL
SLO
HR
TR
PONCEUSE EXCENTRIQUE MANUEL D’UTILISATION 1
RANDOM ORBITAL SANDER USER’S MANUAL 6
EXZENTER-SCHLEIFMASCHINE BEDIENUNGSANLEITUNG 10
LIJADORA EXCÉNTRICA MANUAL DE UTILIZACIÓN 15
LEVIGATRICE ECCENTRICA MANUALE D’USO 20
LIXADORA EXCÊNTRICA MANUAL DE UTILIZAÇÃO 25
EXCENTRISCHE SCHUURMACHINE GEBRUIKERSHANDLEIDING 30
EXCENTERSLIP INSTRUKTIONSBOK 35
EXCENTERSLIBEMASKINE BRUGERVEJLEDNING 40
EKSENTRISK PLANSLIPER
BRUKSANVISNING 44
TÄRYHIOMAKONE KÄYTTÄJÄN KÄSIKIRJA 48
ΕΚΚΕΝΤΡ ΤΡΙΒΕΙ ∆ΗΓΙΕΣ ΡΗΣΗΣ 52
EXCENTER CSISZOLÓ HASZNÁLATI ÚTMUTATÓ 57
EXCENTRICKÁ BRUSKA NÁVOD K OBSLUZE 62
ùäëñÖçíêàóÖëäÄü òãàîéÇÄãúçÄü åÄòàçÄ êìäéÇéÑëíÇé èé ùäëèãìÄíÄñàà 67
MAŞINĂ DE ŞLEFUIT EXCENTRICĂ MANUAL DE UTILIZARE 72
SZLIFIERKA MIMOŚRODOWA INSTRUKCJA OBSŁUGI 77
EKSCENTRIČNI BRUSILNIK UPORABNIŠKI PRIROČNIK 82
EKSCENTRI»NA BRUSILICA KORISNI»KI PRIRU»NIK 86
EKSANTRİK ZIMPARA ALETİ KULLANMA KILAVUZU 90
ERO-2412VN_20 lgs 8/16/04 3:10 PM Page A1

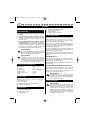
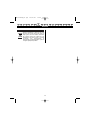
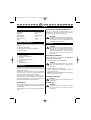
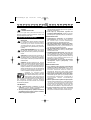
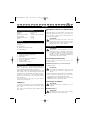
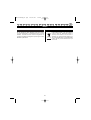
Fig. 1
Fig. 3Fig. 2
Fig. 4
4
1
2
3
7
6
5
ERO-2412VN_20 lgs 24/07/06 10:55 Page A2

Sous réserve de modifications techniques / Subject to technical modifications / Technische Änderungen vorbehalten /
Bajo reserva de modificaciones técnicas / Con riserva di eventuali modifiche tecniche / Com reserva de modificações técnicas /
Technische wijzigingen voorbehouden / Med förbehåll för tekniska ändringar / Med forbehold for tekniske ændringer /
Med forbehold om tekniske endringer / Tekniset muutokset varataan / Υπ την επιύλαη τενικών τρππιήσεων /
A műszaki módosítás jogát fenntartjuk / Změny technických údajů vyhrazeny /
åÓ„ÛÚ ·˚Ú¸ ‚ÌeÒeÌ˚ ÚeıÌ˘eÒÍËe ËÁÏeÌeÌËfl /
Sub rezerva modificaţiilor tehnice / Z zastrzeżeniem modyfikacji technicznych / Tehnične spremembe dopuščene
Podložno tehničkim promjenama / Teknik düzeltmeler hakk sakldr
Attention ! Il est indispensable que vous lisiez les instructions contenues dans ce manuel avant
le montage et la mise en service de l’appareil.
Important! It is essential that you read the instructions in this manual before mounting and operating
this machine.
Achtung! Bitte lesen Sie unbedingt vor Montage und Inbetriebnahme die Hinweise dieser Bedienungsanleitung.
¡Atención! Es imprescindible que lea las instrucciones de este manual antes del montaje y de la
puesta en servicio.
Attenzione! Prima di procedere al montaggio e alla messa in funzione, è indispensabile leggere
attentamente le istruzioni del presente manuale.
Atenção! É indispensável ler as instruções deste manual antes de montar e pôr em serviço.
Let op ! Het is absoluut noodzakelijk vóór montage en inbedrijfstelling de aanwijzingen in deze
handleiding te lezen.
Observera! Det är nödvändigt att läsa instruktionerna i denna bruksanvisning före montering och
driftsättning.
OBS! Denne brugsanvisning skal læses igennem inden montering og ibrugtagning.
Advarsel! Vennligst les instruksjonene i denne bruksanvisningen før du monterer og tar i bruk
maskinen.
Huomio! On ehdottoman välttämätöntä lukea tässä käyttöohjeessa annetut ohjeet ennen
asennusta ja käyttöönottoa.
Πρσή! Είναι απαραίτητ να διαάσετε τις συστάσεις των δηγιών αυτών πριν τη
συναρµλγηση και τη θέση σε λειτυργία
Figyelem! Feltétlenül fontos, hogy a jelen használati útmutatóban foglalt előírásokat az
összeszerelés és az üzembe helyezés ellőt elolvassa!
Důležité upozornění! Před montáží nářadí a uvedením do provozu je nutné si přečíst následující pokyny.
ÇÌËχÌËe! èee‰ Ò·ÓÍÓÈ Ë Á‡ÔÛÒÍÓÏ ËÌÒÚÛÏeÌÚ‡ ÌeÓ·ıÓ‰ËÏÓ ÔÓ˜eÒÚ¸ ËÌÒÚÛ͈ËË ËÁ ̇ÒÚÓfl˘e„Ó
ÛÍÓ‚Ó‰ÒÚ‚‡.
Atenţie! Este indispensabil sã citiţi instrucţiunile conţinute în acest mod de utilizare înainte de montaj
şi de punerea în funcţiune.
Uwaga! Przed montowaniem i uruchomieniem, koniecznie musicie się Państwo zapoznać
z zaleceniami zawartymi w niniejszym sposobie użycia.
Pomembno! Zelo pomembno je, da pred namestitvijo in prvo uporabo te naprave preberete
navodila v tem priročniku.
Upozorenje! Važno je da upute u ovom Korisničkom priručniku pročitate prije postavljanja i uporabe ovog alata.
Dikkat! Montajdan ve aletin kullanmna başlamadan bu klavuzda bulunan talimatlar
okumanz gerekmektedir.
ERO-2412VN_20 lgs 24/07/06 10:55 Page A3
Page is loading ...
Page is loading ...

CONSIGNES DE SÉCURITÉ SPÉCIFIQUES
AUX PONCEUSES
■ N'utilisez jamais votre ponceuse sur des surfaces
humides.
■ La feuille de papier abrasif ne doit pas être trop
grande. Si vous laissez le papier abrasif dépasser
du patin, vous vous exposez à des risques de
blessures graves.
■ Le sac à poussières doit être installé sur l'outil et
vidé régulièrement. Pour installer le sac à poussières,
emboîtez la bague du sac sur la buse d'évacuation
située à l'arrière de la ponceuse en la tournant vers la
droite jusqu'à ce que le sac soit correctement fixé.
Pour retirer le sac, procédez dans l'ordre inverse.
AVERTISSEMENT
Ne jetez pas les poussières provenant du ponçage
dans un feu ouvert car les matériaux sous forme
de fines particules peuvent être explosifs.
AVERTISSEMENT
Vous devez porter un masque anti-poussière
adéquat lorsque vous poncez des surfaces
recouvertes de peinture à base de plomb ainsi
que certains bois et métaux pour éviter d'inhaler
de la poussière ou des vapeurs toxiques.
CARACTÉRISTIQUES PRODUIT
Alimentation 230 V ~ 50 Hz
Puissance 240 W
Vitesse à vide7000 - 12000 tours/min
Diamètre orbital 2,4 mm
Dimensions du patin 125 mm
Poids 1,7 kg
APPLICATIONS
N'utilisez votre outil que pour les applications
mentionnées ci-après:
■ Ponçage du bois.
■ Retrait de la rouille et ponçage de l'acier.
■ Ponçage des plastiques.
DESCRIPTION
1. Interrupteur Marche/Arrêt
2. Patin auto-aggripant
3. Papier abrasif
4. Variateur électronique de vitesse
5. Bague du sac à poussière
6. Sac à poussière
7. Témoin de présence tension
CARACTÉRISTIQUES
Votre ponceuse s'utilise avec des papiers abrasifs de
grains différents (gros, moyens ou fins). Sur du bois,
le passage de la ponceuse dans le sens de la fibre
donne un ponçage lisse, sans éraflures.
Votre ponceuse est équipée d'une poignée offrant une
bonne prise en main et un grand confort d'utilisation.
Les risques de fatigue faisant suite à une utilisation
prolongée sont ainsi réduits.
Un système d'aspiration de la poussière est intégré à la
ponceuse. La poussière est aspirée par les trous dans le
papier abrasif et le patin (voir fig. 2).
Avant d'utiliser votre ponceuse, familiarisez-vous avec
toutes ses fonctionnalités et ses spécificités en termes de
sécurité.
INTERRUPTEUR (1)
Cette ponceuse est équipée d’un simple interrupteur.
Pour METTRE EN MARCHE la ponceuse, poussez
l'interrupteur vers la gauche ("ON").
Pour ARRÊTER la ponceuse, poussez l'interrupteur vers
la droite ("OFF").
VARIATEUR ÉLECTRONIQUE DE VITESSE (4)
Le variateur de vitesse électronique vous permet de
régler la vitesse de ponçage en fonction du type de
surface à poncer (du bois de construction lourd et
résistant au bois de placage délicat).
AVERTISSEMENT
Ne relâchez pas votre vigilance une fois
familiarisé avec votre ponceuse. N'oubliez jamais
qu'il suffit d'une fraction de seconde d'inattention
pour vous blesser gravement.
FONCTIONNEMENT
AVERTISSEMENT
Votre ponceuse ne doit jamais être branchée
lorsque vous montez des pièces, effectuez des
réglages, retirez ou mettez en place une feuille
de papier abrasif, lorsque vous nettoyez votre
outil ou lorsque vous ne l'utilisez pas. Une fois la
ponceuse débranchée, tout risque de démarrage
involontaire pouvant causer des blessures
corporelles graves est écarté.
3
Français
GB D E I P NL S DK N FIN GR H CZ RUS PL
RO
SLO TR
HR
F
ERO-2412VN_20 lgs 24/07/06 10:55 Page 3
Page is loading ...

FONCTIONNEMENT
VIDAGE DU SAC À POUSSIÈRES (Fig. 4)
Pour plus d'efficacité, videz le sac à poussière dès qu'il
est à moitié plein. Cela permet une meilleure circulation
de l'air à l'intérieur du sac. Videz et nettoyez
minutieusement le sac à poussières après chaque
opération de ponçage et avant de ranger la ponceuse.
Pour vider le sac à poussières, procédez de la manière
suivante :
■ Débranchez la ponceuse.
AVERTISSEMENT
Si la ponceuse n'est pas débranchée,
un démarrage involontaire peut se produire et
provoquer des blessures corporelles graves.
■ Retirez la bague du sac à poussières de la buse de
la ponceuse.
■ Retirez le sac à poussières de sa bague.
■ Secouez le sac à poussières pour le vider.
■ Fixez à nouveau le sac à la bague.
■ Remboîtez la bague du sac sur la buse de la ponceuse.
TÉMOIN DE PRÉSENCE TENSION
Cet outil est équipé d'un témoin de présence tension (7)
qui s'allume lorsque l'outil est branché. Ce témoin attire
votre attention sur le fait que l'outil est sous tension et
qu'il se mettra en marche dès que vous appuierez sur
l'interrupteur.
PROTECTION DE L’ENVIRONNEMENT
Recyclez les matières premières au lieu de
les jeter. Pour le respect de l’environnement,
triez vos déchets et déposez l’outil usagé,
les accessoires et l’emballage dans
des conteneurs spéciaux ou auprès
d’organismes chargés de leur recyclage.
Ryobi prend la protection de l'environnement
très au sérieux.
5
Français
GB D E I P NL S DK N FIN GR H CZ RUS PL
RO
SLO TR
HR
F
ERO-2412VN_20 lgs 24/07/06 10:55 Page 5

IMPORTANT
READ THESE SAFETY INSTRUCTIONS.
Before using the RANDOM ORBITAL SANDER, please
read the manual carefully, especially the safety
instructions. Keep this manual for future reference.
GENERAL SAFETY RULES
WARNING
Read all instructions. Failure to follow all
instructions listed below may result in electric
shock, fire and/or serious injury. The term
"power tool'' in all of the warnings listed below
refers to your mains operated (corded) power
tool or battery operated (cordless) power tool.
SAFETY ALERT SYMBOL. Indicates caution or
warning. May be used in conjunction with other
symbols or pictures.
WARNING: Failure to obey a safety warning can
result in serious injury to yourself or to others.
Always follow the safety precautions to reduce
the risk of fire, electric shock and personal injury.
WARNING: Do not attempt to operate this tool
until you have read thoroughly and understood
completely safety rules, etc. contained in this
manual. Failure to comply can result in accidents
involving fire, electric shock or serious personal
injury. Save owners manual and review
frequently for continuing safe operation and
instructing others who may use this tool.
The operation of any tool can result in
foreign objects being thrown into your
eyes, which can result in severe eye
damage. Before beginning power tool
operation, always wear safety goggles
or safety glasses with side shields and a full face shield
when needed. We recommend Wide Vision Safety Mask
for use over eyeglasses or standard safety glasses with
side shields.
WORK AREA
■ Keep work area clean and well lit. Cluttered and
dark areas invite accidents.
■ Do not operate power tools in explosive
atmospheres, such as in the presence of
flammable liquids, gases, or dust. Power tools
create sparks which may ignite the dust or fumes.
■ Keep children and bystanders away while
operating a power tool. Distractions can cause you
to lose control.
ELECTRICAL SAFETY
■ Power tool plugs must match the outlet.
Never modify the plug in any way. Do not use any
adapter plugs with earthed (grounded) power tools.
Unmodified plugs and matching outlets will reduce
risk of electric shock.
■ Avoid body contact with earthed or grounded
surfaces such as pipes, radiators, ranges and
refrigerators. There is an increased risk of electric
shock if your body is earthed or grounded.
■ Do not expose power tools to rain or wet
conditions. Water entering a power tool will increase
the risk of electric shock.
■ Do not abuse the cord. Never use the cord for
carrying, pulling or unplugging the power tool.
Keep cord away from heat, oil, sharp edges or
moving parts. Damaged or entangled cords increase
the risk of electric shock.
■ When operating a power tool outdoors,
use an extension cord suitable for outdoor use.
Use of a cord suitable for outdoor use reduces the
risk of electric shock.
PERSONAL SAFETY
■ Stay alert, watch what you are doing and use
common sense when operating a power tool.
Do not use a power tool while you are tired or
under the influence of drugs, alcohol or medication.
A moment of inattention while operating power tools
may result in serious personal injury.
■ Use safety equipment. Always wear eye protection.
Safety equipment such as dust mask, non-skid safety
shoes, hard hat, or hearing protection used for
appropriate conditions will reduce personal injuries.
■ Avoid accidental starting. Ensure the switch is in
the off position before plugging in. Carrying power
tools with your finger on the switch or plugging in
power tools that have the switch on invites accidents.
■ Remove any adjusting key or wrench before
turning the power tool on. A wrench or a key left
attached to a rotating part of the power tool may
result in personal injury.
■ Do not overreach. Keep proper footing and
balance at all times. This enables better control of
the power tool in unexpected situations.
6
GB
English
F D E I P NL S DK N FIN GR H CZ RUS PL
RO
SLO TR
HR
ERO-2412VN_20 lgs 24/07/06 10:55 Page 6

GENERAL SAFETY RULES
■ Dress properly. Do not wear loose clothing
or jewellery. Keep your hair, clothing and gloves
away from moving parts. Loose clothes, jewellery or
long hair can be caught in moving parts.
■ If devices are provided for the connection of dust
extraction andcollection facilities, ensure these
are connected and properly used. Use of these
devices can reduce dust related hazards.
POWER TOOL USE AND CARE
■ Do not force the power tool. Use the correct
power tool for your application. The correct power
tool will do the job better and safer at the rate for
which it was designed.
■ Do not use the power tool if the switch does not turn
it on and off. Any power tool that can not be controlled
with the switch is dangerous andmust be repaired.
■ Disconnect the plug from the power source
before making any adjustments, changing
accessories, or storing power tools. Such
preventive safety measures reduce the risk of starting
the power tool accidentally.
■ Store idle power tools out of the reach of children
and do not allow persons unfamiliar with the
power tool or these instructions to operate the
power tool. Power tools are dangerous in the hands
of untrained users.
■ Maintain power tools. Check for misalignment or
bindling of moving parts, breakage of parts and any
other condition that may affect the power tools
operation. If damaged, have the power tool repaired
before use. Many accidents are caused by poorly
maintained power tools.
■ Keep cutting tools sharp and clean. Properly
maintained cutting tools with sharp cutting edges are
less likely to bind and are easier to control.
■ Use the power tool, accessories and tool bits etc.,
in accordance with these instructions and in the
manner intended for the particular type of power
tool, taking into account the working conditions
and the work to be performed. Use of the power
tool for operations different from intended could result
in a hazardous situation.
SERVICE
■ Have your power tool serviced by a qualified
repair person using only identical replacement
parts. This will ensure that the safety of the power
tool is maintained.
■ Check damaged parts. Before further use of the tool,
a guard or other part that is damaged should be
carefully checked to determine that it will operate
properly and perform its intended function. Check for
alignment of moving parts, free running of moving parts,
breakage of parts, mounting and any other part that is
damaged should be properly repaired or replaced by an
authorized service center unless otherwise indicated in
this instruction manual. Have defective switches
replaced by an authorized service facility. Do not use
the tool if the switch does not turn it on and off.
SPECIFIC SAFETY INSTRUCTIONS FOR
SANDERS
■ Always wear safety goggles and a dust mask
when sanding, especially sanding over-head.
■ The machine is not suitable for wet sanding.
■ Do not use sanding paper larger than needed.
Extra paper extending beyond the sanding pad can
also cause serious lacerations.
■ The dust bag shall be equipped with the tool.
And it shall be emptied frequently. To connect dust bag,
insert the adapter of dust bag to the dust-collection
opening on the rear end of the sander. And screw the
adapter clockwise until the connection is credible.
Disconnect the bag in the reverse order.
WARNING
Do not throw sanding dust on an open fire because
materials in fine particle form may be explosive.
WARNING
A suitable breathing respirator must be worn
while sanding lead paint, some woods and metal
to avoid breathing the harmful/toxic dust or air.
SPECIFICATION
Input 230 V ~ 50 Hz
Wattage 240 W
No load speed 7000-12000 min
-
1
Orbital diameter 2.4 mm
Pad size 125 mm
Weight 1.7 kg
APPLICATIONS
Use only for the purposes listed below:
■ Sanding on wood surfaces.
7
GB
English
F D E I P NL S DK N FIN GR H CZ RUS PL
RO
SLO TR
HR
ERO-2412VN_20 lgs 24/07/06 10:55 Page 7

APPLICATIONS
■ Removing rust from and sanding steel surfaces.
■ Sanding plastics.
DESCRIPTION
1. ON/OFF Switch
2. Quick Change Hook & Loop Pad
3. Sandpaper
4. Variable Speed Control
5. Dust bag frame
6. Dust bag
7. Livetool indicator
FEATURES
Your sander is suitable for sanding with coarse, medium,
and fine grit sandpaper. It will produce a fine scratch free
finish when used to sand with the grain on wood surfaces.
Your sander has a comfortable palm grip handle that
provides maximum one-hand comfort, and reduces
operator fatigue during continuous sanding operations.
Your sander also has a built-in dust collection that
collects dust through punched holes in the sandpaper
and cushion (Fig. 2).
Before attempting to use your sander, familiarize yourself
with all operating features and safety requirements.
SWITCH (1)
This tool is equipped with a simple switch control. To turn
the sander "ON", slide the switch to the left.
Slide the switch to the right to turn the sander "OFF".
VARIABLE SPEED CONTROL (4)
The electronic speed control allows the operator to adjust
speed to meet varity sanding material from tough heavy
grained timber to delicate veneer.
WARNING
Do not allow familiarity with your sander to make
you careless. Remember, a careless fraction of a
second is sufficient to inflict severe injury.
OPERATION
WARNING
Your sander should never be connected to power
supply when you are assembling parts, making
adjustments, assembling or replacing sandpaper,
cleaning, or when not in use.
Disconnecting sander will prevent accidental
starting that could cause serious personal injury.
INSTALLING ADHESIVE SANDPAPER
Inspect sandpaper before installing. DO NOT use
broken or defective sandpaper.
■ Unplug your sander.
WARNING
Failure to unplug your sander could result in
accidental starting causing possible serious
personal injury.
■ If replacing sandpaper, remove old sandpaper by
peeling it off.
■ Holes in sand paper must line up with holes in
backing pad in order for the dust collection feature of
your sander to function properly.
Note: DO NOT use sander without sandpaper.
Doing so will damage the cushion
PREPARING FOR OPERATION
CAUTION
Be careful not to let your hand completely cover
air vents.
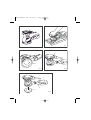
SANDING (Fig. 1)
WARNING
Unsecured work could be thrown towards the
operator causing injury.
Hold your sander in front and away from you, keeping it
clear of the workpiece. Start your sander by pressing the
switch button to "ON" position and letting the motor build
to its maximum speed. Gradually lower your sander on
the work with a slight forward movement. Move it slowly
using forward and backward strokes.
DO NOT FORCE. The weight of the unit supplies adequate
pressure, so let the sandpaper and sander do the work.
Applying additional pressure only slows the motor, rapidly
wears sandpaper and greatly reduces sander speed.
Excessive pressure will overload the motor causing
possible damage from motor overheating and can result in
inferior work.
Any finish or resin on wood may soften from the frictional
heat. Do not allow sanding on one spot too long as the
sander's rapid action may remove too much material,
making the surface uneven.
8
GB
English
F D E I P NL S DK N FIN GR H CZ RUS PL
RO
SLO TR
HR
ERO-2412VN_20 lgs 24/07/06 10:55 Page 8

OPERATION
WARNING
Do not wear loose clothing or jewelry when
operating sander. They could get caught in
moving parts causing serious injury. Keep head
away from sander and sanding area. Hair could
be drawn into sander causing serious injury.
ORBITAL MOTION (Fig. 2)
Orbital motion is ideal for fast cutting action when removing
old finishes, smoothing rough wood, cutting stock down to
required dimensions, or for finishing surfaces to be painted.
The sandpaper moves in tiny circles at a very high speed,
allowing the sander to move easily.
WARNING
Collected sanding dust from sanding surface
coatings such as polyurethanes, linseed oil, etc.
can self-ignite in your sander dust bag or
elsewhere and cause fire. To reduce the risk of fire
always empty your dust bag frequently while
sanding and never store or leave a sander without
totally emptying its dust bag. Also follow the
recommendations of the coatings manufacturers.
USING THE DUST BAG ASSEMBLY
The dust bag assembly provides a dust collection system
for the sander. Sanding dust is drawn up through the
holes of the sanding disc and collected in the dust bag
during sanding.
TO ATTACH THE DUST BAG ASSEMBLY (Fig. 3)
Follow these directions to attach the dust bag assembly.
■ Unplug the sander.
WARNING
Failure to unplug the tool could result in
accidental starting causing possible serious injury.
■ Slide the dust bag assembly onto the blower exhaust
on the sander using a slight twisting motion.
TO EMPTY THE DUST BAG ASSEMBLY (Fig. 4)
For more efficient operation, empty the dust bag when it is
no more than half full. This will permit the air to flow
through the bag better. Always empty and clean the dust
bag thoroughly upon completion of a sanding operation
and before placing the sander in storage.
To empty dust bag:
■ Unplug your sander.
WARNING
Failure to unplug your sander could result in
accidental starting causing possible serious
personal injury.
■ Remove the dust bag assembly from the sander.
■ Remove the dust bag from the frame.
■ Shake out the dust.
■ Replace the dust bag on the frame.
■ Replace the dust bag assembly on the sander.
LIVE TOOL INDICATOR
This tool features a Livetool indicator (7) which
illuminates as soon as the tool is connected to the supply.
This warns the user that the tool is connected and will
operate when the switch is pressed.
ENVIRONMENTAL PROTECTION
Do not dispose of in general household
waste. Instead, dispose of in an
environmentally friendly way. Contact your
local recycling cetre ou council for advise.
Ryobi takes the care of the envrionment
very seriously.
9
GB
English
F D E I P NL S DK N FIN GR H CZ RUS PL
RO
SLO TR
HR
ERO-2412VN_20 lgs 24/07/06 10:55 Page 9
Page is loading ...
Page is loading ...

ALLGEMEINE SICHERHEITSVORSCHRIFTEN
■ Vergewissern Sie sich, dass alle Teile des Geräts in
unbeschädigtem Zustand sind. Bevor Sie Ihr Gerät
weiterverwenden, sollten Sie prüfen, ob ein
beschädigtes Teil oder Zubehörteil noch funktioniert
oder seine Funktion erfüllt. Prüfen Sie auch, ob die
beweglichen Teile richtig eingesetzt sind und
einwandfrei funktionieren. Vergewissern Sie sich, dass
kein Geräteteil gebrochen ist. Kontrollieren Sie die
Montage und alle anderen Elemente, die sich auf den
Betrieb des Geräts auswirken können. Alle
beschädigten Teile müssen von einem autorisierten
Ryobi-Kundendienst repariert oder ersetzt werden,
außer bei einer gegenteiligen Angabe im vorliegenden
Bedienungshandbuch. Lassen Sie alle defekten
Schalter von einem autorisierten Ryobi-Kundendienst
auswechseln. Verwenden Sie das Gerät nicht, wenn
der Ein-/Aus-Schalter defekt ist und das Gerät nicht
ein- oder ausgeschaltet werden kann.
SPEZIFISCHE SICHERHEITSVORSCHRIFTEN
FÜR SCHLEIFMASCHINEN
■ Tragen Sie stets eine Sicherheitsbrille und eine
Staubschutzmaske während Sie schleifen, vor allem,
wenn Sie die Schleifmaschine über Ihrem Kopf halten.
■ Verwenden Sie Ihre Schleifmaschine nie auf
feuchten Flächen.
■ Das Schleifpapier darf nicht zu groß sein. Wenn das
Schleifpapier über den Schleifschuh hinausragt,
kann es zu schweren Verletzungen kommen.
■ Der Staubbeutel muss am Gerät befestigt sein
und regelmäßig geleert werden. Zur Installation des
Staubbeutels muss der Ring des Beutels auf die
Absaugdüse aufgesetzt werden, die sich am hinteren
Teil der Schleifmaschine befindet. Der Ring muss im
Uhrzeigersinn gedreht werden, bis der Beutel
einwandfrei befestigt ist. Um den Beutel zu entfernen,
gehen Sie in umgekehrter Reihenfolge vor.
WARNUNG
Werfen Sie den Schleifstaub nie in ein offenes
Feuer, denn die Bestandteile können in Form
von feinen Partikeln explosiv sein.
WARNUNG
Tragen Sie eine geeignete Staubschutzmaske,
wenn Sie Flächen schleifen, die mit einer
bleihaltigen Farbe lackiert sind, sowie beim
Schleifen bestimmter Holzarten und Metalle,
um zu vermeiden, dass Sie giftige Staube oder
Dämpfe einatmen.
PRODUKTDATEN
Stromversorgung 230 V ~ 50 Hz
Leistung 240 W
Leerlaufdrehzahl 7000-12000 U./Min.
Umlaufdurchmesser 2,4 mm
Maße des Gleitschuhs 125 mm
Gewicht 1,7 kg
ANWENDUNGEN
Verwenden Sie Ihre Schleifmaschine nur für die unten
aufgeführten Anwendungen:
■ Schleifen von Holz.
■ Entfernen von Rost und Schleifen von Stahl.
■ Schleifen von Kunststoff.
BESCHREIBUNG
1. Ein-/Aus-Schalter
2. Selbsthaftender Schleifschuh
3. Schleifpapier
4. Elektronischer Drehzahlregler
5. Staubbeutelring
6. Auffangsack
7. Spannungs-LED
MERKMALE
Ihre Schleifmaschine wird mit Schleifpapier mit
unterschiedlichem Korn verwendet (grob, mittel oder fein).
Durch Verwendung der Schleifmaschine auf Holz in
Faserrichtung wird ein glattes, rillenfreies Schleifen erzielt.
Ihre Schleifmaschine ist mit einem Griff ausgestattet,
der eine gute Handhabung und einen großen
Bedienungskomfort bietet. Dadurch werden die
Ermüdungsrisiken bei einem längeren Einsatz reduziert.
Ein Staubansaugsystem ist in die Schleifmaschine
integriert. Der Staub wird über die Löcher im
Schleifpapier und Schleifschuh angesaugt (siehe Abb. 2).
Bevor Sie Ihre Schleifmaschine verwenden, sollten
Sie sich mit allen Funktionen und besonderen
Sicherheitsvorschriften vertraut machen.
EIN-/AUS-SCHALTER (1)
Diese Schleifmaschine ist mit einem einfachen Ein-/Aus-
Schalter ausgestattet. Drücken Sie den Ein-/Aus-Schalter
zum EINSCHALTEN der Schleifmaschine nach links ("ON").
12
D
Deutsch
F GB E I P NL S DK N FIN GR H CZ RUS PL
RO
SLO TR
HR
ERO-2412VN_20 lgs 24/07/06 10:55 Page 12
Page is loading ...
Page is loading ...
Page is loading ...
Page is loading ...

CONSIGNAS DE SEGURIDAD ESPECÍFICAS
PARA LAS LIJADORAS
■
Use siempre gafas de seguridad herméticas y una
máscara contra el polvo cuando utilice la lijadora,
especialmente en los trabajos en los que deba sujetar la
lijadora por encima de su cabeza.
■
No utilice en ningún caso la lijadora en superficies
húmedas.
■
La hoja de papel abrasivo de lija no debe ser
demasiado grande. Si la hoja de lija rebasa el patín,
podrá sufrir heridas graves.
■
El saco para el polvo debe estar instalado cuando
trabaje con la máquina y se lo debe vaciar con
regularidad. Para colocar el saco para el polvo, inserte
el anillo del saco en la boquilla de salida que se
encuentra en la parte trasera de la lijadora, haciéndolo
girar hacia la derecha hasta que el saco quede
firmemente sujeto. Para retirar el saco repita el mismo
procedimiento en sentido inverso.
ADVERTENCIA
No tire el polvo recogido en el saco en un fuego
que no esté protegido porque la finas partículas del
material pueden producir una explosión.
ADVERTENCIA
Debe utilizar una máscara facial con filtro cuando
lije superficies cubiertas con pintura a base de
plomo, al igual que cuando trabaje ciertas maderas
o metales, para evitar la inhalación de polvo o de
vapores tóxicos.
CARACTERÍSTICAS DEL PRODUCTO
Alimentación eléctrica 230 V ~ 50 Hz
Potencia 240 W
Velocidad en vacío 7.000-12.000 r.p.m.
Diámetro orbital 2,4 mm
Dimensiones del patín: 125 mm
Peso 1,7 kg
APLICACIONES
Utilice la herramienta únicamente para las aplicaciones que
se indican a continuación:
■
Lijar madera.
■
Lijar y sacar el óxido en elementos de hierro.
■
Lijar plásticos.
DESCRIPCIÓN
1. Interruptor Marcha/Parada
2. Patín autoadhesivo
3. Papel abrasivo
4. Variador electrónico de velocidad
5. Anillo del saco para el polvo
6. Saco para el polvo
7. Indicador de presencia de tensión
CARACTERÍSTICAS
La lijadora puede utilizarse con diferentes granos de papel
abrasivo (grueso, medio o fino). Al lijar madera, la aplicación
de la lijadora en el sentido de la fibra produce un lijado liso y
sin marcas.
La empuñadura de la lijadora permite sujetarla correctamente
y ofrece un gran confort de uso. De este modo, se reduce la
fatiga cuando deba trabajar con la máquina de forma
prolongada.
Se ha integrado en la máquina un sistema de aspiración del
polvo. El polvo se aspira por los orificios que tienen el patín
y la hoja de papel abrasivo (véase la fig. 2).
Antes de utilizar la lijadora, familiarícese con todas sus
funciones y características relativas a la seguridad.
INTERRUPTOR (1)
La lijadora está equipada con un interruptor simple.
Para PONER EN MARCHA la lijadora, pulse el interruptor
hacia la izquierda (posición "ON").
Para DETENER la lijadora, pulse el interruptor hacia la
derecha (posición "OFF").
VARIADOR ELECTRÓNICO DE VELOCIDAD (4)
El variador electrónico de velocidad le permite ajustar la
velocidad de lijado en función de la superficie que deba lijar
(de la madera de construcción, pesada y resistente, a la
madera de acabado más delicada).
ADVERTENCIA
Aún cuando esté familiarizado con la lijadora no
deje de estar atento. No olvide que basta con estar
desatento una fracción de segundo para herirse
gravemente.
17
E
Español
F GB D I P NL S DK N FIN GR H CZ RUS PL
RO
SLO TR
HR
ERO-2412VN_20 lgs 24/07/06 10:55 Page 17

FUNCIONAMIENTO
ADVERTENCIA
La lijadora no debe nunca estar enchufada cuando
monte piezas, efectúe ajustes, coloque o retire una
hoja de papel abrasivo, ni tampoco cuando limpie
la herramienta o no la utilice. Una vez que la
lijadora está desenchufada, no hay ninguna
posibilidad de que se pueda poner en marcha
intempestivamente causando heridas graves.
COLOCACIÓN DEL PAPEL ABRASIVO
Controle el estado del papel abrasivo antes de colocarlo.
NO utilice papeles abrasivos defectuosos o
desgarrados.
■
Desenchufe la lijadora.
ADVERTENCIA
Si la lijadora no está desenchufada, podría ponerse
en marcha inadvertidamente y provocar heridas
corporales graves.
■
Retire el papel abrasivo gastado para cambiarlo.
■
Los orificios del papel abrasivo deben estar alineados
con los del patín para permitir la evacuación del polvo.
Observación: NO utilice la lijadora sin papel abrasivo.
Dañaría el patín.
PRECAUCIONES DE USO
AVISO
Cerciórese de no obstruir las ranuras de ventilación
con la mano.
LIJADO (Fig. 1)
ADVERTENCIA
Si la pieza trabajada no está sujeta puede resultar
proyectada hacia usted, causándole heridas graves.
Mantenga la lijadora delante suyo y a cierta distancia de su
cuerpo y de la pieza trabajada. Para poner en marcha la
lijadora, coloque el interruptor en posición "ON" y espere
que el motor alcance su velocidad máxima. Acerque
suavemente la lijadora a la pieza trabajada. Realice
movimientos de vaivén lentos y regulares.
NO fuerce la herramienta. El peso de la lijadora ejerce una
presión suficiente en la pieza trabajada. La lijadora y el
papel abrasivo deben hacer todo el "trabajo". Si ejerce una
presión adicional en la lijadora, el motor funcionará más
lentamente, el papel abrasivo se gastará más rápidamente y
la velocidad de lijar se reducirá considerablemente.
Además, una presión excesiva puede sobrecargar el motor,
produciendo un recalentamiento que podría dañar el motor
y perjudicar el buen funcionamiento de la máquina.
Atención, el calor resultante de la fricción puede ablandar el
barniz o la resina que cubre la madera. No lije durante
demasiado tiempo en el mismo lugar ya que la acción
abrasiva de la lijadora puede gastar rápidamente el material
obteniendo un resultado irregular.
ADVERTENCIA
No lleve prendas amplias ni joyas que puedan
engancharse en las partes móviles y provocar
heridas graves. Mantenga la cabeza a buena
distancia de la lijadora y de la zona de trabajo para
que su cabello no se enganche en la máquina,
lo que podría causar heridas graves.
MOVIMIENTO EXCÉNTRICO (Fig. 2)
El movimiento excéntrico es ideal para lijados rápidos
(eliminar revestimientos antiguos, lijar madera bruta, aplanar
superficies hasta obtener un grosor determinado) y para los
trabajos de acabado (preparar una superficie para pintarla).
El papel abrasivo describe pequeños círculos a gran
velocidad, con lo cual la lijadora tiene mucha movilidad.
ADVERTENCIA
La acumulación de polvo resultante de lijar
superficies que tienen productos altamente
inflamables, como poliuretano, aceite de lino, etc.,
puede inflamar el saco para el polvo o alguna otra
parte de la lijadora, produciendo un incendio.
Para reducir los riesgos de incendio, vacíe a menudo
el saco para el polvo. Antes de guardar la lijadora o si
no la utiliza durante un tiempo, vacíe el saco para el
polvo. Lea atentamente las recomendaciones de los
fabricantes de revestimientos.
UTILIZACIÓN DEL DISPOSITIVO PARA RECOGER
EL POLVO
El saco para el polvo permite recoger el polvo producido al
lijar la pieza trabajada. El polvo se aspira por los orificios del
patín y se acumula en el saco para el polvo a medida que
se lija la pieza trabajada.
INSTALAR EL SACO PARA EL POLVO (Fig. 3)
Para instalar el saco para el polvo, siga las instrucciones
que se dan a continuación.
■
Desenchufe la lijadora.
18
E
Español
F GB D I P NL S DK N FIN GR H CZ RUS PL
RO
SLO TR
HR
ERO-2412VN_20 lgs 24/07/06 10:55 Page 18

FUNCIONAMIENTO
ADVERTENCIA
Si la lijadora no está desenchufada, podría ponerse
en marcha inadvertidamente y provocar heridas
corporales graves.
■
Inserte el anillo del saco para el polvo en la boquilla de
evacuación que se encuentra en la lijadora.
VACIAR EL SACO PARA EL POLVO (Fig. 4)
Para trabajar con más eficacia, vacíe el saco para el polvo
cuando esté lleno hasta la mitad. Esto permite una mejor
circulación del aire dentro del saco. Vacíe y limpie
minuciosamente el saco para el polvo cada vez que acabe
de trabajar y antes de guardar la lijadora.
Para vaciar el saco para el polvo, proceda del siguiente
modo:
■
Desenchufe la lijadora.
ADVERTENCIA
Si la lijadora no está desenchufada, podría ponerse
en marcha inadvertidamente y provocar heridas
corporales graves.
■
Retire el anillo del saco para el polvo de la boquilla de
evacuación que se encuentra en la lijadora.
■
Retire el saco para el polvo de su anillo.
■
Sacuda el saco para el polvo para vaciarlo.
■
Coloque nuevamente el anillo en el saco.
■
Encaje nuevamente el anillo del saco en la boquilla de
la lijadora.
INDICADOR DE PRESENCIA DE TENSIÓN
La herramienta cuenta con un indicador de presencia de
tensión (7) que se enciende cuando la herramienta está
enchufada. Este indicador sirve para llamar su atención
sobre el hecho de que la herramienta está en tensión y
se pondrá en marcha en cuanto pulse el gatillo.
PROTECCIÓN DEL MEDIOAMBIENTE
Recicle las materias primas en lugar de
tirarlas. Para respetar el medioambiente,
separe los residuos y deposite la
herramienta usada, los accesorios y los
envases en contenedores especiales o
entréguelos a los organismos encargados
del reciclado. Ryobi se toma muy en serio la
protección del medioambiente.
19
E
Español
F GB D I P NL S DK N FIN GR H CZ RUS PL
RO
SLO TR
HR
ERO-2412VN_20 lgs 24/07/06 10:55 Page 19
Page is loading ...
Page is loading ...

NORME DI SICUREZZA SPECIFICHE PER LE
LEVIGATRICI
■
Indossare sempre occhiali di sicurezza ed una
maschera antipolvere quando si leviga, ed in particolare
quando si tiene la levigatrice al di sopra del capo.
■
Non utilizzare mai la levigatrice su superfici umide.
■
Il foglio di carta abrasiva non deve essere troppo
grande. Se la carta abrasiva fuoriesce dal pattino,
ci si espone a rischi di gravi ferite.
■
Il sacchetto raccogli polvere deve essere applicato
sull’apparecchio e svuotato periodicamente.
Per installare il sacchetto raccogli polvere, incastrare
l'anello del sacchetto sull'ugello di scarico situato sul
retro della levigatrice, ruotandolo verso destra sino a
quando il sacchetto non risulterà fissato correttamente.
Per togliere il sacchetto, procedere nell’ordine inverso.
AVVERTENZA
Non gettare mai nel fuoco la polvere prodotta dalla
levigatura, in quanto i materiali in forma di piccole
particelle possono essere esplosivi.
AVVERTENZA
Indossare una maschera antipolvere adeguata
quando si levigano superfici ricoperte di pittura al
piombo nonché alcuni tipi di legno o di metallo,
al fine di non inalare polveri o vapori tossici.
CARATTERISTICHE DEL PRODOTTO
Alimentazione 230 V ~ 50 Hz
Potenza 240 W
Velocità a vuoto 7000-12000 giri/min.
Diametro orbitale 2,4 mm
Dimensioni del pattino 125 mm
Peso 1,7 kg
APPLICAZIONI
Utilizzare la levigatrice solo per le applicazioni qui di seguito
citate:
■
Levigatura del legno.
■
Rimozione della ruggine e levigatura dell'acciaio.
■
Levigatura di materiali plastici.
DESCRIZIONE
1. Interruttore di marcia/arresto
2. Pattino autoadesivo
3. Carta abrasiva
4. Variatore elettronico di velocità
5. Collare del sacchetto raccogli polvere
6. Sacchetto raccogli polvere
7. Spia luminosa di presenza tensione
CARATTERISTICHE
Questa levigatrice può essere utilizzata con carta abrasiva a
grana di vario tipo (grossa, media o fine). Sul legno il
passaggio della levigatrice nel senso della fibra consente di
ottenere una levigatura liscia, senza graffi.
La levigatrice è dotata di un'impugnatura in grado di offrire
una buona presa e un notevole comfort in fase di utilizzo.
Ciò consente pertanto di ridurre i rischi di affaticamento
dovuti ad un impiego prolungato dell'apparecchio.
La levigatrice è inoltre provvista di un sistema di aspirazione
della polvere. La polvere viene infatti aspirata attraverso i
fori presenti sulla carta abrasiva e sul pattino (ved. fig. 2).
Prima di procedere all’utilizzo della levigatrice, è necessario
acquisire dimestichezza con tutte le sue funzionalità e
specificità in termini di sicurezza.
INTERRUTTORE (1)
Questa levigatrice è dotata di un semplice interruttore.
Per METTERE IN FUNZIONE la levigatrice, premere
l'interruttore verso sinistra ("ON").
Per ARRESTARE la levigatrice, premere l'interruttore verso
destra ("OFF").
VARIATORE ELETTRONICO DI VELOCITÀ (4)
Il variatore elettronico di velocità consente di regolare la
velocità di levigatura in funzione del tipo di superficie da
levigare (dal legname da costruzione pesante e resistente al
delicato legno per impiallacciatura).
AVVERTENZA
Fare sempre attenzione, anche dopo avere acquisito
dimestichezza con l’apparecchio. Non dimenticare
che basta un secondo di distrazione per ferirsi in
modo grave.
FUNZIONAMENTO
AVVERTENZA
La levigatrice non deve mai rimanere collegata
all'alimentazione elettrica quando si eseguono le
operazioni di montaggio dei componenti,
di regolazione, di rimozione o applicazione di un
foglio di carta abrasiva, né quando si intende
procedere alla pulizia dell'apparecchio o quando non
lo si utilizza.
22
I
Italiano
F GB D E P NL S DK N FIN GR H CZ RUS PL
RO
SLO TR
HR
ERO-2412VN_20 lgs 24/07/06 10:55 Page 22
Page is loading ...

FUNZIONAMENTO
INSTALLAZIONE DEL SACCHETTO RACCOGLI POLVERE
(Fig. 3)
Per installare il sacchetto raccogli polvere, si prega di
seguire le istruzioni sotto riportate:
■
Disinserire la spina della levigatrice dalla presa di
corrente.
AVVERTENZA
Se la spina non è disinserita dalla presa di corrente,
la levigatrice può avviarsi involontariamente e
provocare gravi lesioni fisiche.
■
Incastrare l'anello del sacchetto raccogli polvere
sull'ugello di scarico situato sulla levigatrice.
SVUOTAMENTO DEL SACCHETTO RACCOGLI
POLVERE (Fig. 4)
Per effettuare l’operazione in modo più efficace, svuotare il
sacchetto raccogli polvere quando è pieno per metà.
Ciò consente una migliore circolazione dell’aria all’interno
del sacchetto. Svuotare e pulire accuratamente il sacchetto
raccogli polvere dopo ogni singola operazione di levigatura
e prima di riporre la levigatrice.
Per svuotare il sacchetto raccogli polvere, procedere nel
modo illustrato di seguito:
■
Disinserire la spina della levigatrice dalla presa di corrente.
AVVERTENZA
Se la spina non è disinserita dalla presa di corrente,
la levigatrice può avviarsi involontariamente e
provocare gravi lesioni fisiche.
■
Disinserire l'anello del sacchetto raccogli polvere
dall'ugello della levigatrice.
■
Staccare il sacchetto raccogli polvere dall'anello.
■
Scuotere il sacchetto raccogli polvere per svuotarlo.
■
Fissare nuovamente il sacchetto all'anello.
■
Incastrare nuovamente l'anello del sacchetto sull'ugello
della levigatrice.
SPIA LUMINOSA DI PRESENZA TENSIONE
Questo apparecchio è dotato di una spia luminosa di
presenza tensione (7), che si illumina quando l'apparecchio
è collegato all'alimentazione elettrica. Questa spia attira
l'attenzione dell'utilizzatore sul fatto che l'apparecchio è
sotto tensione e che si mette in funzione non appena ne
viene premuto l'interruttore.
TUTELA DELL’AMBIENTE
Si raccomanda di riciclare le materie prime
anziché gettarle come rifiuti. A garanzia della
tutela dell’ambiente, si raccomanda di
effettuare la raccolta differenziata dei rifuti e di
depositare l’apparecchio usato, gli accessori e
l’imballaggio in appositi contenitori o di portarli
presso un centro autorizzato al loro riciclaggio.
Per Ryobi la tutela dell'ambiente è una
problematica di estrema importanza.
24
I
Italiano
F GB D E P NL S DK N FIN GR H CZ RUS PL
RO
SLO TR
HR
ERO-2412VN_20 lgs 24/07/06 10:55 Page 24
Page is loading ...
Page is loading ...

INSTRUÇÕES DE SEGURANÇA ESPECÍFICAS
ÀS LIXADEIRAS
■ Nunca utilize a lixadeira sobre superfícies húmidas.
■ Afolha de lixa não deve ser grande demais.
Se deixar a folha de lixa ultrapassar o prato,
fica exposto a ferimentos graves.
■ O saco de pó deve ser instalado na ferramenta e
despejado regularmente. Para instalar o saco do pó,
encaixe o anel do saco no bico de evacuação situado
atrás da lixadeira rodando-o para a direita até que o
saco fique correctamente fixado. Para retirar o saco,
proceda na ordem inversa.
AVISO
Não despeje o pó proveniente da lixagem num
fogo aberto porque os materiais na forma de
partículas finas podem ser explosivos.
AVISO
Deve usar uma máscara anti-pó adequada quando
lixar superfícies revestidas com tinta à base de
chumbo assim como certas madeiras e metais,
para evitar inalar poeiras ou vapores tóxicos.
CARACTERÍSTICAS DO APARELHO
Alimentação 230 V ~ 50 Hz
Potência 240 W
Velocidade em vazio 7000-12000 r.p.m.
Diâmetro orbital 2,4 mm
Dimensões da placa de lixa 125 mm
Peso 1,7 kg
APLICAÇÕES
Utilize a sua lixadeira unicamente para as aplicações
mencionadas abaixo:
■ Lixamento da madeira.
■ Remoção da ferrugem e lixamento do aço.
■ Lixamento dos plásticos.
DESCRIÇÃO
1. Interruptor Liga/Desliga
2. Placa de lixa auto-aderente
3. Folha de lixa
4. Variador electrónico de velocidade
5. Anel do saco do pó
6. Saco do pó
7. Lua avisadora de presença de tensão
CARACTERÍSTICAS
A sua lixadeira utiliza-se com folhas de lixa de diversos
grãos (grosso, médio ou fino). Na madeira, a passagem
da lixadeira no sentido da fibra dá um lixamento liso,
sem escoriações.
A sua lixadeira está equipada com uma pega que
proporciona uma boa preensão e um grande conforto
de utilização. Os riscos de fadiga devidos a uma
utilização prolongada são assim reduzidos.
Um sistema de aspiração do pó está integrado na
lixadeira. O pó é aspirado através dos furos da folha de
lixa e do prato (ver fig. 2).
Antes de utilizar a sua lixadeira, familiarize-se sempre
com todas as suas funcionalidades e especificidades em
termos de segurança.
INTERRUPTOR (1)
Esta lixadeira está equipada com um simples interruptor.
Para PÔR EM FUNCIONAMENTO a lixadeira, empurre o
interruptor para a esquerda ("ON").
Para PARAR a lixadeira, empurre o interruptor para a
direita ("OFF").
VARIADOR ELECTRÓNICO DE VELOCIDADE (4)
O variador electrónico de velocidade permite-lhe regular
a velocidade de lixamento em função do tipo da
superfície a lixar (desde a madeira para construção
pesada e resistente até ao folheado de madeira
delicado).
AVISO
Não diminua a sua vigilância mesmo depois de
se ter familiarizado com a sua lixadeira. Nunca
se esqueça que uma fracção de segundo de
falta de atenção basta para se ferir gravemente.
FUNCIONAMENTO
AVISO
A sua lixadeira nunca deve ser ligada quando
monta peças, efectua ajustes, retira ou põe uma
folha de lixa, quando limpa a sua ferramenta ou
quando não a utiliza. Com a lixadeira desligada,
evita-se qualquer risco de arranque por descuido
que possa causar ferimentos graves.
COLOCAÇÃO DA FOLHA DE LIXA
Verifique o estado da folha de lixa antes de colocá-la.
NÃO utilize folhas de lixa defeituosas ou rasgadas.
27
P
Portugues
F GB D E I NL S DK N FIN GR H CZ RUS PL
RO
SLO TR
HR
ERO-2412VN_20 lgs 24/07/06 10:55 Page 27
Page is loading ...

FUNCIONAMENTO
ESVAZIAMENTO DO SACO DE PÓ (Fig. 4)
Para maior eficácia, esvazie o saco de pó quando estiver
meio cheio. Isto permite uma melhor circulação do ar no
interior do saco. Esvazie e limpe minuciosamente o saco
do pó depois de cada operação de lixamento e antes de
arrumar a lixadeira.
Para esvaziar o saco do pó, proceda da seguinte maneira:
■ Desligue a lixadeira da corrente.
AVISO
Se a lixadeira não estiver desligada da corrente,
pode ocorrer um arranque por descuido e
provocar ferimentos graves.
■ Retire o anel do saco do pó do bico da lixadeira.
■ Retire o saco do pó do seu anel.
■ Sacuda o saco do pó para esvaziá-lo.
■ Torne a fixar o saco no anel.
■ Encaixe o anel do saco no bico da lixadeira.
LUZ AVISADORA DE PRESENÇA DE TENSÃO
Esta ferramenta está equipada com uma luz avisadora
de presença de tensão (7) que se acende quando a
ferramenta está ligada. Esta luz chama a sua atenção
para o facto de que a ferramenta está ligada à corrente e
que ela entrará em funcionamento assim que carregar
no gatilho.
PROTECÇÃO DO AMBIENTE
Recicla as matérias-primas em vez de deitá-
las fora. Para o respeito do ambiente,
seleccione os detritos e desmonte a
ferramenta velha, os acessórios e a
embalagem em contentores especiais ou
junto de organismos encarregados da
reciclagem. A Ryobi leva muito a sério a
protecção do ambiente
29
P
Portugues
F GB D E I NL S DK N FIN GR H CZ RUS PL
RO
SLO TR
HR
ERO-2412VN_20 lgs 24/07/06 10:55 Page 29
Page is loading ...
Page is loading ...

SPECIFIEKE VEILIGHEIDSVOORSCHRIFTEN
VOOR SCHUURMACHINES
■ Draag altijd een veiligheidsbril en een stofmasker
tijdens het schuren, vooral wanneer u de
schuurmachine boven uw hoofd houdt.
■ Gebruik uw schuurmachine nooit op vochtige
oppervlakken.
■ Het vel schuurpapier mag niet te groot zijn. Als u
het schuurpapier over de randen van de schuurvoet
laat uitsteken, stelt u zich bloot aan het gevaar voor
lichamelijk letsel.
■ De stofzak moet op de machine zijn geïnstalleerd
en regelmatig worden geleegd. U plaatst de stofzak
door deze over de steunring van de zak te schuiven
en deze op het afvoermondstuk aan de achterkant
van de schuurmachine te draaien (rechtsom) totdat
de zak goed vastzit. Ga in omgekeerde volgorde te
werk om de zak weer los te halen.
WAARSCHUWING
Gooi geen schuurstof in een open vuur, want
materiaal in de vorm van fijne deeltjes kan
explosief zijn.
WAARSCHUWING
Draag een geschikt stofmasker tijdens het
schuren van oppervlakken bedekt met verf op
loodbasis en bij het schuren van bepaalde
houtsoorten en metalen om te voorkomen dat u
giftige stof of giftige dampen inademt.
PRODUCTGEGEVENS
Voeding 230 V ~ 50 Hz
Vermogen 240 W
Toerental bij nullast 7000-12.000 t.p.m.
Diameter van de cirkel-
vormige schuurbeweging 2,4 mm
Afmetingen van de schuurvoet 125 mm
Gewicht 1,7 kg
TOEPASSING
Gebruik uw apparaat uitsluitend voor de hieronder
vermelde toepassingen:
■ Schuren van hout.
■ Verwijderen van roest en schuren van staal.
■ Schuren van kunststoffen.
OVERZICHT
1. Aan/uit-schakelaar
2. Voet met klitbevestiging
3. Schuurpapier
4. Elektronische snelheidsregelaar
5. Steunring van de stofzak
6. Stofzak
7. Spanningsverklikker
TECHNISCHE KENMERKEN
Uw schuurmachine kan met schuurpapier met verschillende
korrelgrootte (grof, medium of fijn) worden gebruikt.
Op hout geeft schuren met de schuurmachine in de richting
van de vezels een gladde afwerking, zonder strepen.
De schuurmachine is uitgerust met een handgreep
waarmee u het apparaat goed en zeer comfortabel kunt
vasthouden. Daarom loopt u minder kans om vermoeid te
raken bij langdurig gebruik.
Er is een stofafzuigsysteem ingebouwd in de schuur-
machine. Het stof wordt afgezogen via de gaten in het
schuurpapier en de schuurvoet (zie afb.2).
Maak uzelf eerst vertrouwd met alle functies en specifieke
kenmerken wat betreft de veiligheid van het apparaat
voordat u de schuurmachine gaat gebruiken.
AAN-/UITSCHAKELAAR (1)
Deze schuurmachine is uitgerust met een eenvoudige
aan-/uitschakelaar. Om de schuurmachine AAN te zetten
duwt u de schakelaar naar links ("ON").
Om de schuurmachine UIT te zetten duwt u de
schakelaar naar rechts ("OFF").
ELEKTRONISCHE SNELHEIDSREGELAAR (4)
Met de elektronische snelheidsregelaar kunt u de
schuursnelheid afstellen al naar gelang het type
oppervlak dat u wilt schuren (van grof en stug bouwhout
tot zacht fineerhout).
WAARSCHUWING
Laat uw waakzaamheid niet verslappen als u
eenmaal vertrouwd bent geraakt met uw
schuurmachine. Vergeet niet dat een seconde
onoplettendheid voldoende is om ernstig letsel te
veroorzaken.
32
NL
Nederlands
F GB D E I P S DK N FIN GR H CZ RUS PL
RO
SLO TR
HR
ERO-2412VN_20 lgs 24/07/06 10:55 Page 32
Page is loading ...

BEDIENING
STOFZAK INSTALLEREN (afb. 3)
Ga als volgt te werk om de stofzak te installeren:
■ Trek de stekker van de schuurmachine uit het
stopcontact.
WAARSCHUWING
Als u de stekker van de schuurmachine niet uit
het stopcontact trekt, kan de machine ongewild
in werking treden en ernstig lichamelijk letsel
veroorzaken.
■ Steek de steunring van de stofzak op het afvoer-
mondstuk dat zich op de schuurmachine bevindt.
STOFZAK LEGEN (afb. 4)
Voor een efficiënte stofafzuiging dient u de zak te
legen als deze halfvol is. Dit zorgt voor een betere
luchtcirculatie in de zak. Leeg de stofzak na elke
schuuroperatie en voordat u de machine opbergt en
maak de zak daarbij zorgvuldig schoon.
Ga als volgt te werk om de stofzak te legen:
■ Trek de stekker van de schuurmachine uit het
stopcontact.
WAARSCHUWING
Als u de stekker van de schuurmachine niet uit het
stopcontact trekt, kan de machine ongewild in
werking treden en ernstig lichamelijk letsel
veroorzaken.
■ Haal de steunring van de stofzak van de
schuurmachine.
■ Haal de stofzak van de steunring.
■ Schud de zak uit om hem te legen.
■ Bevestig de zak daarna weer op de steunring.
■ Steek de steunring van de zak op het afvoermondstuk.
SPANNINGSVERKLIKKER
Dit apparaat is voorzien van een spanningsverklikker (7)
die gaat branden zodra het apparaat is aangesloten.
Dit controlelampje dient om u te waarschuwen dat het
apparaat onder spanning staat en dat het apparaat gaat
werken zodra u op de schakelaar drukt.
MILIEUBESCHERMING
Zorg dat gronstoffen gerecycleerd en niet
vernietigd worden. U dient uw afvalstoffen
gescheiden aan te bieden en oude
apparaten, accessoires en verpakkingen in
speciale bakken te deponeren of naar
instanties te brengen die belast zijn met de
recyclering ervan. Ryobi hecht veel waarde
aan milieubescherming.
34
NL
Nederlands
F GB D E I P S DK N FIN GR H CZ RUS PL
RO
SLO TR
HR
ERO-2412VN_20 lgs 24/07/06 10:55 Page 34
Page is loading ...
Page is loading ...

TEKNISKA DATA
Tomgångshastighet 230 V ~ 50 Hz
Effekt 240 W
Tomgångshastighet
7000-12000 varv/minut
Bandiameter 2,4 mm
Slipdynans mått 125 mm
Vikt 1,7 kg
ANVÄNDNING
Använd verktyget endast för nedanstående ändamål:
■ Träslipning.
■ Borttagning av rost och slipning av stål.
■ Slipning av plaster.
BESKRIVNING
1. På / av -strömbrytare
2. Självhäftande slipdyna
3. Slippapper
4. Elektronisk hastighetsvariator
5. Ring för dammpåse
6. Dammpåse
7. Kontrollampa för påslagen ström
KÄNNETECKEN
Din slipmaskin används med sandpapper med olika
kornstorlek (grov-, medel- eller finkornigt). Om man för
slipmaskinen på trä i fibrernas riktning, får man en slät yta,
utan repor.
Din slipmaskin är utrustad med ett handtag som ger ett
gott grepp och hög komfort vid användningen.
Detta reducerar riskerna för att bli trött vid ett längre
arbetspass.
Ett dammuppsugningssystem är inbyggt i slipmaskinen.
Dammet sugs in genom hålen i sandpappret och
slipdynan (se fig. 2).
Innan du börjar använda din slipmaskin bör du bekanta
dig med alla dess funktioner och speciella detaljer i fråga
om säkerhet.
STRÖMBRYTARE (1)
Denna slipmaskin är utrustad öed en enkel strömbrytare.
För att SÄTTA I GÅNG slipmaskinen trycker du
strömbrytaren mot vänster ("ON").
För att STÄNGA AV slipmaskinen trycker du strömbrytaren
mot höger ("OFF").
HASTIGHETSVARIATOR (4)
Med den elektroniska hastighetsvariatorn kan du ställa in
slipningshastigheten beroende på den typ av yta som
ska bearbetas (från tungt och kraftigt byggträ till
ömtåligt faner).
VARNING
Fortsätt att vara vaksam även efter att du har
blivit van vid din slipmaskin. Glöm aldrig att det
bara behövs ett ögonblicks ouppmärksamhet för
att skada dig allvarligt.
FUNKTION
VARNING
Din slipmaskin får aldrig vara ansluten då du
monterar delar, utför inställningar, tar bort eller
fäster ett sandpapper, då du rengör verktyget
eller då du inte använder det. Då slipmaskinen
kopplats ur, finns det inte längre några risker för
oavsiktlig igångsättning som kan förorsaka
allvarliga kroppsskador.
FASTSÄTTNING AV SANDPAPPRET
Kontrollera sandpapprets skick innan du sätter fast det.
Använd INTE defekt eller trasigt sandpapper.
■ Koppla ur slipmaskinen.
VARNING
Om slipmaskinen inte är urkopplad, kan den
sättas i gång oavsiktligt och förorsaka allvarliga
kroppsskador.
■ Ta loss det använda slippappret för att byta ut det.
■ Hålen i slippappret och i slipdynan bör vara i linje,
för att möjliggöra avledningen av damm.
Anmärkning: Använd INTE slipmaskinen utan
slippapper. Det skulle skada slipdynan.
FÖRSIKTIGHETSÅTGÄRDER VID ANVÄNDNING
VARNING
Se till att din hand inte täpper till ventilations-
öppningarna.
SLIPNING (Fig. 1)
VARNING
Om arbetsstycket inte har fästs, kan det slungas
mot dig och skada dig allvarligt.
37
S
Svenska
F GB D E I P NL DK N FIN GR H CZ RUS PL
RO
SLO TR
HR
ERO-2412VN_20 lgs 24/07/06 10:55 Page 37
Page is loading ...
Page is loading ...
Page is loading ...
Page is loading ...
Page is loading ...
Page is loading ...
Page is loading ...
Page is loading ...
Page is loading ...
Page is loading ...
Page is loading ...
Page is loading ...
Page is loading ...
Page is loading ...
Page is loading ...
Page is loading ...
Page is loading ...
Page is loading ...
Page is loading ...
Page is loading ...
Page is loading ...
Page is loading ...
Page is loading ...
Page is loading ...
Page is loading ...
Page is loading ...
Page is loading ...
Page is loading ...
Page is loading ...
Page is loading ...
Page is loading ...
Page is loading ...
Page is loading ...
Page is loading ...
Page is loading ...
Page is loading ...
Page is loading ...
Page is loading ...
Page is loading ...
Page is loading ...
Page is loading ...
Page is loading ...
Page is loading ...
Page is loading ...
Page is loading ...
Page is loading ...
Page is loading ...
Page is loading ...
Page is loading ...
Page is loading ...
Page is loading ...
Page is loading ...
Page is loading ...
Page is loading ...
Page is loading ...
Page is loading ...
Page is loading ...
Page is loading ...
Page is loading ...
Page is loading ...
Page is loading ...
Page is loading ...
Page is loading ...
-
 1
1
-
 2
2
-
 3
3
-
 4
4
-
 5
5
-
 6
6
-
 7
7
-
 8
8
-
 9
9
-
 10
10
-
 11
11
-
 12
12
-
 13
13
-
 14
14
-
 15
15
-
 16
16
-
 17
17
-
 18
18
-
 19
19
-
 20
20
-
 21
21
-
 22
22
-
 23
23
-
 24
24
-
 25
25
-
 26
26
-
 27
27
-
 28
28
-
 29
29
-
 30
30
-
 31
31
-
 32
32
-
 33
33
-
 34
34
-
 35
35
-
 36
36
-
 37
37
-
 38
38
-
 39
39
-
 40
40
-
 41
41
-
 42
42
-
 43
43
-
 44
44
-
 45
45
-
 46
46
-
 47
47
-
 48
48
-
 49
49
-
 50
50
-
 51
51
-
 52
52
-
 53
53
-
 54
54
-
 55
55
-
 56
56
-
 57
57
-
 58
58
-
 59
59
-
 60
60
-
 61
61
-
 62
62
-
 63
63
-
 64
64
-
 65
65
-
 66
66
-
 67
67
-
 68
68
-
 69
69
-
 70
70
-
 71
71
-
 72
72
-
 73
73
-
 74
74
-
 75
75
-
 76
76
-
 77
77
-
 78
78
-
 79
79
-
 80
80
-
 81
81
-
 82
82
-
 83
83
-
 84
84
-
 85
85
-
 86
86
-
 87
87
-
 88
88
-
 89
89
-
 90
90
-
 91
91
-
 92
92
-
 93
93
-
 94
94
-
 95
95
-
 96
96
-
 97
97
-
 98
98
-
 99
99
-
 100
100
-
 101
101
-
 102
102
-
 103
103


Ryobi ERO2412VN Owner's manual
- Category
- Power sanders
- Type
- Owner's manual
Ask a question and I''ll find the answer in the document
Finding information in a document is now easier with AI
in other languages
- italiano: Ryobi ERO2412VN Manuale del proprietario
- français: Ryobi ERO2412VN Le manuel du propriétaire
- español: Ryobi ERO2412VN El manual del propietario
- Deutsch: Ryobi ERO2412VN Bedienungsanleitung
- Nederlands: Ryobi ERO2412VN de handleiding
- português: Ryobi ERO2412VN Manual do proprietário
- dansk: Ryobi ERO2412VN Brugervejledning
- polski: Ryobi ERO2412VN Instrukcja obsługi
- čeština: Ryobi ERO2412VN Návod k obsluze
- Türkçe: Ryobi ERO2412VN El kitabı
- svenska: Ryobi ERO2412VN Bruksanvisning
- suomi: Ryobi ERO2412VN Omistajan opas
- română: Ryobi ERO2412VN Manualul proprietarului
Related papers
Other documents
-
Genesis GROS2304 User manual
-
-
Greenworks CS24B00 Operating instructions
-
DeWalt DWE6411K Owner's manual
-
Milwaukee M18 2648-20 User manual
-
DeWalt DW421K User manual
-
-
Bosch Power Tools Sander 1295D User manual
-
General International BD7004 User manual
-
Hitachi SV 13YST Safety Instructions And Instruction Manual