Page is loading ...

1 IR320-en-GB_V1.0 6/18
User Manual
Extech Model IR320
Waterproof, Dual Laser IR Thermometer with Alarm
1. Introduction
Thank you for selecting the Extech IR320 IR Thermometer. The IR320 is a professional non-contact infrared thermometer
that measures surface temperature from infrared energy radiated by the target’s surface. We ship this meter fully tested
and calibrated and, with proper use, it will provide years of reliable service. Please visit our website (www.extech.com)
for the latest version of this User Manual and Customer Support.
2. Product Features
Strong and Durable: 3m (9.8 ft.) drop-proof
Dustproof and Waterproof: IP65
Ergonomic Design: Comfortable handheld, simple and convenient operation
MAX/MIN/AVG/DIF values: Quickly display the Maximum, Minimum, Average (running average updates every two
readings), and Differential (Max minus Min) values
Large Backlit LCD
Tripod mount for hands-free operation
Alarm Function: High/Low temperature alarm provides flashing color-coded LED indicators when triggered
Dual Laser Pointers: To enhance measurement target accuracy
3. Safety Instructions
WARNING
To avoid personal injury, please read the following safety information before using this product:
Safety Standards Compliance:
CE Identification: EN 61326-1: 2013, EN 61326-2-3: 2013
Laser Safety Standard: Complies with 21 CFR 1040.10 and 1040.11 except for deviations pursuant to
laser notice no. 50 dated June 24, 2007
Please do not point the laser toward people or animals directly or indirectly.
Please do not look at the laser directly or through other optical tools (telescope, microscope, etc.).
If the battery symbol on the LCD display is flashing, replace the batteries immediately to avoid
inaccurate measurements.
Before using the product, check the product for damage. Do not use this product if obvious physical
damage is apparent.
Refer to the Table of Emissivity Factors for Common Materials in this manual before taking
measurements. Reflective objects will cause the measured value to be lower than the actual
temperature value. Set the emissivity to match each given surface type. When measuring, please do not
touch high temperature surfaces.
Do not use this product near explosive gases.
To ensure measurement accuracy, place this product in the test environment for more than 30 minutes
before use.
Avoid keeping the thermometer near high temperature objects for long periods.

2 IR320-en-GB_V1.0 6/18
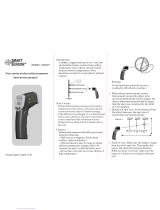
4. Product Description
Meter Description
1. Low Alarm Alert (blue indicator)
2. High Alarm Alert (red indicator)
3. Backlit LCD
4. RCL (Recall MIN-MAX-AVG-DIF) and down arrow button
5. M (Mode) button
6. Battery compartment
7. Battery compartment screw
8. HI-LO (alarm) and up arrow button
9. Laser pointer lenses
10. IR measurement lens
11. Measurement trigger
12. Tripod mount
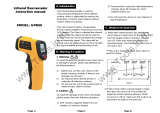
Display Description
Automatic measurement mode
Laser set to default ON
High/Low Alarm modes
Low battery
Scan mode (trigger pulled)
Measurement Data Hold
Units of measure for temperature
Primary measurement digits (center)
Maximum, Minimum, Average, Differential values
Emissivity setting
Secondary digits for MAX/MIN/AVG/DIF values (lower right)

3 IR320-en-GB_V1.0 6/18
5. Operation
Power On and Off
Pull the trigger to power the meter, the LCD (and backlight) will turn on. The thermometer will power off automatically
after approximately eight (8) seconds.
Manual Measurements
1. Pull and hold the trigger after aiming toward the target to measure.
2. The SCAN icon will flash while measuring the targeted surface or object. The center of the measurement spot is
equidistant between the two laser points (enable/disable lasers per the Lasers Enable/Disable section).
3. Read the temperature measurement on the large digits at the center of the LCD.
4. Release the trigger. The SCAN icon disappears and the HOLD icon appears, indicating that the measurement has
stopped and the display is holding the last measured value. The meter will power off automatically after approximately
eight (8) seconds.
Automatic Measurements (trigger-free)
1. Pull and release the trigger to power the meter.
2. Press the M button six (6) times; the will appear on the upper left.
3. Use the arrow buttons to turn the mode ON (or OFF).
4. Pull and release the trigger. The icon will remain ON and the SCAN icon will flash. The thermometer will
continuously measure the target temperature (without having to hold the trigger). Note that In Auto mode, the LCD
backlight will switch off after 2 minutes.
CAUTION: If you enable the lasers (see Lasers Enable/Disable), they will remain ON during the measurement scan.
5. To stop the measurement, pull and release the trigger again. The Auto measure icon and the SCAN icon will
disappear, and the HOLD icon will appear. The meter will stop measuring and will hold the last measured value on the
LCD until it automatically switches off after approximately eight (8) seconds.
MAX/MIN/AVG/DIF Values
With the meter ON, short press the RCL (Recall) button to step through the MAX/MIN/AVG/DIF modes respectively; the
display will show the value of the corresponding mode in the secondary display area (lower right). The MAX value is the
highest reading taken in a given measurement session, the MIN value is the lowest reading, the AVG value is a running
average that updates every two readings, and the differential (DIF) is the MAX minus MIN value.
Alarm Activation
With the meter ON, short press the HI/LO button to select the HI-LO alarm mode, HI-only alarm mode, LO-only alarm
mode, or no alarm mode (the display icons will inform as to what mode is currently selected: HI, LO, HI-LO, or no icons).
When you select the HI alarm mode, the HI LED will flash red when the measured temperature exceeds the high alarm
limit. When you select the LO alarm mode, the LO LED will flash blue when the measured temperature is lower than the
low alarm limit. When you select the HI-LO alarm mode, the HI or LO LED will flash depending on whether the
measured temperature is higher than the HI limit or lower than the LO limit.
HIGH and LOW Alarm Limit Setting
With the meter ON, short press the M button once to access the HI alarm screen or press M twice to step to the LO
alarm screen. Use the up/down buttons to set the alarm thresholds. Short press the up/down buttons to add or
subtract 1 unit, long press to change the units rapidly. The meter will exit the setup screen automatically after five (5)
seconds of button inactivity.

4 IR320-en-GB_V1.0 6/18
Emissivity Setting
With the meter ON, short press the M button three (3) times to step to the emissivity screen. Use the up/down buttons
to set the desired value (from 0.10 ~ 1.00). Short press the up or down button to add or subtract 0.01 units or long
press to change the units rapidly. The meter will exit the setup mode after five (5) seconds of button inactivity. For
more, see the Emissivity Considerations section.
Unit of Measure Setup
With the meter ON, short press the M button four (4) times to step to the unit of measure screen. Use the up/down
buttons to change the units (
o
C or
o
F). The meter will exit the setup mode after five (5) seconds of button inactivity.
Lasers Enable/Disable
With the meter ON, short press the M button five (5) times to step to the laser screen. Use the up/down buttons to
select ON/OFF. The laser icon appears on the LCD when you enable the lasers, indicating that the laser will light
when you pull the trigger (or remain ON in Automatic Measurement mode). The meter will exit the setup mode
automatically after five (5) seconds of button inactivity.
6. IR Measurement Considerations
1. To detect a hot or cold spot, aim the IR thermometer at a region beyond the target and then scan the entire
region in a slow, up/down motion.
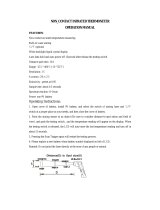
2. Distance-to-Spot (D:S) ratio. The meter’s field of view is 12:1. For example, if the distance from the meter to
the target is 12 inches, then the diameter of the target will be 1 inch. See diagram below.
3. Make measurements < 2 feet from the target when possible. The meter can measure from further distances
but external sources of light can affect measurements. In addition, the spot size may be so large that it
encompasses unwanted surface targets.
4. If frost, oil, grime, etc., covers the surface of the object under test, please clean before taking measurements.
5. If an object's surface is reflective, apply masking tape or flat black paint to the surface before measuring.
6. The meter cannot make accurate measurements through transparent surfaces such as glass.
7. Steam, dust, smoke, etc. can obscure measurements.
8. The meter compensates for deviations in ambient temperature. It can take up to 30 minutes however for the
meter to adjust to wide ambient temperature changes.

5 IR320-en-GB_V1.0 6/18
7. Emissivity Considerations
The Emissivity setting is shown in small digits at the lower left corner of the display. To adjust the Emissivity please refer
to the Emissivity Setting section. Emissivity represents the reflectivity of a material. Most organic materials and painted
or oxidized surfaces have an emissivity of approximately 0.95. Masking tape or flat black paint should be applied to
cover the measured surface. Wait a period of time to allow the tape or paint to reach thermal equilibrium with the
surface of the covered object. Measure the temperature of the surface covered with tape or paint only after
equilibrium has been achieved.
Table of Emissivity Factors for Common Materials
Measured Surfaces
Emissivity
Measured Surfaces
Emissivity
Metals
Non-Metals
Aluminum
Oxidization
0.2-0.4
Asbestos
0.95
A3003 Alloy
Oxidization
Rough
0.3
0.1-0.3
Asphalt
0.95
Brass
Burnishing
Oxidization
0.3
0.5
Basalt
0.7
Copper
Oxidization
Electric Terminal Board
0.4-0.8
0.6
Carbon
Non-Oxidization
Graphite
Silicon Carbide
0.8-0.9
0.7-0.8
0.9
Hastelloy
Alloy
0.3-0.8
Ceramics
0.95
Inconel
Oxidization
Sand-Blasting
Electro Burnishing
0.7-0.95
0.3-0.6
0.15
Clay
0.95
Iron
Oxidization
Rusting
0.5-0.9
0.5-0.7
Concrete
0.95
Iron (Casting)
Oxidization
Non-Oxidization
Casting
0.6-0.95
0.2
0.2-0.3
Cloth
0.9
Iron (Forging)
Passivation
0.9
Glass
Convex Glass
Smooth Glass
Lead-Boron Glass
0.76-0.8
0.92-0.94
0.78-0.82
Lead
Rough
Oxidization
0.4
0.2-0.6
Plates
0.96
Molybdenum
Oxidization
0.2-0.6
Stone Products
0.93
Nickel
Oxidization
0.2-0.5
Plaster
0.8-0.95
Platinum
Black
0.9
Ice
0.98
Steel
Cold rolling
Steel Plate Burnishing
Steel Plate Rubbing
0.7-0.9
0.4-0.6
0.1
Limestone
0.98
Zinc
Oxidization
0.1
Paper
0.95
Plastics
0.95
Water
0.93
Soil
0.9-0.98
Wood
0.9-0.95

6 IR320-en-GB_V1.0 6/18
8. Maintenance
Cleaning
To clean the lenses, use compressed air to clear dust and other particles, then carefully clean with a wet cotton swab,
moistened with clean water. To clean the meter housing, wipe with a soft, damp cloth. Do not use solvents or abrasives.
Do not immerse the meter in liquid.
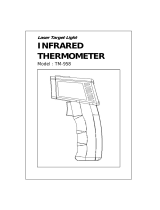
Battery Installation and Replacement
Install or replace the 9V battery according to the following figure.
Never dispose of used batteries or rechargeable batteries in household waste.
As consumers, users are legally required to take used batteries to appropriate collection sites, the retail store where the
batteries were purchased, or wherever batteries are sold.
Disposal: Do not dispose of this instrument in household waste. The user is obligated to take end-of-life devices to a
designated collection point for the disposal of electrical and electronic equipment.

7 IR320-en-GB_V1.0 6/18
9. Specifications
Measurement Range
-20
o
C~650
o
C (-4
o
F ~1202
o
F)
Accuracy
≥0
o
C: ±1.8
o
C or ±1.8% of reading, whichever is greater
< 0
o
C: ±(1.8
o
C +0.1
o
C /
o
C)
≥32
o
F: ±3.6
o
F or ±1.8% of reading, whichever is greater
< 32
o
F: ±(3.6
o
F +0.1
o
F /
o
F)
Temperature Coefficient
0.1
o
C /
o
C (0.1
o
F /
o
F) or ±0.1% of reading per degree, whichever is
greater
D:S Ratio
12:1 distance-to-spot ratio
Emissivity
0.1~1.0 adjustable
Response Time
250ms (95% of reading)
Spectral Response
8um~14um
Display Resolution
0.1
o
C (0.1
o
F)
Repeatability
±1.0
o
C (1.8
o
F) or 0.8% of reading, whichever greater.
Laser configuration
Dual Laser
Laser Type
CLASS II
Laser Wavelength
630nm~670nm
Laser Power
<1mW
Battery Type
9V Battery (6F22), included
Battery Life
≥6h (operating continuously with backlight on)
Dimensions
189mm*118mm*55mm (7.4*4.6*2.2 in.)
Weight
292g (10.3 oz.)
Operating Temperature
0
o
C ~50
o
C (32
o
F ~104
o
F)
Storage Temperature
-20
o
C ~60
o
C (-4
o
F ~140
o
F)
Operating Humidity
< 90% RH (non-condensing)
Operating Altitude
2000m (6562 ft.)
Storage Altitude
12000m (39,370 ft.)
Water Protection Level
According to IEC60529, complies with IP65
Drop Test
3m (9.8 ft.)
Safety Standards Compliance
CE Identification: EN 61326-1: 2013, EN 61326-2-3: 2013
Laser Safety Standard: Complies with 21 CFR 1040.10 and 1040.11 except for deviations pursuant to laser notice no.
50 dated June 24, 2007
Copyright © 2018 FLIR Systems, Inc.
All rights reserved including the right of reproduction in whole or in part in any form
www.extech.com
/