Page is loading ...

SMART BICYCLE HELMET SP-106 / REMOTE
CONTROL SP-11 / BACK LIGHT AND INDICATOR LIGHTS
IAN 309848
SMART BICYCLE
HELMET SP-106 /
REMOTE CONTROL
SP-11 / BACK LIGHT
AND INDICATOR
LIGHTS
owner´s manual
GB / IE / NI Owner´s Manual 04 - 12

GB / IE / NI Owner´s Manual 04 - 12

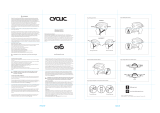
A B
E
K
M
J
H I
C
F
G
D
Press
Press
1
2
3
1x 2x 3x
L

4
Smart Bicycle Helmet SP-106 05
Safety instructions 05
User information 06
1. The correct helmet position 06
2. Operating the one-handed size adjustment system 06
3. Adjusting the strap divider 06
4. Adjusting the chin strap 07
5. Charge battery 07
6. Turning the helmet on and off 07
7. Cleaning and care 07
8. Disposal 08
Remote control SP-11 08
Safety instructions 08
User information 08
1. Before the rst use 08
2. Attaching to handlebars 08
3. Removing and attaching the control element 09
4. Functions 09
5. Cleaning and care 09
6. Disposal 10
Back light and indicator lights 10
Safety instructions 10
User information 10
1. Before the rst use 10
2. Functions 10
3. Cleaning and care 11
Smart Bicycle Helmet SP-106

5
4. Disposal 11
Resetting the wireless connection 11
Technical information 12
Conformity declaration 12
SMART BICYCLE HELMET SP-106
Dear customer!
We are pleased that you have chosen our high-quality products, which are strictly produced
and certied according to current valid safety standards. Familiarise yourself with the product
before use.
Read the instruction manual and the safety information carefully. Only use the product as
described and for the indicated areas of use. Please store this manual safely. Please hand
over all the documentation when passing this product to third parties.
Safety instructions
• Warning! This helmet should not be used by children while climbing or doing other
activities when there is a risk of strangulation/hanging if the child gets trapped with
the helmet.
• Your helmet was especially developed to protect you when cycling, skateboarding,
roller-skating and when riding your pedal scooter.
• It may not be used for other sports or for motorcycling.
• Please be aware that the helmet can only protect if it ts correctly. Make sure to try
different sizes when buying it.
• Please be aware that, despite its correct adjustment, a helmet cannot always protect
from all injuries.
• The helmet must be checked periodically for visible defects.
• After every hard impact, blow or deep scratch, the helmet must be replaced, as it has
lost its protective function.
• The helmet must also be replaced if it no longer ts or 5 years after the date of
manufacture at the latest, even if no damage can be observed.
• Changing or removing original parts of the helmet can drastically affect its protective
Smart Bicycle Helmet SP-106

6
function.
• The helmet may not be changed to make any additions which are not recommended
by the manufacturer.
• High temperatures from 60° C can seriously damage the helmet. Uneven helmet
surfaces and air bubbles are signs of this kind of damage.
• Do not store behind glass panes e.g. in the car or near heat sources.
• Ensure that the helmet battery is always charged with a micro USB cable.
• Please be aware that the indicator function on the helmet to indicate a change in
direction does not replace manual hand signals.
• Check before each use that the back light and indicator light functions work in
combination with the remote controls.
User information
1. Correct helmet position
• The helmet must always sit horizontally on your head. (Fig. A)
• If the helmet is too far forward, this can impair your vision.
• If the helmet is too far back, your forehead is not sufciently protected. (Fig. B)
2. Operating the one-handed size adjustment system
The integrated size adjustment system (Fig. C) can be adjusted freely with a turning knob on
the back of the head:
• smaller = turn to the right • larger = turn to the left
3. Adjusting the strap divider
• Open the strap divider. (Fig. E)
• The strap divider must be positioned in such a way that the straps are tight but
comfortable. The strap divider must be placed under the ears; the straps should not
cover the ears.
• Close the strap divider. (Fig. D)
An open strap divider can lead to the helmet slipping during an
accidentandthuslosingitsefcacy!!!
Smart Bicycle Helmet SP-106

7
4. Adjusting the chinstrap
• The chinstrap (G.3) is adjusted correctly when it is comfortable and secure and you
feel a light pressure when you open your mouth.
The fastener (G.1) should not be on the chin or jaw.
• If the chinstrap (G.3) is too loose, it must be tightened with the buckle (G.2) on the
fastener (G.1).
• If the chinstrap (G.3) is too tight, it must be loosened with the buckle (G.2) on the
fastener (G.1).
Please be aware that the fastener must be closed before each
journey!!! (Fig. F)
Pleasebeawarethatthehelmetcanonlyprotectifittscorrectly.
Please try different sizes and choose one that feels comfortable and
secure on your head.
5. Charge battery
To be able to use the helmet functions, charge the battery completely before the rst use:
• Connect the micro USB charging cable with the USB connection at the back of the
helmet (Fig. L).
• The charging light next to the USB connection lights up in red during the charging
process (Fig. L).
• Once the charging light on the helmet goes out, this indicates that charging is
complete.
• Remove the micro USB cable from the helmet once charging is complete.
• Check the battery display before every use. The LED light next to the USB connection
ashes when the battery is down to just 10-15% charge.
Caution:Chargethebatterycompletelybeforetherstuse.
To ensure that the helmet works properly, check the back light and
indicator light functions as well as the battery LED light on the helmet
before each use.
6. Turning the helmet on and off
• Switch the helmet on at the -switch before use (Fig. I).
• The LED light goes green during operation.
• Hold down the switch for approx. 3 seconds until the LED light goes out to turn it off
again after use.
Smart Bicycle Helmet SP-106

8
7. Cleaning and care
• Wash your helmet only with lukewarm water, mild soap and a soft cloth.
• Leave your helmet to air dry after every use.
• Wash the inner padding with lukewarm water and mild soap and then leave to air
dry.
8. Disposal
You must dispose of the helmet through an authorised waste disposal company or a
communal waste disposal facility.
REMOTE CONTROL SP-11
Safety instructions
• Ensure that the remote control battery is always charged with a micro USB cable.
• Never leave the remote control unattended on your handlebars.
• When attaching the remote control to the handlebars, always ensure that you attach
the remote control in such a way that you can read the writing.
• Before each use, check that the remote control works properly in combination with the
helmet and its back light and indicator light functions.
User information
1. Beforetherstuse
Charge the battery completely before the rst use (Fig. J):
• Connect the micro USB charging cable with the USB connection at the back of the
remote control
• The ON/OFF button lights up in red during the charging process.
• Once the ON/OFF button light goes out, this indicates that charging is complete.
• Remove the micro USB cable from the remote control once charging is complete.
2. Attaching to handlebars
• Attach the remote control to your handlebars using the recess provided (Fig. J).
• To attach the remote control, place the screw in the provided opening and tighten it
Remote control SP-11

9
(Fig. J).
• Also reinstall the rubber covers and the brakes properly on your handlebars if
necessary.
3. Removing and attaching the control element
Never leave the control element of your remote control unattended on your handlebars. The
remote control has a bayonet catch. Release the control element as follows (Fig. J):
• Turn the upper control element anticlockwise until it is diagonal to the bracket.
• Remove the control element of the remote control and keep it with you.
Reattach the control element to the bracket on the handlebars before use as follows:
• Place the control element of the remote control diagonally onto the handlebar
attachment. Be careful to attach the control element in the correct position, meaning
the ON/OFF button must always be readable while travelling and may not be upside
down.
• turn the control element of the remote control clockwise on the handlebar attachment
until it locks into place and sits rmly
Caution: Keep your remote controls with you and do not leave them
unattended on the handlebars. When attaching the control element
to the handlebars, please ensure that you attach this correctly and
that you will be able to read the writing while travelling.
4. Functions
To be able to use the functions of the remote control in connection with the helmet, start the
remote control by pressing the ON/OFF switch.
Now, you can control the back light and the indicators via the remote control attached to the
handlebars.
The remote control displays which function is active by illuminating the respective button.
The remote control has 4 functions:
• ON-/OFF
• Left indicator light
• Right indicator light
• Back light
To switch off the remote control, hold the ON/OFF switch for a few seconds until the light
goes out.
Remote control SP-11

10
5. Cleaning and care
The casing of the remote control can be cleaned with a moist cloth.
6. Disposal:
You must dispose of the remote controls through an authorised waste disposal company or a
communal waste disposal facility.
BACK LIGHT AND INDICATOR LIGHTS
Safety instructions
• The back light does not replace the prescribed light features for bicycles mentioned in
the German Road Trafc Act (StVZO Art. 67).
• When used properly, the back light serves to improve visibility.
• The back light is only intended for private use
• Please ensure that the back light is not covered or cannot be obscured by collars,
rucksacks or head movements.
• Parents should ensure that their child also regularly checks the functionality of the
back light.
• The back light is not a toy and may only be used by children under adult supervision.
• Please be aware that the indicator function on the helmet to indicate a change in
direction does not replace manual hand signals.
• Check before each use that the back light and indicator light functions work properly
in combination with the remote controls.
User information
1. Beforetherstuse
To be able to use the back light and the indicator lights, charge the battery for the helmet
and the remote control before the rst use.
You can read about the charging process in the previous chapters.
2. Functions
The back light has two different functions which can be used as you desire (Fig. M):
• Press once: Permanent light
Back light and indicator lights

11
• Press twice: Flashing light
• Press three times: Light off
By activating the indicator lights, other road users will be prepared for your change of
direction. On the remote control, there are two functions to choose from (Fig. K):
• Left arrow: Indicator on the left side of the helmet ashes
• Right arrow: Indicator on the right side of the helmet ashes
• After activation, the indicators selected switch themselves off automatically.
3. Cleaning and care
Wash the casing of the lights as well as your helmet only with lukewarm water, mild soap
and a soft cloth.
4. Disposal
You must dispose of the remote controls through an authorised waste disposal company or a
communal waste disposal facility.
Resetting the wireless connection
• Switch the remote control off using the ON/OFF button.
• Switch the
-button (g. I) on the helmet on.
• Press the
-button on the helmet briey 3 times in quick succession.
• Press the ON/OFF button on the remote control.
Back light and indicator lights

12
Technical information:
1. Helmet
Battery: Lithium-ion battery 400 mAh, 3.7 V
Charge time: approx. 2 hours
Operating time: approx. 16 hours
Operating time in standby mode: approx. 60 days
Transmission frequency: RF 2.4G up to max. 35 Meter
Frequency range: 2407MHz - 2477MHz
Maximum transmission power: -6 dBm
2. Remote controls
Battery: Lithium-ion battery 100 mAh, 3.7 V
Charge time: approx. 2 hours
Operating time: approx. 16 hours
Operating time in standby mode: approx. 60 days
Conformity declaration
SPEQ GmbH hereby declares that the helmet and the remote control comply with the
provisions of PSA VO 2016/425/EU and the following directives and standards:
• Directive RED 2014/53/EU
• Directive RoHS 2011/65/EU
• Standards: EN 1078
EN 62311:2008 (Art.3.1a)
EN 301489-1 (Art.3.2)
EN 300328 (Art.3.2)
You can nd the complete conformity declaration at www.speq.de.
Technical information

Service Address:
SPEQ GmbH
Tannbachstraße 10
D-73635 Steinenberg
Hotline 00800 30 777 999
Email: ser[email protected]
Web: www.speq.de
Information as of:
10/2018
Testing house:
TÜV Rheinland LGA Products GmbH
Tillystrasse 2
D-90431 Nuremberg
Ref no. 0197
2016/425
DIN EN 1078
IAN 309848 6
/