
Page 1 of 8
RELEASE NOTES AND
UPDATE INSTRUCTIONS
ConferenceSHOT AV Camera
Current Release
ConferenceSHOT AV 1.6.0
December 8, 2020
New Features
• We have placed the company’s standard privacy notice on this product’s Help page. This product
does not record or save audio or video files, and it does not store any identifying information other
than what you may choose to enter on the Room Labels page of the web interface. However, the
device’s IP address is considered “personally identifiable information” for the purposes of the
privacy notice. This information is stored for display to the user, but not otherwise shared or
transmitted.
• You can now connect the ConferenceSHOT AV camera to a room audio system or connect an
external audio source to the camera using an EasyMic adapter (balanced audio connection). Use
the new "EasyMic Adapter Mode" setting on the Audio page.
• Added VISCA-over-IP support.
• Added the Telnet command camera focus ir-correction {standard | ir-light |
get} for IR correction mode control.
Improvements
• Camera behavior settings previously presented on the DIP Switches tab of the System page are
now on the General tab.
• Improved IR remote compatibility.
• Improved USB enumeration behavior.
• Enhanced compatibility with the new Vaddio Device Controller.
• In some cases, firmware updates could fail. This has been fixed.
• In some cases, the web interface could display the mute state of individual inputs or outputs
inaccurately. This has been fixed.
• After updating firmware, the Telnet enabled/disabled status shown in the web interface could
become out of sync with device behavior. This has been fixed.
• Under certain circumstances, using UVC (USB video) controls to move the connected camera
could cause the UAC (USB audio) controls to stop working. This has been fixed.
Release History
ConferenceSHOT AV 1.5.0
December 23, 2019
New Features
• If you restore factory defaults, the camera now requires an initial setup step to make the
administrative controls and other functionality available. In this initial step, you must set the admin
password. This is also required for initial access to cameras that ship with this version of
firmware. See Initial Set-Up Procedure. After completing the initial setup, you have the option of
enabling streaming and other disabled features. At this time, setting the admin password is the
only task in the initial setup procedure.
• When static IP addressing is selected, the administrator can specify a DNS server.

Page 2 of 8
• Added support for long press right-clicking on iOS devices.
• Added Telnet command camera ptz-position {{pan | tilt | zoom} <position>
[no_wait]} to specify multiple-axis movements to absolute positions. The optional no_wait
parameter allows the command to return the command prompt immediately, while the requested
camera movement is still in progress. The command camera ptz-position get returns the
camera’s current pan, tilt, and zoom positions.
Improvements
• Security improvements include changes to the default settings for:
o HTTP access is disabled. To connect using HTTPS, type https:// followed by the IP
address. Because Vaddio uses self-signed certificates, your browser will present warning
messages indicating that you are trying to access an unsafe website; however, this is a
secure connection to the camera and traffic will be encrypted.
o Streaming is disabled.
o Telnet access is disabled.
• TLS v1.1 protocol is no longer supported; more recent protocols continue to be supported.
• The Audio page now provides the ability to enable or disable the buttons on a connected
TableMic microphone, individually.
• The Telnet command network settings get now includes the camera’s hostname in the
information it returns.
• The Telnet command camera ccu get now returns all camera ccu settings if no parameter is
specified.
• Telnet commands to set hostnames and other user-definable strings now accept hyphens.
• Improved out-of-range error messages for Telnet commands specifying movements by absolute
position.
• Improved help text for some Telnet commands.
• The top speeds for Global Preset Speeds have been reduced to provide better control in certain
conferencing applications.
• The default setting for UVC mode has been changed to Client Custom for better out-of-the-box
compatibility with major soft conferencing clients. This does not change your camera’s stored
settings; however, if you need to restore factory defaults, you may need to change this setting
afterward.
• Exporting data to an Android device now works properly.
• Telnet commands now recognize the appropriate ranges of values for various camera settings,
such as iris.
• If a custom home preset was stored while the camera was in manual focus mode, and the home
preset was subsequently cleared, attempting to select the home preset could generate an error
message. This has been fixed.
• In some cases, the camera reported its zoom position inaccurately after a very small change in
zoom level. This has been fixed.
Notes
• If controlling this camera with any of the following devices, the device may require a firmware
update to be able to control the camera via IP.
o PCC Premier
o AV Bridge MATRIX PRO
o AV Bridge MatrixMIX

Page 3 of 8
ConferenceSHOT AV 1.4.0
June 19, 2019
New Features
• Added support for the new TableMIC microphone.
• Added support for camera presets over USB with Zoom soft clients that support the feature.
• Added Telnet command camera icr { get | on | off } to control the camera’s IR cut filter. When
the filter is on, the video image is black and white.
Improvements
• In the admin web interface, various camera behavior settings have moved from soft DIP switches
to the General tab of the System page.
• In some cases, the web interface did not load properly if the computer had recently accessed
another Vaddio device at the same IP address. This has been fixed.
• After certain operations such as changing resolution or changing the Super-Wide Mode setting,
the camera's zoom position was not reported correctly. This has been fixed.
• Improved camera motor control.
• Various cosmetic improvements to the administrator web interface.
ConferenceSHOT AV 1.3.0
January 31, 2019
New Features
• Added support for the new CeilingMIC microphone.
• Added support for RTMP streaming. This is configured in the admin web interface and can be
enabled/disabled in both the admin and the user web interface.
• Added initial public REST API.
• One Push White Balance can now be executed through the camera's admin web interface.
• Added a control in the admin web interface to configure the behavior of a connected table
microphone's OneTouch button as either momentary or latched.
• Added support for DNS Service Discovery.
• Telnet command to get and set camera module gamma values:
[ camera ccu {get | set} gamma ]
• Telnet command to allow streaming enabled status to be toggled:
[streaming ip enable get | on | off |toggle ]
Improvements
• Improved streaming performance.
• Added ability to configure maximum packet size (MTU) for IP streaming.
• Added USB streaming notifications to the web interface.
• Improved stability when changing IP streaming settings.
• In the event that IP streaming stops working properly and a reboot is needed, the admin web
interface prompts the user to reboot the camera.
• Improved pan and tilt performance.
• On receiving a reboot instruction, the ConferenceSHOT AV now ensures your most recent
configuration changes have been saved successfully before rebooting.
• Improved camera behavior when an operator rapidly and repeatedly cancels and restarts camera
operations.
• When the camera is in standby mode, the web interface no longer permits configuration changes
using the soft DIP switches in the admin web interface.
• Improved the accuracy of the volume level indicator on connected EasyMic Table MicPOD
microphones.
• On-hook/off-hook call state is now handled correctly on a connected table microphone.
• Corrected an issue that occasionally resulted in an error message during certain camera
operations such as switching Super-Wide Mode on or off.

Page 4 of 8
• Corrected an issue that could result in some software trigger assignments not being initialized
properly after a reboot.
ConferenceSHOT AV 1.2.0
May 31, 2018
New Features
• Added ability to disable the Telnet server on the device.
• Added ability to disable general HTTP access to the device.
• Added ability to configure HTTPS certificates from the web UI.
• Added support for EasyMic PRO I/O DSP firmware update.
• Added tooltips to the main navigation bar in the web UI when it's collapsed.
• Added setting to allow the front LED to be turned off during standby instead of displaying its
normal standby color.
• Added setting to allow the system to automatically enter and exit standby based on USB
connect/disconnect events.
Improvements
• Added ability to disable the telnet server on the device.
• Added ability to disable general HTTP access to the device.
• Added ability to configure HTTPS certificates from the web UI.
• Added support for EasyMic PRO I/O DSP firmware update.
• Added tooltips to the main navigation bar in the web UI when it's collapsed.
• Added setting to allow the front LED to be turned off during standby instead of displaying its
normal standby color.
• Added setting to allow the system to automatically enter and exit standby based on USB
connect/disconnect events.
Notes
• Home preset can take a longer time than usual to execute under some circumstances.
ConferenceSHOT AV 1.1.0
December 19, 2017
New Features
• Added firmware update support for EasyUSB PRO MIC I/O.
• Allow import of configuration exported from previous versions of software.
Improvements
• Improved UI notification when saving changes.
• PCC Premier 2.0.0 compatibility.
• Enhanced support for USB joystick control.
ConferenceSHOT AV 1.0.1
January 13, 2017
Improvements
• Improved interoperability with EasyMIC products.
ConferenceSHOT AV 1.0.0
January 19, 2017
Notes
• Initial Release.

Page 5 of 8
Initial Set-Up Procedure
Recent security improvements to Vaddio products have changed the way you interact with this product
when you set it up for the first time.
What’s new
• The product now uses the more secure HTTPS protocol, rather than HTTP.
• You must set the admin password using the web interface. Until the admin password is set and
any other initial tasks are completed, the control and administrative interfaces are not available.
• You will not be able to open a Telnet session to this product until you set the password using the
web interface.
• You will need to set the admin password again if you restore factory defaults.
Refer to the product’s manual for specific instructions to discover its IP address and access its
web interface.
Connect using HTTPS
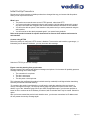
Before the product is configured, HTTP access is disabled. To access the web interface, type https://
followed by the IP address. Otherwise, you may encounter this message:
Switch to HTTPS if you see this message.
Expect a security warning from your browser
Different browsers will respond with different messages and options. Your browser will probably present a
message indicating one of these things:
• The connection is not private
• The site is not secure
• The site is not trusted
• The site poses a security threat
This is because the certificate (the product’s website security credential) is self-signed rather than being
issued by an external certificate authority.
To proceed to the product’s web interface, you will need to make the selections that your browser’s
security message discourages. The security warning page may present an option to learn more, view
details, or go to the “Advanced” page. When you select the applicable option, your browser provides a
button or link to continue to the IP address you entered, with a reminder that it may be unsafe. Select this
option.
After you have accessed the product’s web interface once, your browser remembers its IP address and
will not present the security message again.

Page 6 of 8
Device set-up
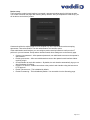
The first time the product’s web interface is accessed, it presents a landing page for initial set-up tasks.
You will also encounter this page after restoring factory defaults. After you complete the initial set-up, you
will be able to work with the product.
Create and confirm the admin password, and complete any other required tasks such as accepting
agreements. Then select Submit. The main administrative web interface opens.
In the administrative web interface, you can configure product security features to conform to the IT
policies for your environment. Except where otherwise noted, these settings are on the Security page.
• Create a user password – Allow password-protected, non-administrative access to the operator’s
web interface.
• Enable guest access – Allow non-administrative access to the operator’s web interface without
requiring a login.
• Choose whether to expire idle sessions – By default, the web interface automatically logs you out
after 30 minutes of inactivity.
• Enable HTTP access – Enable connections to the product’s web interface using the less-secure
HTTP protocol.
• Enable Telnet access – This is disabled by default.
• Enable IP streaming – This is disabled by default. You can enable it on the Streaming page.

Page 7 of 8
Firmware Update Instructions – ConferenceSHOT AV
Requirements
• Network access to the camera.
• The web interface’s admin password.
• The .p7m firmware file for the camera – download this from https://www.legrandav.com/. It is
available on the product page’s Resources tab.
Step-By-Step Process
1. Enter the IP address or hostname for the camera into the address bar of a web browser.
2. Log in as admin.
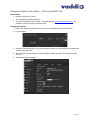
3. Navigate to the System page. Your camera’s System page may present different information than
shown in the screen shot.
4. Select Choose File, then browse to the downloaded firmware and select it. The filename ends
with .p7m.
5. Select Begin Firmware Update.

Page 8 of 8
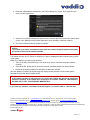
6. Read and understand the information in the Confirm dialog box. It's dull, but it could save you
some time and aggravation.
7. Select OK. A progress message box opens and the indicator light on the front of the camera turns
yellow. If the update process presents warnings or error messages, read them carefully.
8. The camera reboots when the update is complete.
Caution
The camera must remain connected to power and to the network during the update. Interrupting
the update could make the camera unusable.
This update can take up to 5 minutes to complete; the pop-up message window will identify the progress
of the update.
While you’re waiting, you could try the following:
• Think of as many clean jokes as you can. How many can you remember while the update is
running?
• Think about fish. Which species should be renamed, and what should it be called instead?
• Decide what imaginary holiday you would like to add to the calendar.
After the update is complete, the System page will display the new firmware version under System
Information. Enjoy that ‘New Firmware Smell’!
If the update procedure is interrupted for any reason the product may need to be returned to
Vaddio for updating. If the update does not seem to run, DO NOT TURN OFF THE PRODUCT
OR UNPLUG IT. CALL TECH SUPPORT IMMEDIATELY.
If you have any questions, call Vaddio Technical Support: (+1) 763-971-4428 or 1-800-572-2011
Vaddio is a brand of Legrand AV Inc. · www.legrandav.com · Phone 800.572.2011 / +1.763.971.4400 · Fax +1.763.971.4464
Email – Europe, Middle East, Africa: av.emea.vaddio.support@legrand.com | All other regions: av.vaddio.support@legrand.com
Visit us at www.legrandav.com for firmware updates, specifications, drawings, manuals, and technical support information, and more.
Vaddio is a registered trademark of Legrand AV Inc. All other brand names or marks are used for identification purposes and are trademarks of
their respective owners. All patents are protected under existing designations. Other patents pending.
©2019 Legrand AV Inc.
-
 1
1
-
 2
2
-
 3
3
-
 4
4
-
 5
5
-
 6
6
-
 7
7
-
 8
8


VADDIO 999-99950-300B Operating instructions
- Type
- Operating instructions
- This manual is also suitable for
Ask a question and I''ll find the answer in the document
Finding information in a document is now easier with AI
Related papers
-
VADDIO ConferenceSHOT AV Complete Manual
-
VADDIO 999-99950-400B Owner's manual
-
-
-
-
-
-
-
-