Page is loading ...

Column Packing Instructions
1
Read Me First!
What These Instructions Tell You
These instructions describe how to use the POROS® Prep Self Pack®
packing device and related hardware. They explain:
•How to assemble the packing device
•How to adapt the packing device to different LC instruments
•Specific slurry and packing conditions for your media
•How to pack your own columns
•How to test a column
•How to unpack a column
•How to reuse POROS Self Pack media
Other Information Provided
You receive two documents with your media:
•Column Operating Instructions for your media provides
information about running the packed column and also
provides guidelines for using Perfusion Chromatography.
•Packing and Testing Conditions instructions provide the
conditions you need to test the packed column (if appropriate).
NOTE: Refer to the Packing and Testing Conditions instructions for
packed column testing information only. Ignore slurry and packing
conditions information in the Packing and Testing Conditions
instructions included with your POROS Self Pack® media. This
information pertains to the smaller scale device that can also be used
with POROS Self Pack media.
1 Product Description
The POROS Prep Self Pack Packing Device for Perfusion
Chromatography® columns lets you pack and repack empty PEEK
columns with POROS 20 and POROS 50 Self Pack media. By packing
your own Perfusion Chromatography columns, you receive the superb
performance of the latest bioseparation technology along with
unsurpassed affordability and economy.
The Self Pack packing device:
•Is made of corrosion-resistant 316L stainless steel that can be
used with salt buffers.
•Has a total volume of 70 ml (packing device and column).
•Has a maximum operating pressure of 2,000 psi.
You purchase empty columns and POROS Self Pack media separately
from the packing device.
1.1 Packing Device Hardware
This section describes:
•Packing device parts
•Fitting adaptor kit
•Backpressure regulator
Packing Device Parts
The packing device consists of these parts:
•Cap (center cover and lock nut)
•O-ring
•Chamber
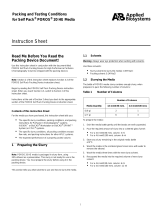
A backpressure regulator comes with the packing device. Figure 1
shows the parts of the packing device and the backpressure regulator.
Figure 1 Prep Packing Device Parts
PB1000816
Chamber
O-ring Cap
Backpressure regulator
Outlet end Inlet end
Lock
nut
Cente
r
cover
POROS® Prep Self Pack® Packing Device
for High Performance
Perfusion Chromatography® Columns
Section Page
1 Product Description .............................................................1
2 Additional Items Needed to Pack Your Column ..................2
3 Preparing Your Equipment for Packing ..........................3
4 Packing a Column ............................................................. 4
5 Running the Packed Column ........................................... 7
6 Unpacking a Column ........................................................ 7
7 Storing the Packing Device and Column ........................7
8 Accessories, Spare Parts, and Ordering Information ..........8
9 Technical Support ...............................................................8

2
The inlet end of the chamber connects to your LC instrument. It has:
•A screw-on 2-piece cap with a 10-32 female fitting. You can
adapt this fitting to M-6 metric systems (such as the Pharmacia
FPLC® system) or 1/4-28 systems by using the fitting adaptor
kit provided with the packing device.
•An O-ring seated in a depression around the rim of the inlet
opening. The O-ring lets you hand-tighten the cap, even when
you use the packing device with high-pressure instruments.
The outlet end is the narrow end of the chamber, where:
•You can connect an empty 10 mm diameter PEEK column tube
without making any adaptations.
•A white Teflon® washer recessed in the outlet end of the
packing chamber creates a proper seal when a column is
screwed in place. (This washer is not visible in Figure 1.)
Fitting Adaptor Kit
The fitting adaptor kit adapts the Self Pack packing device to
M-6 metric or 1/4-28 LC systems. The kit provides these fittings:
•2 red Fingertight fittings
•2 beige ferrules (barrel-shaped)
•2 black metric nuts
•2 green nuts
•2 blue ferrules (cone-shaped)
•2 pieces of orange 0.020-inch I.D. PEEK tubing
To use the fitting adaptor kit:
1. Connect one end of the orange tubing to an M-6 or 1/4-28 system.
•For M-6 systems: Slip a black nut over the tubing followed by
a blue ferrule, with the conical end pointing toward the nut.
Connect to the LC system and finger tighten.
•For 1/4-28 systems: Slip a green nut over the end of the
tubing, followed by a blue ferrule, with the conical end pointing
away from the nut. Connect to the LC system and finger
tighten.
2. Put a red Fingertight fitting on the other end of the tubing, followed
by a beige ferrule.
The fitting is now ready to be connected to the 10-32 fitting on the
cap of the packing device. Because the cap is heavy, do not attach
it now. Wait until you are ready to attach the cap to the chamber
(see Section 4.3, Filling the Packing Device).
Backpressure Regulator
The backpressure regulator improves the quality of the packing by
increasing the pressure drop over the column during packing. The
backpressure regulator shipped with the packing device consists of a
length of 0.005-inch I. D. PEEK tubing and a Fingertight fitting. The
backpressure regulator screws into the outlet end of an empty column
that is installed on the outlet end of the chamber.
2 Additional Items Needed to Pack Your
Column
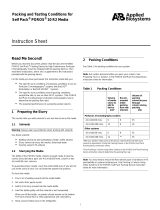
In addition to the packing device, to pack a column you need an empty
PEEK column, POROS Self Pack media, and protein test standard (all
purchased separately). Figure 2 shows these items.
Figure 2 Additional Items Needed
You can order this equipment from Applied Biosystems. For ordering
information, see Section 8, Accessories, Spare Parts, and Ordering
Information.
PEEK Column
An empty PEEK column comes with these parts:
•A hollow tube
•Two end fittings, which screw onto threads at either end of the
column tube
•Two end plugs
As shipped, the end fittings are assembled on the tube, and the
end plugs are installed.
•Four PEEK frits, provided in a separate package
•Two 10-32 thread fittings and ferrules (used to connect the
packed column to a system)
•A fitting adaptor kit (identical to the one provided with the
packing device). This kit adapts the column 10-32 end fitting to
M-6 metric or 1/4-28 systems.
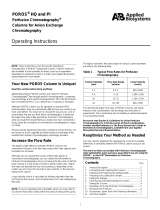
Figure 3 shows a PEEK column without end plugs.
Figure 3 PEEK Column Parts
PB1000817
Protein test
standard
Media
PEEK
columns
PB1000077
End fitting
Frit Tube

3
3 Preparing Your Equipment for Packing
To pack a column, you must:
•Clean the column and packing device
•Prepare your LC system
•Assemble the packing device and empty column
•Position the packing device
Lab Equipment Needed
In addition to the packing device and empty column, you need this
equipment to pack a column:
•LC system
•Spatula
•Glass beaker of 200 ml or greater
•Squirt bottle
•Laboratory tissue
•25 ml graduated cylinder or 20 ml pipette
•Deionized water
3.1 Cleaning the Column and Packing Device
NOTE: Observe good laboratory practice. Wear safety glasses during
the following procedures.
The column and packing device are reusable. You clean them
differently depending on whether you have used them before.
Never Used
If the column and packing device have never been used:
Column: Unscrew the end fittings and flush the tube and end fittings
with deionized water. Do not reassemble the column. Set all the pieces
aside.
Packing device: Wash or sonicate the packing chamber and cap with
50% isopropyl, ethanol, or other alcohol to ensure cleanliness. Set all
the pieces aside.
Previously Used
If the column or packing device has been used before, clean it before
each reuse to avoid contamination with packing material left over from
a previous use.
Column: Sonicate the tube, end fittings, and frits in 50% isopropyl,
ethanol, or other alcohol for 10 minutes. Rinse all pieces thoroughly
with deionized water. Set all the pieces aside.
Packing device: Flush the packing device cap with deionized water
and thoroughly wash the threads at the outlet end of the chamber.
Residual media gets trapped in the threads during normal use. Wash
the O-ring. Flush with organic solvent if you see any media residue on
surfaces after the water wash. Rinse again with water to remove the
organic solvent. Do not reassemble the packing device. Set all the
pieces aside.
3.2 Preparing Your LC System
To prepare your LC system, you must:
•Prepare the tubing
•Set the pressure limit
•Prepare the pumps
Preparing the Tubing
Make sure that the fitting on the end of your LC system pump outlet
tubing is compatible with the fitting on the packing device cap. If it is
not, use the fitting adaptor kit (see “Fitting Adaptor Kit” on page 2).
Do not connect the free end of the pump outlet tubing to the cap of the
packing device yet.
Set the Pressure Limit
For Perfusion Chromatography or conventional HPLC systems:
Set the pressure limit of your system at 2,500 psi.
For medium-pressure systems: Set the pressure limit at the
maximum allowable on the system.
Preparing the Pumps
Flush the pumps and the outlet tubing with the packing solvent listed in
Section 4.1, Slurry and Packing Solvents.
3.3 Assembling the Packing Device and Empty
Column
To assemble the packing device and column for packing:
1. Make sure the white Teflon washer is installed in the outlet end of
the chamber. The washer is required for a proper seal to pack the
column.
2. Lay out the equipment needed for packing (see “Lab Equipment
Needed” on page 3).
3. Write the name of your POROS Self Pack media on one of the
blank labels provided with the media.
These labels identify the columns and also identify the top of the
column (the end connected to the packing chamber). When you
use the column, you must use the top as the inlet end.
4. Attach the label to an end fitting on the PEEK column. Reserve this
fitting to be the top end fitting.
5. Set the PEEK column end fittings on the countertop so that you
can look down into them.
6. Drop a frit into each end fitting. The frit is smaller than the inner
diameter of the end fitting and must sit in the center depression
that is visible inside the end fitting.
7. Pick up the end fitting without the column label (containing a frit).
NOTE: With PEEK columns, be careful to hold the end fitting level.
Otherwise, the frit may slip out of the center depression as you
screw in the column, and you will not get a good seal. Media will
leak out of the column during packing.
8. Screw the column tube into the end fitting until finger-tight.
9. Tighten the end fitting a little more by gripping the column tube with
one hand and the end fitting in the other hand and tighten securely.
10. Screw the free end of the column tube into the outlet end of the
packing chamber. Tighten securely with both hands.
11. Screw the backpressure regulator into the bottom of the column.
Finger tighten.
12. Set the second end fitting aside to attach to the inlet end of the
column after it is packed.

4
3.4 Positioning the Packing Device
1. Clamp the open packing device/column assembly on the front of
your LC instrument. If clamps are not available on the instrument,
use a ring stand. Make sure that:
•The packing device is positioned vertically.
•The pump outlet tubing can reach the top of the packing
device.
•You can fit a 200 ml beaker under the end of the column.
2. Position your empty beaker below the end of the column.
3. Seat the packing chamber O-ring in the depression around the rim
of the chamber opening (shown earlier in Figure 1).
4 Packing a Column
This section describes:
•Slurry and packing solvents
•Slurrying the media (POROS 20 only)
•Filling the packing device
•Packing the column
•Removing and capping the packed column
•Cleaning up
•Testing the column
4.1 Slurry and Packing Solvents
Table 1 lists the slurry and packing solvents to use for different POROS
chemistries.
If you are using POROS 20 media, perform the steps in Section 4.2,
Slurrying POROS 20 Media.
If you are using POROS 50 media, skip to Section 4.3, Filling the
Packing Device. POROS 50 media is provided in a slurry of 20%
ethanol in a ratio of 1.8:1 slurry volume:packed media.
Table 1 POROS 20 and 50 Slurry and Packing
Solvents
4.2 Slurrying POROS 20 Media
WARNING: POROS 20 media is provided as a dry powder, which may
form a light dust. Use one of the following when handling dry POROS
media:
• NIOSH*/MSHA**-approved respirator with dust cartridge
• Fume hood
* National Institute for Occupational Safety and Health
** Mine Safety and Health Administration
To slurry the powdered POROS 20 media:
1. Weigh out:
2. If you are using POROS 20 AL, EP, or OH media, react the
weighed support (slurry the media in binding solution), then skip to
Section 4.3, Filling the Packing Device.
NOTE: The prep packing device and column can hold up to 70 ml
total volume.
For specific information and guidelines on reacting the support,
please refer to the following sections in the POROS AL, EP, and
OH Bulk Media Operating Instructions included with the POROS
media:
3. For all other media, add the following volume of slurry solvent (see
Table 1, “POROS 20 and 50 Slurry and Packing Solvents”, on
page 4):
4. Swirl gently until the material is well suspended.
NOTE: Do not use a stir bar or stirring rod. They generate fines
and may denature proteins.
When you tilt the mixing vessel, no powder should remain on the
bottom. The slurry should have a milky appearance and
consistency.
POROS 20 or 50
Media Slurry Solvent Packing Solvent
HP2, R1, R2 13% Isopropanol 13% Isopropanol
AL, EP, HE, HQ,
HS, MC, OH, PI,
S, Protein A,
Protein G
0.5 M NaCl 0.15M NaCl
D, Q 25mM sodium acetate
pH 4.5, 0.5M NaCl 25mM sodium acetate
pH 4.5, 0.15M NaCl
Column Weight of POROS 20 media (g)
10 mmD/50 mmL 2.0
10 mmD/100 mmL 4.0
Topic Section
General Considerations Section 2
Reacting the Support Section 3
POROS AL coupling reaction Section 4
POROS EP coupling reaction Section 5
POROS OH coupling reaction Section 7
Column Volume of slurry solvent (ml)
to add to weighed powder
10 mmD/50 mmL 12
10 mmD/100 mmL 24

5
4.3 Filling the Packing Device
To fill the packing device:
CAUTION: Do not proceed without setting your system pressure as
described in Section 3.2, Preparing Your LC System.
1. Swirl the slurried media to resuspend the slurry.
2. Add the following to the open packing device:
3. Rinse the mixing vessel, pipette, or cylinder with a small amount of
slurry solvent (see Table 1, “POROS 20 and 50 Slurry and Packing
Solvents”, on page 4) to ensure that all of the slurry is added to the
packing device.
4. Add slurry solvent (see Table 1, “POROS 20 and 50 Slurry and
Packing Solvents”, on page 4) to the packing device until it is
completely full.
NOTE: Do not stir up the slurry at the bottom of the packing device.
Direct the slurry solvent so that it runs down the inner wall of the
packing device, instead of pouring directly on the slurry.
5. Quickly screw the 2-piece cap onto the packing device: place the
center cover on the chamber, thread the lock nut down over the
cap and hand tighten until snug. Keep a lab tissue on hand
because some liquid may come out through the top as you tighten
the cap.
NOTE: Do not overtighten the cap. Overtightening can damage the
threads of the chamber and the cap.
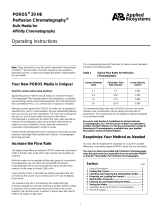
Figure 4 shows a packing device setup on a BioCAD® SPRINT™
System.
Figure 4 Typical Packing Device Setup
6. Attach the pump outlet tubing from the LC system to the cap of the
packing device. Finger tighten.
4.4 Packing the Column
This section discusses these topics:
•Principles of packing
•Packing a column using the VISION™ BioCAD Workstation,
BioCAD Workstation, or BioCAD SPRINT System
•Packing a column using other systems
Principles of Packing
As a column packs, the backpressure on the column rises.
The optimal packing flow rate is the highest flow rate possible that:
•Allows packing to proceed within the pressure limit you set
earlier, while maintaining a steady pressure reading
•Allows a sufficient volume of packing solvent to pass through
the column to ensure an efficient and stable bed
The actual packing flow rate is dependent on the system used, the
particle size of the media, and the length of the column.
Packing a Column Using the VISION Workstation, BioCAD
Workstation, or BioCAD SPRINT System
NOTE: Monitor the highest sustained pressure that occurs during
packing. Do not exceed this pressure when you run the packed
column.
To pack a column:
1. Determine the required volume of packing solvent to pass through
the column during packing (see Table 2).
2. Set the correct flow rate (see Table 2).
Table 2 Packing Flow Rates and Packing Solvent
Volumes
3. Turn on the flow and monitor the volume of packing solvent in the
waste beaker below the column.
4. Once the required volume of packing solvent has passed through
the column and you observe a steady pressure, stop the flow.
5. Let the column sit for 3 minutes to allow the pressure to dissipate
evenly across the packed bed.
NOTE: The packing flow rate has been determined to allow you to
comfortably pack your column within the pressure limit of your
system. However, variations in frit permeability or system
backpressure may require you to adjust the flow rate slightly.
6. If your system is well below the pressure limit during packing,
increase the flow rate in 0.5 ml/min increments until you approach
the pressure limit. Pack columns at the highest flow rate possible
without exceeding the system pressure limit.
Media Volume of media slurry (ml) to add to packing device
20µEntire volume of slurry prepared in Section 4.2, Slurrying
POROS 20 Media.
50µUse a pipette or graduated cylinder to remove the correct
volume of slurry:
•For 10 mmD/50 mmL column—10 ml from total
slurry volume provided
•For 10 mmD/100 mmL column—20 ml from
total slurry volume provided
PB1000177
Packing chamber
Cap
PEEK column
Column
Dimensions Recommended initial
packing flow rate
(ml/min)
Minimum volume of
Packing solvent to
pass through
column during
packing (ml)
10mmD/
50mmL 20 80
10mmD/
100mmL 15 150

6
7. If you reach the pressure limit before you finish packing the
column, stop the flow, restart the flow at 0.5 ml/min lower than the
original setting, and continue packing. Repeat if necessary until
you are able to pack the column within the pressure limit.
NOTE: Occasionally defective frits generate excessive
backpressure. If so, replace the frits and start again.
8. Record the highest sustained pressure that occurred during
packing.
Do not exceed 85% of this pressure when you run the packed
column.
Packing a Column Using Other Systems
NOTE: Monitor the highest sustained pressure that occurs as you pack
the column. Do not exceed 85% of this pressure when you run the
packed column.
If you are using a system other than the VISION Workstation, BioCAD
Workstation, or BioCAD SPRINT System, you need to experiment to
find the correct flow rate. Start by setting the flow at the maximum
allowable on the system.
When using another system to pack the column:
1. Determine the minimum volume of packing solvent to pass through
the column during packing (see Table 2, “Packing Flow Rates and
Packing Solvent Volumes”, on page 5).
2. Turn on the flow and monitor the volume of packing solvent coming
through the column by observing the level in the waste beaker
below the column.
3. If you reach the pressure limit before the minimum volume of
packing solvent passes through the column, stop the flow, restart
the flow rate at 0.5 ml/min lower than the original setting, and
continue packing.
4. If the pressure limit is again exceeded, lower the flow rate another
0.5 ml/min.
5. Continue lowering the flow rate in 0.5 ml/min increments until the
minimum volume of packing solvent passes through the column
and you observe a steady pressure.
NOTE: Occasionally defective frits generate excessive
backpressure. If so, replace the frits and start again.
6. Record the final flow rate. Use this flow rate the next time you pack
a column with your system.
7. Record the highest sustained pressure that occurred during
packing.
Do not exceed 85% of this pressure when you run the packed
column.
4.5 Removing and Capping the Packed Column
To remove the column:
1. Unscrew the column from the packing device by grasping the body
of the column. (You may need to use pliers. Do not squeeze too
tightly with the pliers or you may scratch the tube finish.) Turn the
column to the left (counterclockwise) to unscrew it. Do not grasp
and turn the outlet end fitting. Doing so unscrews the end fitting
from the column. Place a clean beaker below the packing device.
A small bubble of excess packing material covers the top end of
the column tube. If the material is wet, lightly touch the bubble with
a lab tissue or paper towel to draw off the moisture.
2. Draw the flat side of the spatula across the top of the column to
remove the excess material and to level off the top of the packed
bed.
3. With a damp tissue, carefully wipe any remaining packing material
from around the rim at the top of the column tube. Do not touch the
top of the packed bed itself.
4. Holding the unused end fitting upright (see Section 3.3,
Assembling the Packing Device and Empty Column) to ensure that
the frit remains seated, turn the packed column upside down and
screw it into the end fitting. Keep track of the column inlet end.
5. Tighten the end fitting with both hands.
6. Insert the end plugs into the column end fittings.
7. Set the column aside while you clean up from the packing
procedure.
4.6 Cleaning Up
To clean up:
1. Make sure an empty waste beaker is below the column packing
device.
2. Pump several milliliters of packing solvent through the packing
device to push out excess packing material accumulated at the
outlet end of the chamber.
3. Remove the connection at the top of the packing device.
The pressure inside the packing device is released and the entire
contents flush into the beaker.
4. Remove the packing device from the clamp, take off the cap, and
rinse all pieces thoroughly with water.
5. Rinse the threads at the outlet end to remove residual media.
NOTE: The O-ring may stick to the cap of the packing device by
surface tension. Use the spatula to pull it out.
4.7 Testing the Column
After packing, perform the following two tests to on the column:
•Permeability test
•Protein separation test using test standards (if appropriate)
For specific conditions for both tests, and expected results for the
protein separation test, see Packed Column Performance, in the
Packing and Testing Conditions instructions included with your
POROS Self Pack media.
NOTE: Refer to the Packing and Testing Conditions instructions for
packed column testing information only. Ignore slurry and packing
conditions information in the Packing and Testing Conditions
instructions included with your POROS Self Pack® media. This
information pertains to the smaller scale device that can also be used
with POROS Self Pack media.
After you perform the tests:
•Compare the results of the protein separation test to the
expected results. If the data does not compare favorably, make
sure that your system is functioning properly. If your system is
functioning properly, unpack your column and start again (see
Section 6, Unpacking a Column.)
•Keep the data generated from both the initial permeability test
and the initial protein separation test as a reference standard
and use it to monitor the performance of the column over time.

7
Periodic Testing
The packing methods for POROS Self Pack media are designed to
produce columns that give you hundreds of runs. However, actual
column lifetime depends on the samples you run. Contaminants may
build up over time, decreasing capacity and increasing backpressure.
To check column backpressure and performance, run a permeability
test and the test protein standards after every 100 runs. Compare the
results to the reference data you generated after the initial packing.
If the backpressure of the column has increased more than 50% or if
the test chromatogram looks different from the original, unpack the
column and pack a new one (see Section 6, Unpacking a Column).
NOTE: Always use a freshly packed column for your most important
separations, to eliminate any possible contaminating proteins that may
remain from a previous run.
5 Running the Packed Column
For information about running the packed column, see the column
Operating Instructions included with your POROS Self Pack media.
6 Unpacking a Column
To unpack a column:
1. Unscrew the outlet end fitting and remove the frit.
2. Connect the inlet end of the column to the pump outlet tubing of
your LC system.
3. Position a beaker under the column.
4. Start the flow rate at 5 ml/min.
5. As soon as the media is pushed out of the column into the beaker,
stop the flow.
6. Remove the inlet end fittings and rinse all fittings, frits, and the
column tube in water and organic solvent.
6.1 Reusing the Media
You can reuse the media to pack a new column.
NOTE: As with any chromatographic media, repacking POROS Self
Pack media may result in increased backpressure in the packed
column. Backpressure is caused by particulate matter generated when
you unpack and repack the column. Do not repack your column more
than five times.
You can reduce backpressure by removing all particulate matter each
time you unpack the column.
Removing Particulate Matter
To remove particulate matter:
1. Suspend the unpacked media in slurry solvent (see Table 1,
“POROS 20 and 50 Slurry and Packing Solvents”, on page 4).
2. Let the slurry settle for 30 to 60 minutes.
3. Draw off the supernatant, which contains particulate matter.
Reusing Media
To reuse media:
1. If you are using POROS 20 media, make additional slurry using:
•10 mmD/50 mmL columns—0.8 g media in 2 ml slurry solvent
•10 mmD/100 mmL columns—1.0 g media in 3 ml slurry solvent
2. Add the following volume of new, unused POROS 20 or
POROS 50 slurried media to the used media (from which you have
removed particulate matter):
•10 mmD/50 mmL columns—2 ml
•10 mmD/100 mmL columns—3 ml
3. Add 6 ml of slurry solvent.
4. Slurry the entire mixture thoroughly and use it to repack the
column.
If backpressure continues to be a problem, repeat the process to
remove particulate matter 2 or 3 times.
7 Storing the Packing Device and Column
7.1 Packing Device
Store the packing device with the cap on to keep the threads from
knocking against other equipment. If the threads are damaged, the
device may not seal properly during packing. Also, damaged threads
may cause the cap to lock in place irreversibly.
Store the capped device in its original box.
7.2 Column
To store a packed column, see the column Operating Instructions
included with your POROS Self Pack media.
To store an unpacked column, collect the tube, end fittings, frits, and
end plugs, and keep them together.

8
8 Accessories, Spare Parts, and Ordering
Information
These accessories are available for your Self Pack equipment:
9 Technical Support
Applied Biosystems is dedicated to helping you use Perfusion
Chromatography and POROS media to the fullest extent possible. Our
biochromatographers, bioprocess engineers, and applications
development laboratories are available for support ranging from
telephone consultation to full method development.
Applied Biosystems offers a full line of POROS media for Perfusion
Chromatography in the reversed-phase, ion exchange, affinity, and
other chromatographic modes. Please contact your Applied
Biosystems representative for technical and ordering information.
Applied Biosystems publishes a continuing series of Application and
Technical Notes, highlighting specific purification solutions and
technical aspects of Perfusion Chromatography. Please contact
Applied Biosystems directly for a publication list.
For further details or for answers to questions on POROS Self Pack,
Perfusion Chromatography, or other products, please contact Applied
Biosystems. Refer to the last page of this document for contact
information.
Table 3 Self Pack Accessories
Description Quantity Part
Number
Prep Packing Device 1 1-9542-00
POROS Self Pack media See the POROS Self Pack
price list.
Test Standards
Anion Exchange Package of 1 1-9002-00
Cation Exchange Package of 1 1-9003-00
Hydrophobic Interaction Package of 1 1-9005-00
Protein A/G Package of 1 1-9006-00
Reversed Phase Package of 1 1-9001-00
Empty Self Pack Columns
10 mmD/50 mmL PEEK 1 1-9541-44
10 mmD/100 mmL PEEK 1 1-9541-46
Accessories, column
10-32 thread fittings and ferrules Package of 5 GEN602301
Fitting Adaptor Kit 1 1-9532-00
PEEK column frits, 10 mm 1 1-9127-05

9

Headquarters
850 Lincoln Centre Drive
Foster City, CA 94404 USA
Phone: +1 650.638.5800
Toll Free (In North America): +1 800.345.5224
Fax: +1 650.638.5884
Worldwide Sales and Support
Applied Biosystems vast distribution and
service network, composed of highly trained
support and applications personnel, reaches
into 150 countries on six continents. For sales
office locations and technical support, please
call our local office or refer to our web site at
www.appliedbiosystems.com.
www.appliedbiosystems.com
Applera Corporation is committed to providing
the world’s leading technology and information
for life scientists. Applera Corporation consists of
the Applied Biosystems and Celera Genomics
businesses.
Printed in the USA, 08/2001
Part Number 8-0193-40-0799 Rev. A
© Copyright 2000, 2001, Applied Biosystems. All rights reserved.
For Research Use Only. Not for use in diagnostic procedures.
Information in this document is subject to change without notice.
Applied Biosystems assumes no responsibility for any errors that
may appear in this document. This document is believed to be
complete and accurate at the time of publication. In no event shall
Applied Biosystems be liable for incidental, special, multiple, or
consequential damages in connection with or arising from the use of
this document.
POROS products and perfusive chromatography are covered by U.S.
patents 5,552,041; 5,605,623; and 5,833,861; foreign patents
pending. Chromatography materials of certain pore geometries,
including certain wide-pore supports, can permit perfusive
chromatography, that is, separations in which the rate of intraparticle
convection exceeds the rate of intraparticle diffusion. Use of any
such chromatography media at sufficiently high linear velocity,
without license, may constitute patent infringement. A limited license
to use the patented perfusive chromatography process is granted
with the purchase of POROS products from Applied Biosystems. The
license terminates upon expiration of the useful life of the product.
Subtractive Assay technology, enabled by the use of
ImmunoDetection (ID) Sensor Cartridges and the INTEGRAL Micro-
Analytical Workstation, is covered by U.S. patent 5,234,586. Other
patents pending.
Applied Biosystems, BioCAD, ImmunoDetection, INTEGRAL,
Perfusion Chromatography, POROS, and Self Pack are registered
trademarks of Applera Corporation or its subsidiaries in the U.S. and
certain other countries.
AB (Design), Applera, SPRINT, and VISION are trademarks of
Applera Corporation or its subsidiaries in the U.S. and certain other
countries.
Teflon is a registered trademark of E.I. Du Pont de Nemours and Co.
All other trademarks are the sole property of their respective owners.
/