Page is loading ...

(A)
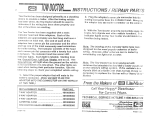
(C) (B) (D)
Endurance Socket Instructions: #48480 / 48470
1.) Attach mounting bracket (A) to desired location on rear of vehicle or use
existing mount. (Mounting screws not included).
2.) Run function wires through terminal cover (B).
3.) Strip function wires ¼” and tightly secure them to socket terminals (C)
according to function.
4.) Apply a small amount of grease (included) to all terminals, both front and rear
of socket to prevent corrosion.
5.) Snap terminal cover (B) onto socket.
6.) Fasten provided hex-head screw, nut, and washer combination to mounting
bracket (A) tightly.
7.) Tighten rear strain relief screw (D) located on bottom of terminal cover.
Note: Locate wires on vehicle by function only. Color coding is not standard with
all manufacturers.
Caution: Connect auxiliary power lead to fuse block or fused battery lead. 20
Amp.
LIMITED WARRANTY
Hopkins Manufacturing Corporation warrants Endurance™ products to be free from defects in material and workmanship, under normal use and service, for a period of 3 years from the date of original purchase.
This warranty does not cover, and Hopkins Manufacturing Corporation is not liable for, the cost of repair or replacement of parts which have been subjected to misuse, negligence, accident, improper installation, modification, or normal deterioration due to wear and exposure, or defects caused by
unauthorized repairs. THE ORIGINAL BUYER’S EXCLUSIVE REMEDIES UNDER THIS LIMITED WARRANTY SHALL BE LIMITED TO REPAIR OR REPLACEMENT (AT THE OPTION OF HOPKINS MANUFACTURING CORPORATION) OF THE DEFECTIVE PRODUCT OR PART. The repair or replacement of
the product or part under warranty will be made by Hopkins Manufacturing Corporation without charge for parts or labor.
ALL WARRANTIES IMPLIED BY LAW, INCLUDING BUT NOT LIMITED TO WARRANTIES FOR MERCHANTABILITY AND FITNESS FOR A PARTICULAR PURPOSE, ON DEFECTS IN THE MATERIAL AND WORKMANSHIP SHALL BE EFFECTIVE ONLY FOR A PERIOD OF 3 YEARS FROM THE DATE OF
PURCHASE. Some states do not allow limitations on how long an implied warranty lasts, so the above limitations may not apply to you.
UNDER NO CIRCUMSTANCES WILL HOPKINS MANUFACTURING CORPORATION BE LIABLE FOR INCIDENTAL OR CONSEQUENTIAL DAMAGES, INCLUDING BUT NOT LIMITED TO DAMAGE TO OR LOSS OF OTHER PROPERTY OR EQUIPMENT. Some states do not allow the exclusion or
limitation of incidental or consequential damages, so the above limitations or exclusions may not apply to you. This warranty gives you specific legal rights, and you may also have other rights which vary from state to state.
In order to obtain performance under this warranty, return the defective product, postage prepaid, along with dated proof of purchase, to Hopkins Manufacturing Corporation, 428 Peyton, Emporia, Kansas 66801-1157. This warranty does not cover shipping and delivery charges to or from Hopkins
Manufacturing Corporation.
Endurance Plug Instructions: #48500
1.) Remove set screw (A) from middle of plug. Separate plug and housing panels from
terminal puck (B).
2.) Run wires through rear grommet (C) and up to terminal assembly (B). Cut grommet
if needed for larger wire diameter. Strip function wires ¼” and tightly secure to the
terminal assembly. It is important to attach function wires to the terminal assembly (B)
in the same function position as found on the vehicle side 7-way socket. Leave 18” of
slack between tow vehicle and trailer to allow trailer to turn.
3.) Apply a small amount of grease (included) to all terminals, both front and rear of
terminal assembly to prevent corrosion.
4.) Place terminal assembly (B) in the post-side (D, right side) of the plug body with the
key pointing up, latching them into place.
5.) Route wires through plug body around the stabilizer post (E). Use provided ny-tie
to secure wires as a strain relief inside plug. Cut off excess ny-tie length.
6.) Put rear grommet back into place at rear of plug. Attach left side of plug body into
slotted fitting. Replace set screw (A) and fasten securely.
7.) Plug trailer plug into vehicle socket and test all functions.
8.) Find suitable location on trailer to install plug mounting bracket. Use the provided
self-tapping screws to mount. This secures trailer plug when not in use.
Note: Locate wires on vehicle by function only. Color coding is not standard with all
manufacturers.
48480
48470 48500
(A)
(C)
(B) (D)
311-0288-068 Rev. C 7/09
(RT)
(LT)
(T/M)
(AX)
(EB)
(GD)
(BU)
WIRE IDENTIFICATION /
IDENTIFICACIÓN DE LOS CABLES
(GD) = Ground / Tierra
(LT) = Left Turn / Direccional Izquierda
(T/M) = Taillight / Luces traseras
(BU) = Backup / Reversa
(AX) = Auxiliary / Auxiliar
(RT) = Right Turn / Direccional Derecha
(EB) = Electric Brake / Eléctrico del Freno
(E)
(LT)
(RT)
(AX)
(T/M)
(GD)
(EB)
(BU)
/