

Contents
2
Before Use
Introduction.......................................................................5
What can PHOTOfunSTUDIO do?...................................7
Supported picture files......................................................8
System requirements .......................................................9
Setting up
Connecting a digital camera to a PC..............................11
Starting PHOTOfunSTUDIO...........................................12
Basic operations
Switching among display modes....................................15
List (Thumbnail) Mode.................................................. 16
Focus Mode ................................................................. 18
Full Screen Mode ......................................................... 19
Calendar Mode............................................................. 20
Selecting pictures...........................................................22
Marking on pictures........................................................23
Copying pictures.............................................................25
Moving pictures..............................................................26
Deleting pictures.............................................................27
Refreshing the display....................................................27
Acquiring and displaying pictures
Acquiring pictures to PC.................................................29
Displaying the acquired pictures in list view...................32
Displaying pictures by recording date (Calendar format)......33
Displaying pictures in enlarged view /
playback the pictures.....................................................34
Playing back slide shows...............................................35
Playing back the displayed pictures as a slide show...............35
Creating a slide show from your favorite pictures ..........35
Opening the saved slide show.......................................36
Settings for slide shows ................................................37
Playing music files.........................................................39
Categorization
Flow of categorization....................................................41
Details on categorization ...............................................42
Categorization by recording date...................................42
Categorization by recording scene ................................42
Categorization by number of persons
(Face Detection) ...........................................................43
Categorization by model name......................................44
Categorization by picture storage folder........................44
Categorization by keywords ..........................................44
Categorization by face (Face Recognition)....................45
Registering the face pictures.........................................45
Execute the face check .................................................46
Correcting the face check result....................................47
Changing the category name.........................................48
Deleting categorization ..................................................49
Deleting pictures from categorization ............................49
Deleting a folder in a categorization ..............................50
Deleting all categorizations ...........................................51
Contents

Contents
3
Process
Process flow...................................................................53
Resizing a picture...........................................................55
Converting picture format...............................................56
Changing several picture file names at one time
(Batch renaming)............................................................57
Adding date and title information to a picture (Burn-in)......59
Changing the recording date..........................................60
Creating still pictures from motion pictures ....................61
Rotating pictures ............................................................62
Retouch
Start and exit the retouch function..................................64
Window configuration for the retouch function...............65
Correcting pictures or add effects ..................................67
Saving retouched pictures..............................................70
Retouch function menu ..................................................71
Outputting
Output flow.....................................................................74
Printing pictures..............................................................75
Attaching pictures to e-mail............................................81
Using a picture as wallpaper..........................................84
Print settings (DPOF setting)..........................................85
Writing pictures onto a memory card..............................86
Writing pictures to a CD or a DVD..................................88
Upload picture to YouTube............................................90
Edit and output of AVCHD Lite motion
picture
Delete part of AVCHD Lite motion picture.....................93
Write AVCHD Lite motion picture to memory card
or DVD (AVCHD Lite/DVD-Video) .................................96
Usable card / DVD (Media)............................................96
Writing ..........................................................................98
Disc format...................................................................103
Setting the AVCHD Lite function..................................105
Other settings
Customizing picture display.........................................108
Changing order of picture (Sort)..................................108
Setting types of pictures (View type) ...........................109
Registering application in Launcher.............................110
Managing folders .........................................................112
Properties of picture file...............................................114
Setting the operations at the time of start....................116
Changing the initial settings of acquisition...................117
Changing the initial settings of rotation........................119

Contents
4
Convenient information
Tool bar........................................................................120
Picture browser display setting area ............................120
Status bar.....................................................................121
Output view ..................................................................121
Menu ............................................................................122
Context menu...............................................................126
Context menu on the picture browser ..........................126
Context menu on the folder view .................................127
Troubleshooting (Q&A).................................................128
Glossary.......................................................................136

5
Before Use Introduction
Before Use
Introduction
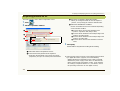
J About the contents of these instructions
•Please note that some of the explanation and screens
covered in these operating instructions may differ from actual
ones depending on the operating environment of your PC.
Please be aware of this beforehand.
•No information is provided about basic PC operations and
terms. Please refer to the relevant PC manual.
•The contents of these operating instructions may be
subjected to changes without prior notice.
•Reproduction of these operating instructions in part or in full
without permission is prohibited.
•The description of Windows
®
in these operating instructions
is based on the Windows
®
XP screen.
•The English, French, German, Spanish and Simplified
Chinese versions of this software are available to the OS of
the corresponding languages. If you use an OS of another
language, the English version of this software will be installed
and become available.
•Pages to be referred to are shown as “00”.
•In these operating instructions, PHOTOfunSTUDIO 3.0 HD
Edition is indicated as “PHOTOfunSTUDIO”.
•In these operating instructions, a memory card refers to an
SD memory card, including the internal memory.
•The usable operation items on the menu and context menu
depend on the operation status of PHOTOfunSTUDIO or
status of the selection of the pictures. The unusable items are
displayed in grey.
•Depending on the digital camera, some of the models do not
have functions like [BABY] Mode, [PET] Mode, [TRAVEL DATE],
[DATE STAMP], [TEXT STAMP], face categorization (face
recognition), RAW file, AVCHD Lite motion picture etc.
mentioned in these instructions.
J
Precautions for use
•Do not pull out the connected cable of media (memory card and
DVD, etc.) or digital camera when using it with this software.
There is a possibility that the software may not work normally or the
data under transmission may be damaged.
•If the PHOTOfunSTUDIO cannot be started due to the lack of
system resources, close other applications and then restart
the PHOTOfunSTUDIO.
•If a large number of pictures is selected, it takes time to
display as a thumbnail view.
•Depending on the environment used, the thumbnail might not
be displayed normally, when more than a few hundred
pictures are displayed.
J
About the network function
•This service is available as of January 1, 2009.
•In future, a guarantee of operation is not offered for any service
or changes in the specifications of YouTube
TM
. Please note that
the contents of the service or the window which can be used
might change at any time without prior notice.
•Do not upload the motion pictures protected by copyright
except when permission has been obtained from the related
right holder.

6
Before Use Introduction
About personal information
Personal information of name and age is included in the recorded
picture when the name or birthday is set in [BABY] Mode.
Since the face recognition function extracts the characteristics of the
face to categorize, characteristic information of the face and the face
picture will be saved on the PC.
In addition, personal information of name and age will be saved on the
PC if name and birthday are set in the face picture.
J Management and disclaimer of personal information
•Information including personal information may be altered or vanish
due to erroneous operation, static electricity, accident, malfunction or
repair etc.
Please note in advance that Panasonic is not liable in any way for any
direct or indirect damage or loss resulting from the alteration or
vanishing of information including personal information.
J Always erase personal information when it is transferred
to another party or disposed of
•To protect personal information, always erase the information on the
hard disk before transferring to another party or disposing of it.
•“Format” or “delete” using the PC will only modify the file management
information, and it will not erase the data in the hard disk completely.
It is recommended that you physically destroy the hard disk or use the
commercially available PC data deletion software to completely erase
the data in the hard disk before transferring to another party or
disposing of it.
•Microsoft
®
, Windows
®
, Windows Vista
®
and DirectX
®
are either
registered trademarks or trademarks of Microsoft Corporation in the
United States and/or other countries.
•IBM
®
and PC/AT are registered trademarks of International Business
Machines Corporation of the U.S.
•Intel
®
, Core
TM
and Pentium
®
are registered trademarks or trademarks
of Intel Corporation in the United States and other countries.
•QuickTime and the QuickTime logo are trademarks or registered
trademarks of Apple, Inc., used under license therefrom.
•YouTube and YouTube logo is a trademarks or registered trademarks of
YouTube LLC.
•“AVCHD” , “AVCHD Lite”, the “AVCHD” Logo, and the “AVCHD Lite”
Logo are trademarks of Panasonic Corporation and Sony Corporation.
•Manufactured under license from Dolby Laboratories.
Dolby and the double-D symbol are trademarks of Dolby Laboratories.
Confidential unpublished works. Copyright 1993-2005 Dolby
Laboratories. All rights reserved.
•Microsoft product screen shot(s) reprinted with permission from
Microsoft Corporation.
•Other names of systems and products mentioned in these instructions
are usually the registered trademarks or trademarks of the
manufacturers who developed the system or product concerned.
•This product is licensed under the AVC patent portfolio license for the
personal and non-commercial use of a consumer to (i) encode video in
compliance with the AVC Standard (“AVC Video”) and/or (ii) decode
AVC Video that was encoded by a consumer engaged in a personal and
non-commercial activity and/or was obtained from a video provider
licensed to provide AVC Video.
No license is granted or shall be implied for any other use.
Additional information may be obtained from MPEG LA, LLC.
See http://www.mpegla.com.

7
Before Use What can PHOTOfunSTUDIO do?
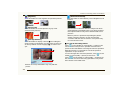
What can PHOTOfunSTUDIO do?
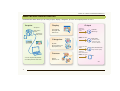
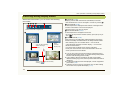
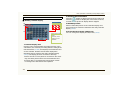
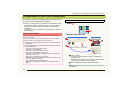
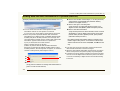
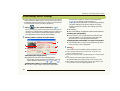
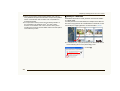
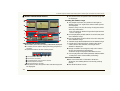
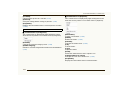
PHOTOfunSTUDIO allows you to easily acquire, display, categorize, process and output pictures on a PC.
㩷
Acquire OutputDisplay
Categorize
Process
In thumbnail
Enlarged view
Slide show
By date
By recorded scene
By keyword, etc.
Resize
Retouch, etc.
You can acquire still pictures
or motion pictures all at once.
CD/DVD
(Back-up)
etc.
11/11/2008
8
/
8
/
2
0
0
8
Still picture
MOV motion
picture
AVCHD Lite
motion picture
Still picture
MOV motion
picture
AVCHD Lite motion
picture
AVCHD Lite motion
picture
Still picture
MOV motion picture
AVCHD Lite motion
picture
DVD-Video
- Standard quality
- Create DVD video
- Convert to MPEG2
DVD (AVCHD Lite)
- High definition quality
SD

8
Before Use Supported picture files
Supported picture files
Picture files which can be handled in PHOTOfunSTUDIO
are in the following formats.
In display function, all of the compatible files are displayed as
pictures.
Pictures with non-supported files are not displayed; instead
they are displayed in thumbnail list by icons of a related
application. (It cannot be displayed after expansion or in
full-screen.)
When the size of the picture file is huge or the picture is in
special format, the picture browser may not be changed to the
Focus Mode or the Full Screen Mode.
There are some functional limitations on compatible files like
categorization, processing, retouch, output, motion picture edit /
output function etc. Please read the explanation of each function.
J
Still picture
zJPEG format
Extensions: .JPG, .JPEG, .JPE
•JPEG is an abbreviation for Joint Photographic Experts
Group, and derives from the designation of the committee
that has developed this compression format. This file format
adopts the data compression method that thins out color data
from a colored image to the extent that the human eye cannot
discern.
z
BMP format
Extensions: .BMP
•Some BMP files with special formats are excluded.
•BMP is an abbreviation of Bitmap, and an image format most
commonly used in Windows
®
.
z
TIFF format
Extensions: .TIF, .TIFF
•TIFF is an abbreviation of Tagged Image File Format.
J
Motion picture
In a list display, the representative picture in a motion picture
(usually the first frame of a motion picture) is displayed.
z
MOV motion picture
Extensions: .MOV
•The QuickTime motion picture files of Motion JPEG format
are the target files.
•To play files in this format, QuickTime is needed.
z
AVCHD Lite motion picture
Extensions: .CONT
•It is a motion picture recorded based on the AVCHD standard
(high definition quality).
•CONT files are administrative files automatically created during
acquiring. The actual data of the motion picture is saved as an m2ts file.
•Do not delete, change, or move the files or folders related to
the AVCHD Lite motion pictures using the Explorer or similar.
It will make it impossible to playback or edit.
J
Other files
zRAW format
Extensions: .RAW, .RW2
•If JPEG image data for thumbnails is contained in a RAW file,
a thumbnail is displayed in List Mode. Any RAW files with no
thumbnail information are indicated by the [RAW] icon.
Pictures recorded using this software or using the digital
camera compatible with this software can be used. (However,
motion pictures in DVD-Video format are not compatible.)
Pictures recorded by any other digital camera or other software
might not operate normally.
Pictures with the recording date between 1971 to 2037 can be
handled without any problem.

9
Before Use System requirements
System requirements
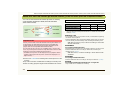
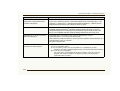
J PHOTOfunSTUDIO 3.0 HD Edition
Windows
®
2000/XP Windows Vista
®
Personal
computer
IBM
®
PC/AT compatible
personal computer having
Intel
®
Pentium
®
III 500 MHz
or higher CPU (including
compatible CPU)
IBM
®
PC/AT compatible
personal computer
having Intel
®
Pentium
®
III 800 MHz or higher
CPU (including
compatible CPU)
Recommended environment for AVCHD Lite motion
picture function
Intel
®
Core
TM
2 Duo 2.16 GHz/Pentium
®
D 3.2 GHz or
higher (when playing back the motion picture)
Intel
®
Core
TM
2 Quad 2.6 GHz or higher (when editing
motion picture)
The minimum environment for AVCHD Lite motion
picture function (environment which can be played
back for 2 frames/seconds)
Intel
®
Pentium
®
III 1 GHz or higher
OS Preinstalled
Microsoft
®
Windows
®
2000 Professional
Microsoft
®
Windows
®
XP Home Edition
Microsoft
®
Windows
®
XP Professional
Microsoft
®
Windows Vista
®
Ultimate
Microsoft
®
Windows Vista
®
Business
Microsoft
®
Windows Vista
®
Home Premium
Microsoft
®
Windows Vista
®
Home Basic
RAM 256 MB or more 512 MB or more
(1 GB or more for AVCHD Lite motion picture function)
Display High Color (16 bit) or more (32 bit or more recommended)
Desktop resolution of 1024k768 pixels or more
(1280k1024 pixels or more recommended)
Graphics card complying
with DirectX
®
9.0c
Graphics card complying
with DirectX
®
10
DirectDraw
®
overlay support
PCI Express
TM
x16 is recommended
Free hard disk
space
Ultra DMA-100 or higher
450 MB or more for installing software
•When writing to DVD, twice the amount of free space
as the disc is necessary.
Necessary
software
DirectX
®
9.0c
• If you install the software in a
PC that is not compatible with
DirectX
®
9.0c, the PC may stop
operating properly. If you are
unsure if your PC is compatible,
contact the maker.
.NET framework 2.0
DirectX
®
10
QuickTime 6.1 or more (required for playback of MOV file)
Internet Explorer 6.0 or more
Sound Windows compatible sound device
Drive
CD
-ROM drive (required for installing software)
• A compatible drive and media are required for DVD writing.
Interface USB port (Hi-Speed USB (USB2.0))
Other
requirements
Mouse or equivalent pointing device

10
Before Use System requirements
•Even if the system requirements mentioned in these operating
instructions are fulfilled, some personal computers cannot be used.
•The operation of this software will not be guaranteed when fonts other
than English fonts are selected and used.
•This software may not run properly on user-built computers.
•Supplied CD-ROM is available for Windows only.
•This software cannot be used on Microsoft Windows
®
3.1, Windows
®
95, Windows
®
98, Windows
®
98SE, Windows
®
Me and Windows NT
®
.
•Operation is not guaranteed on Microsoft
®
Windows Vista
®
Enterprise,
Windows
®
XP Media Center Edition, Tablet PC Edition and not
compatible with 64 bit operation systems.
•Operation on an upgraded OS is not guaranteed.
•Operation on an OS other than the one pre-installed is not guaranteed.
•Multi-boot environment is not supported.
•This software does not support the multi-monitor environments.
•Only the system administrator can install or uninstall this software.
•Log on with an administrator account or standard user account before
using this software. You cannot use this software with a guest account.
•If the settings for the size of characters in the screen settings dialog box
in Windows is larger than the standard size, some buttons may be
displayed off-screen and cannot be operated. In this case, restore the
character size to standard size.
•When 2 or more USB devices are connected to a PC, or when devices
are connected through USB hubs or by using extension cables, proper
operation is not guaranteed.
•Operation on Windows Vista
®
Ultimate with the user interface set to
other languages using the Multi-language User Interface (MUI) function
is not guaranteed.
•Only AVCHD Lite motion pictures that were created with the following
equipment can be handled.
-This software
-Digital camera that had this software supplied with it

11
Setting up Connecting a digital camera to a PC
Setting up
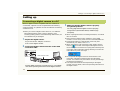
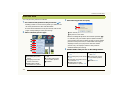
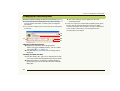
Connecting a digital camera to a PC
When a digital camera compatible with this software is
connected, a picture can be acquired from the memory
card of camera, or a picture can be recorded on a memory
card from a PC.
When you connect a digital camera to the PC, use batteries
with sufficient battery power or the AC adaptors. If the
remaining battery power is exhausted during data transfer, the
recorded data may be damaged.
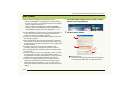
1 Prepare the digital camera.
• If you use the AC adaptor, connect it.
• Turn on the digital camera.
2 Connect the digital camera to the PC via the USB
connection cable.
• Set the digital camera for connecting to a PC. (For details,
refer to the operating instructions for the digital camera.)
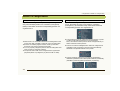
3 Make sure that the digital camera is properly
recognized by the PC.
You may judge that the digital camera is properly
recognized if a [Removable Disk] is added in [My
Computer].
When acquiring from DVD or recording to DVD/CD, use a DVD
drive or CD drive.
Data cannot be output from this software to some digital
cameras. In such cases, please use SD card reader/writer etc.
PHOTOfunSTUDIO or LUMIX Simple Viewer may start
automatically. For details, refer to 13.
When removing the USB connection cable, double click the
task tray [ ] icon after confirming that the digital camera is
not accessing the card and click on [Stop] after selecting USB
connection cable ([USB Mass Storage Device]) to remove the
cable without any error messages.
Do not operate the digital camera or disconnect the USB
connection cable while transferring data from the digital
camera. The software may not function correctly and damage
the data being transferred.
The shape of the terminal varies depending on the digital
camera used. For details, refer to the operating instructions for
the digital camera.
DIGITAL
AV OUT
DC IN
AC adaptor
USB connection cable

12
Setting up Starting PHOTOfunSTUDIO
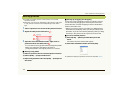
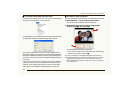
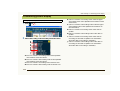
Starting PHOTOfunSTUDIO
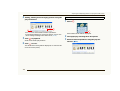
Before using for the first time, select [start] [All Programs]
[Panasonic] [PHOTOfunSTUDIO HD Edition] [Readme]
and make sure to read the supplementary explanation and the
latest information.
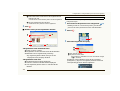
1 Select [start] [All Programs] [Panasonic]
[PHOTOfunSTUDIO HD Edition]
[PHOTOfunSTUDIO HD Edition].
• Or double-click the shortcut icon [ ] on the desktop.
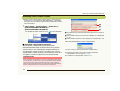
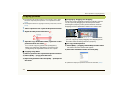
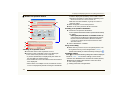
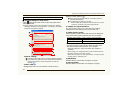
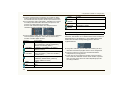
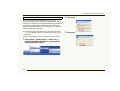
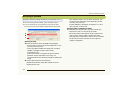
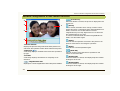
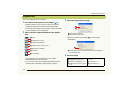
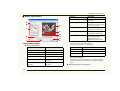
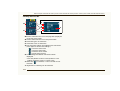
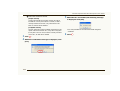
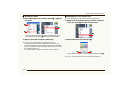
J Automatic categorization of pictures
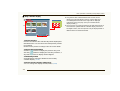
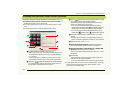
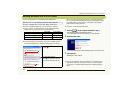
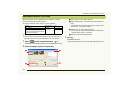
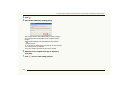
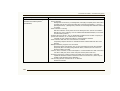
The [Automatic categorization] panel opens when
PHOTOfunSTUDIO starts for the first time. Here, pictures
saved on the PC are automatically categorized based on
recording date, model of camera, recorded scene, picture
storage folder, number of persons (face detection), face (face
recognition), and then registered in PHOTOfunSTUDIO.
1 Click [Browse] to select the folder where pictures are saved on
the PC.
2 Select whether pictures saved in the subfolder are categorized
or not.
3 Select whether pictures on the desktop are categorized or not.
Click the [Start] button to start categorization.
•Click [Cancel] to interrupt automatic categorization.
PHOTOfunSTUDIO can be set to perform automatic
categorization on every startup. (116)
For details on categorization, refer to 42.
Important notice
When automatic categorization is executed, categorization data which
has already been set for pictures in the specified folder will be deleted,
and the picture files will be recategorized based on data contained
within the picture files themselves. Be aware that categorization data for
pictures categorized with user-selected keywords will be lost.
1
2
3

13
Setting up Starting PHOTOfunSTUDIO
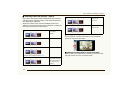
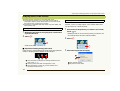
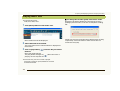
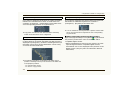
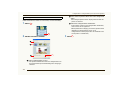
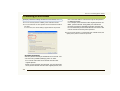
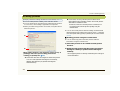
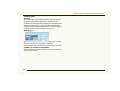
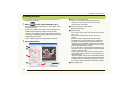
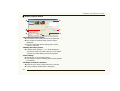
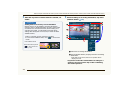
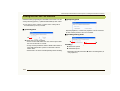
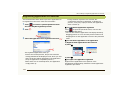
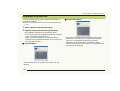
J Auto start
The following windows may appear depending on the
settings, when the memory card is set or the digital camera
is connected to the PC.
• Acquisition window of PHOTOfunSTUDIO (29)
• Window for LUMIX Simple Viewer
• Window for selecting the operation of Windows
®
* Auto start operation can be changed in Setting window. (116)
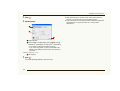
J Exiting PHOTOfunSTUDIO
1 Select [File] [Exit] on the menu.
• You may also exit the PHOTOfunSTUDIO by pressing
the [Alt] key and the [F4] key at the same time when
the picture browser is displayed.
When the auto start of
PHOTOfunSTUDIO is enabled, this
opens.*
When the auto start of LUMIX
Simple Viewer is enabled, this
window opens.
*
To use PHOTOfunSTUDIO, click
[No] to close the window.
This is displayed depending on the
Windows
®
setting.
When the icon of PHOTOfunSTUDIO
is selected and [OK] is clicked, the
acquisition window of
PHOTOfunSTUDIO is displayed.

Basic operations
14
Basic operations
The explanation of PHOTOfunSTUDIO window and basic operation method is given.
Switching among display modes 15
You can view in the following four modes.
-List Mode 16
-Focus Mode 18
-Full Screen Mode 19
-Calendar Mode 20
Select pictures 22
You can select one or more pictures.
Mark pictures 23
With the mark, you can select pictures in different folders at one time. Marked pictures become candidates for
processing when you categorize, process or output pictures.
Copy, move or delete pictures 25 26 27
Refresh the display 27
The picture browser or folder view display can be updated manually.

15
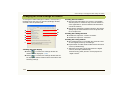
Basic operations Switching among display modes
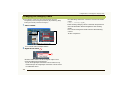
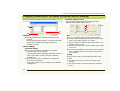
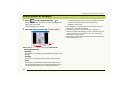
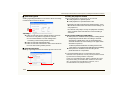
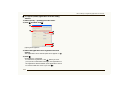
Switching among display modes
With PHOTOfunSTUDIO, you can view in the following
four modes.
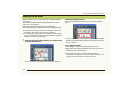
1 List Mode (16)
Displays pictures with reduced ones (thumbnail) in list form.
•The thumbnail size can be changed in 5 levels by moving A.
2 Focus Mode (18)
A selected picture is displayed in the browser in enlarged view.
•Pictures information can also be displayed.
•Motion pictures can also be played.
3 Full Screen Mode (19)
A selected picture is enlarged to full screen.
•To return to the previous window (mode), press [Esc] key or
click [ ].
4 Calendar Mode (20)
Sorts pictures by recording date and then displays them in the
format for Monthly Calendar Mode or the Daily Calendar Mode.
•The switching over of Calendar Mode Focus Mode,
Calendar Mode (Monthly calendar display) Full Screen
Mode cannot be done.
First select the List Mode, then perform switching.
•Some part of the function from Calendar Mode cannot be
used. Operate it from List Mode.
You can also select each of the modes by selecting [View]
[View Format] from the menu, or by right-clicking in the picture
browser and selecting [View Format].
If you switch to the Focus Mode or the Full Screen Mode
without selecting any picture, the first picture within the folder is
displayed.
For the file formats that can be displayed, consult “Supported
picture files” (8).
If displays on the screen are corrupted, such as after starting
the screen saver, update the display. (27)
You can also switch by
double-clicking a
picture.
You can also switch the mode by
clicking [ ].
Switch modes with a single click!
(Daily
calendar
display only)
123 4
1 4
3
2
A

Basic operations Switching among display modes
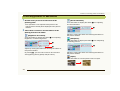
16
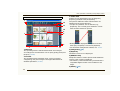
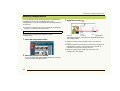
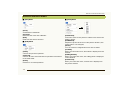
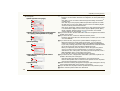
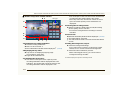
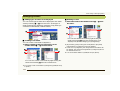
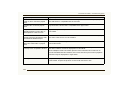
1Menu bar
The operating items in PHOTOfunSTUDIO are arranged
according to the classifications such as [File], [Edit], [View] and
[Output]. (122)
2 Tool bar
The operating items frequently used, such as acquiring,
categorizing, and processing are arranged with buttons to
facilitate operations. (120)
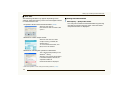
List (Thumbnail) Mode
1
2
7
11
12
10
9
8
6
345
3 Folder view
Folders can be displayed by type ([Categorize],
[Explorer], [DVD/SD card] and [Music]).
The pictures within the folder selected here are
displayed in the picture browser.
• To open any window, click its title bar (e.g.,
[Explorer]). The currently open window is closed
when another window is opened.
• Nothing can be displayed in the picture browser
when [My Computer] is selected in [Explorer].
• For the folder management method, see 112.
z [Categorize] (40)
z [Explorer]
All folders on the PC are displayed.
z [DVD/SD card]
Still picture folder or motion picture folder within the
memory card or DVD is displayed.
•The memory card and DVD being recorded with a
compatible digital camera or this software is the
target.
z [Music] (39)

17
Basic operations Switching among display modes
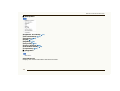
4 Picture browser
The pictures within the selected folder will be displayed
as thumbnails.
• If there are many pictures in a folder, it may take time
until they are displayed as thumbnails.
• If the file is not compatible, a picture will not be displayed.
Instead, an icon for the compatible application that can be
used to view the picture will be displayed.
5 Output view
Operation items concerned with picture output appear as
buttons. (73)
• You can output in the following ways:
6Status bar
The total number of files in the selected folder, the
number of files selected and the number of files marked
are displayed.
7 Folder view open/close button
The folder view can be opened or closed by clicking this
button.
8 Output view open/close button
The output view can be opened or closed by clicking this
button.
9 Check box
This is the check box for marking. This is selected when
you click in the box and the picture becomes marked.
(23)
10 Identification icon
In the following cases, icons appear as thumbnails.
[ ]: MOV motion pictures
[ ]: AVCHD Lite motion picture
[ ]: Pictures set to “My favorites” (44)
[ ]: Pictures with title information*
[ ]: RAW files
11 Folder name display area
The name or the location (path) of the selected folder will
be displayed.
12 Picture browser display setting area
-Changing the view format (mode) (15)
-Sorting pictures (108)
-Narrowing types of pictures (109)
* Information about the title set in the [TITLE EDIT] function, or the
name set in the [BABY] Mode, [PET] Mode by digital camera.
-Printing
-Attaching to E-mail
-Setting as Wallpaper
-Writing to the memory
card
-Writing to a CD/DVD
-YouTube
-Print settings

Basic operations Switching among display modes
18
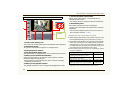
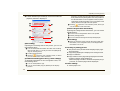
1 Folder name display area
The name or the location (path) of the selected folder will be displayed.
2 Thumbnail display
The picture selected here appears in enlarged view.
3 Enlarged picture window
4 Title information display area
Title information is displayed here, if it is included in the picture.
5 Motion picture PLAY/PAUSE button*
Each time this button is clicked, the motion picture switches
between playback and pausing.
• Motion pictures automatically play when selected, and play
repeatedly until pausing.
6 Motion picture playback slider*
The playback position can be changed by dragging this slider.
Focus Mode
Same as the
List Mode.
4
1
2
3
5
6
8
7
7 Full Screen Mode select button
When clicking this button, a selected picture is
enlarged to full screen.
•For motion pictures, playback starts automatically.
8 Information panel
Information about the picture is displayed.
Clicking each information tab switches the contents
displayed.
• The contents displayed are the same as those on
the Properties window. (114)
* Displayed only when a motion picture is selected.
When playing motion pictures, the pictures and/or voice may
be interrupted depending on the performance of your PC.
Depending on the [Windows Aero] function of the Windows
Vista
®
, PC environment, or the motion picture to playback,
missing frames or colors may occur during the playback, or
the motion picture may not play back smoothly. It may occur
more often when it is played back in full screen.
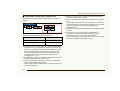
Frame rates for the CPU of a PC are as following. (Values
are just a guideline)
However, the frame rate may become lower than the table
depending on the environment or the usage of the PC.
CPU Frame rates (fps)
Pentium
®
III 1.0 GHz - Pentium
®
4
HyperThreading Technology 3.0 GHz
2
Pentium
®
4 Hyper-Threading Technology 3.0
GHz - Pentium
®
D 3.0 GHz
8 (NTSC: 10)
Pentium
®
D 3.0 GHz - Pentium
®
D 3.2 GHz 25 (NTSC: 30)
Pentium
®
D 3.2 GHz, Core
TM
2 Duo 2.16 GHz -
50 (Fields)
(NTSC: 60)

Basic operations Switching among display modes
19
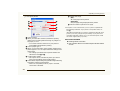
1 Motion picture PLAY/PAUSE button*
Each time this button is clicked, the motion picture switches
between playback and pausing.
• Motion pictures automatically play when selected, and play
repeatedly until pausing.
2 Restores the picture to the original size.
3 Fits to the window.
4 Zoom out
5 Zoom in
6 Returns to the first picture in the previous folder.
(Displayed only when two or more folders are selected.)
Full Screen Mode
12345678910
11
7 Returns to the previous picture.
8 Goes to the next picture.
9 Goes to the first picture in the next folder.
(Displayed only when two or more folders are
selected.)
10 Returns to the previous window (mode).
11 Check box
Sets/Cancels mark on the picture. (24)
* Displayed only when a motion picture is selected.
Only available buttons can be displayed. When the
mouse cursor is not operated, the buttons disappear.
When the whole of the picture is not displayed, you can
move the position of the picture by dragging it with a
mouse. (For still picture)
When playing motion pictures, the pictures and/or voice
may be interrupted depending on the performance of your
PC.
Depending on the picture, a black band may appear
around it.
Pausing playback and switching to the original mode
while MOV motion pictures are playing back in Full
Screen Mode may result in audio being output
momentarily. In that case, install QuickTime from the
install CD-ROM for this software.

20
Basic operations Switching among display modes
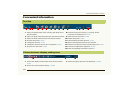
J Monthly calendar display
1 Calendar display area
Pictures in the selected folder (including pictures in the
sub folders) are sorted by recording date according to the
Exif information (136) and displayed in thumbnail view
on the calendar. Double-click the date displayed in
thumbnail view to switch to the daily calendar display
(21), and display pictures recorded on that day.
• If there are two or more pictures recorded on the same
day, the latest picture will be used in thumbnail view.
• Pictures with no recording date in Exif will be sorted
according to the date the file was updated.
2 Month back/forward button
Click the [ ] button to display the previous month, and
click the [ ] button to display the next month; however,
a month with no picture to display will be skipped.
3 Month/Day button
Select a date with pictures in the calendar display area
and click [Day] to switch the window to the daily calendar
display (21).
4 Picture browser display setting area
You can change the display format (mode). (15)
Calendar Mode
Same as the List
Mode.
However, some
buttons are not
available.
4
3
1
2
Page is loading ...
Page is loading ...
Page is loading ...
Page is loading ...
Page is loading ...
Page is loading ...
Page is loading ...
Page is loading ...
Page is loading ...
Page is loading ...
Page is loading ...
Page is loading ...
Page is loading ...
Page is loading ...
Page is loading ...
Page is loading ...
Page is loading ...
Page is loading ...
Page is loading ...
Page is loading ...
Page is loading ...
Page is loading ...
Page is loading ...
Page is loading ...
Page is loading ...
Page is loading ...
Page is loading ...
Page is loading ...
Page is loading ...
Page is loading ...
Page is loading ...
Page is loading ...
Page is loading ...
Page is loading ...
Page is loading ...
Page is loading ...
Page is loading ...
Page is loading ...
Page is loading ...
Page is loading ...
Page is loading ...
Page is loading ...
Page is loading ...
Page is loading ...
Page is loading ...
Page is loading ...
Page is loading ...
Page is loading ...
Page is loading ...
Page is loading ...
Page is loading ...
Page is loading ...
Page is loading ...
Page is loading ...
Page is loading ...
Page is loading ...
Page is loading ...
Page is loading ...
Page is loading ...
Page is loading ...
Page is loading ...
Page is loading ...
Page is loading ...
Page is loading ...
Page is loading ...
Page is loading ...
Page is loading ...
Page is loading ...
Page is loading ...
Page is loading ...
Page is loading ...
Page is loading ...
Page is loading ...
Page is loading ...
Page is loading ...
Page is loading ...
Page is loading ...
Page is loading ...
Page is loading ...
Page is loading ...
Page is loading ...
Page is loading ...
Page is loading ...
Page is loading ...
Page is loading ...
Page is loading ...
Page is loading ...
Page is loading ...
Page is loading ...
Page is loading ...
Page is loading ...
Page is loading ...
Page is loading ...
Page is loading ...
Page is loading ...
Page is loading ...
Page is loading ...
Page is loading ...
Page is loading ...
Page is loading ...
Page is loading ...
Page is loading ...
Page is loading ...
Page is loading ...
Page is loading ...
Page is loading ...
Page is loading ...
Page is loading ...
Page is loading ...
Page is loading ...
Page is loading ...
Page is loading ...
Page is loading ...
Page is loading ...
Page is loading ...
Page is loading ...
Page is loading ...
-
 1
1
-
 2
2
-
 3
3
-
 4
4
-
 5
5
-
 6
6
-
 7
7
-
 8
8
-
 9
9
-
 10
10
-
 11
11
-
 12
12
-
 13
13
-
 14
14
-
 15
15
-
 16
16
-
 17
17
-
 18
18
-
 19
19
-
 20
20
-
 21
21
-
 22
22
-
 23
23
-
 24
24
-
 25
25
-
 26
26
-
 27
27
-
 28
28
-
 29
29
-
 30
30
-
 31
31
-
 32
32
-
 33
33
-
 34
34
-
 35
35
-
 36
36
-
 37
37
-
 38
38
-
 39
39
-
 40
40
-
 41
41
-
 42
42
-
 43
43
-
 44
44
-
 45
45
-
 46
46
-
 47
47
-
 48
48
-
 49
49
-
 50
50
-
 51
51
-
 52
52
-
 53
53
-
 54
54
-
 55
55
-
 56
56
-
 57
57
-
 58
58
-
 59
59
-
 60
60
-
 61
61
-
 62
62
-
 63
63
-
 64
64
-
 65
65
-
 66
66
-
 67
67
-
 68
68
-
 69
69
-
 70
70
-
 71
71
-
 72
72
-
 73
73
-
 74
74
-
 75
75
-
 76
76
-
 77
77
-
 78
78
-
 79
79
-
 80
80
-
 81
81
-
 82
82
-
 83
83
-
 84
84
-
 85
85
-
 86
86
-
 87
87
-
 88
88
-
 89
89
-
 90
90
-
 91
91
-
 92
92
-
 93
93
-
 94
94
-
 95
95
-
 96
96
-
 97
97
-
 98
98
-
 99
99
-
 100
100
-
 101
101
-
 102
102
-
 103
103
-
 104
104
-
 105
105
-
 106
106
-
 107
107
-
 108
108
-
 109
109
-
 110
110
-
 111
111
-
 112
112
-
 113
113
-
 114
114
-
 115
115
-
 116
116
-
 117
117
-
 118
118
-
 119
119
-
 120
120
-
 121
121
-
 122
122
-
 123
123
-
 124
124
-
 125
125
-
 126
126
-
 127
127
-
 128
128
-
 129
129
-
 130
130
-
 131
131
-
 132
132
-
 133
133
-
 134
134
-
 135
135
-
 136
136
-
 137
137


Panasonic DMCFT1 Operating instructions
- Type
- Operating instructions
- This manual is also suitable for
Ask a question and I''ll find the answer in the document
Finding information in a document is now easier with AI
Related papers
-
Panasonic DMCTZ10 Operating instructions
-
-
-
-
-
-
-
-
-
