Kenwood C471FM User manual

Category
Car video systems
Type
User manual
©B64-2788-00/00 (KW/EW)
COMPACT
DIGITAL AUDIO
Take the time to read through this instruction manual.
Familiarity with installation and operation procedures will help you
obtain the best performance from your new compact disc auto changer.
For your records
Record the serial number, found on the back of the unit, in the spaces desig-
nated on the warranty card, and in the space provided below. Refer to the
model and serial numbers whenever you call upon your KENWOOD dealer for
information or service on the product.
Model KDC-C521FM, KDC-C471FM Serial number
CD AUTOCHANGER / CONTROLLER / FM MODULATOR SYSTEM
INSTRUCTION MANUAL
CHANGEUR AUTOMATIQUE DE CD / CONTROLEUR / SYSTEME
A MODULATION DE FM
SISTEMA DEL MODULADOR DE FM / CONTROLADOR / CAMBIADOR
AUTOMATICO DE DISCOS COMPACTOS
MANUAL DE INSTRUCCIONES
KDC-C521FM
KDC-C471FM
MODE D’EMPLOI
KDC-C521FM_C471FM_(KE)_Cover 2004.01.15 05:28 PM Page 1
— 2 —
English
Contents
Before use
Safety Precautions ........................................................................3
Handling Compact Discs...............................................................4
Loading Compact Discs ................................................................5
General features
Power............................................................................................6
Selecting the Source.....................................................................6
Sirius satellite radio tuner features
Selecting Sirius Mode ...................................................................7
Switching Seek Mode...................................................................7
Selecting the Preset Band.............................................................7
Channel Preset Memory ...............................................................8
Preset Tuning................................................................................8
Channel Scan ................................................................................8
Channel Search ............................................................................8
Direct Access Tuning ....................................................................9
Switching Display..........................................................................9
Disc control features
Playing Disc.................................................................................10
Fast Fowarding and Reversing....................................................10
Track Search................................................................................10
Disc Search .................................................................................11
Direct Track Search.....................................................................11
Direct Disc Search.......................................................................11
Track/Disc Repeat .......................................................................11
Track Scan...................................................................................11
Random Play ...............................................................................11
Magazine Random Play...............................................................12
Switching Display........................................................................12
Menu system
Menu System..............................................................................13
Changing the Transmission Frequency.......................................14
Modulation level..........................................................................14
Dynamic control ..........................................................................14
Text Scroll ...................................................................................14
Sirius ID (ESN).............................................................................14
Basic Operations of remote .............................................15
Installation
Accessories.................................................................................17
Installation Procedure..................................................................17
Installation...................................................................................18
Connecting Wires to Terminals...................................................20
Troubleshooting guide .......................................................22
Specifications .........................................................................25
Warning ......................................................................................26
KDC-C521FM_C471FM_(KE)_U.S 2004.01.16 10:51 AM Page 2
— 3 —
Take the following precautions to prevent
fire and avoid personal injury:
When extending the ignition wire, battery
wire, or ground wire, use 0.75mm
2
(AWG18)
or larger automotive grade wire to avoid wire
deterioration or damage to the covering.
Check that no metal objects (coins, tools,
etc.) are left inside the unit to avoid short
circuits.
If you smell or see smoke, turn the power off
immediately and consult your Kenwood
dealer.
Do not touch the liquid crystal fluid if the LCD
is damaged or broken due to shock. The
liquid crystal fluid may be dangerous to your
health or even fatal.
If the liquid crystal fluid from the LCD
contacts your body or clothing, wash it off
with soap immediately.
Take the following precautions to
keep the unit in proper working order.
Be sure the unit is connected to a 12V DC
power supply with a negative ground
connection.
Do not open the top or bottom cover.
Do not install the unit in places it is exposed
to direct sunlight, high heat or humidity,
water may splash over it, or dust exists.
2CAUTION
2WARNING
When replacing a fuse, only use a new one
with the prescribed rating. Using a fuse with
the wrong rating may cause your unit to
malfunction.
To prevent a short circuit when replacing a
fuse, first disconnect the wiring harness.
If you have difficulty in installing this unit in
your vehicle, contact your Kenwood dealer.
If it doesn’t seem to be working properly,
first press the Reset button. If the
malfunction persists, consult your Kenwood
dealer.
Some car stereos cause the sound of the
tuner to make for a moment when an
engine is activated.
•The reception of the tuner may be reduced
a little if the KDC-C521FM, KDC-C471FM is
used.
If the sound is lower than the tuner sound,
raise up the volume level of the CD with
using the receiver.
Do not use your own screws. Use only the
screws provided. If you use the wrong
screws, you could damage the unit.
NOTE
Cleaning the Unit
If the front panel gets dirty, turn off the
power and wipe the panel with a dry silicon
cloth or soft cloth.
Do not use hard cloths or paint thinner,
alcohol, or other volatile solvents. These may
damage external surfaces or remove
indicator characters.
Lens fogging
In cold climates, there may be a period after
you turn on your vehicle’s heater when the
lens that guides the laser beam used in your
CD player fogs up. If this happens, you
cannot play compact discs. Take out discs
and the fogging will disappear. If it does not
return to normal after several hours, contact
your Kenwood dealer.
2CAUTION
Safety Precautions
Reset button
KDC-C521FM_C471FM_(KE)_U.S 2004.01.16 10:51 AM Page 3
— 4 —
English
Handling Compact Discs
Playing a CD that is dirty, scratched or
warped can cause the sound to skip and
the unit to operate incorrectly, resulting in
worsened sound quality. Take the
following precautions to prevent your CDs
from getting scratched or damaged.
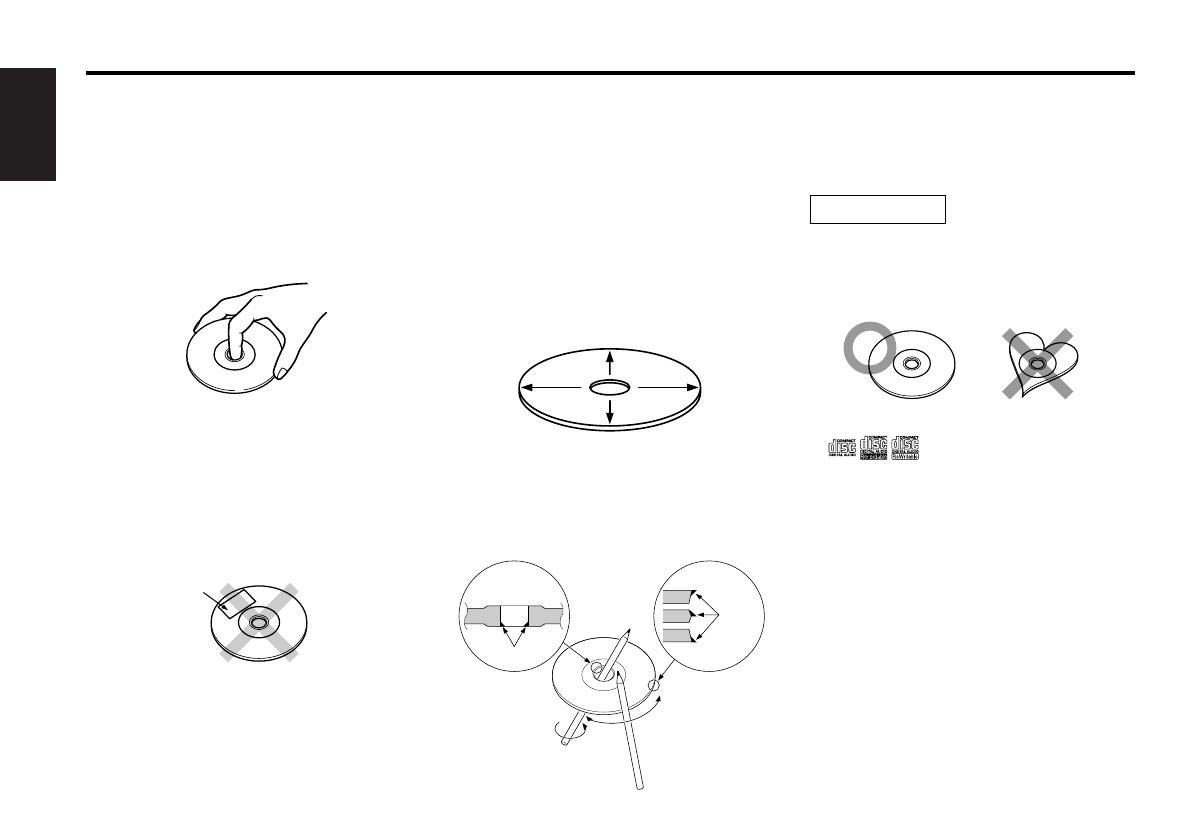
Handling CDs
Do not touch the recorded side of the CD (the
side opposite the label) when holding it.
The reflective film on a CD-R or a CD-RW is more
fragile than that on an ordinary music CD, and may
peel off if scratched. Fingerprints on a CD-R or CD-
RW are also more likely to cause skipping when
the disc is played. For these reasons, handle the
disc very carefully. Detailed handling instructions
will appear on the CD-R or CD-RW package: read
this information carefully before using the disc.
Do not stick tape on either side of the CD.
Storing CDs
Do not store CDs in areas exposed to direct
sunlight (such as a car seat or the dashboard) or
other hot places.
•A CD-R or CD-RW is more susceptible than a
music CD to damage from high temperatures and
humidity, and in some cases, may become
unusable if left in the car for long periods of time.
Remove CDs from the unit when not listening to
them for a while, and put them back in their
cases. Do not pile up CDs that are removed from
their cases or prop them against something.
Cleaning CDs
I
f a CD has gotten dirty, wipe it off gently using a
commercially available cleaning cloth or a soft
cotton cloth, starting from the center of the disc
and moving outward. Do not clean CDs with
conventional record cleaners, anti-static formulas,
or chemicals such as paint thinner or benzene.
Checking New CDs for Burrs
When playing a new CD for the first time, check
that there are not any burrs stuck to the perimeter
of the disc or in the central hole. CDs with burrs
stuck on them may not load properly or may skip
while playing. Remove burrs using a ballpoint pen
or a similar utensil.
Do Not Load CD Accessories
Do not use commercially available CD accessories
that can be loaded into the CD slot, such as
stabilizers, protective sheets, or CD cleaning discs,
since they can cause the unit to malfunction.
Do Not Use Special Shape CDs
Be sure to use round shape CDs only for this unit
and do not use any special shape CDs. Use of
special shape CDs may cause the unit to
malfunction.
This unit can only play the CDs with
.
It may not correctly play disks which do not have
the mark.
CD-Rs and CD-RWs which have not undergone
finalization processing cannot be played. (For
more information on finalization processing, refer
to the manual for your CD-R/CD-RW writing
software or CD-R/CD-RW recorder.) Additionally,
depending on the recording status, it may prove
impossible to play certain CDs recorded on CD-R
or CD-RW.
Do Not Use CDs with Sticker on the
Labeled Side
Do not use the CD with the label sticker stuck on
it.
Using such a CD may cause the CD to be
deformed and the sticker to peel off, resulting in
malfunction of the unit.
2CAUTION
Tape
Burrs
Burrs
KDC-C521FM_C471FM_(KE)_U.S 2004.01.16 10:51 AM Page 4
— 5 —
'
'
'
'
Make sure the disc magazine is the
right way up with the Kenwood logo
on the top.Pull the tray out by the
projection.
Insert the magazine into the CD changer
until it clicks.
Open the CD changer door.
Place the disc on the tray with the label
facing upwards. Insert the tray into the
disc magazine until it locks. The discs
are numbered from the bottom from 1
to 6 or 10.
Take care to insert the tray into the
correct grooves in the disc magazine.
Keep all the trays in the magazine even
when empty.
8-cm discs cannot be used. If an 8-cm disc
adapter is used, the disc cannot be ejected.
2CAUTION
Loading Compact Discs
1
2
"KENWOOD"
Projection
4
3
'
Open the CD changer door, and press the
EJECT button.
Be sure to open the door completely before
pressing the EJECT button. If the door is not
completely open, the magazine may hit the
door and cause damage of malfunction.
NOTE
Magazine ejection
5
6
Use the CD changer with its door closed
to prevent the entry of dust into the
changer.
NOTE
Close the CD changer door.
KDC-C521FM_C471FM_(KE)_U.S 2004.01.16 10:51 AM Page 5
— 6 —
English
General features
SRC
Turning ON the Power
Press the [SRC] button.
Turning OFF the Power
Press the [SRC] button for at least 1 second.
The FM modulator is turned OFF and the radio can be heard.
Be sure to turn down the volume whenever you listen to the radio
or a cassette tape after stopping the disc play.
During the disc play is being conducted, you are not able to
receive ordinary Radio broadcasting because antenna output is
switched into compact disc player‘s side.
Power
Set the car radio FM station to 88.3 MHz. See Page 14 for
more information on changing the transmission frequency.
Press the [SRC] button.
Source required Display
Sirius (Function of the KDC-C521FM/ "SIRIUS"
C471FM for the Americans Market)
CD auto-changer "CHANGER"/
"CHANGER-1"/
"CHANGER-2"
Auxiliary input "AUX"
Off
For Sirius the KTC-SR901 or KTC-SR902 is necessary.
For Auxiliary input one of the below optional accessories is
necessary.
- KCA-S210A
- CA-C1AX
- CD changer with an Auxiliary input function installed.
Selecting the Source
KDC-C521FM_C471FM_(KE)_U.S 2004.01.16 10:51 AM Page 6
— 7 —
Sirius satellite radio tuner features
(Function of the KDC-C521FM/ C471FM for the Americans Market)
d
u
4
SRCH
¢
SRC
DISP
1-6
SEEK
Band display Channel number
Preset station number
Press the [SRC] button.
Select the "SIRIUS" display.
You need to subscribe to SIRIUS to receive the service by Sirius
Satellite Radio. Consult SIRIUS if "CALL 888-539 SIRIUS TO
SUBSCRIBE" appears.
It may take a little time to start receiving after you selected the
SIRIUS source.
If the signal receiving fails, "ACQUIRING SIGNAL" appears.
Selecting Sirius Mode
Press the [u] button.
Each time the button is pressed the preset band switches
between the SR1,SR2,SR3, and SR4.
Selecting the Preset Band
Sets the seeking mode.
Press the [SEEK] button.
Each time the button is pressed the Seek mode switches as
shown below.
Display Operation
"SEEK 1" Normal manual seeking control.
"SEEK 2" Search in order of the channels in the
Preset memory.
You cannot operate this unit during switching Channel or Category.
Switching Seek Mode
SCAN indicator
KDC-C521FM_C471FM_(KE)_U.S 2004.01.16 10:51 AM Page 7
— 8 —
English
Putting the channel in the memory.
1 Select the preset band
Press the [u] button.
2 Select the channel to put in the memory
Press the [4] or [¢] button.
3 Put the channel in the memory
Press the [1] — [6] button for at least 2 seconds.
The preset number display blinks 1 time.
On each band, 1 channel can be put in the memory on each [1] —
[6] button.
Only the channel number is stored. Category information is not
stored.
Channel Preset Memory
Calling up the channels in the memory.
1 Select the preset band
Press the [u] button.
2 Call up the channel
Press the [1] — [6] button.
Preset Tuning
You can switch from Up/Down of Channel in a category being
selected to Previous/Next of Category that includes Channel
being received and vice versa.
1 Enter Channel Search mode
Press the [SRCH] button.
2 Select the Category
Press the [u] or [d] button.
3 Select the Channel
Press the [4] or [¢] button.
Canceling Channel Search
Press the [SRCH] button.
You cannot operate this unit until all the Category information is
acquired.
Channel Search
Scanning for the channel you want to listen to.
1 Start Channel Scan
Press the [SEEK] button for at least 1 second.
"SCAN" indicator is ON.
2 Release it when the channel you want to listen to is received
Press the [SEEK] button for at least 1 second.
Channel Scan
Sirius satellite radio tuner features
(Function of the KDC-C521FM/ C471FM for the Americans Market)
KDC-C521FM_C471FM_(KE)_U.S 2004.01.16 10:51 AM Page 8
— 9 —
You can display various kinds of text data transmitted from
broadcasting stations by switching as follows.
Press the [DISP] button.
Each time the button is pressed the display switches as shown
below.
Information Display
Channel Number
Channel Name "CHANNEL"
Song Title "SONG"
Artist Name "ARTIST"
Category Name "CATEGORY"
Album Title "ALBUM"
Switching Display
Entering the channel and tuning.
1 Enter Direct Access Tuning mode
Press the [DIRECT] button on the remote.
2 Enter the channel number
Press the number buttons.
3 Do Channel Search
Press the [4] or [¢] button.
Canceling Direct Access Tuning
Press the [DIRECT] button on the remote.
If you make no button operation for 10 seconds, the Direct Access
Tuning mode is automatically canceled.
You can set up to Channel number 223.
If there is no signal in the input Channel, "NO CHANNEL" appears.
If you cannot receive any signal in the input Channel due to a bad
condition on radio wave or another problem, "ACQUIRING SIGNAL"
appears.
Direct Access Tuning (Function of remote)
KDC-C521FM_C471FM_(KE)_U.S 2004.01.16 10:51 AM Page 9
— 10 —
English
Disc control features
d
u
4
6
¢
SRC
DISP
SCAN
RDM REP
M.RDM
Track number
Track time
Disc number
Indicator
Play:
Press the [SRC] button.
Select the "CHANGER"/ "CHANGER-1"/ "CHANGER-2" display.
Stop the play:
Press the [SRC] button for at least 1 second.
The FM modulator is turned OFF and the radio can be heard.
Pause and play:
Press the [6](38...Remote) button.
Each time the button is pressed it pauses and plays.
If you press the switch once more, the disc is replayed from
the paused part.
Playing Disc
Fast Forwarding
Hold down on the [¢] button.
Release your finger to play the disc at that point.
Reversing
Hold down on the [4] button.
Release your finger to play the disc at that point.
Fast Forwarding and Reversing
Searching for a song on the disc.
Press the [4] or [¢] button.
Track Search
KDC-C521FM_C471FM_(KE)_U.S 2004.01.16 10:51 AM Page 10
— 11 —
Doing Disc Search by entering the disc number.
1 Enter the disc number
Press the number buttons on the remote.
2 Do Disc Search
Press the [+] or [] button.
Canceling Direct Disc Search
Press the [38] button.
Input "0" to select disc 10.
Direct Disc Search
(Function of disc changers with remote)
Replaying the song, disc in the Disc changer you're listening to.
Press the [REP] button.
When it's ON, the "REP" indicator is ON.
Each time the button is pressed the Repeat Play switches as
shown below.
Repeat play Display
Track Repeat Track No. blinks.
Disc Repeat Disc No. blinks.
OFF
Track/Disc Repeat
Play all the songs on the disc in random order.
Press the [RDM] button.
Each time the button is pressed Random Play turns ON or OFF.
When it's ON, the "RDM" indicator is ON and the track number
blinks.
When the [¢] button is pressed, the next song select starts.
Random Play
Playing the first part of each song on the disc you are listening to
and searching for the song you want to listen to.
1 Start Track Scan
Press the [SCAN] button.
"SCAN" indicator is ON.
2 Release it when the song you want to listen to is played
Press the [SCAN] button.
Track Scan
Doing Track Search by entering the track number.
1 Enter the track number
Press the number buttons on the remote.
2 Do Track Search
Press the [T.UP] or [T.DOWN] button.
Canceling Direct Track Search
Press the [38] button.
Direct Track Search (Function of remote)
Selecting the disc set in the Disc changer.
Press the [u] or [d] button.
Disc Search
KDC-C521FM_C471FM_(KE)_U.S 2004.01.16 10:51 AM Page 11
— 12 —
English
Play the songs on all the discs in the disc changer in random
order.
Press the [M.RDM] button.
Each time the button is pressed the Magazine Random Play turns
ON or OFF.
When it's ON, the "RDM" indicator is ON and the track and disc
number blink.
When the [¢] button is pressed, the next song select starts.
Magazine Random Play
(Function of disc changer)
Disc control features
Switching the information displayed.
Press the [DISP] button.
Each time the button is pressed the display switches as shown
below.
Information Display
P-Time
Disc title "DISC TITLE"
Track title "TRACK TITLE"
This unit does not display the information of Disc title and Track title.
Select the information of P-Time.
Switching Display
KDC-C521FM_C471FM_(KE)_U.S 2004.01.16 10:51 AM Page 12
— 13 —
Menu system
The Menu system basic operation method is explained here. The
reference for the Menu items and their setting content is after
this operation explanation.
1 Enter Menu mode
Press the [MENU] button for at least 1 second.
"MENU" is displayed.
2 Select the menu item
Press the [u] or [d] button.
3 Set the menu item
Press the [4] or [¢] button.
You can continue by returning to step 2 and setting other items.
4 Exit Menu mode
Press the [MENU] button.
When other items that are applicable to the basic operation method
above are displayed afterwards their setting content chart is entered.
Menu System
d
u
¢
4
MENU
KDC-C521FM_C471FM_(KE)_U.S 2004.01.16 10:51 AM Page 13
Sirius ID (Electronic Serial Number) is displayed.
Sirius ID (ESN)
<When the KTC-SR901 or KTC-SR902 is
connected>
Menu system
Function of the KDC-C521FM/ C471FM for the Americans Market
— 14 —
English
Select the frequency.
Display Setting
"T-FREQ 87.7" 87.7 MHz
"T-FREQ 87.9" 87.9 MHz
"T-FREQ 88.1" 88.1 MHz
"T-FREQ 88.3" 88.3 MHz (Initial setting)
"T-FREQ 88.5" 88.5 MHz
"T-FREQ 88.7" 88.7 MHz
"T-FREQ 88.9" 88.9 MHz
"T-FREQ 89.1" 89.1 MHz
"T-FREQ 89.3" 89.3 MHz
"T-FREQ 89.5" 89.5 MHz
"T-FREQ 89.7" 89.7 MHz
"T-FREQ 89.9" 89.9 MHz
Some car radios cannot receive a 87.7 MHz frequency.
Changing the Transmission Frequency
Select the modulation level.
Display
"MOD LEVEL 1"
"MOD LEVEL 2" (Initial setting)
"MOD LEVEL 3"
"MOD LEVEL 4"
Modulation level
Settingt the Dynamic control.
Display Setting
"D-CONT ON" The dynamic control is ON.
"D-CONT OFF" The dynamic control is OFF. (Initial setting)
The unit comes with the prevention of distortion function to reduce
sound distortion.
If the sound is distorted severely, press the [4]or[¢] button on
the display unit and then set the function to "ON". If the prevention
of distortion function is set to "ON", the sound extension is reduced.
If a disc with a high recording level is used, the sound may distort
even if the prevention of distortion function is set to "ON". In this
case, reduce the modulation level.
Dynamic control
Setting the displayed text scroll.
Display Setting
"SCROLL MANU" Doesn't scroll.
"SCROLL AUTO" Scrolls when the display changes.
The texts scrolled are shown below.
- Song title/ Artist name/ Album title/ Category name
Text Scroll
KDC-C521FM_C471FM_(KE)_U.S 2004.01.16 10:51 AM Page 14
— 15 —
[0] – [9]
SRC
M.RDM
DIRECT
SCAN
T.
DOWN
T.
UP
D.REP
REP
RDM
DISC
+
38
SRC
D.REP
RDM
/ CH SEARCH
M.RDM/ DIRECT
T.UP/T.DOWN
REP
SCAN
Basic Operations of remote
[SRC] button
Each time the button is pressed the source switches.
Basic operations
Use two "AA" batteries.
Slide the cover while pressing downwards to remove it as
illustrated.
Insert the batteries with the + and
poles aligned properly,
following the illustration inside the case.
Store unused batteries out of the reach of children. Contact a doctor
immediately if the battery is accidentally swallowed.
The provided batteries are intended for use in operation
checking, and their service life may be short.
When the remote controllable distance becomes short, replace
both of the batteries with new ones.
•A portion of the operations may not be possible, depending on
the unit that is connected.
Do not set the remote on hot places such as above the dashboard.
2WARNING
Loading and Replacing the battery
Function of the KDC-C521FM/ C471FM for the European Market
KDC-C521FM_C471FM_(KE)_U.S 2004.01.16 10:51 AM Page 15
— 16 —
English
[T.UP]/ [T.DOWN] buttons
Doing track forward and backward.
[+]/ [–] buttons
Doing disc forward and backward.
[38] button
Each time the button is pressed the song pauses and plays.
[REP] button
Each time the button is pressed Track Repeat function turns ON
or OFF.
[D.REP] button
Each time the button is pressed Disc Repeat function turns ON or
OFF.
[RDM] button
Each time the button is pressed Random Play turns ON or OFF.
[M.RDM] button
Each time the button is pressed Magazine Random function turns
ON or OFF.
[SCAN] button
Each time the button is pressed Trak Scan function turns ON or
OFF.
[0] — [9] buttons
When in <Direct Track Search> (page 11) and <Direct Disc
Search> (page 11), enter the track/disc number.
In Disc source
[+] buttons
Select the band.
Each time the [+] button is pressed it switches between the
SR1, SR2, SR3, and SR4 bands.
[T.UP]/ [T.DOWN] buttons
Tune up or down the channels.
[0] — [9] buttons
Press buttons [1] — [6] to recall preset channels.
[DIRECT] button
Enters and cancels the <Direct Access Tuning> (page 9) mode.
[CH SEARCH] button
Enters and cancels the <Channel Search> (page 8) mode.
In Sirius source
Basic Operations of remote
Function of the KDC-C521FM Function of the KDC-C521FM/ C471FM for the European Market
KDC-C521FM_C471FM_(KE)_U.S 2004.01.16 10:51 AM Page 16
— 17 —
.........1
1
.........4
2
.........4
3
.........1
4
External view
......... Number of items
The use of any accessories
except for those provided
might result in damage to the
unit. Make sure only to use
the accessories shipped with
the unit, as shown above.
2CAUTION
When drilling a hole in the car chassis to install the unit, check
first that nothing is on the other side.
If the fuse blows, first make sure the wires aren’t touching to
cause a short circuit, then replace the old fuse with one with the
same rating.
Do not let unconnected wires or terminals touch metal on the car
or anything else conducting electricity. To prevent a short circuit,
do not remove the caps on the ends of the unconnected wires or
the terminals.
After the unit is installed, check whether the brake lamps,
blinkers, wipers, etc. on the car are working properly.
Insulate unconnected wires with vinyl tape or other similar
material.
Some disc changers need conversion cords for connection. See
the section on "Safety Precautions" for details.
2CAUTION
2WARNING
Removing the transportation screws
Transportation
screws
Remove all 3 transportation screws for protecting the internal
mechanism before you start to install the unit.
After removing the transport screw, retain it carefully and
attach it again before transporting the unit again.
NOTE
.........1
5
.........2
6
.........1
7
8
9
For the model of European Market.
.........1
.........1
Accessories
1. To prevent a short circuit, remove the key from the ignition and
disconnect the - battery.
2. Make the proper input and output wire connections for each unit.
3. Connect the wiring harness wires in the following order: ground,
battery, ignition.
4. Install the unit in your car.
5. Reconnect the - battery.
6. Press the reset button.
Installation Procedure
KDC-C521FM_C471FM_(KE)_U.S 2004.01.16 10:51 AM Page 17
— 18 —
English
Angle adjustment switches
The angle adjustment switches on the both saides of the unit
are to be set according to the angle of installation of the CD
auto changer. Set both of the two switches to the same
position. If the switches are not set properly, sound skip or
other malfunction may occur.
Set the angle adjustment switches with a coin or other flat
object.
Change the switch step by step by detaching and reusing the
object at the end of each step.
Right side
Left side
Angle adjustment switches
9090
0
45
90
0
45
Installation
angle
0°~5° 40°~50°
85°~90°
90
0
45
90
0
45
90
0
45
Angle
adjustment
switch
position
It is not possible to install at an angle of
40°~50° if only 1 is used.
Installation of Display unit
• Installation without using the trim mount plate 7
Attach one velcro to the
slanted-line of the the display
units as shown above, and
attach the other velcro to the
parts where you wish to
attach the display units.
Then, put velcros together
and install the display units.
• Installation using the trim mount plate 7
Display unit
Display unit
5
7
Pass the wire from the display unit through the hole on the
trim mount plate and push fit the display unit into the trim
mount plate until it locks.
Be sure not to place the unit on such place as where it is
exposed to direct sunlight and temperature eventually rises.
It results in the deformation of the case.
Depending on the installing location, the display unit may not
be able to receive the signals from the controller unit. Install
them after confirming that the signals can be received.
Install the unit in such a way that it does not disturb driving.
2CAUTION
Installation
Installation Procedure
KDC-C521FM_C471FM_(KE)_U.S 2004.01.16 10:51 AM Page 18
— 19 —
Use the holes marked () to install the unit.
Horizontal installation
Vertical installation
Bottom view
Side view
KDC-C521FM
90
0
45
90
0
45
90
0
45
90
0
45
90
0
45
90
0
45
90
0
45
90
0
45
90
0
45
90
45
0
2
3
φ
4
1
2
3
φ
4
1
Use the holes marked () to install the unit.
In case of hanging in the trunk
Installation of FM modulator unit
90
0
45
90
0
45
9
0
0
4
5
Install the FM modulator unit beneath the front seat using
Metal fixture and Bind head screw as shown in the above
figure.
Take sufficient care so
that the wires are not
caught under the seat.
If they are caught, they
may break.
2CAUTION
φ
3
φ
4
2
3
1
6
KDC-C471FM
Bottom view
Side view
KDC-C521FM
KDC-C471FM
Bottom view
Side view
KDC-C521FM
KDC-C471FM
KDC-C521FM_C471FM_(KE)_U.S 2004.01.16 10:51 AM Page 19
— 20 —
English
To prevent fire when the ignition wire (Red) or battery wire
(Yellow) is short-circuited by coming into contact with the
vehicle chassis (ground), only connect the power supply after
making the fuse box connections.
Be sure to press the reset button after installation.
2CAUTION
2WARNING
Control output
Control input
CD auto-changer
Changer connection wire 4
FM modulator unit
FM/AM antenna input
FM/AM antenna output
Ground wire (Black)
- (To car chassis)
Car fuse box
ACC
Ignition key
switch
Antenna plug
for automobile
Output
Car stereo
with FM tuner
Battery
Display unit
Battery wire + (Yellow)
CD auto - changer input
Do not install an antenna of radio equipment or distribute the
antenna wire near the changer output wire, for this could
cause malfunction with this unit.
NOTE
Connecting Wires to Terminals
*8 & *9 : For the model of European Market.
Ignition wire
+ (Red)
*
8
*9
KDC-C521FM_C471FM_(KE)_U.S 2004.01.16 10:51 AM Page 20
  • Page 1 1
  • Page 2 2
  • Page 3 3
  • Page 4 4
  • Page 5 5
  • Page 6 6
  • Page 7 7
  • Page 8 8
  • Page 9 9
  • Page 10 10
  • Page 11 11
  • Page 12 12
  • Page 13 13
  • Page 14 14
  • Page 15 15
  • Page 16 16
  • Page 17 17
  • Page 18 18
  • Page 19 19
  • Page 20 20
  • Page 21 21
  • Page 22 22
  • Page 23 23
  • Page 24 24
  • Page 25 25
  • Page 26 26
  • Page 27 27
  • Page 28 28
  • Page 29 29
  • Page 30 30
  • Page 31 31
  • Page 32 32
  • Page 33 33
  • Page 34 34
  • Page 35 35
  • Page 36 36
  • Page 37 37
  • Page 38 38
  • Page 39 39
  • Page 40 40
  • Page 41 41
  • Page 42 42
  • Page 43 43
  • Page 44 44
  • Page 45 45
  • Page 46 46
  • Page 47 47
  • Page 48 48
  • Page 49 49
  • Page 50 50
  • Page 51 51
  • Page 52 52
  • Page 53 53
  • Page 54 54
  • Page 55 55
  • Page 56 56
  • Page 57 57
  • Page 58 58
  • Page 59 59
  • Page 60 60
  • Page 61 61
  • Page 62 62
  • Page 63 63
  • Page 64 64
  • Page 65 65
  • Page 66 66
  • Page 67 67
  • Page 68 68
  • Page 69 69
  • Page 70 70
  • Page 71 71
  • Page 72 72
  • Page 73 73
  • Page 74 74
  • Page 75 75
  • Page 76 76

Kenwood C471FM User manual

Category
Car video systems
Type
User manual

Ask a question and I''ll find the answer in the document

Finding information in a document is now easier with AI