Hardware List
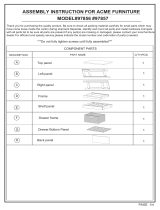
Part List
Home Styles Customer Service: www.homestyles-furniture.com,
888-680-7460, 877-831-0319
Tool(s) required for assembly: Phillips screwdriver
20 05664 0091
Potting Bench
IMPORTANT
Refer to later page(s) of these instructions for rack and drawer assembly.
Carefully remove all the parts from the carton and
place them individually on a soft cloth to prevent
scratches or other damage.
Carefully and strictly follow these assembly instructions
to ensure a completed product as designed.
Do not use power tools above 8 volts to assemble.
A.
Top
1 pc.
B.
Shelf
1 pc.
I.
Handle
4 pcs.
K.
Rack
1 pc.
L.
Drawer
2 pcs.
E.
Rail
2 pcs.
Caster
2 Locking
2 Non-Locking
4 pcs.
Key Wrench
1 pc.
Hex Wrench
1 pc.
Small Hex Wrench
1 pc.
Hanger
6 pcs.
Wood Plug
6 pcs. (+1 extra)
Pin
4 pcs. (+1 extra)
8x1”
Wood Screw (short)
6 pcs. (+1 extra)
M7x90
Assembly Screw
12 pcs. (+1 extra)
M6x40
Head Cap Bolt
14 pcs. (+1 extra)
6x1”
Wood Screw (small)
24 pcs. (+1 extra)
8x1 ”¼
Wood Screw
12 pcs. (+1 extra)
8x1 ”½
Wood Screw (long)
4 pcs. (+1 extra)
F.
Middle Frame
1 pc.
Dowel
4 pcs. (+1 extra)
G.
Side Frame
1 pc.
J.
Bar
2 pcs.
H.
Side Frame
1 pc.
C.
Base Frame
1 pc.
D.
Rail
2 pcs.

Assembly Instructions 2/7
STEP 1
Attach Rails (D) and (E)
to Middle Frame (F) with
Wood Screws. (See Figure 1)
Note: A Phillips screwdriver 5” or
less in length is recommended.
D
D
F
E
E
Wood Screw
IMPORTANT
Use a soft cloth between these parts and the floor.
Do not use power tools above 8 volts to assemble.
Do not tighten all bolts until each part is properly assembled.
Keep Hex Wrench as bolts may need to be tightened in the future.
G
H
Figure 2
STEP 2
Insert Bars (J) into Handles (I).
Attach Handles (I) to Side Frames (G) and (H) with Head Cap Bolts.
(See Figure 2)
Attach Hangers to Side Frames (G) and (H) with Head Cap Bolts.
Figure 1
I
I
J
I
I
J
Head Cap Bolt
Hanger

Assembly Instructions 3/7
Locking Caster
Non-Locking Caster
C
STEP 3
Attach unit form Step 1 and Base Frame (C) to side frames with Assembly Screws.
Attach Casters underneath unit with Locking Casters on front.
(See Figure 3)
Assembly Screw
Figure 3

Part List
Assembly Instructions 4/7
Rack (K)
K1.
Side Panel
1 pc.
K3.
Side Panel
1 pc.
K5.
Top
1 pc.
K4.
Shelf
2 pcs.
K2.
Middle Panel
1 pc.
STEP 4
Attach Shelf (K4) to Side Panel (K1)
and Middle Panel (K2).
K1
K2
K4
K3
STEP 5
Attach Shelf (K4) and
Side Panel (K3) to unit.
K4
STEP 6
Attach Top (K5) to unit with Wood Screws (short).
Cover all holes with Wood Plugs. (See Figure 4)
Figure 4
K5
Wood Screw (short)

Assembly Instructions 5/7
K
A
Wood Screw (long)
STEP 7
Attach Rack (K) to Top (A) with
Wood Screws (long).
STEP 8
Turn unit from Step 3 to its upright position.
Attach unit from Step 7 to unit from Step 3 with Dowels and Wood Screws.
Note: A Phillips screwdriver 5” or less in length is recommended.
Wood Screw
Dowel

Assembly Instructions 6/7
L1.
Drawer Front
2 pcs.
L2.
Drawer Back
2 pcs.
L3.
Drawer Side
2 pcs.
L4.
Drawer Side
2 pcs.
L5.
Drawer Bottom
2 pcs.
Part List
L3
STEP 10
Attach Drawer Side (L3) to unit
with Wood Screws (small).
Wood Screw (small)
Drawer (L)
STEP 9
Attach Drawer Front (L1), Drawer Back
(L2) and Drawer Side (L4) to Drawer
Bottom (L5) with Wood Screws (small).
L1
L2
L4
L5
Wood Screw (small)

Assembly Instructions 7/7
STEP 11
Insert Pins into side frames.
Place Shelf (B) into position.
Orientate stopper on bottom of Drawers (L)
to front. (See Figure 5)
Slide Drawers (L) into position.
Stopper
Figure 5
Pin
B
L
L

Home Styles will provide replacements free of charge for missing or damaged hardware or parts within 30 days of
purchase. Digital images of the defective parts may be required. If the product was not purchased from an authorized
retail affiliate, Home Styles is under no obligation to provide replacement parts. Parts are not available for fully assembled
items nor are parts available for sale. Replacements for missing or damaged hardware or parts may be requested at:
www.homestyles-furniture.com/customer-service/replacement-parts
Advisory Notes
· Do not use power tools above 8 volts to assemble.
· Periodic structural checks of this furniture should be undertaken. Do not use if there are any
doubts about its’ fitness for purpose.
· Exercise care so as to not trap fingers in any of the hinged parts of this furniture.
· Always use on firm level ground, ensuring that all legs remain in contact with the ground.
· Do not stand on a chair or sit or stand on any other item.
· Do not let children play with this furniture.
· This furniture should be stored under cover during periods of adverse weather (wet or cold)
and during winter. Clean and dry thoroughly before storage.
Tannin Exudation
Tannin is a naturally occurring substance which may exude from the surface of some wood species
and may stain the surface of hard areas such as patios or decks. To clean tannin marks use a
proprietary cleaning product or a water-based wood restorer containing oxalic acid. Stains must be
removed within 1-2 days of them occurring. Care should be exercised to follow the manufacturer's
guidelines of the cleaner used and test a small area first to determine its’ effectiveness. This is
especially important on wooden decking areas where the existing surface finish may be lifted due
to the application of the cleaning agent. If decking has become discolored from the cleaning, it
can be restored with a suitable wood finish.
Maintenance
In order to maintain the appearance of the wood, regular coatings of linseed oil must be applied.
The frequency will depend on the weather conditions experienced.
· Refer to the manufacturer’s guidelines of the linseed oil used.
· Apply the linseed oil with a clean cloth, wiping it directly onto the wood surface.
· Treat all surfaces of the furniture. Ensure that any hidden surfaces, such as those exposed
when the furniture is turned upside down, are adequately treated. Care should be given to
wipe the end grain, to all joints and to crevices that may have been caused by damage.
· Let the surface dry out. This can take 4-12 hours depending on weather conditions.
· Repeat the above steps with at least 2 more coats of oil. Extra coats may leave a semi-gloss
sheen once the oil has dried, but excess oil can be wiped off with a clean cloth.
· IMPORTANT: Cloths with linseed oil may be a fire hazard. Immediately after use, saturate all
cloths used for applying linseed oil with water and dispose of safely outside the home.
If left untreated, this furniture will turn a grayish color. Light sanding can restore the original color
after which linseed oil can be applied. Fine surface cracks may occur over time from weathering,
but these won't affect the structural integrity of the furniture.
CARE INSTRUCTIONS
Home Styles Customer Service: www.homestyles-furniture.com,
888-680-7460, 877-831-0319
/