Epson Artisan 800 All-in-One Printer Supplemental Information
- Type
- Supplemental Information

CPD-26999
© 2008 Epson America, Inc. 10/08
Printed in XXXXXX / Pays d’impression : XXXXXX / Impreso en XXXXXX
Move the transportation lock to the rear storage slot.
Placez le verrou de transport dans le logement d’entreposage arrière.
Coloque el bloqueo de transporte en la ranura de almacenaje posterior.
Move the transportation lock to the rear storage slot.
Placez le verrou de transport dans le logement d’entreposage arrière.
Coloque el bloqueo de transporte en la ranura de almacenaje posterior.
*411583700*
*411583700*
Caution / Mise en garde / Precaución
Artisan 800 Series
Artisan 700 Series / Epson Stylus Photo TX700WSeries / Epson Stylus Photo TX700W

Important Setup Information
Network Connection
(Wireless or Wired)
1. If you’re connecting to a network, use the
Ethernet cable that came with your product.
IMPORTANT:
Connect the cable for wireless or wired
networks. For a wireless connection, you’ll
remove the cable later.
2. Set up your product using the Start Here sheet,
including setting the date and time. DO NOT
follow the steps in the “Install Software” section.
3. Install your software using the Network
Installation Guide.
For a variety of network setup information, go to:
www.epson.com/support/wireless
Direct Connection (USB)
1. If you are NOT installing your product on a
network, connect it using a USB cable (not
included).
You can purchase a USB cable at most
electronics stores.
2. Set up your product, including setting the date
and time, and install your software as described
on the Start Here sheet.
CPD-26496R1
Printed in/Pays d’impression : Indonesia
Ethernet network
cable (included)
USB cable
(not included)

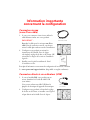
Information importante
concernant la configuration
Connexion réseau
(sans fil ou câblé)
1. Si vous vous connectez à un réseau, utilisez le
câble Ethernet inclus avec votre produit.
IMPORTANT :
Branchez le câble pour les réseaux sans fil ou
câblé. Pour la connexion sans fil, vous devrez
retirer le câble plus tard au cours de l’installation.
2. Configurez votre produit en suivant les
instructions de la feuille Point de départ,
cela inclut le réglage de la date et de l’heure. NE
suivez PAS les étapes de la section « Installez le
logiciel ».
3. Installez votre logiciel en utilisant le Guide
d’installation réseau.
Pour plus d’information concernant la configuration d’un réseau, consultez
le : www.epson.com/support/wireless (disponible en anglais seulement).
Connexion directe à un ordinateur (USB)
1. Si vous n’installez PAS votre produit sur un
réseau, branchez-le à l’aide du câble USB
(non inclus).
Vous pouvez acheter un câble USB dans la
plupart des boutiques d’appareils électroniques.
2. Configurez votre produit, cela inclut le réglage
de la date et de l’heure, et installez votre logiciel
tel que décrit sur la feuille Point de départ.
Câble réseau
Ethernet (inclus)
Câble USB
(non inclus)
-
 1
1
-
 2
2
-
 3
3


Epson Artisan 800 All-in-One Printer Supplemental Information
- Type
- Supplemental Information
Ask a question and I''ll find the answer in the document
Finding information in a document is now easier with AI
in other languages
- français: Epson Artisan 800 All-in-One Printer
Related papers
-
Epson WorkForce 600 All-in-One Printer Supplemental Information
-
-
-
Epson WorkForce Pro WF-C869R Installation guide
-
-
-
-
Epson WF-R5190 Installation guide
-
Epson WorkForce WF-7110 Installation guide
-
Epson WorkForce Pro WF-R4640 Installation guide