Panasonic CSPW18GKX Quick start guide

Type
Quick start guide

This manual is also suitable for

ENGLISH
ENGLISH
2 ~ 7
2 ~ 7
Before operating the unit, read these
operating instructions thoroughly and
keep them for future reference.
FRANÇAIS 8 ~ 13
FRANÇAIS 8 ~ 13
Avant d’utiliser l’appareil, lisez ce mode
d’emploi dans son intégralité et conservez-le
pour toute référence ultérieure.
ESPAÑOL 14 ~ 19
ESPAÑOL 14 ~ 19
Antes de utilizar la unidad, sírvase leer
atentamente estas instrucciones de
funcionamiento y conservarlas como
futuro elemento de consulta.
DEUTSCH 20 ~ 25
DEUTSCH 20 ~ 25
Bevor Sie das Gerät in Betrieb nehmen,
lesen Sie bitte diese Bedienungsanleitung
aufmerksam durch und bewahren Sie sie
r die künftige Verwendung auf.
für die künftige Verwendung auf.
ITALIANO 26 ~ 31
ITALIANO 26 ~ 31
Prima di utilizzare l’unità si prega di leggere
attentamente le istruzioni e di conservare
questo opuscolo per potervi fare riferimento
in futuro.
in futuro.
NEDERLANDS 32 ~ 37
NEDERLANDS 32 ~ 37
Lees voor u het apparaat gebruikt deze
gebruiksinstructies grondig en bewaar ze
voor toekomstig gebruik.
PORTUGUÊS 38 ~ 43
PORTUGUÊS 38 ~ 43
Antes de ligar a unidade, leia
cuidadosamente este manual de
utilização e guarde-o para futura
referência.
referência.
E 44 ~ 49
E 44 ~ 49
     ,
     ,
    
    
     
     
.
.
 50 ~ 55
 50 ~ 55
   ,
   ,
  
  
     
     
.
.
Operating Instructions
Air Conditioner
Indoor Unit Outdoor Unit
CS-PW18GKX CU-PW18GKX
F566714
QUICK GUIDE / GUIDE RAPIDE
GUÍA RÁPIDA / KURZANLEITUNG
GUIDA RAPIDA / SNELLE GIDS
GUΙA RÁPIDO / ΣYNTOMOΣ OHГOΣ
БЪРЗ СПРАВОЧНИК
БЪРЗ СПРАВОЧНИК
© Panasonic HA Air-Conditioning (M) Sdn. Bhd. 2008.
Unauthorized copying and distribution is a violation
of law.
2
SAFETY PRECAUTIONS SAFETY PRECAUTIONS
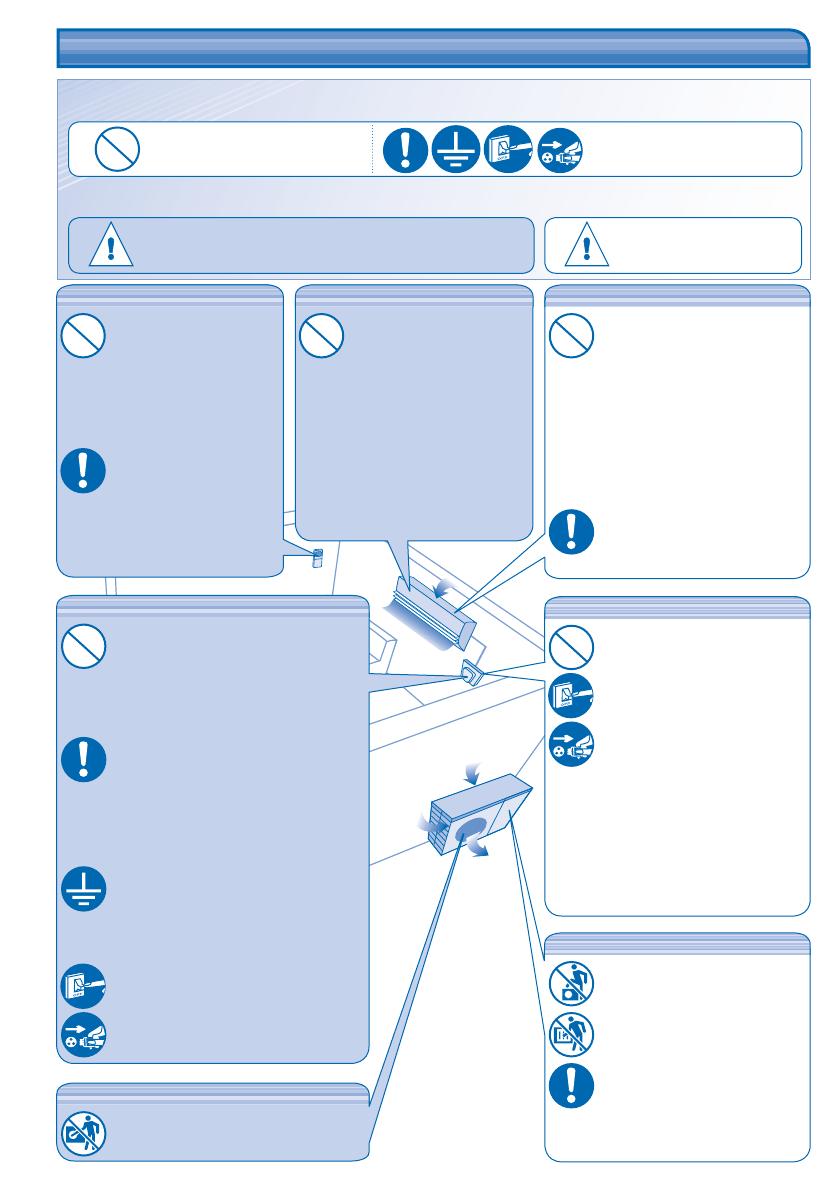
DEFINITION
The instructions to be followed are classi ed by the following symbols:
This symbol denotes an action
that is PROHIBITED.
These symbols denote actions
that are COMPULSORY.
To prevent personal injury, injury to others, or property damage, please observe the following.
Incorrect operation due to failure to follow instructions may cause harm or damage, the seriousness of which is classi ed as below:
Warning
This sign warns of death or serious injury.
Caution
This sign warns of
injury or damage
to property.
Remote Control
• Do not use rechargeable
(Ni-Cd) batteries.
• Do not allow infants and
small children to play
with the remote control
to prevent them from
accidentally swallowing the
batteries.
• Remove the batteries if the
unit is not going to be used
for a long period of time.
• New batteries of the same
type must be inserted
following the polarity stated
to prevent malfunction of
the remote control.
Outdoor Unit
Do not sit or step on the unit, you
may fall down accidentally.
Do not touch the sharp aluminium
n, sharp parts may cause injury.
Ensure that the drainage pipe is
connected properly. Otherwise,
leakage may occur.
After long periods of use, make
sure the installation rack is not
damaged.
Power Supply
Do not pull the cord to disconnect
the plug.
Switch off the power supply and
unplug before cleaning or servicing.
Turn off the power supply and
unplug if the unit is not used for a
long period of time.
This air conditioner is equipped
with a built-in surge protective
device. However, in order to further
protect your air conditioner from
being damaged by abnormally
strong lightning activity, you may
want to disconnect it from the
power supply. Do not touch the air
conditioner during lightning, it may
cause electric shock.
Air inlet
Air inlet
Air
Air
outlet
outlet
Air outlet
Air inlet
Air inlet
Power Supply
• Do not share the same power outlet with
other equipment.
• Do not modify power cords.
• Do not use extension cords.
• Do not operate with wet hands.
• Do not operate or stop the unit by
inserting or pulling out the power plug.
• Insert the power plug properly.
• Use the speci ed supply cord.
• If the supply cord is damaged, it must be
replaced by the manufacturer, its service
agent or similarly quali ed persons in
order to avoid a hazard.
• Dust on the electric power plug should be
periodically wiped with a dry cloth.
• This equipment must be earthed and
strongly recommended to be installed
with Earth Leakage Circuit Breaker
(ELCB) or Residual Current Device
(RCD). Otherwise, it may cause electrical
shock or re in case of malfunction.
• In case of emergency or abnormal
conditions (burnt smell, etc), turn off the
power supply and unplug, and please
consult authorized dealer.
Indoor Unit
• Do not install, remove and
reinstall the unit by yourself;
improper installation will
cause leakage, electric
shock or re. Please consult
authorized dealer or
specialist for the installation
work.
• Do not insert your ngers or
other objects into the unit,
rotating parts may cause
injury.
• Do not attempt to repair the
unit by yourself.
Indoor Unit
Do not install the unit in a
potentially explosive atmosphere.
Do not wash the unit with water,
benzene, thinner or scouring
powder.
Do not use for other purposes
such as preservation of food.
Do not use any combustible
equipment in front of the air ow
outlet.
Do not expose directly to cold air
for a long period.
Ensure that the drainage pipe is
connected properly. Otherwise,
leakage may occur.
Aerate the room regularly.
Outdoor Unit
• Do not insert your ngers or other objects
into the unit, rotating parts may cause
injury.
3
ENGLISH
REGULATORY INFORMATION REGULATORY INFORMATION
Replacement or installation of power plugs shall be performed by authorized/
quali ed personnel only. The wires in this mains lead are coloured in accordance
with the following code:
Terminals
Red
wires
live
neutral
earth
colours (GB Standard)
blue
green-yellow
brown
Black
Green/Yellow
Wiring colour may vary depending on a country wiring code’s standard.
Thank you for purchasing
Panasonic Air Conditioner
TABLE OF CONTENTS
TABLE OF CONTENTS
NOTE :
NOTE :
The illustrations in this manual are
for explanation purposes only and
may differ from the actual unit. It is
subjected to change without notice
for future improvement.
SAFETY PRECAUTIONS
2
REGULATORY INFORMATION
3
PRODUCT OVERVIEW &
OPERATIONS
4~5
CARE & CLEANING
6
TROUBLESHOOTING
7
QUICK GUIDE
BACK COVER
This appliance is not intended for use by persons (including children) with reduced
physical, sensory or mental capabilities, or lack of experience and knowledge,
unless they have been given supervision or instruction concerning use of the
appliance by a person responsible for their safety. Children should be supervised to
ensure that they do not play with the appliance.
• Do not switch ON the unit when waxing the oor. After waxing, aerate the room properly before operating the unit.
• Do not install the unit in oily and smoky areas.
Information for Users on Collection and Disposal of Old Equipment and used Batteries
These symbols on the products, packaging, and/or accompanying documents mean that used electrical and
electronic products and batteries should not be mixed with general household waste.
For proper treatment, recovery and recycling of old products and used batteries, please take them to
applicable collection points, in accordance with your national legislation and the Directives 2002/96/EC and
2006/66/EC.
By disposing of these products and batteries correctly, you will help to save valuable resources and prevent
any potential negative effects on human health and the environment which could otherwise arise from
inappropriate waste handling.
For more information about collection and recycling of old products and batteries, please contact your local
municipality, your waste disposal service or the point of sale where you purchased the items.
Penalties may be applicable for incorrect disposal of this waste, in accordance with national legislation.
For business users in the European Union
If you wish to discard electrical and electronic equipment, please contact your dealer or supplier for further
information.
[Information on Disposal in other Countries outside the European Union]
These symbols are only valid in the European Union. If you wish to discard these items, please contact your
local authorities or dealer and ask for the correct method of disposal.
Note for the battery symbol (bottom two symbol examples):
This symbol might be used in combination with a chemical symbol. In this case it complies with the requirement
set by the Directive for the chemical involved.
Pb
OPERATION CONDITION
OPERATION CONDITION
Use this air conditioner under the following temperature range
Temperature (°C)
Indoor Outdoor
*DBT *WBT *DBT *WBT
COOLING
Maximum 32 23 43 26
Minimum 16 11 16 11
HEATING
Maximum 30 - 24 18
Minimum 16 - -5 -6
NOTICE: This model is not suitable for 24 hours non-stopping operation in heating
mode below -5°C. When the outdoor temperature is below -5°C and you use
this model out of above conditions, the outdoor unit might be frozen up and stop
operation for protection control.
* DBT: Dry bulb temperature
* WBT: Wet bulb temperature
4
PRODUCT OVERVIEW & OPERATIONS PRODUCT OVERVIEW & OPERATIONS
Auto OFF/ON button
Used when remote control is misplaced
or malfunction.
Action Mode
Press once. Auto
Press and hold until you hear
one beep, then release.
Cooling
Press the button to turn off.
Front panel
Air lters
Receiver
Maximum distances: 8m
Remote control display
INDICATOR
(Green) (Orange)
Vertical air ow direction louver
Do not adjust by hand.
Horizontal air ow direction
louver
• Manually adjustable.
5
ENGLISH
TO SET THE TIMER
TO SET THE TIMER
To turn ON or OFF the unit at a preset time.
Select ON or
OFF timer.
Set the time. Con rm.
To cancel ON or OFF timer, press
or then
press .
When ON Timer is set, the unit may start earlier (up
to 30 minutes) before the actual set time in order to
achieve the desired temperature on time.
Timer operation is based on the clock set in the remote
control and repeats daily once set. For clock setting,
please refer to Remote Control Preparation at back
cover.
If timer is cancelled manually or due to power failure,
you can restore the previous setting (once power is
resumed) by pressing
.
OPTIONAL SETTINGS
OPTIONAL SETTINGS
Press and hold for approximately 10
seconds to show 12-hour (am/pm) or 24-
hour time indication.
Press to restore the remote control’s default
setting.
Not used in normal operations.
Use curtains to screen off sunlight and outdoor heat to
reduce power consumption during cool mode.
TO TURN ON OR OFF THE UNIT
Please be aware of the OFF indication on the remote
control display to prevent the unit from starting/
stopping improperly.
TO SET TEMPERATURE
For heat, cool and dry modes, the range of
temperature for selection is 16˚C ~ 30˚C.
Operating the unit within the recommended
temperature could induce energy saving.
HEAT mode : 20˚C ~ 24˚C.
COOL mode : 26˚C ~ 28˚C.
DRY mode : 1˚C ~ 2˚C lower than room temperature.
TO SELECT OPERATION MODE
AUTO mode - For your convenience
Unit selects the operation mode according to the
room temperature.
Once auto mode is selected, the unit will operate at
the standard setting temperature.
Room
temperature
Operation
mode
Standard setting
temperature
23˚C & above Cool 25˚C
Below 23˚C Dry 22˚C
Below 20˚C Heat 21˚C
To change the standard setting temperature, press
for “HI” or for “LO”.
Operation mode HI (+2˚C) LO (-2˚C)
Cool 27˚C23˚C
Dry 24˚C20˚C
Heat 23˚C19˚C
HEAT mode - To enjoy warm air
Unit takes a while to warm up. The power indicator
blinks during this operation.
COOL mode - To enjoy cool air
DRY mode - To dehumidify the environment
Unit operates at low fan speed to give a gentle
cooling operation.
TO SELECT FAN SPEED (3 OPTIONS)
For AUTO, the indoor fan speed is automatically
adjusted according to the operation mode.
TO ADJUST VERTICAL AIRFLOW
DIRECTION (5 OPTIONS)
Keeps the room ventilated.
If AUTO is set, the louvers swing up/down
automatically.
In heat mode, the air blows horizontally for a while,
then starts to blow downwards.
6
CARE & CLEANING CARE & CLEANING
Switch off the power supply and unplug before cleaning.
Do not touch the aluminium n, sharp parts may cause injury.
WASHING INSTRUCTIONS
Do not use benzene, thinner or scouring powder.
Use only soap ( pH7) or neutral household detergent.
Do not use water hotter than 40°C.
HINT
HINT
To ensure optimal performance of the unit, cleaning
maintenance have to be carried out at regular intervals.
Please consult authorized dealer.
CAUTION
FOR SEASONAL INSPECTION AFTER EXTENDED
NON-USE
NON-USE
Checking of remote control batteries.
No obstruction at air inlet and air outlet vents.
After 15 minutes of operation, it is normal to have the following
temperature difference between air inlet and air outlet vents:
Cooling: 8°C Heating: 14°C
NON SERVICEABLE CRITERIAS
TURN OFF POWER SUPPLY AND UNPLUG then please
consult authorized dealer under the following conditions:
Abnormal noise during operation.
Water/foreign particles have entered the remote control.
Water leaks from Indoor unit.
Circuit breaker switches off frequently.
Power cord becomes unnaturally warm.
Switches or buttons are not functioning properly.
FOR EXTENDED NON-USE
Activate Heat mode for 2~3 hours to remove moisture left in
the internal parts thoroughly.
Turn off the power supply and unplug.
Remove the remote control batteries.
Remove
Remove
INDOOR UNIT
INDOOR UNIT
Wipe the unit gently with a soft, dry cloth.
ALUMINIUM FIN
ALUMINIUM FIN
FRONT PANEL
FRONT PANEL
Remove Front Panel
Raise and pull to remove the front
panel.
Wash gently and dry.
Close Front Panel
Press down both ends of the front
panel to close it securely.
AIR FILTERS
AIR FILTERS
• Air lters cleaning is needed every two weeks.
• Wash/rinse the lters gently with water to avoid damage
to the lter surface.
• Dry the lters thoroughly under the shade, away from re
or direct sunlight.
Replace any damage lter.
7
ENGLISH
TROUBLESHOOTING TROUBLESHOOTING
Symptom
Symptom
Check
Check
Heating/Cooling operation is not working
ef ciently.
Set the temperature correctly.
Close all doors and windows.
Clean or replace the lters.
Clear any obstruction at the air inlet and air outlet vents.
Noisy during operation. Check if the unit has been installed at an incline.
Close the front panel properly.
Remote control does not work.
(Display is dim or transmission signal is weak.)
Insert the batteries correctly.
Replace weak batteries.
The unit does not work. Check if the circuit breaker is tripped.
Check if timers have been set.
The unit does not receive the signal from the
remote control.
Make sure the receiver not obstructed.
• Certain uorescent lights may interfere with signal transmitter. Please
consult authorized dealer.
Symptom
Symptom
Cause
Cause
Mist emerges from indoor unit. Condensation effect due to cooling process.
Water owing sound during operation. Refrigerant ow inside the unit.
The room has a peculiar odour. This may due to damp smell emitted by the wall, carpet, furniture or
clothing.
Indoor fan stops occasionally during automatic
fan speed setting.
This helps to remove the surrounding odours.
Operation is delayed a few minutes after
restart.
The delay is a protection to the unit’s compressor.
Outdoor unit emits water/steam. Condensation or evaporation occurs on pipes.
Timer indicator is always on. The timer setting repeats daily once set.
Power indicator blinks during operation and
the indoor fan is stopped.
The unit is in defrost mode, and the melted frost is drained from the
outdoor unit.
Indoor fan stops occasionally during heating
operation.
To avoid unintended cooling effect.
Cracking sound during operation. • Changes of temperature cause the expansion/contraction of the unit.
The following symptoms do not indicate malfunction.
Check the following before calling for servicing.
4
5
6
1
2
3
Remote Control Preparation Pparation De La Télécommande Preparación Del Mando A Distancia Vorbereitung
Remote Control Preparation • Préparation De La Télécommande • Preparación Del Mando A Distancia • Vorbereitung
Der Fernbedienung Telecomando: Operazioni Preliminari De Afstandsbediening Gereedmaken Preparão Do
Der Fernbedienung • Telecomando: Operazioni Preliminari • De Afstandsbediening Gereedmaken • Preparação Do
Controlo Remoto Προετοιμασία Τηλεχειριστήριου Подготвяне На Дистанционното Управление
Controlo Remoto • Προετοιμασία ΤηλεχειριστήριουПодготвяне На Дистанционното Управление
Panasonic Corporation
Website: http://panasonic.net/
F566714
Printed in Malaysia
OSSC0811-00
1
AUTO HEAT
DRY COOL
Select the desired mode.
Sélectionnez le mode de fonctionnement souhaité.
Seleccione el modo deseado.
Wählen Sie die gewünschte Betriebsart aus.
Selezionare la modalità desiderata.
Selecteer de gewenste stand.
Seleccione o modo de funcionamento pretendido.
     .
     .
2
Start/stop the operation.
Mettez l’appareil sous/hors tension.
Inicie/detenga el funcionamiento.
Schalten Sie das Gerät ein bzw. aus.
Avviare/arrestare l’apparecchio.
Start/stop het apparaat.
Ligue/Desligue a unidade.
/  .
/.
3
Set the desired temperature.
nissez la température souhaitée.
Ajuste la temperatura deseada.
Stellen Sie die gewünschte Temperatur ein.
Impostare la temperatura desiderata.
Stel de gewenste temperatuur in.
De na a temperatura desejada.
   .
    .
1
Pull out • Retirez • Quite • Nach unten ziehen • Estrarre • Verwijderen • Retire •  
2
Insert AAA or R03 batteries (can be used ~ 1 year) • Placez des piles AAA ou R03 (valables environ 1 an)
Inserte pilas AAA o R03 (puede ser usado ~ 1 año) • Batterien einlegen (AAA oder R03) (Betriebsdauer
etwa ein Jahr) • Inserire batterie AAA o R03 (può essere utilizzato per circa 1 anno) •
Plaats AAA- of R03-batterijen (kan ~ 1 jaar gebruikt worden) • Introduza pilhas AAA ou R03 (pode ser
utilizado ~ 1 ano) •   AAA R03 (   ~ 1 )
 AAA  R03  (      )
3
Close the cover • Fermez le couvercle • Cierre la tapa • Batteriefach schließen • Chiudere il coperchio • Sluit
het deksel • Feche a tampa •    
4
Press CLOCK • Appuyez sur CLOCK • Presione CLOCK • CLOCK drücken • Premere CLOCK • Druk op
CLOCK • Prima CLOCK •  CLOCK CLOCK
5
Set time • Réglez l’heureAjuste la hora • Uhrzeit einstellen • Impostare l’ora • Tijd instellen • Con gurar a
hora •    
6
Con rm • Con rmez • Con rmar • Bestätigen • Confermare • Bevestig • Con rmar • 

QUICK GUIDE/GUIDE RAPIDE/GUÍA RÁPIDA/
KURZANLEITUNG/GUIDA RAPIDA/SNELLE
GIDS/GUIA RÁPIDO/ΣΥΝΤΟΜΟΣ Ο∆ΗΓΟΣ/БЪРЗ
СПРАВОЧНИК
QUICK GUIDE/GUIDE RAPIDE/GUÍA RÁPIDA/
KURZANLEITUNG/GUIDA RAPIDA/SNELLE
GIDS/GUIA RÁPIDO/ΣΥΝΤΟΜΟΣ Ο∆ΗΓΟΣ/БЪРЗ
СПРАВОЧНИК
Pursuant to at the directive 2004/108/EC, article 9(2)
Panasonic Testing Centre
Panasonic Service Europe, a division of
Panasonic Marketing Europe GmbH
Winsbergring 15, 22525 Hamburg, F.R. Germany
  • Page 1 1
  • Page 2 2
  • Page 3 3
  • Page 4 4
  • Page 5 5
  • Page 6 6
  • Page 7 7
  • Page 8 8
  • Page 9 9
  • Page 10 10
  • Page 11 11
  • Page 12 12
  • Page 13 13
  • Page 14 14
  • Page 15 15
  • Page 16 16
  • Page 17 17
  • Page 18 18
  • Page 19 19
  • Page 20 20
  • Page 21 21
  • Page 22 22
  • Page 23 23
  • Page 24 24
  • Page 25 25
  • Page 26 26
  • Page 27 27
  • Page 28 28
  • Page 29 29
  • Page 30 30
  • Page 31 31
  • Page 32 32
  • Page 33 33
  • Page 34 34
  • Page 35 35
  • Page 36 36
  • Page 37 37
  • Page 38 38
  • Page 39 39
  • Page 40 40
  • Page 41 41
  • Page 42 42
  • Page 43 43
  • Page 44 44
  • Page 45 45
  • Page 46 46
  • Page 47 47
  • Page 48 48
  • Page 49 49
  • Page 50 50
  • Page 51 51
  • Page 52 52
  • Page 53 53
  • Page 54 54
  • Page 55 55
  • Page 56 56

Panasonic CSPW18GKX Quick start guide

Type
Quick start guide
This manual is also suitable for

Ask a question and I''ll find the answer in the document

Finding information in a document is now easier with AI