Shimano CP-WH30 Dealer's Manual

Category
Bicycles
Type
Dealer's Manual

This manual is also suitable for

Shimano CP-WH30 is a specially designed wheelset for trekking and city touring bikes, boasting great durability and reliability. Constructed with a sturdy aluminum rim and stainless steel spokes, it can withstand the rigors of long-distance rides and urban commutes, ensuring a smooth and enjoyable cycling experience.

Shimano CP-WH30 is a specially designed wheelset for trekking and city touring bikes, boasting great durability and reliability. Constructed with a sturdy aluminum rim and stainless steel spokes, it can withstand the rigors of long-distance rides and urban commutes, ensuring a smooth and enjoyable cycling experience.

(English)
DM-GAWH001-01
Dealer's Manual
ROAD MTB Trekking
City Touring/
Comfort Bike
URBAN SPORT E-BIKE
WHEEL SET
(DISC BRAKE)
GRX
WH-RX570-TL-F12
WH-RX570-TL-R12
2
CONTENTS
CONTENTS .................................................................................2
IMPORTANT NOTICE ..................................................................3
TO ENSURE SAFETY ...................................................................4
LIST OF TOOLS TO BE USED ......................................................8
INSTALLATION/REMOVAL .........................................................9
Tire size ...................................................................................................9
Installing/removing the cassette sprocket ...........................................9
Installing the disc brake rotor ...............................................................9
MAINTENANCE ........................................................................10
Spoke lacing .........................................................................................10
Replacing the spokes ...........................................................................12
Replacing tubeless tape .......................................................................13
Front hub ..............................................................................................16
• Disassembly ............................................................................................................................. 16
• Assembly ................................................................................................................................. 18
Freehub .................................................................................................19
• Disassembly ............................................................................................................................. 19
• Assembly ................................................................................................................................. 22
Replacement of the freewheel body ..................................................23
Installing and removing the tubeless tires .........................................24
• Installation .............................................................................................................................. 25
• Removal .................................................................................................................................. 27
• Installing the inner tube during use ..................................................................................... 28
3
IMPORTANT NOTICE
IMPORTANT NOTICE
This dealer's manual is intended primarily for use by professional bicycle mechanics.
Users who are not professionally trained for bicycle assembly should not attempt to
install the components themselves using the dealer's manuals.
If any part of the information on the manual is unclear to you, do not proceed with the
installation. Instead, contact your place of purchase or a bicycle dealer for their
assistance.
Make sure to read all owner's manuals included with the products.
Do not disassemble or modify the product other than as stated in the information
contained in this dealer's manual.
All owner's manuals and dealer's manuals can be viewed on-line on our website (https://
si.shimano.com).
For consumers who do not have easy access to the internet, please contact a SHIMANO
distributor or any of the SHIMANO offices to obtain a hardcopy of the user's manual.
Please observe the appropriate rules and regulations of the country, state or region in
which you conduct your business as a dealer.
For safety, be sure to read this dealer's manual thoroughly before use, and
follow it for correct use.
The following instructions must be observed at all times in order to prevent personal injury
and physical damage to equipment and surroundings.
The instructions are classified according to the degree of danger or damage which may occur
if the product is used incorrectly.
DANGER
Failure to follow the instructions will result in death or serious
injury.
WARNING
Failure to follow the instructions could result in death or
serious injury.
CAUTION
Failure to follow the instructions could cause personal injury or
physical damage to equipment and surroundings.
4
TO ENSURE SAFETY
TO ENSURE SAFETY
WARNING
Be sure to follow the instructions provided in the owner's manuals when installing the
product.
It is recommended to use SHIMANO genuine parts only. If parts such as bolts and nuts
become loose or damaged, the bicycle may suddenly fall over, which may cause serious
injury.
In addition, if adjustments are not carried out correctly, problems may occur, and the
bicycle may suddenly fall over, which may cause serious injury.
Be sure to wear safety glasses or goggles to protect your eyes while performing
maintenance tasks such as replacing parts.
After reading the dealer's manual thoroughly, keep it in a safe place for later reference.
Be sure to also inform users of the following:
Check that the wheels are fastened securely before riding the bicycle. If the wheels are
loose in any way, they may come off the bicycle and cause serious injury.
Before riding the bicycle, check the wheels to make sure that there are no bent or loose
spokes, dents, scratches, or cracks on the rim surface. Do not use the wheel if any of these
problems are found. The wheel may break, and you may fall. In the case of carbon
wheels, check also that there is no carbon peeling or cracking.
If the wheels are used in harsh conditions such as on unpaved surfaces, they may become
deformed or damaged, which may then result in accidents.
These wheels are designed exclusively for use with disc brakes. They are not compatible
with rim brakes.
If the axle release lever is on the same side as the disc brake rotor, there is the danger
that it may interfere with the disc brake rotor. Make sure that, even if the axle release
lever is tightened as much as possible by hand, the axle release lever does not interfere
with the disc brake rotor. If it interferes with the disc brake rotor, stop using it and
consult a place of purchase or a distributor.
Axle release
lever
Disc brake rotor
5
TO ENSURE SAFETY
The disc brake calipers and disc brake rotor will become hot when the brakes are
operated, so do not touch them while riding or immediately after dismounting from the
bicycle. Otherwise, you may get burned. Check that the brake system has cooled down
sufficiently before attempting brake system maintenance.
Be sure to also carefully read the owner's manual for the disc brakes.
The tires should be inflated to the pressure indicated on the tires or rims before use. If
the maximum pressure is indicated on the tires and rims, be sure not to exceed the lower
value shown.
If the axle release lever is not used correctly, the wheel may come off the bicycle and
serious injury could result.
For details on the E-THRU Axle, refer to the E-THRU Axle user's manual.
F12 (Front 12 mm Axle), R12 (Rear 12 mm Axle) Wheel (Thru
Axle)
This wheel can only be used in combination with the special front fork/frame and the
through axle. If it is used in combination with any other front fork/frame or through
axle, it may cause the wheel to become detached from the bicycle during riding and
result in serious bodily injury.
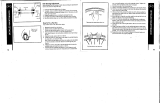
TL: Tubeless wheel
The tires should be installed and removed by hand.
If this is difficult, a plastic tire lever for tubeless wheels may be used. In such cases, be
sure to check that the rim surface has not been dented, scratched, or cracked as there is a
risk of causing damage to the air seal between the tire and the rim, which would result
in air leakage. For carbon rims, check that there is no carbon peeling or cracking, etc.
Finally, make sure that there is no air leakage.
WH-RX570-TL: Maximum pressure = 5 bar/72 psi /500 kPa
A higher pressure than indicated can cause a sudden puncture and/or sudden release of
the tire, which can result in serious injury.
CAUTION
Be sure to also inform users of the following:
Note that a higher rim is more easily affected by the wind and makes riding unstable.
If you will be using a puncture repair agent, consult the place of purchase or a
distributor.
6
TO ENSURE SAFETY
TL: Tubeless wheel
Do not use rim tape if using an inner tube. Rim tape may make it difficult to remove and
install the tire, and the tire tube may become damaged or the tires may suddenly
puncture, causing the bicycle to fall over.
Be sure to use tubeless tape when using these wheels.
It is recommended to use genuine SHIMANO tubeless tape to prevent punctures and
other possible damage.
If you use a tire such as a Tubeless Ready tire that needs to be used with a sealant, use
the sealant recommended by the tire manufacturer.
Burn-in period
Disc brakes have a burn-in period, and braking force will gradually increase as the burn-
in period progresses; therefore, make sure that you are aware of any such increases in
braking force when using the brakes during this period. The same thing will happen
when the brake pads or disc brake rotor are replaced.
For installation to the bicycle, and maintenance:
Refer to the tire size table in the "INSTALLATION/REMOVAL" section when using tires.
Also, read carefully all owner's manuals included with the tire.
NOTICE
Be sure to also inform users of the following:
For the use of the supplied nipple wrench tool, contact your place of purchase or a
bicycle dealer for their assistance.
Do not add oil to the internal parts of the hub. Otherwise, grease will flow out.
It is recommended that you ask a place of purchase to adjust the spoke tensions if there
is any deviation in the spokes and after the first 1,000 km of riding.
Optional reflector and spoke protector sets are available. Check the model number on
the website specifications and please ask your bicycle dealer for details.
Do not use detergent or other chemicals when wiping the wheel, otherwise, the sticker
on the rim may come off.
Products are not guaranteed against natural wear and deterioration from normal use
and aging.
For maximum performance we highly recommend SHIMANO lubricants and maintenance
products.
7
TO ENSURE SAFETY
For installation to the bicycle, and maintenance:
Use of genuine SHIMANO spokes and nipples is strongly recommended. Otherwise, the
area where the spokes fit into the hub body may become damaged.
Be careful not to overtighten the nipples when adjusting the spoke tensions. If
overtightened, damage to the rim may result.
If the wheel becomes stiff and difficult to turn, apply grease.
Special nipple wrenches are available as optional accessories.
For compatible reflectors and spoke protectors, check the specifications table (https://
si.shimano.com).
For information on how to install and remove the tires, refer to the owner's manual
accompanying the wheel.
TL: Tubeless wheel
Use genuine SHIMANO spokes, spoke plugs, and washers. Otherwise, the area where the
spokes fit into the hub body may become damaged.
The actual product may differ from the illustration because this manual is
intended mainly to explain the procedures for using the product.
8
LIST OF TOOLS TO BE USED
The following tools are needed for installation/removal, adjustment, and maintenance
purposes.
Tool
17 mm hub spanner
22 mm hub spanner
15 mm hexagon wrench
9
INSTALLATION/REMOVAL
Tire size
INSTALLATION/REMOVAL
Tire size
The recommended tire sizes for installation to each wheel are as follows.
Wheel size Model name Tire size
GRX
622 x 21C (700C)
WH-RX570-TL-F12
32C - 42C
WH-RX570-TL-R12
584 x 21C (650B)
WH-RX570-TL-F12
38C - 53C
WH-RX570-TL-R12
Installing/removing the cassette sprocket
Refer to the dealer's manual for the cassette sprocket to install/remove the cassette sprocket.
Installing the disc brake rotor
Refer to the dealer's manual for the hydraulic disc brakes to install the disc brake rotor.
10
MAINTENANCE
Spoke lacing
MAINTENANCE
Spoke lacing
Lace the spokes as shown in the figure.
* The spoke tension values should be used as a guide only.
Number of spokes: 24
For front
Left side (disc brake rotor side) Right side
For rear
Left side (disc brake rotor side) Right side (sprocket side)
11
MAINTENANCE
Spoke lacing
622 x 21C (700C)
Spoke tension value
For front For rear
Left side
(disc brake rotor side)
950 - 1,250 N 580 - 880 N
Right side 650 - 950 N 850 - 1,150 N
584 x 21C (650B)
Spoke tension value
For front For rear
Left side
(disc brake rotor side)
950 - 1,250 N 600 - 900 N
Right side 650 - 950 N 880 - 1,200 N
12
MAINTENANCE
Replacing the spokes
Remove the tubeless tape before replacing the spokes.
(For instructions on attaching/removing tubeless tape, refer to "Replacing tubeless tape".)
1. Insert the spoke through the hole in the hub flange.
Spoke
Hub flange
2. Attach the nipple and washer, and tighten the spoke with the specified
tension.
Nipple
Washer
13
MAINTENANCE
Replacing tubeless tape
3. Remove the dirtiness from the rim hole and where the tubeless tape
will be affixed.
Replacing tubeless tape
1. Wipe away the sealant.
* Only while using sealant
2. Remove the tubeless tape.
14
MAINTENANCE
Replacing tubeless tape
NOTICE
The tubeless tape cannot be reused, so use a new one after replacing it.
Use a tubeless tape matching the rim width.
It is recommended to use genuine SHIMANO tubeless tape to prevent punctures
and other possible damage.
Tubeless tape
3. Remove the dirtiness from the rim surface where the tape will be
affixed.
4. Affix new tubeless tape.
Start affixing the tubeless tape from the opposite side of the valve.
15
MAINTENANCE
Replacing tubeless tape
TECH TIPS
As the tape may tear, do not use a tool (use your
hand) to affix the tape. Pull the tape with your hand
to some extent when affixing it.
Affix the tubeless tape in the middle of the rim, not off
to one side, as shown in the following figure.
5. Securely attach both ends of the tape to the rim.
* Overlap the ends of the tape by about 10 cm.
Approximately
10 cm
6. Drill a pilot hole in the valve hole section and then attach the valve.
Valve hole section
Valve
Approximately 3 mm
in diameter
16
MAINTENANCE
Front hub
Front hub
Disassembly
1. Loosen the lock nut on the double-lock section on the right side of the
hub body.
The hub cannot be disassembled from the left side of the hub body (the disc brake rotor
fixing serration side).
Lock nut
17
MAINTENANCE
Front hub
2. The unit can be disassembled as shown in the figure. Apply grease to
the indicated parts at periodic intervals.
Ball size: 5/32"
Number of balls: 14
Apply grease: Premium grease (Y-04110000)
Number of balls: 14
Ball size: 5/32"
Seal (Lip is on the outside)
Dust cover (Cannot be
disassembled)
Dust cover (Cannot be disassembled)
NOTICE
When removing and installing the seal, do so very carefully so that the seal does
not become deformed. When reinstalling the seal, make sure that it is facing the
right way, and insert it as far as it will go.
18
MAINTENANCE
Front hub
Assembly
1. Install the hub axle from the left side of the hub body.
Hub body
Hub axle
2. After assembling the necessary parts and adjusting the rotation,
tighten the lock nut and double-lock it.
Lock nut
18 - 20 N·m
NOTICE
If using a hub spanner on the beveled parts on the left side of the hub body, be
careful not to apply excessive torque. Otherwise, it may be damaged.
19
MAINTENANCE
Freehub
Freehub
Disassembly
1. Loosen the lock nut on the double-lock section on the left side of the
hub body.
Lock nut
2. Remove the lock nut, cone, and seal ring.
Lock nut
Cone
Sealing
20
MAINTENANCE
Freehub
3. Remove the hub axle from the right side of the hub body.
Hub axle
Hub body
  • Page 1 1
  • Page 2 2
  • Page 3 3
  • Page 4 4
  • Page 5 5
  • Page 6 6
  • Page 7 7
  • Page 8 8
  • Page 9 9
  • Page 10 10
  • Page 11 11
  • Page 12 12
  • Page 13 13
  • Page 14 14
  • Page 15 15
  • Page 16 16
  • Page 17 17
  • Page 18 18
  • Page 19 19
  • Page 20 20
  • Page 21 21
  • Page 22 22
  • Page 23 23
  • Page 24 24
  • Page 25 25
  • Page 26 26
  • Page 27 27
  • Page 28 28
  • Page 29 29
  • Page 30 30

Shimano CP-WH30 Dealer's Manual

Category
Bicycles
Type
Dealer's Manual
This manual is also suitable for

Shimano CP-WH30 is a specially designed wheelset for trekking and city touring bikes, boasting great durability and reliability. Constructed with a sturdy aluminum rim and stainless steel spokes, it can withstand the rigors of long-distance rides and urban commutes, ensuring a smooth and enjoyable cycling experience.

Ask a question and I''ll find the answer in the document

Finding information in a document is now easier with AI