Bodyworx Colorado 200 Treadmill User manual
- Type
- User manual

0
COLORADO200

1
CONTENT
CONTENT ---------------------------------------------------------------------------------------------------------------------------------1
I
MP
ORTANT SAFETY PRECAUTIONS -------------------------------------------------------------------------------------2
M
AIN TECHNICAL PARAMETERS AND PRODUCT OVERVIEW ---------------------------------------------3
ASSEMBLY INSTRUCTIONS -------------------------------------------------------------------------------------------------4-6
FOLDING & UNFOLDING INSTRUCTIONS
------------------------------------------------------------------------------7
GROUNDING METHODS
----------------------------------------------------------------------------------------------------------8
OPERATION GUIDE --------------------------------------------------------------------------------------------------------------9-13
GETTING S
TARTED GUIDE ----------------------------------------------------------------------------------------------------14
SA
FETY EXERCISES ---------------------------------------------------------------------------------------------------------------15
WARM-UP EXERCISES -----------------------------------------------------------------------------------------------------------16
MAINTENANCE INSTRUCTIONS --------------------------------------------------------------------------------------------17
BE
LT ADJUSTMENT ----------------------------------------------------------------------------------------------------------------18
EXPLODED DRAWING ------------------------------------------------------------------------------------------------------------19
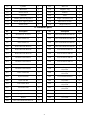
PA
RTS LIST -------------------------------------------------------------------------------------------------------------------------20-21
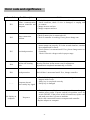
ERROR CODE AND SIGNIFICANCE----------------------------------------------------------------------------------------22

2
IMPORTANT SAFETY PRECAUTIONS
WARNING: Before starting any exercise program, consult with your physician or health professional,
especially the person who is above 35 years old people or has some health problems before. We take no
responsibility for any troubles or hurts due to above reasons. Don't power on until you finish assembly the
treadmill and covering the protected top of motor.
ATTENTIONS:
1. When using this treadmill, keep attaching the safety pull pin rope to your clothes or
belt.
2. Do
not plug anything into any
parts of this equipment as it may cause dama
ge and a serious
safety risk.
3. Position the treadmill on a clear, level surface. Do not place the treadmill on thick ca
rpet as it may interfere with proper ventilation.
Also, do not place the treadmill near water or outdoors.
4. Never start the treadmill while you are standing on the walking belt.
After turning the power on and
adjusting the speed control, there may be a pause before the walking belt begins to move, always stand
on the foot rails on the sides of the frame until the belt is moving.
5. Wear appro
priate clothi
ng wh
en exercising on the
treadmill. Do not wear long, loose fitting clothing that could become caught
in the treadmill. Always wear running or aerobic shoes with rubber soles.
6. Keep small children or pet away from the
treadmill during operation.
7. Do not exercise for 40 minutes after a meal.
8. This treadmill is designed and intended for us
ing
by adults.
Any use by people less than
adult age
needs to be
under strict supervision and at the risk of the user a
nd supervisor.
9. Always
hold the handrails
when
initially
walking
or
running on the treadmill,
until
y
ou are familiar with the use
of the treadmill.
10. The treadmill is for indoor equipment, do not use outdoor. Posit
ion the treadmill on a
clean, level surface.
Note: The treadmill is ma
de with
specialised equipment, plea
se do not
a
ttempt to modify any of the original parts.
11. The power cord of
motorized
treadmill
is specialized.
If the power cord
is damaged,
please purchase it from distributor or
contact our company directly.
12. If the treadmill should suddenly increase in
speed due t
o an
electroni
cs failure
or
the speed
inadvertently increased, the treadmill
will come to a sudden stop when the pull pin is disengaged from the console.
13. Do not use an extension cord with this product.
Keep the power cord clear
from all moving parts. Do not place the power cord
underneath the treadmill as it may become entangled and cause a
serious safety risk. Ensure that the power cord is not near any
high temperature.
14. When the treadmill is not being used, th
e power cord
should
be
unplugged
and
the
safety pull
pin removed.
Note the power cord of motorized treadmill made by special equipment, and if it is broken, please contact distributor quickly.
1
5.
The treadmill is for h
ome use only.
16.
The treadmill max
imum user weight is 130KG.
17. Please do not overuse the treadmill so can avoid any injury and do not use incorrect way for your safety.
18.
When the treadmill is not bein
g used, please keep the safety pull pin in the safety place to avoid the other use.

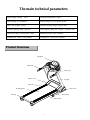
3
The main technical parameters
Input supply voltage:240V
Working temperature: 0-40 ℃
Speed range: 0.8-18KM/H Incline range:15 level Motor incline
Max. user weight: 130kg Distance display range: 0.00-99.9km
Calories display range: 000-999
Time display range: 00:00-99:59 (min : sec)
Heart rate range: 50-200 (time / min) Running surface: 480*1400mm
Product size: 1850*750*1430mm Folding size: 1100*855*1590mm
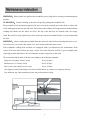
Side cover
Product Overview
Computer
Upright
Handrail
Motor cover
End cap
Running belt
Side rail
Safety key
Base frame
Main frame

4
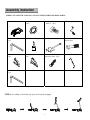
WHEN YOU OPEN
THE CARTON, YOU WILL FIND THE BELOW SPARE PARTS:
Main frame 1set
D21 Inner washer M8
8 pcs
D13 Round h
ex bolt
M8*15 4pcs
C13 Safety Key 1set
D3 Allen wrench 5MM,
1 pc
B18 Silicon oil 1pc D1 Screw driver 1 pc
D16 Round h
ex bolt
M8*45 4pcs
B11 Left Side cover
1 pc
B11 Right Si
de cover
1 pc
D48 Cross self-tapping
bolt ST4.2X1
9, 4 pcs
C19 MP3 lin
e 1 pc
D2 Allen wrench 6MM,
1 pc
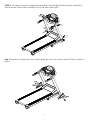
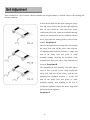
STEP 2: According to the following steps to lift up the uprights.

5
STEP 3: According to the picture, tighten the bottom frame with bolt M8*45(D16) and inner washer(D17).
Then locked the console frame with M8*15 (D13) and inner washer (D17).
D16
D17
D13
D17
D13
D16
D17
D13
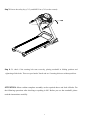
Step 4: Attach the left/right side covers (B11L)&(B11R) to the base frame with bolt ST4.2*19 (D48) as
picture.

6
Step 5: Put on the safety key (C13), and MP3 Line (C19) on the console.
C13
Step 6: To check if the running belt runs correctly, placing treadmill in folding position and
tightening all the bolts. Then set speed under 3km/h and see if running belt runs without problem.
ATTENTION: Must confirm complete assembly as the required above and lock all bolts. Do
the following operations after checking everything is OK. Before you use the treadmill, please
read the instructions carefully.

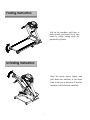
7
Lift up the machine and force to
pull up until you heard "click" that
made by safety casing stuck the
pneumatic cylinder.
Kick the safety sleeve lightly and
pull down the machine at the same
time as the arrow direction. Then the
machine will fall down smoothly.

8
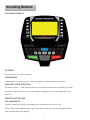
This product must be grounded. If it should malfunction or breakdown, grounding provides a path of
least resistance for electric current to reduce the risk of electric shock. This product is equipped with
a cord having an equipment-grounding conductor and a grounding plug. The plug must be plugged
into an appropriate outlet that is properly installed and grounded in accordance with all local codes
and ordinances.
DANGER – Improper connection of the equipment-grounding conductor can result in a risk of
electric shock. Check with a qualified electrician or serviceman if you are in doubt as to whether the
product is properly grounded. Do not modify the plug provided with the product – if it will not fit the
outlet, Please find a proper outlet installed by a qualified electrician.
This product is for use on a nominal 240V circuit and has a grounding plug. Make sure that the
product is connected to an outlet having the same configuration as the plug. No adapter should be
used with this product.

9
1.1 WINDOW DISPLAY
1.2. START
Normal start after 5 seconds countdown
1.3 PROGRAM
1 manual mode,15 re-set programs, 1 body fat program,3 countdown function and 3 users.
1.4 SAFETY LOCK FUNCTION
The window shows"---" when take away the safety lock and the treadmill will stop quickly with "didi"
alarm noise. And put the safety lock on, the computer will display for 2 seconds and the date count
down to “0”
1.5 BUTTON FUNCTION
1.5.1 START/STOP
“START”--When the treadmill is not running, press this button to start, speed is “0.8”
“STOP”--When the treadmill is running, press this button to stop, then set program default and then
return to manual mode after stopped.

10
1.5.2 “PROGRAM” BUTTON
When the treadmill is not running, press this button can circle choose from manual mode to pre-set
mode P1-P12, body fat program, 3 countdown function, U1-U3.
1.5.3 “MODE” BUTTON
When the treadmill is not running, press this button to choose countdown modes:”H-1”,”H-2”,”H-3”,
“H-1” is the time countdown mode, and “H-2” is the distance countdown mode,“H-3” is the calorie
countdown mode; press the “SPEED+/-” or “INCLINE+/-“button to adjust the data. After that, press the
“START” button to start this treadmill.
1.5.4“SPEED +/-“BUTTON
SPEED +/–, Adjust speed when treadmill start, the increment is 0.1km/time in kilometer. Press the button
more than 2 seconds, and it will be up or down automatically.
1.5.5 SPEED QUICK BUTTON
Press the speed quick button 3km/h,6km/h,9km/h,12km/h to adjust the speed directly when the treadmill is running.
1.5.6 “INCLINE+/-” BUTTON
INCLINE +/ –, Adjust incline when treadmill start; the increment is 1 level/time. Press the button
more than 2 seconds, and it will be up or down automatically
1.5.7 INCLINE QUICK BUTTON
Press the incline quick button 3,6,9,12 to adjust the incline directly when the treadmill is running
1.6 DISPLAY FUNCTION
1.6.1 SPEED
Display running speed
1.6.2 TIME
Display the running time or countdown time
1.6.3 DISTANCE
Display the running total distance or distance countdown.
1.6.4 CALORIE
Display the calorie or calorie countdown
1.6.5 INCLINE
Display the incline
1.6.6 PULSE
Display pulse data

11
1.6.7 ALL WINDOW DISPLAY DATA RANGE
TIME:0:00 – 99.59(MIN)
DISTANCE: 0.00 – 99.9(KM)
CALORIES: 0.0 – 999 (C)
SPEED:0.8-18.0(km/h)
PULSE: 50 – 200 (BPM)
INCLINE:0 – 15
1.7 PULSE FUNCTION
When the treadmill is running, hold the hand pulse about 5 seconds, it will display pulse data. The
pulse data range is 50-200 times/ minute. It has heart-shaped graphics when testing pulse. This
data is only for reference, can not be as medical data.
1.8 PROGRAM EXERCISE CHART
TIME
MODE
SET TIME / 16= EVERY GRADE TIME
1 2 3 4 5 6 7 8 9 10 11 12 13 14 15 16
P1
SPEED
2 5 5 5 10 10 5 5 5 3 3 2 5 5 3 2
INCLINE
0
0 1 1 1 1 2 2 2 2 3 3 3 2 2 0
P2
SPEED
2 2 7 2 2 7 7 12 4 4 12 4 4 12 4 2
INCLINE
0 1 2 2 3 3 2 2 3 3 2 2 3 2 2 0
P3
SPEED
2 4 9 9 4 4 8 8 10 10 12 4 4 8 4 2
INCLINE
0 1 2 3 4 5 4 5 4 2 1 2 3 2 1 0
P4
SPEED
2 6 6 6 12 12 12 12 6 6 3 3 3 5 5 2
INCLINE
0 1 2 3 4 5 6 7 6 6 5 4 3 2 1 0
P5
SPEED
2 4 6 12 12 12 3 3 3 3 12 12 12 6 4 2
INCLINE
0 2 4 6 4 2 1 0 1 1 2 2 2 2 3 0
P6
SPEED
2 4 5 5 6 6 8 8 6 6 8 8 6 9 6 2
INCLINE
0 1 3 4 4 3 3 1 2 1 2 1 2 1 2 0
P7
SPEED
2 7 7 9 9 4 4 12 12 4 4 8 8 4 4 2
INCLINE
0 1 1 2 2 3 3 4 4 3 3 2 2 1 1 0
P8
SPEED
2 2 6 6 6 8 9 10 11 12 9 5 5 5 3 2
INCLINE
0 1 2 4 2 1 2 4 2 1 2 4 2 1 2 0
P9
SPEED
2 4 8 10 2 4 8 10 2 4 10 2 4 10 4 2
INCLINE
0 1 2 3 4 5 6 7 8 9 8 6 4 2 1 0
P10
SPEED
2 5 6 7 8 9 10 11 10 9 8 6 7 5 4 2
INCLINE
0 1 2 4 6 6 6 4 4 4 2 2 2 1 1 0
P11
SPEED
2 5 6 7 9 9 6 9 6 9 6 10 6 10 7 2
INCLINE
0
2 2 2 3 3 3 4 4 4 5 5 5 4 4 0
P12
SPEED
2 6 8 10 8 6 4 6 8 12 8 6 8 12 12 2
INCLINE
0 1 1 3 3 5 5 7 7 5 5 3 3 1 1 0
P13
SPEED
2 12 4 12 4 12 4 12 4 12 4 12 4 12 4 2
INCLINE
0 8 10 13 4 8 10 13 4 8 10 13 4 8 10 0
P14
SPEED
2 8 10 12 4 8 10 12 4 8 10 12 4 8 10 2
INCLINE
0 8 12 13 4 8 12 13 4 8 12 13 4 8 12 0

12
P15
SPEED
2 12 10 8 12 12 10 8 12 12 10 8 12 12 10 2
INCLINE
0 3 4 5 6 8 7 8 8 7 7 6 5 4 3 0
1.9 Manual model operation
1.9.1 Press start key, time count down 5 seconds, then treadmill will start to work with initial speed1km/h
1.9.2 Press speed +/-, you can adjust the speed
1.9.3 Press incline+/-, you can adjust the incline
1.9.4 Press stop, you can stop treadmill at working state
1.9.5 Press quick speed key, you can quickly adjust the speed you want
1.9.6 Press quick incline key, you can quickly adjust the incline you want
1.10 3 COUNTDOWN FUNCTION PARAMETER DATA
Countdown time initial setting 30:00 minutes,setting range 5:00---99:00 minutes , each step 1:00.
Countdown calorie initial setting 50therm, setting range 10---990 term,each step 10.
Countdown distance initial setting 1.0km,setting range 0.5---99.9 km,each step 0.1
Cycle switch order is: manual, time, distance, calories.
1.11 BODY TESTER(FAT)
At the beginning state, press “ PROGRAM” continually to enter “FAT“ body fat test,window display
“FAT”. Press “MODE” to enter (F1 SEX, F2 AGE, F3 HEIGHT, F4 WEIGHT). Press “SPEED +”,
“SPEED -” to set. After setting, the computer will display F5 and grasp the hand pulse, the window
will display your body quality index.
The body quality index is to test the relation between height and weight not the body scale.
The body FAT suits for any male and female to adjust the weight according together with other
body quality index. The ideal FAT should be between 20-25, if under 19, it means too thin. If
between 25 and 29, it means overweight, if over 30, it means obesity. (The data is just for
reference and can not be as medicinal data)
01 Sex 01 Male 02 Female
02 Age 10------99
03 Height 100----200
04 Weight 20-----150
05 FAT ≤19 Under weight
FAT = (20---25) Normal weight
FAT = (25---29) Over weight
FAT ≥30 Obesity

13
1.12 User Program
Besides 12 pre-set programs, there have 3 user-defined programs: U1, U2 and U3 Each user program has 10
segments. The user can set the desired speed and incline .Press "PROGRAM" button to choose U1 ,U2 or
U3,press "MODE" button to enter setting condition, then set the time of the first segment. Press "SPEED+"
and "SPEED-" to set speed. Press” INCLINE+” and “INCLINE-“ to set incline. Press "MODE" button and
your
choice will be set. The next workout segment will flash, go through the same setup as you completed
with segment one. You must complete all 10 segments and then your user program is ready to use. Press
“STOP” key to return to last segment setting any time.
1.13 OTHERS
1.13.1 The system will enter into power saving mode automatically if there is no any action within 10
minutes under IDLE MODE and there is no display and backlit on the computer. Press any key to
resume the system.
1.13.2 Countdown time, countdown calorie and countdown distance, you just can set one of them at
one time, press last item to set running, the setting parameter is countdown, others display normal data
1.13.3 MP3 audio function: Insert the MP3 line in the input hole of the right side in the computer.
1.13.4 Bluetooth music function: Press the Bluetooth key till the display show Bluetooth icon, turn on
the Bluetooth of your device to match with computer and play the music, user can increase or decrease
the volume from the device, and also can turn back to last song or jump to next song.
1.13.5 On display – Distance covered, Calories burnt, Pulse reading, Body Fat test shown is only for
indicative purpose and may vary from machine to machine. Do not compare these readings to a
medical instrument.

14
PREPARE
If
you are around 35 years old, or have health problem, even this is your first time to do fitness exercise, please consult
doctor or professional before use it.
Before you exercise, please stand on the side to learn how to operate, such as start, stop and speed adjustment. After that
stand on the plastic deck of the treadmill board, catch hold of the handrail, start by 1.6--3.2 km/h low speed, stand
straight, look forward, one foot try to do few times, then stand on the belt to do exercise. After adapting, you can
adjust the speed to 3--5 km/h and keep doing about 10 minutes, then stop.
EXERCISE
Start exercise by walking slowly. Remember it is for your health and if you feel uncomfortable stop exercising immediately
and seek medical advice.
AMOUNT OF EXERCISE
SHORTCUT——The best way to save time is do 15-20 minutes exercise.
If you are finding that it is difficult to increase your exercise intensity by increasing the speed, you can alternatively chose
to increase the incline slowly which will also increase the exercise intensity for you.
EXERCISE FREQUENCY
It is better to make a weekly time schedule for your exercise routine to ensure it forms parts of your busy schedule.

15
Please consult professional staff before starting an exercise program. They can help recommend
the exercise rate / intensity and time according to your age and health condition. When running,
if you feel chest tightness or chest pain, irregular Heartbeats, short of breath, dizziness or other
unwell, please stop immediately! And consult professional before you want continually to do
exercise. If you often use treadmill, you can choose normal walk speed or jog speed.
If you have no experience or can't make sure the best testing speed, you can reference below standard:
Speed 1-3.0 km weak constitution people.
Speed 3.0-4.5 km sedentary or not often exercise people.
Speed 4.5-6.0 km walking quickly people.
Speed 6.0-7.5 km fast walk people.
Speed 7.5-9.0 km jogger.
Speed 9.0-12.0 km intermediate speed runner.
More than 12.0 km excellent runner.
ATTENTION:It is suitable for walker to choose less than or equal to 6 km speed.

16
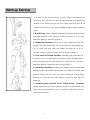
It is better to do some warm-up exercise. Warm the muscle easy
stretch, so use 5-10 mins to warm-up. Then stop and according below
method to do stretch exercise for five times, and each foot do 10
seconds or more every time. After running, do those stretch exercises
again.
1. Reach Down:Knees slightly bent and body slowly bent forward,
back and shoulders relax, trying to touch toes. Keep 10-15 seconds
and relax. Repeat 3 times(See picture l).
2. Hamstrings Stretches: Sitting on a clean cushion, put one leg
straight, the other inward and close to the inside of the straight leg.
Try to touch your toes with your hands. Keeping for 10 to 15
seconds, and relax. Repeat 3 times for each leg(See picture 2).
3. Crus and Feet Tendon Stretches: Standing with two hands on
the wall or tree, one leg behind. Keeping your legs straight and the
heel on the ground, tilt to the wall or tree. Keep 10 to 15 seconds,
and relax. Repeat 3 times for each leg (See picture 3).
4. Quadriceps Stretches: Keeping your balance with your left hand
holding on the wall or table, then stretch your right heel toward your
buttocks slowly, until you feel very tense in the front of your thigh.
Keep10 to 15 seconds, and relax. Repeat 3 times for each leg (See
picture 4).
5. Sartorius (Inner Muscles of the Thigh Muscle Stretches:
Sitting down with your soles opposite and knees outward Pull your
feet toward your groin Keep 10 to 15 seconds,and relax. Repeat 3
times (See picture 5).

17
WARNING:Please make sure pull out the treadmill's power plug before cleaning or maintaining the
product.
CLEANSING:General cleaning or the unit will greatly prolong the treadmill's life.
Keep treadmill clean by dusting regularly. Be sure to clean the exposed part of the deck on either side
of the walking belt and also the side rails. This reduces the buildup of foreign material underneath the
walking belt. Make sure the shoes are clean. The top of the belt may be cleaned with a wet soapy
cloth. Be careful to keep liquid away from inside the motorized treadmill frame or from underneath
the belt.
WARNING:Always unplug the treadmill from the electrical outlet before removing the motor cover.
At least once a year remove the motor cover and vacuum under the motor cover.
This treadmill's walking belt and deck are equipped with a pre-lubricated, low maintenance deck
system. The belt/ deck friction may play a major role in the function and life of your treadmill, thus
requiring periodic lubrication. We recommend a periodic inspection of the deck.
We recommend lubrication of the deck according to the following timetable:
Light user (less than 3 hours/ week) Every 60 days
Medium user (3-5 hours/ week) Every 45 days
Heavy user (more than 5 hours/ week) Every 30 days
We suggest you buy lubricating oil from local distributors or contact our company directly.
Pay attention, any other maintains please ask professionals for help.

18
Place treadmill on a level surface. Make treadmill run at approximately 6-8 km/h, observe the running belt
deviate condition.
I
f the belt has drifted to the right, unplug the safety
lock and power switch, and turn the right adjusting
bolt 1/4 turn clockwise, then insert the power
switch and safety lock, make the treadmill running,
observe the running belt deviate condition. Repeat
above steps until the running belt be placed in the
middle. See picture A
Once the treadmill belt swerving to the left, unplug
the safety lock, turn off the power, then with the
left adjusting bolt clockwise rotation 1 / 4 laps, and
turn on the safety lock and power to make
treadmill running, checking the deviation of the
treadmill belt. Repeat the above steps until the belt
centered. See picture B
The treadmill belt will gradually relax after above
steps or after a period of time using, unplug the
safety lock, and turn off the power, with the two
adjusting bolt clockwise rotation 1 / 4 laps, and
turn on the safety lock and power to make
treadmill running, then standing on the belt to
confirm the tightness. Repeat the above steps until
the belt moderate tightness.
See picture C

19
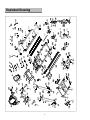
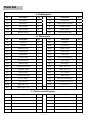
B27
B20
B4
B4
B3
B3
B6
B6
D57
D57
A2
B8
C35
D28
D28
D18
B21
D4
D21
C2
C5
D60
D36
D60
D38
D38
D60
D60
D36
D55
D55
D45
D48
D48
B44
Page is loading ...
Page is loading ...
Page is loading ...
Page is loading ...
-
 1
1
-
 2
2
-
 3
3
-
 4
4
-
 5
5
-
 6
6
-
 7
7
-
 8
8
-
 9
9
-
 10
10
-
 11
11
-
 12
12
-
 13
13
-
 14
14
-
 15
15
-
 16
16
-
 17
17
-
 18
18
-
 19
19
-
 20
20
-
 21
21
-
 22
22
-
 23
23
-
 24
24


Bodyworx Colorado 200 Treadmill User manual
- Type
- User manual
Ask a question and I''ll find the answer in the document
Finding information in a document is now easier with AI
Related papers
Other documents
-
 Freeform F60 Operating Instructions Manual
-
LifeSpan Lift Owner's manual
-
New Balance 1200 User manual
-
-
Fitness Quest 1200 User manual
-
-
 Healthstream Avenger Owner's manual
-
 thdstatic Single function Motorized Treadmill User manual
-
Insportline inCondi T40i User manual
-
Trojan Elite 2000 Owner's manual


