
SONY
DVD Recorder
\
\
\
\
\
\
2-672-839-11 (1)
\
\
\
Operating Instructions
RDR-GX330
BVD + ReWritable
O TM
© 2006 Sony Corporation

WARNING
To reduce tile risk of lirc or electric
shock, do not expose Ibis apparatus
to rain or moislure.
To avoid electrical shock, do not
open tile cabinet. RelPr servicing to
qualified personnel only.
The AC power cord must be
changed only at a qualified smwice
shop.
CAUTION
The use of optical insmmlents with
this product will increase eye
hazard. As the lair beanl used in
tiffs DVD recorder is harnlful to
eyes. do no[ attelnpt tO disassemble
the cabinet.
Relcr selwicing to qualified
personnel only.
This label is located on the laser
protective housing inside tile
enclosure.
This sylnbol is
illtended to alert the
u_r lo file presence
OI uninsulated
"dangerous voltage"
within file product's
enclosure that nlay be
of sullicient
magnitude to
constitute a ri_k of
electric sbock to
persons.
This sylnbol is
illlended to alert file
tl_l" [O tile presence
ol illlporlalll
operating and
maintenance
(sel vicing)
instructions ill file
lilerature
acconlpanying the
appliance.
For customers in the U.S.A
Owner's Record
"['h_'mo(kq and selial numbms at<'
Io(atcd al the wm of Ihe unit
Record the' serial numbm in the spae
l_lOvkk'd bcqo_ Relci Io Ihem _ h(qlcwc'l
you clll upon youi Sony dcak'l
regarding Ihis produ_l
Mu&q No RI)R C;X330
Serial No
CAUTION
You are CiUltioned that any
changes or nlodifications not
expressly approved in this nlanual
couM xoid your aufllority to
operate tills equipnlenl.
_r_ Note
This equipmenl has been tesled
and round to comply with tile
limits lor a Class B digital device.
pursuam to Part 15 of file FCC
Rules. These linlits are designed iv)
provide reasonable protection
against harnllul interlPrence ill a
residential installation. Ttds
equiplnenl generales, uses, and call
radiale radio tiequency energy
and. if not inslalled and used in
accordance with the instl/icliolls>
may cause ]larllll/ll inlerlcrence to
radio colnnlunications. However.
them is no guaranlee thal
interlPrcnce will not occur in a
particular installation. 11 this
equiplnem does cause harmlul
intcrllrmnce lo radio or television
reception, which can be
detcmlined by turning the
equipment oil and on. tile user is
encouraged to try to correct file
interl_rcnce by one or lnore of tile
lollowing measures:
Reorient or relocate the
receiving antenna.
Increase file separatk)n between
the equipment and receiver.
Connect tile equipnlent into an
oul]et on a circuit dillcrent flonl
thai lo which tbe receiver is
connected.
Consult the dealer or an
experienced radio/TV technician
lor Ilelp.
Precaution
hlstall this systenl so tllal tile AC
power cord can be unplugged h'om
tile wall socket itnnlediately in lhe
event (if trouble.

Precautions
This equipment has been tested
and found to comply with the
limits set out in the EMC
Directive using a connection
cable shorter than 3 meters.
On safety
Should any solid object or liquid
fall into the cabinet, unplug the
recorder and have it checked by
qualified personnel bel\m:
operating it any limher.
Onpowersources
• The recorder is not
disconnected fromthe AC
power soulve as long as it is
connected to the wall outlet,
even if the recorder itself has
been turned off.
• If you are not going to use the
recorder R)ra king time, be
sure to disconnect the recorder
from the wall outlet. To
disconnect the AC power cor&
grasp the plug itself: never pull
the cord.
Onplacement
• Place tile recorder in a location
with adequate ventilation to
prevent heat build-up ill the
recorder.
• Do not place the recorder on a
soft surface such as a rug that
might block the ventilation
holes.
• Do not place the recorder in a
confined space such as a
bookshelf or similar unit.
• Do not place Ihe recorder in a
location near helt sources_ or
in a place subject to direct
sunlight, excessive dust, or
mechanical shock.
• Do not placetherecorderin an
inclined position. It is
designed to be operated in a
horizontal position only.
• Keep the recorder and discs
away from equipment with
strong magnets, such as
microwave ovens_or large
loudspeakers.
• Do not place heavy objects on
the recorder.
• To prevent fire or shock
hazard, do not place objects
filled with liquids, such as
vases, on the apparatus.
Onrecording
Make trial recordings before
making the actual recording.
Oncompensationforlost
recordings
Sony is not liable and _ill not
compensate for any lost
recordings or relevant losses,
inchlding when recordings are
not nlade due to reasons
including recorder failure, or
when the contents of a recording
are lost or damaged as a result of
recorder failure or repair
underlaken to the recorder. Sony
will not restore, recover, or
replicate the recorded contents
under ally circunlstances.
Copyrights
• Teh:vision programs, films,
video tapes, discs, and other
materials may be copyrighted.
UnauthoriTcd recording of
such material may be contrm3
to the provisions of the
copyright laws. Also, use of
this recorder with cable
television transmisskm may
require aulhorization from the
cable television transmitter
and/or program owner.
• This product incorporates
copyright protection
technology that is protected by
U.S. patents and other
intellectual property rights.
Use of this copyright
protection technology must be
authorized by Macrovisiom
and is intended lbr home and
other limited viewing uses
only unless otherwise
authorized by M ,crovision.
Reverse engineering or
disassembly is prohibited.
Copyguardfunction
Since the recorder has acopy
guard limction, programs
received through an external
tuner (not supplied) may contain
copy protection signals (copy
guard Rmction) and as such may
not be recordable, depending on
the type of signah
IMPORTANTNOTICE
Caution: This recorder is
capable of holding a still
video image or oil-screen
display image on your
television screen
indefinitely. If you leave the
still video image or on-
screen display image
displayed on your TV for an
extended period of time you
risk permanent damage to
your television screen.
Plasma display panels and
projection televisions are
especially susceptible to this.
If you have ally questions or
problems concerning your
recorder, please consuh your
nearest Sony dealer.
,,_continued 3

Important Safety
Instructions
1) Read these instructions.
2) Keep these instructions.
3) Heed all warnings.
4) Follow all instructions.
5) Do not use this apparatus
near water.
6) Clean only with dry cloth.
7) Do not block any ventilation
openings. InstaU in
accordance with the
nlanulactlJrer_s instructions.
8) Do not install near any heat
solJrces such ts radiators,
heat registers, stoves, or
other apparatus (including
amplifiers) that produce
heat.
9) Do not defeat the safety
purpose of the polarized or
grounding-type plug. A
polarized plug has two
blades with one wider than
the olher. A grounding type
plug has two blades and a
third grounding prong. The
wide blade or the third prong
arc provided for your safety.
lfthe provided plug does not
fit into your outlet, consult
an electrician for
replacement of the obsolete
outlet.
10) Protect the po_er cord from
being wdked on or pinched
particularly at plugs,
convenience receptacles,
and the point where they exit
from the apparatus.
11) Only use attachments/
accessories specified by the
n/anlJlactlJrer.
12) Use only with the cart, stand,
tripod, bracket, or table
specified by the
manufacturer, or sold with
the ippar itus. When a cart is
used, use caution when
moving the cart/apparatus
combination to avoid injury
from tip-over.
14)Rell.r all servicing to
qualified service personneh
Servicing is required when
the apparatus has been
damaged in any way, such as
power-supply cord or plug is
damaged, liquid has been
spilled or ol_iects have fallen
into the apparatus, Ihe
apparatus has been exposed
to rain or moisture, does not
operate normally, or has
been dropped.
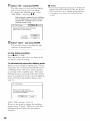
About this manual
• In this manuah disc is used
as a general reference for the
DVDs or CDs unless
otherwise specified by the text
or illustrations.
• Icons, such as _, listed
at the top of each exphmation
indicate what kind of media
can be used with the filnction
being explained.
• Instructions in this manual
describe the controls on the
rclIlote. You call also use the
controls on the recorder if they
have the same or similar
names as those on the remote.
• The on-screen display
illustrations used in this
nlanual may not match the
graphics displayed on your TV
_;creell.
• The expl mations regarding
DVDs in Ihis manual refer to
DVDs created onthisrecorder.
The explanations do not apply
to DVDs that are created on
other recorders and played
back on this recorder.
13) Unplug this apparatus during
lightning storms or when
unused for long periods of
time.

Table of Contents
WARNING ................................................... 2
Precautions ................................................... 3
Quick Guide to Disc Types ....................................... 8
Recordable and playable discs ................................. 8
Playable discs ............................................. 10
Hookupsand Settings ................................ 12
Hooking Up the Recorder ....................................... 12
Step 1: Connecting the Antenna Cable ............................ 12
A: Cable box or satellite receiver with a video/audio output .......... 13
B: Cable box with an antenna output only ........................ 14
C: Cable without cable box, or antenna only (no cable TV) .......... 15
Step 2: Connecting the Video Cords .............................. 16
Step 3: Connecting the Audio Cords .............................. 18
Step 4: Connecting the AC Power Cord ............................ 19
Step 5: Preparing the Remote ................................... 20
Controlling TVs with the remote ............................... 20
If you have a Sony DVD player or more than one
Sony DVD recorder ...................................... 21
Changing channels of the recorder using the remote ............... 22
Step 6: Easy Setup ............................................ 23
Connecting a VCR or Similar Device .............................. 24
Connecting to the LINE 1 IN jacks .............................. 24
Connecting to the LINE 2 IN jacks on the front panel ............... 25
Connecting to a Satellite or Digital Tuner ........................... 26
1. Inserting a Disc ............................................. 27
2. Recording a Program ........................................ 27
Checking the disc status while recording ........................ 28
3. Playing the Recorded Program (Title List) ........................ 28
4. Displaying the Playing/Remaining Time and Play Information ......... 30
Checking the playing/remaining time ............................ 31
Checking the remaining disc space ............................. 32
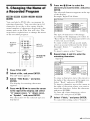
5. Changing the Name of a Recorded Program ...................... 33
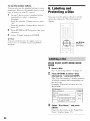
6. Labeling and Protecting a Disc ................................. 34
Labeling a disc ............................................. 34
Protecting a disc ........................................... 35
7. Playing the Disc on Other DVD Equipment (Finalize) ............... 35
Finalizing the disc using A OPEN/CLOSE button .................. 36
Finalizing the disc using "Disc Information" display ................. 36
Unfinalizing a disc .......................................... 37
8. Reformatting a disc .......................................... 37
•._continued 5

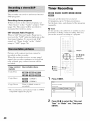
Timer Recording .................................... 39
Before Recording ............................................. 39
Recording mode ........................................... 39
Recording a stereo/SAP program .............................. 40
Unrecordable pictures ....................................... 40
Timer Recording .............................................. 40
Using the Quick Timer function ................................ 42
Adjusting the recording picture quality and size ................... 42
Creating chapters in a title ................................... 43
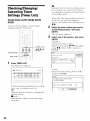
Checking/Changing/Canceling Timer Settings (Timer List) ............. 44
Changing the priority of overlapped settings ...................... 4,5
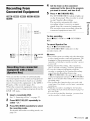
Recording From Connected Equipment ............................ 47
Recording from connected equipment with a timer (Synchro Rec) ..... 47
Recording from connected equipment without a timer .............. 48
Playback ......................................... 49
Playing ..................................................... 49
Playback options ........................................... ,51
Adjusting the picture quality .................................. 52
Adjusting the delay between the picture and sound (AV SYNC) ...... 53
Playing from the beginning of the program you are recording
(Chasing Playback) ...................................... 53
Playing a previous recording while making another
(Simultaneous Rec and Play) .............................. 54
Searching for a Title/Chapter/Track, etc ............................ 54
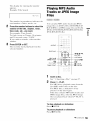
Playing MP3 Audio Tracks or JPEG Image Files ..................... 5,5
About MP3 audio tracks and JPEG image files ................... 56
MP3 audio tracks or JPEG image files that the recorder can play ..... 57
About playback order of albums, tracks, and files .................. 57
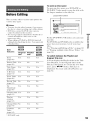
Erasing and Editing .................................. 59
Before Editing ................................................ 59
Erasing and Editing a Title ...................................... 60
Erasing multiple titles (Erase Titles) ............................ 60
Erasing a section of a title (A-B Erase) .......................... 61
Creating chapters manually .................................. 62
Creating and Editing a Playlist ................................... 62
Moving a Playlist title (Change Order) .......................... 64
Combining multiple Playlist titles (Combine Titles) ................. 64
Dividing a Piaylist title (Divide Title) ............................ 65
DV/Digital8 Dubbing .................................. 66
Before DV/Digital8 Dubbing ..................................... 66
Preparing for DV/Digital8 dubbing .............................. 66
Recording an Entire DV Format Tape (One Touch Dubbing) ........... 68
Program Edit ................................................ 68

Settings and Adjustments .............................. 71
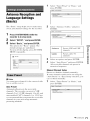
Antenna Reception and Language Settings (Basic) ................... 71
Tuner Preset .............................................. 71
Clock .................................................... 72
OSD (On-Screen Display) .................................... 73
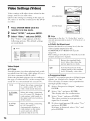
Video Settings (Video) ......................................... 74
Audio Settings (Audio) ......................................... 76
Recording Settings (Recording) .................................. 78
Disc Settings (DVD) ........................................... 79
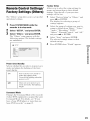
Remote Control Settings/Factory Settings (Others) ................... 81
Easy Setup (Resetting the Recorder) .............................. 82
Additional Information ................................ 83
Troubleshooting .............................................. 83
Self-diagnosis Function (When letters/numbers appear in the display) .... 88
Notes About This Recorder ..................................... 88
Specifications ................................................ 89
About i.LINK ................................................. 90
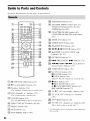
Guide to Parts and Controls ..................................... 92
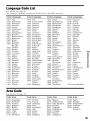
Language Code List ........................................... 95
Area Code .................................................. 95
Index ....................................................... 96

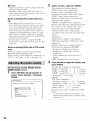
QuickGuideto DiscTypes
o
RW
OVD+R
OVD+R OL
Automatically
fl_rmatted in
+VR mode
(DVD+RW
VIDEO)
Formal in VR
mode
(page 27)
Formal ill
Video mode
/page 27)
Automatically
formatted in
+VR mode
(DVD+R
VIDEO)
Format in VR
mode
(page 27)* 1
Formatting is
performed
using the "Disc
Information"
display.
Aulomatically
for nmtled in
VMeo mode
Playable on DVD+RW
compatible players
(aulomalically finalized)
Playable only on VR mode
compatible players
(finalizalion unnecessary)
Playable on mosl DVD
players (firmlizalion
necessary) (page 35)
Playable on mosl DVD
players (firmlizalion
necessary) (page 35)
Playable only on DVD-R in
VR mode compatible
players (finalization
necessary) (page 35)
Playable on mosl DVD
players (finalizalion
necessary) (page 35)

Usablediscversions(asofMarch2006)
• 8x-speed or slower DVD+RWs
• 6x-speed or slower DVD-RWs (Ver. 1.1,
Ver. 1.2 with CPRM '2)
• 16x-speed or slower DVD+Rs
• 16x-speed or slower DVD-Rs (Ver.2.0,
Vet.2.1 with CPRM '2)
• 8x-speed or slower DVD+R DL (Double
Layer) discs
"DVD+RW," "DVD-RW," "DVD+R," "DVD+R
DLj' and "DVD-R" arc trademarks.
*J When an unformatted DVD-R is inserted into
this recorder, it is automatically fornmtted in
Video mode. To format a new DVD-R in VR
mode, format using the "Disc Information"
display (page 27).
2 CPRM (Content Protection for Recordable
Media) is a coding technology that protects
copyrights for images.
Discs that cannot be recorded on
• 8 cm discs
• DVD-R DL (Dual Layer) discs
•._continued 9

Discs such as movies that can be
purchased or rented
This recorder also recognizes DVD-R
Dual Layer (Video mode) discs as DVD
Video compatible discs.
D_ VIDEO CDs or CD-Rs/CD-RWs in
VIDEO CD/Super VIDEO CD formal
o,o,, ,Aoo,o m ,sicCDIorm =
"DVD VIDEO" and "CD" are Irademarks.
Discs that cannot be played
• PHOTO CDs
• CD-ROMs/CD-Rs/CD-RWs that are
recorded in a l\)rmat difli_rent fi'om the
tkwmats mentioned in the table above.
• Dala part of CD-Extras
• DVD-ROMs/DVD+RWs/DVD-RWs/
DVD+Rs/DVD-Rs that do not contain
DVD Video or JPEG image files.
• DVD Audio discs
• DVD-RAMs
• HD layer on Super Audio CDs
• DVD VIDEOs with a dift_rent region code
(page 1 1).
DVD+RWs/DVD+Rs/DVD-RWs/
DVD_Rs/DVD-ROMs containing
JPEG image files
CD-ROMs/CD_R,,/CD_RWs
containing either MP3 audio tracks or
JPEG image files
8 cm DVD+RW. DVD_RW. and
DVD_R recorded with a DVD video
camera
(Still images recorded with a DVD
video camera cannot be played.)
• DVDs that were recorded on a diftizrent
recorder and not correctly finalized.
• A disc recorded in a color system other than
NTSC, such as PAL
10

Maximum recordable number of titles
Disc Number of titles*
DVD-RW/DVD-R 99
DVD+RW/DVD+R 49
DVD+R DL 49
* The maximum length lbr one title is eight hours.
Note on playback operations ofDVD
VIDEOs/VIDEOCDs
Snme playhack operations of DVD VIDEOs/
VIDEO CDs may be h*tentionally set by
snftware producers. Since this recorder plays
DVD VIDEOs/V1DEO CDs according to the
disc contents the software producers
designed, some playback features may not be
available. See the instmctinns supplied with
the DVD VIDEOs/VIDEO CDs.
Regioncode(DVDVIDEOonly)
Your recorder has a region code printed on
the rear of tire unit and will only play DVD
VIDEOs (playback only) labeled with
identical region codes. This system is used to
protect copyrights.
DVD VIDEOs labeled _ will also play
on
tiffs recorder.
lfyou try to play any other DVD VIDEO, the
message "Playback prohibited by region
code." will appear nn the TV screen.
Depending on the DVD VIDEO. no region
code indication may be labeled even though
playing the DVD VIDEO is prohibited by
area restrictions.
Y
Region code
Musicdiscs encodedwith copyright
protection technologies
This product is designed to play back discs
that conR)rm to tireCompact Disc (CD)
standard.
Recently, various music discs encoded with
copyright protection teclmologies are being
marketed by some record companies. Please
be aware that among tbnse discs, there are
some thaido not confnrm to the CD standard
and may not be playable by this product.
NoteonDualDiscs
A DualDisc is a two sided disc product wbicll
mates DVD recorded material on one side
with digital audit) material nn the nther side.
However, since the audit) material side does
not conform to the Compact Disc (CD)
standard, playback nn this product is not
guaranteed.
Notes
• Some DVD+RWs/DVD+Rs, DVD-RWs/DVD-
Rs, or CD-RWs/CD-Rs cannet be played on this
recerder due to the recording quality or physical
condition of the disc, or the characteristics of the
recerding device md authoring seftware. The
disc will net play if it has not been cerrcctly
finalized. Fer mere infennation, seethe eperating
instructions for the recerding &.vice.
• Yeu cannot mix VR mode and Video mode en the
same DVD-RW. To change the disc's retreat,
refermat the disc (page 37). Note that the disc's
contents will be erased afler rclbrmatting.
• You cannet shorten the time required l_)r
receMing even with high-speed discs.
• It is recommended that yeu use discs _ith "Fer
Video" printed on their packaging.
• You cannot add new recordings to DVD+Rs,
DVD-Rs, or DVD-RWs (Video mode) that
contain recerdings made on ether DVD
equipment.
• In some cases, yeu may net be able to add new
recerdings to DVD+RWs that contain recordings
mlde en ether DVD equipment. If you de add a
new recerding, note that this recerder will rex_rite
the DVD menu.
• You cannot edit recerdings en DVD+RWs,
DVD-RWs (Vide() mode), DVD+Rs, orDVD-Rs
that ,re made on ether DVD equipment.
• lfthe disc contains PC data unrecognizable by
this recerder, Ihe data may be erased.
• Veil m;ly not be ,Die te recerd on some
recerdable discs, depending on the disc.
11

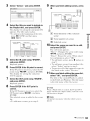
HookingUpthe Recorder
Follow steps 1 through 6 to hook up and adjust the settings of tile recorder. Do not connect the
AC power cord until you reach "Step 4: Connecting the AC Power Cord" on page 19.
Notes
• See "Specifications" (page 89) for alist of supplied accessories.
• Plug in cords securely to prevent unwanted noise.
• Refer to the instructions supplied with the components to be connected.
• You cannot connect this recorder to a TV that does not have a video input jack.
• Be sure to disconnect the AC power cord of each component before connecting.
Step1: Connectingthe AntennaCable
Select one of the l\_llowing antenna hookups.
If you have Hookup
A: Cable box or satellite receiver with a video/audio output A (page ]3)
B: (!able box with an antenna output only B/page 14)
C: Cable without cable box, or antenna only (no cable TV) C (page 15)
NOTETOCATVSYSTEMINSTALLER(INUSA)
This reminder is provided to call the CATV system installer's attention to Article 820- 40 of
the NEC that provides guidelines for proper grounding and, in particular, specifies that the cable
ground shall be connected to tile grounding system of the building, as close to the point of cable
entry as practical.
(J Notes
• If your antenna is a flat cable (300-ohm twin lead cable), use an external antenna connector (not supplied)
to connect the antenna to the recorder.
• If you have separate cables for VHF and UHF antennas, use a UHF/VHF band mixer (not supplied) to
connect the antenna to the recorder.
12

With this hookup, you can record any channel on the cable box or satellite receiver. Be sure that
the salellite receiver or cable box is turned on.
To watch cable or satellite channel, you need to match the channel on the recorder (LI) to the
input.jack c(mnected to the cable box or satellite receiver (LINE I IN).
Cable box/satellite receiver
o
-g
_a
Audio/video cord --
(not supplied)
m
_°l_ S-video c°rd
_ (not supplied)
to antenna input
to LINE 1 IN DVD recorder
: Signal flow
"_';"Hints
• If your cable bex or salellite recei',er has an S-videe jack, you can use an S-videe cord (nel supplied)
inste K1ef Ihe audie/videe cerd.
• lfyeu connect an S-videe cord le Ihe LINE I IN.jack, sel "Linel lnpu¢' effl_e "Line hlpu¢' le "S Video"
in Ihe "Video" selup (page 75).
,,_continued 13

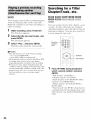
With this hookup, you can record any channel on the satellite receiver or cable box. Be sure that
the satellite receiver or cable box is turned on.
To watch cable programs, you need to match the channel on tile recorder (2ch, 3ch, or 4ch) to
the antemla output channel on the cable box (2ch, 3ch, or 4ch).
Cable box
Antenna cable_
(supplied)
gl to VHF/UHF IN
'd
DVD recorder
_to VHF/U_OUT I V
to antenna input
Note
When using Ihis cenneclien, set "Anlcnna / Cable of Ihe "Tuner Preset te _Anlcnna' ill the 'Basic sclup
(page 71 ).
14

Use this hookup if yon watch cable channels wifllout a cable box. Also use this hookup if you
are using a VHF/UHF antenna or separate VHF and UHF antennas.
With this hookup, you can record any channel by selecting tile channel on the recorder.
to VHF/UHF IN
DVD recorder
l to VHF/UHF OUT I_
to antenna input
Antenna cable (supplied)
15

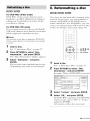
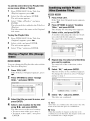
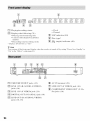
Step2: ConnectingtheVideoCords
Selecl one of the lk)llowing patterns, O flrrough _, accoMing to Ihe input jack on your TV
monilor, proieclor, or AV amplilier (receiver). This will enable you to view pictures.
Svideocord
Audio/video/notsupp,ied/ ii
cord (supplied)
to
)W) ....
!
to LINE OUT (S VIDEO)
to LINE OUT (VIDEO) DVD recorder
(green)
,_to COMPONENT VIDEO
Component video cord
(not supplied)
OUT
r'-J'_'- : Signal flow
O Videoinputjack
Youwill enjoysluudardqtmlily images.
Q SVIDEOinputjack
You will enjoy high quality images.
0 Component video inputjacks (Y, Pe,
PR)
You will enjoy uccurute color reproduction
and high quality images.
If your TV accepts progressive 480p l\_rmat
signals, you must use this connection. Then
set "Progressive Output" of "Video Output"
to "On" in tire "Video" setup to send
progressive video signals. For details, see
"Progressive Output" on page 74.
16

Whenplaying"wide screen"images
Some recorded imagesmay not fityour TV
screen. Tochange the picture size, see
page 74.
Ilyou are connecting to a VCR
Connect your VCR to the LINE 1N jack on
die recorder (page 24).
Note
Do nol connect IIIOI'L'Ihan ()ILL'type of video cord
between Ihe recorder and your TV at the same time.
-g
_a
17

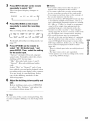
Step3: Connectingthe AudioCords
Selecl one of fire following pallems, O or O, according to tlae inpul jack on your TV monilor,
projeclnr, or AV amplifier 0 eceiver). This will enable you to listen In sound.
gital cord (not supplied)
to DIGITAL OUT (COAXIAL)
DVD recorder
to LINE OUT (R-AUDIO-L)
(yellow) _' (red)
' The yellew plug is used fer videe signals (page 16).
0 Digital audio inputjack
If your AV amplifier (receiver) has a Dolby _I
Digital or DTS .2 decoder and a digital input
jack. use this connection. You can enjoy
Dolby Digital (5.1ch) and DTS (5.1ch)
SUFFOUlld e[]ccts,
0 AudioL/R(left/right) inputjacks
This connection will use ynur TV's nr stereo
amplifier's (receiver's) two speakers for
sntllld.
18

"_° Hint
For correct speaker location, see the operating
instructions supplied with tile connected
components.
Notes
• Do not connect your TV's audio output jacks to
the LINE IN (R-AUDIO-L).jacks at the same
time. This will cause unw;mted noise to come
from your TV 's spe &ers.
• With connection Q, do not connect tile LINE IN
(R-AUDIO-L) and LINE OUT (R-AUDIO-L)
jacks to your TV's radio output jacks it the sune
time. This will cause unwanted noise to come
from your TV 's speakers.
• With connection Q, after you have completed the
connection, make the appropriate settings under
"Easy Sclup - Audio Connection" (page 23).
Otherwise, no sound or a loud noise will come
from your speakers.
_1 Manufactured under license lron/Dolby
Laboratories.
"Dolby" and the double-D symbol arc,
trademarks of Dolby Laboratories.
2 "DTS" and "DTS Digital Out" are trademarks of
Digital Theater Systems, Inc.
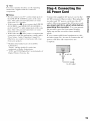
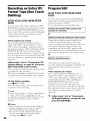
Step4: Connectingthe
ACPowerCord
Connecl d_e supplied AC power cord to Ihe
AC IN lerminal oflhe recorder. Then plug Ihe
recolder and TV power cords inlo the AC =_
outlet. After you connect the AC power cord, "_
you must wait for a short while before
operating the recorder. You can operule
the recorder once the front panel display
lights up and the recorder enters slandby
mode.
If you connecl additional equipment lo 1his
recorder (page 24). be sure Io connecl Ihe AC
power cord after all conlleclions are
complete.
@ _ toACIN @
to AC outlet
19

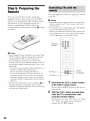
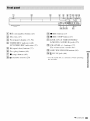
Step5: Preparingthe
Remote
You can control the recorder using the
supplied remote. Insert two Size AA (R6)
batteries by matching the (_ and @ ends on
tile batteries to the markings inside the
battery compartment. When using tile
remote, point it at the remote sensor [] on the
recorder.
Notes
• If the supplied remote interferes your other Sony
DVD recorder or player, change the conmland
mode number for this recorder (page 21).
• Use the batteries correctly to avoid possible
leakage and corrosion. Should leakage occur, do
not touch the liquid with bare hands. Observe the
following:
Do not use a new batter}' with an (lidbatte U, or
batteries of different manufacturers.
Do not attempt to recharge the batteries.
If you do not intend to use the remote for an
extended period of time, remove the batteries.
If batteU leakage occurs, wipe out any liquid
inside the batteU comparmlent, and insert new
batteries.
• Do not expose the remote sensor (marked [] on
the front panel) to strong light, such as direct
sunlight ora lighting apparatus. The recorder may
not respond to the renlote.
You can adjusl Ihe remote's signal to control
your TV.
Notes
• Depending on the connected unit, you may notbe
able to control your TV with some or all of the
buttons below.
• If you enter anew code number, tile code number
previously entered will be erased.
• When you replace tile batteries of the remote, the
code nun/ber n/a} be reset to the default setting.
Set the appropriate code number ,gain.
i.......................
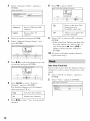
TV VOL
TV CH
2
HolddowntheTVI/_ buttonlocated
at the bottom of the remote.
Do not press the I/_) button at the top of
tile renlote.
WiththeIV I/_ buttonpresseddown,
entertheTV'smanufacturercode
usingthenumberbuttons.
For instance, to enter "09," press "0 then
"9." After you enter the last ]mmber.
release the TV |/(_) button.
2O
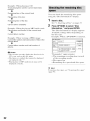
Page is loading ...
Page is loading ...
Page is loading ...
Page is loading ...
Page is loading ...
Page is loading ...
Page is loading ...
Page is loading ...
Page is loading ...
Page is loading ...
Page is loading ...
Page is loading ...
Page is loading ...
Page is loading ...
Page is loading ...
Page is loading ...
Page is loading ...
Page is loading ...
Page is loading ...
Page is loading ...
Page is loading ...
Page is loading ...
Page is loading ...
Page is loading ...
Page is loading ...
Page is loading ...
Page is loading ...
Page is loading ...
Page is loading ...
Page is loading ...
Page is loading ...
Page is loading ...
Page is loading ...
Page is loading ...
Page is loading ...
Page is loading ...
Page is loading ...
Page is loading ...
Page is loading ...
Page is loading ...
Page is loading ...
Page is loading ...
Page is loading ...
Page is loading ...
Page is loading ...
Page is loading ...
Page is loading ...
Page is loading ...
Page is loading ...
Page is loading ...
Page is loading ...
Page is loading ...
Page is loading ...
Page is loading ...
Page is loading ...
Page is loading ...
Page is loading ...
Page is loading ...
Page is loading ...
Page is loading ...
Page is loading ...
Page is loading ...
Page is loading ...
Page is loading ...
Page is loading ...
Page is loading ...
Page is loading ...
Page is loading ...
Page is loading ...
Page is loading ...
Page is loading ...
Page is loading ...
Page is loading ...
Page is loading ...
Page is loading ...
Page is loading ...
Page is loading ...
Page is loading ...
Page is loading ...
Page is loading ...
-
 1
1
-
 2
2
-
 3
3
-
 4
4
-
 5
5
-
 6
6
-
 7
7
-
 8
8
-
 9
9
-
 10
10
-
 11
11
-
 12
12
-
 13
13
-
 14
14
-
 15
15
-
 16
16
-
 17
17
-
 18
18
-
 19
19
-
 20
20
-
 21
21
-
 22
22
-
 23
23
-
 24
24
-
 25
25
-
 26
26
-
 27
27
-
 28
28
-
 29
29
-
 30
30
-
 31
31
-
 32
32
-
 33
33
-
 34
34
-
 35
35
-
 36
36
-
 37
37
-
 38
38
-
 39
39
-
 40
40
-
 41
41
-
 42
42
-
 43
43
-
 44
44
-
 45
45
-
 46
46
-
 47
47
-
 48
48
-
 49
49
-
 50
50
-
 51
51
-
 52
52
-
 53
53
-
 54
54
-
 55
55
-
 56
56
-
 57
57
-
 58
58
-
 59
59
-
 60
60
-
 61
61
-
 62
62
-
 63
63
-
 64
64
-
 65
65
-
 66
66
-
 67
67
-
 68
68
-
 69
69
-
 70
70
-
 71
71
-
 72
72
-
 73
73
-
 74
74
-
 75
75
-
 76
76
-
 77
77
-
 78
78
-
 79
79
-
 80
80
-
 81
81
-
 82
82
-
 83
83
-
 84
84
-
 85
85
-
 86
86
-
 87
87
-
 88
88
-
 89
89
-
 90
90
-
 91
91
-
 92
92
-
 93
93
-
 94
94
-
 95
95
-
 96
96
-
 97
97
-
 98
98
-
 99
99
-
 100
100


Ask a question and I''ll find the answer in the document
Finding information in a document is now easier with AI
Related papers
-
Sony RDR-GX7 Owner's manual
-
Sony RDR-GX315 User manual
-
-
-
-
-
-
Sony GX355 - RDR DVD Recorder User manual
-
Samsung MAX-VS530 User manual
-