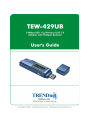
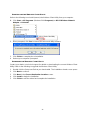
Trendnet TEW-429UB combines the features of a Wireless USB adapter and a Hotspot Detector. It can be used to connect to a wireless network, detect available hotspots, and provide secure access to those networks. With its compact design and user-friendly interface, TEW-429UB is ideal for mobile users who need to stay connected while on the go.
Trendnet TEW-429UB combines the features of a Wireless USB adapter and a Hotspot Detector. It can be used to connect to a wireless network, detect available hotspots, and provide secure access to those networks. With its compact design and user-friendly interface, TEW-429UB is ideal for mobile users who need to stay connected while on the go.


-
 1
1
-
 2
2
-
 3
3
-
 4
4
-
 5
5
-
 6
6
-
 7
7
-
 8
8
-
 9
9
-
 10
10
-
 11
11
-
 12
12
-
 13
13
-
 14
14
-
 15
15
-
 16
16
-
 17
17
-
 18
18
-
 19
19
-
 20
20
-
 21
21
-
 22
22
-
 23
23
-
 24
24
-
 25
25
-
 26
26
-
 27
27
-
 28
28
-
 29
29
-
 30
30
-
 31
31
-
 32
32
-
 33
33
-
 34
34
-
 35
35
-
 36
36
-
 37
37
-
 38
38
-
 39
39
-
 40
40
-
 41
41
-
 42
42
-
 43
43
-
 44
44


Trendnet TEW-429UB combines the features of a Wireless USB adapter and a Hotspot Detector. It can be used to connect to a wireless network, detect available hotspots, and provide secure access to those networks. With its compact design and user-friendly interface, TEW-429UB is ideal for mobile users who need to stay connected while on the go.
Ask a question and I''ll find the answer in the document
Finding information in a document is now easier with AI
Related papers
-
Trendnet TEW-429UB User manual
-
-
Trendnet TEW-604UB User manual
-
-
-
-
Trendnet TEW-621PC User guide
-
-
-
Trendnet TEW-424UB User manual
Other documents
-
Digisol DG-WN3860AC (H/W Ver. A1) User manual
-
SENAO PCE3500AH User manual
-
EDUP EP-AC1689 Installation guide
-
LevelOne WNC-0304USB User manual
-
 StarTech.com WIFIDETG Datasheet
-
Digitus WI-FI Finder with LC Display User manual
-
SMC Networks SMCWUSB-N User manual
-
-
Netopia 6161210-00-01 User manual
-
