Page is loading ...

2 DKRCI.PI.AJ0.A2.67 / 520H0729 © Danfoss A/S (AC-MCI/MWA), 2013-11
DANSK
Tekniske data
Maks. følertemperatur:
100°C
Maks. prøvetryk: p’ :
28 bar (P
e
)
Maks. driftstryk:
PS/MWP = 19 bar (P
e
)
Kølemiddel:
R717 (NH
3
)
Kapillarrørslængde:
5 m
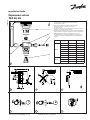
Montering
Ventilen kan monteres i enhver position,
men ventilhuset skal altid være varmere end
føleren (fig. 2).
Bemærk!
Kapillarrøret må ikke bøjes tættere på føleren
end 25 mm / 1 in. Se figur 3 og 4. Sker dette,
kan kapillarrøret knække og derved mistes
fyldningen. Uden fyldning fungerer ventilen
ikke.
Kun TEA 20-1 er forsynet med separat
efterdyse (best.nr. 006-0466). TEA 20-2 har
samme dyseindsats som TEA 20-1, men er
uden separat efterdyse.
Ventilen kan kun virke med den udvendige
trykudligning tilsluttet. Udligningsledningen
tilsluttes foroven på sugeledningen efter
føleren.
Tilslutningen sker med
1
/
4
in eller 6 mm
stålrør, som påsvejses nippelen på ventilens
udligningstilslutning. Endvidere kan
udligningsrøret tilsluttes ventilen ved hjælp
af. en 8 mm Ermeto forskruning.
Føleren må ikke anbringes i eller efter
væskelommer, nær rørsamlinger, massive
jerndele, samt hvor den kan udsættes for
falske temperaturpåvirkninger, som f.eks. i
luftstrømmen fra en ventilator eller en åben
dør.
Føleren monteres bedst på en vandret
sugeledning, fastspændt med følerklemmen
som vist på fig. 5, såfremt udv. rørdiameter er
7
/
8
in eller mindre. Ved udv. rørdiam. over
7
/
8
in placeres føleren på rørets side som vist på
fig. 6.
Ønskes ventilens kapacitet ændret, kan
indsatser med forskellige nominelle
kapaciteter leveres efter tabellens (tabel 1)
bestillingsnumre. Indsatserne er mærket som
eks. i fig. 7.
Tilspændingsmoment
for element ca. 9 kpm
for dyseindsats ca. 5 kpm
Indstilling
Fabriksindstilling: 5°C overhedning ved 0°C
følertemperatur.
Denne kan ændres ved at dreje spindelen
(se fig. 1 pos. 4). Drejes højre om (med uret),
forøges overhedningen og omvendt. En
omdrejning forskyder overhedningen ca.
0.5°C.
Fabriksindstillingen genfindes ved fra helt
slap eder at dreje spindelen ca. 10 omgange.
ENGLISH
Technical data
Maximum bulb temperature:
+212°F (+100°C)
Maximum test pressure:
p’ = 398 psig (28 bar) (P
e
)
Max. working pressure:
PS/MWP = 270 psig (19 bar) (P
e
)
Refrigerant:
R717 (NH
3
)
Capillary tube length:
16.5 ft (5 m)
Fitting
The valve can be fitted in any position, but
the valve body must always be warmer than
the bulb (fig. 2).
Note !
The capillary tube must not be bent closer
than 25 mm /1 in. from the sensor shown
in fig. 3 and 4. Otherwise the capillary tube
will crack and the filling will get lost. As
consequence the valve will not function.
TEA 20-1 only is equipped with a separate
discharge orifice (code No. 006-0466); TEA
20-2 has the same orifice assembly but is
without a separate discharge orifice.
The valve can only operate if the external
pressure equalising line is connected. The
equalising line should be connected to the
upper side of the suction line after the bulb.
Connection is through a
1
/
4
in or 6 mm
steel tube which is welded to the nipple on
the valve pressure equalising connection.
The equalising line can also be connected
to the valve by an 8 mm Ermeto screwed
connection.
The bulb must not be fitted in or after liquid
pockets, near pipe joints or solid iron parts,
nor should it be fitted in places where it may
be exposed to fluctuating temperature effects
such as in the air flow from a fan or an open
door.
The best place to fit the bulb is on a
horizontal suction line, using a clip as shown
in Fig, 5 if the outside pipe diameter is
7
/
8
in or
less. If the outside pipe diameter is more than
7
/
8
in, the bulb should be fitted on the pipe
side as shown in Fig. 6.
If it should become necessary for the valve
capacity to be altered, orifice assemblies with
different rated capacities can be obtained
by quoting the code Nos. specified in table
1. Orifice assemblies are marked as shown in
Fig, 7.
Torque
for power element approx. 9 kpm
for orifice assembly approx. 5 kpm
Adjustment
Factory setting: 9°F (5°C) superheat at a bulb
temperature of +32°F (0°C).
This setting can be altered by rotating the
spindle (see Fig. 1, pos. 4) – clockwise rotation
increases the superheat, and vice versa.
One revolution in the appropriate direction
increases or decreases the superheat by
about 1°F (0.5°C).
It is possible to return to the factory setting
by clockwise rotation through about 10
revolutions, starting from the completely
slack spring condition.
Page is loading ...
Page is loading ...
-
 1
1
-
 2
2
-
 3
3
-
 4
4


Ask a question and I''ll find the answer in the document
Finding information in a document is now easier with AI
in other languages
- italiano: Danfoss 068G6143 Guida d'installazione
- français: Danfoss 068G6143 Guide d'installation
- español: Danfoss 068G6143 Guía de instalación
- Deutsch: Danfoss 068G6143 Installationsanleitung
- dansk: Danfoss 068G6143 Installationsvejledning
Related papers
-
Danfoss 068G6143 Installation guide
-
Danfoss TEA 20, 85 Installation guide
-
-
Danfoss 068G6072 Installation guide
-
-
-
-
-
-
Other documents
-
Robertshaw 2000 Series Thermostatic Expansion Valves User manual
-
Giacomini R206C-1 Operating instructions
-
sauter TFL 611 Fitting Instruction
-
Hoshizaki KM-1300SRH-E User manual
-
Omega MPS11 Owner's manual
-
McQuay SB250B Installation guide
-
Blodgett 961/966 Owner's manual
-
WIKA TGT73 User manual
-
 Delphi Diavia 1RE20100E + A03967 Installation Instructions Manual
-
Aermec RX 62 Installation guide
