Canon 1957C002 User manual
- Category
- Camera flashes
- Type
- User manual
This manual is also suitable for

1
J
E
INSTRUCTION
MANUAL

2
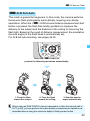
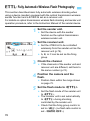
The Canon Speedlite 470EX-AI is an EOS-dedicated external
Speedlite, compatible with E-TTL II/E-TTL autoflash systems. The
Speedlite can be used as an on-camera flash that attaches to the hot
shoe of the camera (normal flash photography), and as a receiver unit
during optical transmission wireless flash photography. Note that,
during normal flash photography, the Speedlite can be used for AI
bounce flash photography.
Before Starting to Shoot, Be Sure to Read the Following
To avoid botched pictures and accidents, first read the “Safety
Precautions” (pages 8-9). Also, read this manual carefully to ensure that
you use the product correctly.
Read This Instruction Manual while also Referring to Your
Camera’s Instruction Manual
Before using the product, read this Instruction Manual and your
camera’s Instruction Manual to familiarize yourself with their operations.
Be sure to store this manual safely, too, so that you can refer to it again
when necessary.
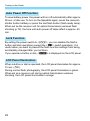
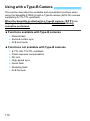
Using with an EOS DIGITAL camera (Type-A camera)
You can use the Speedlite for easy flash photography using
autoflash control in the same way as a camera’s built-in flash.
Using with an EOS film camera
An EOS camera with E-TTL II/E-TTL autoflash metering
system (Type-A camera)
You can use the Speedlite for easy flash photography using
autoflash control in the same way as a camera’s built-in flash.
An EOS camera with TTL autoflash metering system (Type-B
camera)
See page 110.
* This Instruction Manual assumes that the Speedlite is used with a
Type-A camera.
Introduction
Using the Speedlite with a Camera

3
Chapters
Introduction
2
Getting Started and Basic Operations
Preparing for flash photography and basic flash photography
17
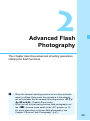
Advanced Flash Photography
Advanced shooting utilizing the flash functions
29
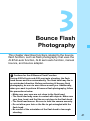
Bounce Flash Photography
Flash photography using the AI bounce flash functions and
bounce adapter
41
Setting Flash Functions with Camera Controls
Setting the flash functions from the camera’s menu screen
65
Wireless Flash Photography: Optical Transmission
Wireless (receiver) flash photography using optical transmission
71
Customizing the Speedlite
Customizing with Custom Functions and Personal Functions
81
Reference
System map, Troubleshooting guide, Using with a type-B camera
93
1
2
3
4
5
6
7

4
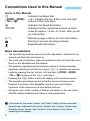
Icons in this Manual
9 : Indicates the Select dial.
<H> <E>:<S> Indicates the top, bottom, left, and right
<I> <O> buttons of the cross keys.
8 : Indicates the Select/Set button.
p/2 : Indicates that the respective function remains
active for approx. 12 sec. or 16 sec. after you let
go of the button.
(p.**) : Reference page numbers for more information.
: Warning to prevent shooting problems.
: Supplemental information.
Basic Assumptions
The operation procedures assume that the Speedlite is attached to the
camera and that both are turned on.
The icons used for buttons, dials, and symbols in the text match the icons
found on the Speedlite and the camera.
The selection operation performed when setting a function basically
describes selecting a function by turning <9>. A selection can also be
made by pressing the top, bottom, left, and right (<H> <E>
<I> <O> buttons) of the <S> cross keys.
Pressing the <0> button returns the display to the previous screen.
The operation procedures assume that the Custom Functions and
Personal Functions of the Speedlite, and the menu and Custom
Functions of the camera are at their default settings.
All figures such as the number of flashes are based on the use of four
AA/LR6 alkaline batteries and Canon’s testing standards.
Conventions Used in this Manual
In this manual, the words “master” and “slave” used in previous manuals
have all been replaced by the words “sender” and “receiver” respectively.
Read the words “sender” and “receiver” in this manual for the above
meanings as necessary.

5
2
1
Introduction 2
Chapters ...........................................................................................3
Conventions Used in this Manual .....................................................4
Contents............................................................................................5
Index to Features..............................................................................7
Safety Precautions............................................................................8
Nomenclature..................................................................................10
Getting Started and Basic Operations 17
Installing the Batteries.....................................................................18
Attaching and Detaching the Speedlite to and from the Camera.... 20
Turning on the Power......................................................................21
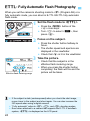
a: Fully Automatic Flash Photography ...................................24
E-TTL II/E-TTL Autoflash by Shooting Mode ..................................25
Advanced Flash Photography 29
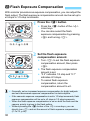
f Flash Exposure Compensation .................................................30
7: FE Lock...................................................................................31
c High-speed sync ........................................................................32
r Second-curtain sync.................................................................33
H: Setting the Flash Coverage ...............................................34
a: Manual Flash............................................................................36
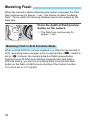
Modeling Flash................................................................................38
Clearing Speedlite Settings.............................................................40
Contents

6
Contents
3
4
5
6
7
Bounce Flash Photography 41
X AI Bounce Flash .................................................................... 42
W AI.B Full-Auto........................................................................ 46
W AI.B Full-Auto Shooting ........................................................ 48
V AI.B Semi-Auto Shooting ...................................................... 56
m Manual Bounce Flash Photography ........................................ 61
q Combined Use with the Bounce Adapter ............................... 63
Setting Flash Functions with Camera Controls 65
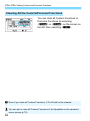
Flash Control from the Camera’s Menu Screen ............................. 66
Wireless Flash Photography: Optical Transmission 71
: Optical Transmission Wireless Flash Photography................. 72
Wireless Settings............................................................................ 74
a: Fully Automatic Wireless Flash Photography.................... 76
A Manual Flash Setting on a Receiver Unit ......................... 79
Customizing the Speedlite 81
C / >: Setting Custom and Personal Functions................... 82
C: Setting Custom Functions.................................................... 85
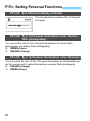
>: Setting Personal Functions................................................... 88
Reference 93
470EX-AI System ........................................................................... 94
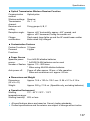
f Flash Firing Restrictions due to Temperature Increase ........... 96
Troubleshooting Guide ................................................................... 98
Specifications ............................................................................... 105
Using with a Type-B Camera ....................................................... 110
Index............................................................................................. 113

7
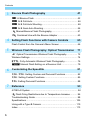
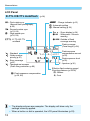
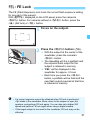
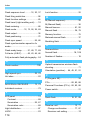
Power Source
Batteries Î p.18
Firing interval/count Î p.18
Power ON/OFF Î p.21
Flash ready Î p.21
Quick flash Î p.21
Auto power off Î p.22
Operations
Attaching and detaching
the Speedlite Î p.20
Lock function Î p.22
LCD panel illumination Î p.22
Normal Flash Photography
E-TTL autoflash Î p.24
Autoflash by shooting
mode Î p.25
Manual flash Î p.36
Metered manual
flash Î p.37
TTL autoflash Î p.110
Functions
Flash exposure
compensation Î p.30
FE lock Î p.31
High-speed sync Î p.32
Second-curtain sync Î p.33
Modeling flash Î p.38
AF-assist beam Î p.27
Flash coverage Î p.34
• Wide panel Î p.35
Clearing settings
(Reverting to defaults) Î p.40
Flash function settings Î p.65
Flash firing restriction Î p.96
Type-B camera Î p.110
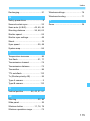
Bounce Flash Photography
AI.B full-auto Î p.43
AI.B semi-auto Î p.45
Manual bounce Î p.61
Bounce adapter Î p.63
Optical Transmission Wireless
Flash Photography
E-TTL autoflash Î p.76
Memory function Î p.75
Individual receiver Î p.79
Customization
Custom Functions (C.Fn) Î p.85
Personal Functions (P.Fn)
Î p.88
Clear all Î p.84
Index to Features

8
The following precautions are provided to prevent harm or injury to
yourself and others. Make sure to thoroughly understand and follow
these precautions before using the product.
If you experience any malfunctions, problems, or damage to the
product, contact the nearest Canon Service Center or the dealer
from whom you purchased the product.
Safety Precautions
Warnings:
Follow the warnings below. Otherwise, death or
serious injuries may result.
To prevent fire, excessive heat, chemical leakage, explosions, and electrical shock,
follow the safeguards below:
• Do not insert any foreign metallic objects into the electrical contacts of the product,
accessories, connecting cables, etc.
• Do not use any batteries, power sources, or accessories not specified in the
Instruction Manual. Do not use any deformed or modified batteries, or the product
if it is damaged.
• Do not short-circuit, disassemble, or modify the product or batteries. Do not apply
heat or solder to the batteries. Do not expose the batteries to fire or water. Do not
subject the batteries to strong physical shock.
• Do not insert any battery’s plus and minus ends incorrectly, or mix new batteries
with used ones or batteries of different type.
Do not use the product in locations where there is flammable gas. This is to prevent
an explosion or a fire.
Do not fire the flash at anyone driving a car or other vehicle. It may cause an accident.
Do not disassemble or modify the equipment. High-voltage internal parts may cause
electrical shock.
If you drop the equipment and the casing breaks open to expose the internal parts,
do not touch the exposed parts. There is a possibility of an electrical shock.
Do not store the product in dusty or humid places or location with lots of oil smoke.
This is to prevent a fire or electrical shock.
Before using this product inside an airplane or hospital, check if it is allowed.
Electromagnetic waves emitted by the product may interfere with the plane’s
instruments or the hospital’s medical equipment.
If a battery leaks, changes color, deforms, or emits smoke or fumes, remove it
immediately. Be careful not to get burned in the process. It may cause a fire,
electrical shock or burns if you keep using it.
Keep the batteries and other accessories out of the reach of children and infants. If a
child or infant swallows a battery or accessory, consult a physician immediately.
(Battery chemicals may harm the stomach and intestines.)
Be careful not to get the product wet. If you drop the product in the water or if water
or metal get inside the product, promptly remove the batteries. This is to prevent fire,
electrical shock, and burns.
Do not cover or wrap the product with a cloth. Doing so may trap heat within and
cause the casing to deform or catch fire.

9
Safety Precautions
Keep the equipment out of the reach of children and infants, including when in use.
Straps or cords may accidentally cause choking, electrical shock, or injury. Choking
or injury may also occur if a child or infant accidentally swallows a part or accessory.
If a child or infant swallows a part or accessory, consult a physician immediately.
When the equipment is not in use, make sure to remove the batteries, and
disconnect the external power source and cable from the equipment before storing.
This is to prevent electrical shock, excessive heat, fire, or corrosion.
Prevent any battery leakage from contacting your eyes, skin, and clothing. It can
cause blindness or skin problems. If the battery leakage comes in contact with your
eyes, skin, or clothing, flush the affected area with lots of clean water without rubbing
it. See a physician immediately.
Do not use paint thinner, benzene, or other organic solvents to clean the product.
Doing so may cause fire or a health hazard.
Cautions:
Follow the cautions below. Otherwise physical injury
or property damage may result.
When the product is not in use for a prolonged period, make sure to remove the
batteries before storing. This is to prevent malfunction or corrosion.
When disposing of a battery, insulate the electrical contacts with tape. Contact with
other metallic objects or batteries may cause a fire or an explosion.
Do not use, store, or leave the product in a vehicle in the direct sunlight or with a
high interior temperature, or near a high-temperature object. The product may
become hot and cause burns if touched. Doing so may also cause battery heat
generation, breakage, leakage, and the like.
Do not fire the flash with the flash head (light-emitting unit) in contact with a human
body or any object. Doing so may result in the risk of burns and fire.
Before performing AI bounce flash photography, be sure to warn people nearby. The
flash head may move automatically and fire without warning.
Do not fire the flash near the eyes. It may hurt the eyes.
Do not leave the product in a low-temperature environment for an extended period of
time. The product will become cold and may cause injury when touched.
Do not directly touch any part of the product that becomes hot. Extended contact on
the skin may result in low temperature contact burns.
If you replace the batteries after continually firing, the batteries may be hot. Be
careful not to get burned in the process. It may cause a skin burn.


11
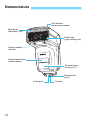
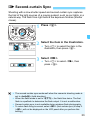
Nomenclature
<Q> Flash-ready lamp/
Test flash button (p.21, 77)
<X> Bounce mode
switch (p.42)
<0°> : Flash head
forward-facing
position
<Y> : AI.B semi-auto
<Z> : AI.B full-auto
Bounce adapter attachment
(p.63)
<z>
Bounce angle
setting button
(p.45, 54, 57)
Battery compartment
cover (p.18)
Power switch (p.21)
<K>:Power on
<a>: Button/Dial lock
(Power on)
<J>:Power off
<9> Select dial
<8> Select/Set button
<S> Cross keys
<H> Zoom button (p.34)
<E> Flash mode button (p.24, 36)
<I> Wireless setting button (p.74, 79)
<O> Flash exposure compensation/
Flash output setting button (p.30/36)
Lock-release button (p.20)
Mounting foot lock lever
(p.20)
<0>
Back button
<X>
AI.B full-auto distance
measurement start
button/AI.B lamp
(p.43, 49/54, 59)
<1>
Sub-menu button
(p.40, 75, 82)
LCD panel

12
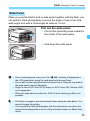
Nomenclature
LCD Panel
E-TTL II/E-TTL Autoflash
(p.24)
2:
First-curtain sync
(Normal flash photography,
p.68)
r : Second-curtain sync
(p.33, 68)
c : High-speed sync
(p.32, 68)
a :
E-TTL II/E-TTL
autoflash
j : Standard
k : Guide number
priority (p.87)
l : Even coverage
(p.87)
t : Temperature increase
(Flash firing restriction, p.96)
f: Flash exposure compensation
(p.30, 68)
G : Charge indicator (p.21)
L : Automatic setting
d : Manual setting (p.34)
e : Zoom display (p.34)
N : Wide panel + bounce
warning
O: Outside of flash
coverage warning
Flash coverage
(Focal length, p.34)
Flash exposure
compensation amount
(p.30)
Flash exposure level
(p.30)
v : Aperture (p.36)
Effective flash metering range/
Shooting distance (p.24/36)
R : Meters
@ : Feet
The displays shown are examples. The display will show only the
settings currently applied.
When a button or dial is operated, the LCD panel illuminates (p.22).

13
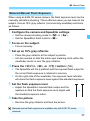
Nomenclature
Receiver unit
Manual Flash
(p.36)
Optical Transmission Wireless Shooting
(p.71)
q : Manual flash
Manual flash output
Manual flash level
x : Receiver
setting (p.74)
( :
Individual receiver (p.79)
: : Optical
transmission
wireless
shooting (p.74)
h : Receiver icon
Firing group
(p.78)
* : Transmission
channel
(p.74)

14
Nomenclature
Bounce Shooting
(p.41)
m : Bounce
(p.49, 56, 61)
H : Bounce adapter
attached (p.63)
W : AI.B full-auto (p.48)
V : AI.B semi-auto (p.56)
Flash head
rotation angle
Horizontal direction
Upward direction
Flash head upward angle
The rotation angle of the flash head is displayed in 5 increments.
If the camera’s orientation is horizontal during AI.B full-auto shooting, the
bounce angle in the upward direction is displayed up to 180°.


16

17
1
Getting Started and
Basic Operations
This chapter describes the preparations before starting
flash photography and the basic shooting operations.
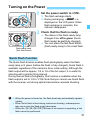
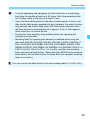
Cautions for firing continuous flash
To avoid degrading and damaging the flash head due to
overheating, limit firing the flash continuously at full output
up to 30 times. After firing the flash continuously at full
output for 30 times, allow a rest time of at least 10 min.
If you fire the flash continuously at full output for the above
listed number of times, and then fire the flash again
repeatedly at short intervals, the safety function may
activate and restrict flash firing. With flash firing restriction
level 1, the firing interval is automatically set to approx. 8
sec. If this happens, allow a rest time of at least 40 min.
For details, see “Flash Firing Restriction due to Temperature
Increase” on page 96.
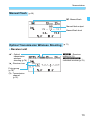
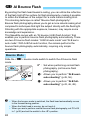
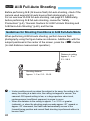
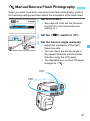
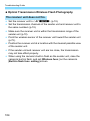
When you are not performing bounce flash photography, set the
<X> bounce mode switch to the <0°> position (p.11). For more
information on bounce flash photography, see Chapter 3 “Bounce
Flash Photography” (p.41).

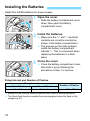
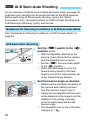
18
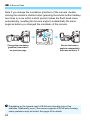
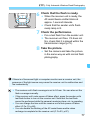
Install four AA/R6 batteries for power supply.
1
Open the cover.
Slide the battery compartment cover
down, then open the battery
compartment cover.
2
Install the batteries.
Make sure the “+” and “-” electrical
contacts are correctly oriented as
shown in the battery compartment.
The grooves on the side surfaces
inside the battery compartment
indicate “-”. This is convenient when
replacing the batteries in a dark
place.
3
Close the cover.
Close the battery compartment cover,
then slide it up by following the
procedure of step 1 in reverse.
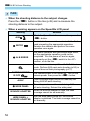
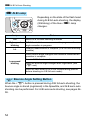
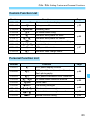
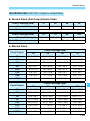
Firing Interval and Number of Flashes
Based on new AA/LR6 alkaline batteries and Canon’s testing standards.
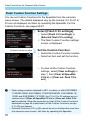
The Quick flash function enables flash photography before the flash is fully
charged (p.21).
Installing the Batteries
Firing Interval
Number of Flashes
Quick Flash Normal Flash
Approx. 0.1 to 3.9 seconds
Approx. 0.1 to 5.5 seconds
Approx. 115 to 800 times

19
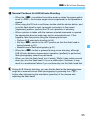
Installing the Batteries
CAUTION
Do not use “AA/R6 lithium batteries”.
Note that certain AA/R6 lithium batteries may become extremely hot in rare
cases during use. Due to safety reasons, do not use “AA/R6 lithium
batteries”.
When performing continuous flash, do not touch the flash head,
batteries, or the area near the battery compartment.
When continuous flash or modeling flash is repeatedly fired at short
intervals, do not touch the flash head, batteries, or the area near the battery
compartment. The flash head, batteries, and area near the battery
compartment may become hot, resulting in the risk of burn.
Do not use the Speedlite while touching the same part for a long
period of time.
Even if the product does not feel too hot, prolonged contact with the same
body part may cause skin redness or blistering due to low-temperature
contact burns. Using a tripod is recommended in very hot places or for
people with circulation problems or very sensitive skin.
Using AA/R6 batteries other than the alkaline type may cause contact failure
due to the irregular shape of the battery contacts.
When <!> is displayed or the LCD panel display turns off during
recharging, replace the batteries with new ones.
Use a new set of four batteries of the same brand. When replacing the
batteries, replace all four at one time.
AA/HR6 Ni-MH batteries can also be used.

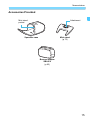
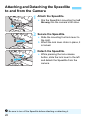
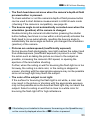
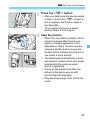
20
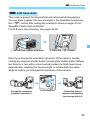
1
Attach the Speedlite.
Slip the Speedlite’s mounting foot all
the way into the camera’s hot shoe.
2
Secure the Speedlite.
Slide the mounting foot lock lever to
the right.
X When the lock lever clicks in place, it
is locked.
3
Detach the Speedlite.
While pressing the lock-release
button, slide the lock lever to the left
and detach the Speedlite from the
camera.
Attaching and Detaching the Speedlite
to and from the Camera
Be sure to turn off the Speedlite before attaching or detaching it.
Page is loading ...
Page is loading ...
Page is loading ...
Page is loading ...
Page is loading ...
Page is loading ...
Page is loading ...
Page is loading ...
Page is loading ...
Page is loading ...
Page is loading ...
Page is loading ...
Page is loading ...
Page is loading ...
Page is loading ...
Page is loading ...
Page is loading ...
Page is loading ...
Page is loading ...
Page is loading ...
Page is loading ...
Page is loading ...
Page is loading ...
Page is loading ...
Page is loading ...
Page is loading ...
Page is loading ...
Page is loading ...
Page is loading ...
Page is loading ...
Page is loading ...
Page is loading ...
Page is loading ...
Page is loading ...
Page is loading ...
Page is loading ...
Page is loading ...
Page is loading ...
Page is loading ...
Page is loading ...
Page is loading ...
Page is loading ...
Page is loading ...
Page is loading ...
Page is loading ...
Page is loading ...
Page is loading ...
Page is loading ...
Page is loading ...
Page is loading ...
Page is loading ...
Page is loading ...
Page is loading ...
Page is loading ...
Page is loading ...
Page is loading ...
Page is loading ...
Page is loading ...
Page is loading ...
Page is loading ...
Page is loading ...
Page is loading ...
Page is loading ...
Page is loading ...
Page is loading ...
Page is loading ...
Page is loading ...
Page is loading ...
Page is loading ...
Page is loading ...
Page is loading ...
Page is loading ...
Page is loading ...
Page is loading ...
Page is loading ...
Page is loading ...
Page is loading ...
Page is loading ...
Page is loading ...
Page is loading ...
Page is loading ...
Page is loading ...
Page is loading ...
Page is loading ...
Page is loading ...
Page is loading ...
Page is loading ...
Page is loading ...
Page is loading ...
Page is loading ...
Page is loading ...
Page is loading ...
Page is loading ...
Page is loading ...
Page is loading ...
Page is loading ...
-
 1
1
-
 2
2
-
 3
3
-
 4
4
-
 5
5
-
 6
6
-
 7
7
-
 8
8
-
 9
9
-
 10
10
-
 11
11
-
 12
12
-
 13
13
-
 14
14
-
 15
15
-
 16
16
-
 17
17
-
 18
18
-
 19
19
-
 20
20
-
 21
21
-
 22
22
-
 23
23
-
 24
24
-
 25
25
-
 26
26
-
 27
27
-
 28
28
-
 29
29
-
 30
30
-
 31
31
-
 32
32
-
 33
33
-
 34
34
-
 35
35
-
 36
36
-
 37
37
-
 38
38
-
 39
39
-
 40
40
-
 41
41
-
 42
42
-
 43
43
-
 44
44
-
 45
45
-
 46
46
-
 47
47
-
 48
48
-
 49
49
-
 50
50
-
 51
51
-
 52
52
-
 53
53
-
 54
54
-
 55
55
-
 56
56
-
 57
57
-
 58
58
-
 59
59
-
 60
60
-
 61
61
-
 62
62
-
 63
63
-
 64
64
-
 65
65
-
 66
66
-
 67
67
-
 68
68
-
 69
69
-
 70
70
-
 71
71
-
 72
72
-
 73
73
-
 74
74
-
 75
75
-
 76
76
-
 77
77
-
 78
78
-
 79
79
-
 80
80
-
 81
81
-
 82
82
-
 83
83
-
 84
84
-
 85
85
-
 86
86
-
 87
87
-
 88
88
-
 89
89
-
 90
90
-
 91
91
-
 92
92
-
 93
93
-
 94
94
-
 95
95
-
 96
96
-
 97
97
-
 98
98
-
 99
99
-
 100
100
-
 101
101
-
 102
102
-
 103
103
-
 104
104
-
 105
105
-
 106
106
-
 107
107
-
 108
108
-
 109
109
-
 110
110
-
 111
111
-
 112
112
-
 113
113
-
 114
114
-
 115
115
-
 116
116


Canon 1957C002 User manual
- Category
- Camera flashes
- Type
- User manual
- This manual is also suitable for
Ask a question and I''ll find the answer in the document
Finding information in a document is now easier with AI
Related papers
-
Canon 320EX User manual
-
Canon Speedlite 600EX User manual
-
-
Canon Speedlite 430EX III-RT Owner's manual
-
-
-
-
-
Canon Speedlite EL-100 User manual
-
Canon Speedlite 600EX-II RT User manual
