Astra
Refer to Owner’s Manual for detailed information. Note: some items described may be optional 3.
Quick Reference Guide
July 2007
TS 1613-A-08
Vehicle security
Electric windows 3:
Operated via 2 or 4 3 switches in the
driver’s door handle.
For incremental operation, briefly pull or
press the switch. For automatic opening
or closing, pull or press switch for longer.
Pull or press again to stop.
Refuelling:
Open tank flap, unscrew fuel filler cap,
remove and suspend from tank flap. The
fuel tank has a limiting system which
prevents overfilling of the tank.
Electric windows 3 continued:
Front switches operate the front
windows and rear switches 3 operate
the rear windows.
Additional switches located in the
passenger’s door and rear doors.
Luggage compartment:
To unlock
Press button q on the radio remote
control. The luggage compartment is
unlocked together with the central
locking system and can be opened by
pulling the button under the handle.
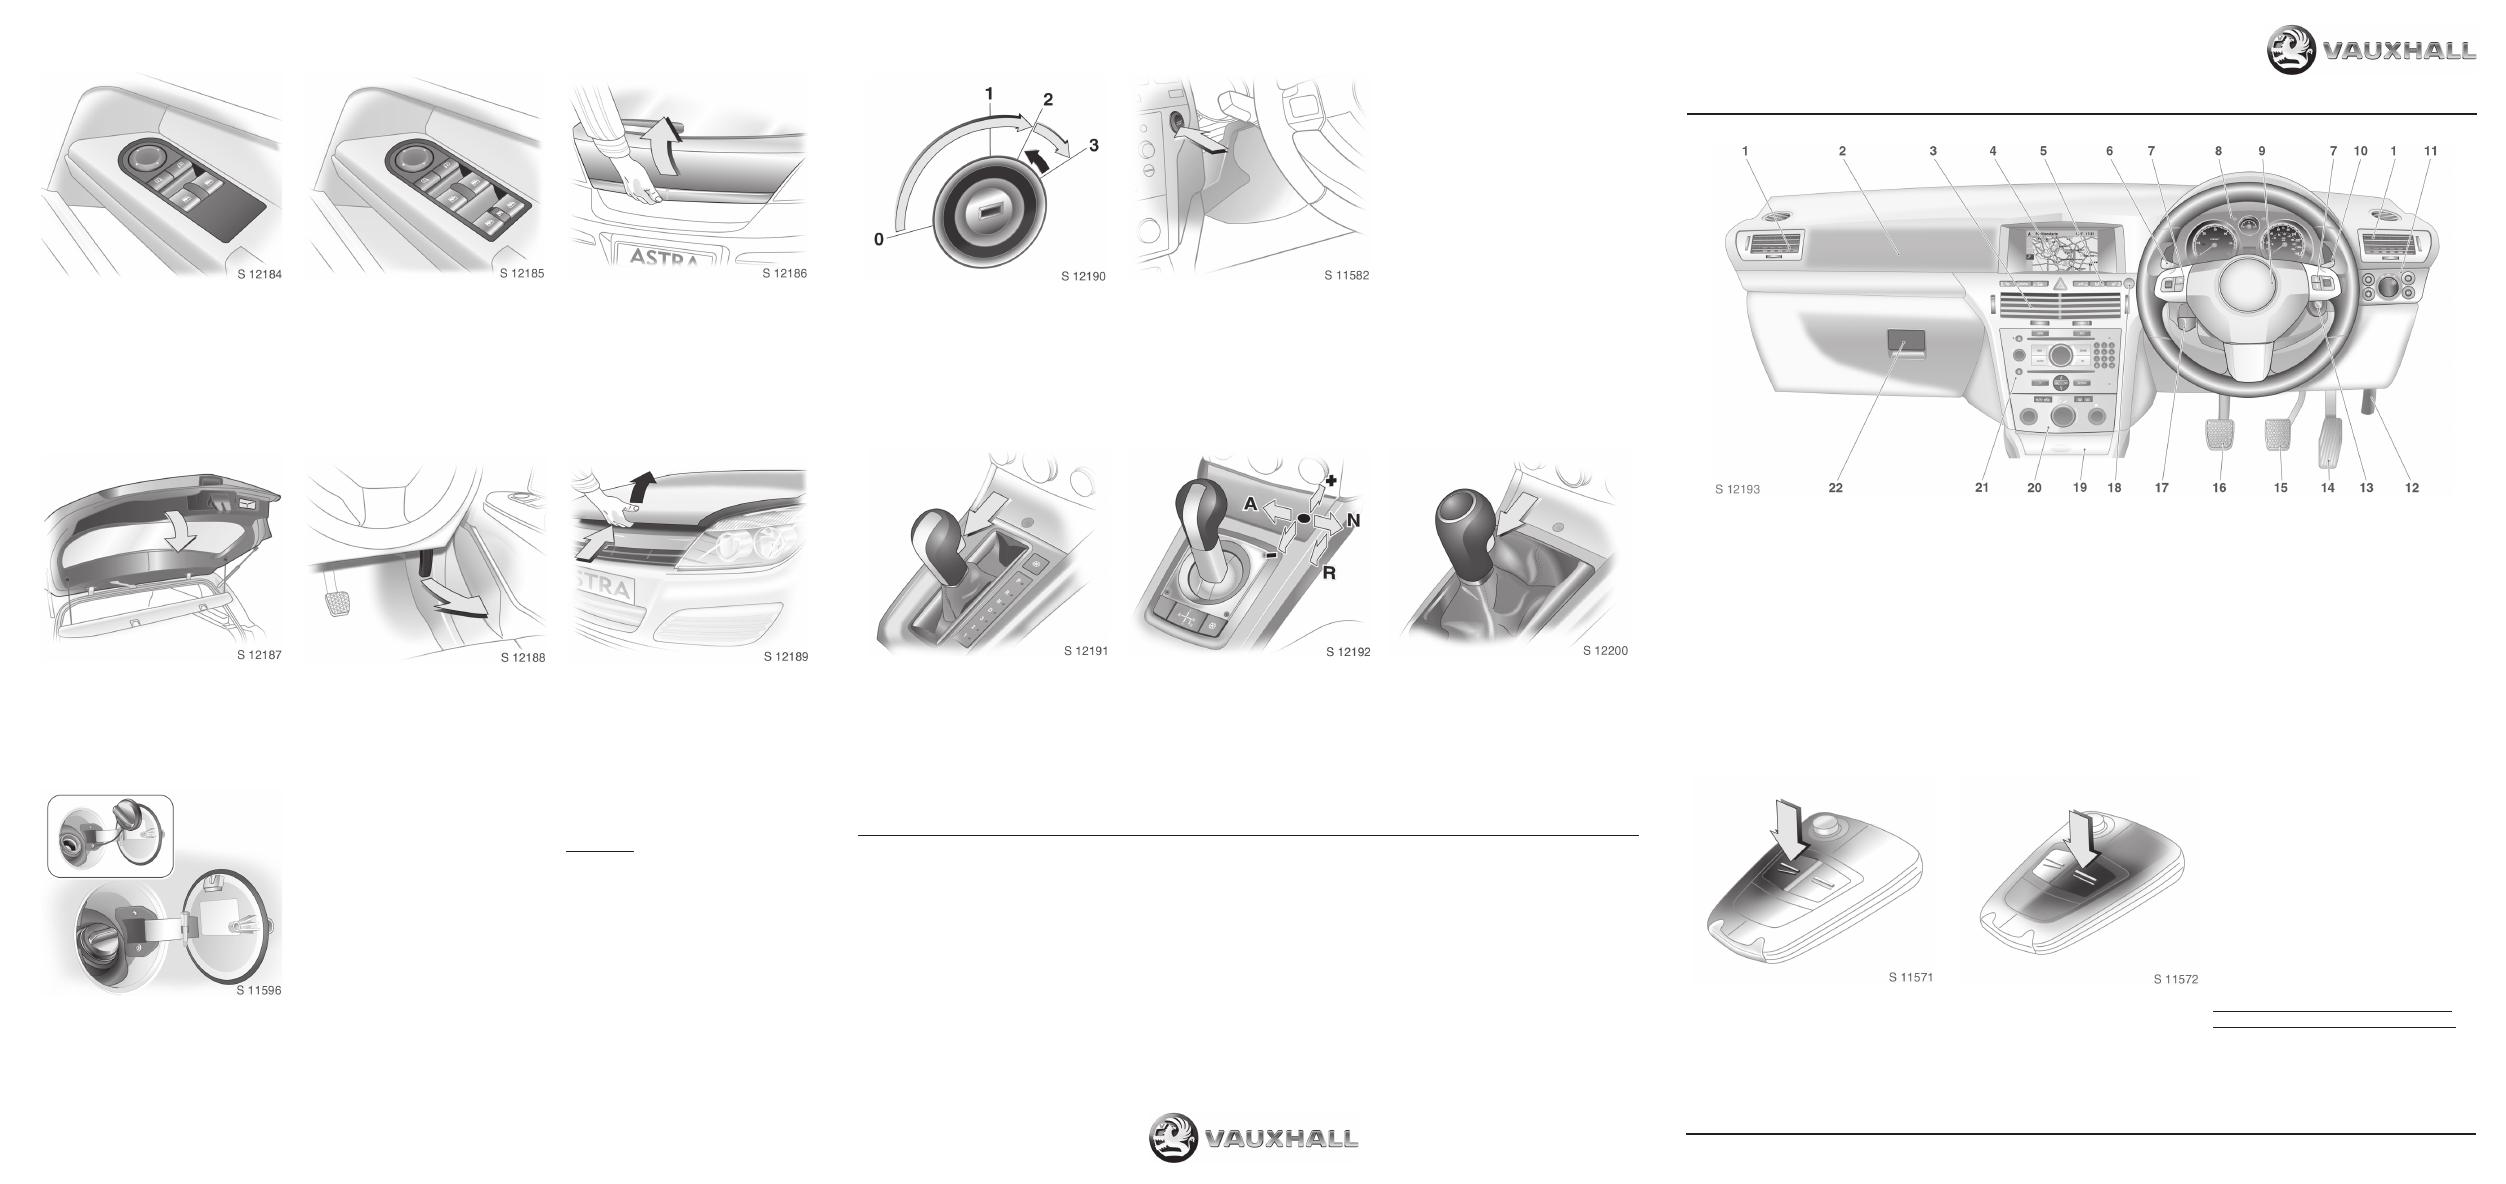
Instruments and controls
In vehicles with Open&Start system 3,
the vehicle is unlocked automatically by
pulling a door handle while the key is in
the external reception range of the
vehicle. (approx. 1 metre).
The vehicle is locked from the outside
with the doors closed by touching the
sensor panel in the door handle of one of
the front doors.
Electronic immobiliser
z Deactivated when key is in ignition
z Activated when key is removed
Engine cannot be started in any other
way, so keep spare key in a safe place!
Starting the engine:
Manual transmission in neutral with
clutch depressed, depress footbrake,
automatic transmission 3 in P or N,
do not accelerate, (diesel engines; turn
key to 2, wait for pre-heating indicator
! to go out)
1)
, turn key to 3.
1)
Pre-heating system switches on only if
outside temperature is low.
Starting the engine:
Vehicles with Open&Start system 3 the
electronic key must be within reception
range of interior. Manual transmission in
neutral with clutch depressed, depress
footbrake, automatic transmission 3 in
P or N, do not accelerate.
1. Side air vents
2. Front passenger airbag
3. Centre air vents
4. Display for time, date, outside
temperature and infotainment
system 3, Check control 3,
Trip computer 3, Climate control
system 3
5. Heated seats 3, Hazard warning
lights , Deflation detection system 3,
Tyre pressure monitoring system 3,
Parking distance sensor 3, Central
locking system, SPORT mode 3
6. Turn signals, Headlight flash, Dipped
and Main beam, Cruise control 3,
Door-to-door light function 3
7. Remote control for infotainment
system 3
8. Instruments
9. Horn
10. Windscreen wiper and wash system,
Headlight wash system 3 and rear
window wash system
11. Parking lights, Dipped beam,
Instrument illumination, Fog tail light,
Fog lights 3, Headlight range
adjustment 3
12. Bonnet release lever
13. Starter switch with immobiliser and
emergency operation Open&Start
sensor panel 3
14. Accelerator pedal
15. Brake pedal
16. Clutch pedal 3
17. Steering wheel adjustment 3
18. Start/Stop button
19. Ashtray 3, cigarette lighter
20. Climate Control
21. Infotainment system 3
22. Glove compartment
Unlocking:
Press button q on remote control - or -
turn key in driver's door lock towards
front of vehicle as far as it will go, turn
key back to the vertical position and
remove.
To unlock from inside, press central
locking switch
m in the centre console.
Locking:
Press button p on remote control - or -
turn key in driver's door lock towards
rear of vehicle as far as it will go, turn key
back to the vertical position and
remove. To unlock from inside, press
central locking switch
m in the centre
console. with the doors closed. LED in
the switch flashes.
Tyre pressures (psi)
for load of up to 3 persons.
Hatch, Estate, Van, TwinTop
Engine Tyres Front Rear
Z 14 XEP,
Z 16 XER
All except
below
33 30
195/65 R15, 205/55 R16,
225/45 R17
1)
1)
Z 16 XER only.
29 29
205/55 R16, 225/45 R17 30
2)
2)
TwinTop.
30
2)
Z16 LET All except
below
33 30
215/45 R17, 225/40 R18 39 36
Refuelling continued:
Before refuelling, switch off engine and if
applicable any auxiliary heating with
combustion chambers. Switch off mobile
phones.
To close, position fuel filler cap and
rotate past resistance until cap audibly
clicks over retainer. Close tank flap and
wipe off any overflowing fuel.
Petrol engines - use unleaded fuel only.
Diesel engines - use diesel fuel meeting
specifications of DIN EN 590
Fuel tank capacity (all models) - 52 litres.
Engine oil:
Check every 300 miles or prior to long
journeys.
Important:
It is the owner’s responsibility to
maintain the correct level of an
appropriate quality oil in the engine.
Open luggage compartment:
There is a handle on the inside of the
tailgate for closing luggage
compartment.
Bonnet:
To open the bonnet, pull the release
lever located below the instrument panel
on the driver's side. The bonnet will then
be unlocked and will partially open.
Return release lever to its original
position.
To open completely, locate safety catch
as viewed from the front:
lift upwards and open the bonnet.
The bonnet is held open automatically.
To close, lower it slowly and allow it to
fall into lock under its own weight.
Automatic transmission 3:
Engine may be started only in P or N.
To move out of P; switch on ignition,
depress footbrake and pull up button
on selector lever. To engage P or R;
pull up button on selector lever.
P: Only with vehicle stationary,
first apply handbrake.
R: Only with vehicle stationary.
Easytronic transmission 3:
Current gear is displayed in the
transmission display. The engine can
only be started with the lever in position
N and with the footbrake depressed.
The display shows N. If the footbrake is
not depressed, N flashes in the display.
Manual drive modes: + shift to higher
gear, - shift to lower gear.
For starting on slippery surfaces, press
button T - indicator illuminates, vehicle
pulls away in 2nd gear.
Transmission fault; indicator A
illuminates.
Manual transmission:
Reverse: with the vehicle stationary,
3 seconds after de-clutching pull the
button up on the selector lever and
engage gear.
Check tyre pressures, including spare wheel,
every 14 days and prior to any long journey;
tyres should be checked when cold. Use valve
cap key to make unscrewing valve caps easier.
Tyre pressures (psi)
for load of up to 3 persons.
Hatch, Estate, Van, TwinTop
Engine Tyres Front Rear
Z 18 XER All except
below
33 30
195/65 R15, 205/55 R16,
225/45 R17
1)
1)
Z 18 XER Estate & TwinTop only.
29 29
205/55 R16, 225/45 R17 30
2)
2)
TwinTop.
30
2)
2.0 LEH All 35 35
Tyre pressures (psi)
for load of up to 3 persons.
Hatch, Estate, Van, TwinTop
Engine Tyres Front Rear
Z 17 DTH All except
below
30 30
215/45 R17, 225/40 R18 36 33
Z 19 DT,
Z 19 DTH
All except
below
33 30
215/45 R17, 225/40 R18 39 36
225/40 R18
1)
1)
TwinTop.
36
33
Spare wheel 3
T 115/70 R16
61 61
Starting the engine continued:
Petrol engine: press button;
Diesel engine: briefly press button when
control indicator ! goes out)
1)
, press
button again for 1 second; release
button when engine is running.
Press button again to repeat the starting
procedure or switch off the engine.
Only press briefly to switch on the
ignition if the brake or clutch pedal has
not been depressed.
Do not start unless vehicle is stationary.
1)
Pre-heating system switches on only if
outside temperature is low.

