Page is loading ...

Zur Filterreinigung den Schlauch am Ansaugrohr abziehen und Topf
über Abfluss oder Eimer entleeren. Erst dann Filterdeckel öffnen;
Filtermassen entnehmen (reinigen oder wechseln) und Gerät säu-
bern. Beim Filter 2260 kann der Topf über den Ablasshahn mit
einem zusätzlichen Schlauch auch direkt entleert werden!
Reinigung der Pumpe:
Anschlusswinkel abziehen, Pumpendeckel entriegeln und alle Teile
gemäß Zeichnung herausnehmen. Mit Reinigungsbürsten-Set
(Best.-Nr. 4009570 bei 2250 oder Best.-Nr. 4009580 bei 2260)
Pumpenkanäle kräftig säubern. Pumpenteile unter fließendem
Wasser reinigen und anschließend in gleicher Reihenfolge wieder
zusammensetzen.
I Handhabung der Sicherheits-Schlauchmontage.
Hinweis: Die kompletten Schlauchverbindungen in regelmäßigen
Abständen auf korrekten Sitz prüfen.
VERY IMPORTANT SAFETY INSTRUCTIONS
WARNING- To guard against injury, basic safety precautions should be observed,
including the following.
FOR HOUSEHOLD USE ONLY
WARNING! RISK OF ELECTRIC SHOCK!
This pump has not been investigated for use in swimming pools areas!
DO NOT RUN DRY!
READ AND FOLLOW ALL SAFETY INSTRUCTIONS.
– DANGER. To avoid possible electric shock, special care should be taken since water is em-
ployed in the use of aquarium equipment. For each of the following situations, do not at-
tempt repairs by yourself; return the appliance to an authorized service facility for service
or discard the appliance.
– If the appliance falls into the water DON’T reach for it. First unplug the appliance immedia
tely (Nonimmersible equipment only)
– If the appliance shows any sign of abnormal water leakage, immediately unplug it from the
power source.
– Carefully examine the appliance after installation. It should not be plugged in if there is
water on parts not intended to be wet.
– Do not operate any appliance if it has a damaged cord or plug, or if it’s malfunctioning
or if it is dropped or damaged in any manner.
– Care should be taken to arrange the cord so that it will not be tripped over or pulled.
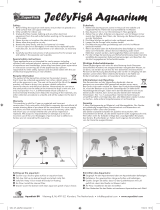
– To avoid the possibility of the
appliance plug or receptacle
getting wet, position aquari-
um stand and tank to one side
of a wall mounted receptacle
to prevent water from drip-
ping onto the receptacle or
plug. A “drip loop”, shown in
the figure, should be arranged
by the user for each cord
connecting the aquarium
appliance to a receptacle. The
AQUARIUM TANK
POWER
SUPPLY
CORD
DRIP
LOOP
APPLIANCE
English

The “drip loop” is that part of the cord below the level of the receptacle, to prevent water tra-
velling along the cord and coming in contact with the receptacle. If the plug or receptacle does
get wet, DON’Tunplug the cord; disconnect the fuse or circuit breaker that supplies power to
the appliance. Then unplug and examine for presence of water in the receptacle.
– Close supervision is necessary when any appliance is used by or near children.
– To avoid injury, do not contact moving parts.
– Always unplug an appliance from an outlet when not in use, before putting or taking off
parts, and before cleaning. Never yank cord to pull plug from outlet. Grasp the plug and pull
to disconnect.
– Do not use an appliance for other than intended use. The use of attachments not recom-
mended or sold by the appliance manufacturer may cause an unsafe condition.
– Do not install or store the appliance where it will be exposed to the weather or to tempera-
tures below freezing.
– Make sure an appliance mounted on a tank is securely installed before operating it.
– This appliance has a polarized plug (one blade is wider than the other). As a safety
feature, this plug will fit in a polarized outlet only one way. If the plug does not fit fully in
the outlet, reverse the plug. If it still does not fit, contact a qualified electrician. Never use
with an extension cord unless plug can be fully inserted. Do not attempt to override this
safety feature.
– Read and observe all the important notices on the appliance and its cord.
– If an extension cord is necessary, a cord with a proper rating should be used. A cord rated
for less amperes or watts than the appliance rating may overheat. Care should be taken to
arrange the cord so that it will not be tripped over or pulled.
– Check that the voltage shown on the label of the unit corresponds to the voltage of the mains
supply.
– Disconnect all electrical appliances from the mains before placing hands in the water.
– The line cord of this unit cannot be replaced or repaired. Should the line cord become da-
maged the appliance must be discarded.
KEEP THESE INSTRUCTIONS
FOR FUTURE REFERENCE.
Many thanks
for purchasing your new EHEIM classic external filter. It gives you op-
timum performance with excellent reliability and great effectiveness.
External filter 2260
Read the operating and safety instructions carefully and comply with all
instructions prior to operating this device. Keep these operating
instructions in a safe place.
For indoor use only. For use with aquariums. The aquarium filter is for
domestic use only.
All electrical equipment in the water must be disconnected from the
mains during care and maintenance work. To protect against contact
voltage being too high, the fixture must have a residual current device
with a rated release fault current not exceeding 30 mA. Ask your elec-
trician.
Safety instructions

The connecting line of this device can not be replaced. In case of dama-
ge to the power cord, the device is to be scrapped. Never carry the pump
by the cable; do not bend the cable.
This equipment can be used by children above the age of 8 or by persons
with reduced physical, mental or sensory capacities or a lack of experi-
ence or knowledge, provided they are supervised or have received
instruction in the safe use of the equipment and the refore understand
the risks involved. Do not allow children to play with this equipment. Do
not allow children to clean or conduct user maintenance without super-
vision.
Notice: These devices produce magnetic fields which
might cause electronic and mechanical disturbances or
damages. This also refers to pacemakers. Please consult the manuals
of medical equipment for the required safety margins.
Attention: Maintenance work presents the risk of crus-
hing th fingers due to high magnetic forces.
For your own safety, we recommend to form a drip loop
with the connection cable to prevent any water running
along the cable from intruding into the socket. When
using a multiple socket or an external power supply
unit, position them atop the filter’s power connection.
Since a wide variety of varnishes and polishes are
used when processing timer, the appliance feet can
leave visible traces on furniture or parquet floors as a
result of chemical reactions. Therefore the device should not be placed
on unprotected wooden surfaces.
To achieve optimal operational safety there must be a maximum of 150
cm between the surface of the water and the bottom of the filter.
Do not clean the unit – or parts of it – in the dishwater. Not dishwater
resistant!
Do not dispose of this product as normal household waste. Take it to
your local refuse collection side.
The product is qualified in accordance with the respective
national regulations and guidelines and meets EC standards.
2
0 cm
max.
150 cm
Function
A
a
Suction pads with clamping brackets
b
Jet pipe with end-plug
c
Outlet elbow
d
Threaded connector, pressure side
e
Cover
f
Centrifugal pump
g
Filter cover
h
Large sealing ring
i
Top
lattice screen (short lugs)
j
Lower lattice screen (long lugs)
k
Fil-
ter canister with fasteners
l
Hose connection, suction side
m
El-
bow
n
Intake pipe
o
Strainer
p
Drain tap (filter model 2260 only)
q
Hose clamps
r
Elbow connection
s
Union nut
t
Small sea-
ling ring
u
21
Union
u
22
Base plate.

Filter model 2260 comes complete with a drain tap which should be
screwed into the filter canister and closed. It provides for the interim
drainage of coarse deposits.
Installation
B Slide union nut onto long pipe section of elbow connection and fit
sealing ring. Screw threaded end of elbow connection into pump
intake socket and adjust vertically. Screw union into filter cover, pla-
ce pump on base plate so that the elbow connection is inserted into
union. Align pump and secure to base plate with 4 self-tapping scr-
ews and washers supplied. Screw union nut to union, tightening
with light pressure. Screw in pressure side union.
C Place lower lattice screen (long lugs facing downwards) in the filter
canister and install filter compound (E). Place top lattice screen
(short lugs facing upwards) in position. Fit sealing ring on filter cover
and install complete filter cover/pump assembly on filter canister.
Secure cover with fastening screws, making sure they are tight.
D Install top cover so that the two fastening clips engage the recesses
in the filter cover handles.
To remove the top cover, press in the two fastening clips below the
handles and push upwards simultaneously.
E Filter compound formation, from base upwards:
Install EHEIM FIX or EHEIM MECH to a depth of approx. 3 – 5 cm as
the lowest filtration layer.
Fill the accompanying net bag with EHEIM SUBSTRAT or EHEIM
SUBSTRATpro or EHEIM LAV, as the main mechanical-biological
filtration compound, and install in the filter canister. The net bag fa-
cilitates subsequent handling for cleaning operations.
Install approx. 3 cm EHEIM FIX as the top layer. Except when carry-
ing out short-term filtering after adding medication, please do not
use cotton wool, which soon becomes clogged with the high flow
rate through the filter.
Charcoal is only advisable for short-term use if it is necessary to
filter out unwanted substances when the filter is new or after the
addition of medication. It should be replaced by the specified filte-
rcompound formation after a maximum of 3 weeks. Never re-use
old charcoal.
F Place the filter below the water level, ideally beneath the aquarium.
Take care to ensure that the pump receives sufficient ventilation.
Pressure side installation:
Secure the jet pipe to the rear aquarium panel with the aid of the two
suction pads, at a sufficient distance from the surface to ensure
good oxygenation (1) or surface movement (2), depending on type
of installation. The outlet elbow should be secured to the jet pipe
with a short piece of hose, the elbow being led over the edge of the
aquarium. Con-nect the outlet elbow and pressure side union of the
filter with hose.
G Suction side installation:
Fit the intake pipe and strainer together, connect the elbow with a
short piece of hose and secure the intake pipe assembly to the

Putting into operation
Release the pressure hose from the jet pipe. By suction on pressu-
re side (or using the EHEIM suction device, order no. 4003540),
draw water through the end of the hose and over the rim of the aqua-
rium until the filter is functioning fully of its own accord. Now
reconnect the pressure hose to the jet pipe and switch on the filter
by plugging it into the power supply.
Servicing and maintenance
H Always disconnect the power supply before carrying out any clean-
ing or other operations on the filter.
To clean the filter, pull off the hose from the intake pipe and empty
the canister into a bucket or allow it to drain. Then, and only then,
remove the filter cover. Remove filter compound (clean or replace)
and clean the appliance. For the care of the centrifugal pump, refer
to the accompanying pump instruction leaflet.
The filter canister on model 2260 can be emptied direct by attaching
a hose to the drain tap, if required.
Cleaning of the pump:
Remove the connection bend, unlock the pump lid and remove all
parts as shown on the drawing. Clean the pump pipes with a set of
cleaning brushes (order no. 4009570 for 2250 or 4009580 for 2260).
Clean the pump parts under running water and then reassemble in
the same order.
I Diagram showing assembly of the safety hose.
Note: All hose connections must be checked at regular intervals for
correct fitting.
aquarium panel with 2 suction pads. Connect the elbow to the inta-
ke side hose connector on the filter with hose. (See also fig. J).
Français
Filtre extérieur 2260
Mercy beaucoup
pour l’achat de votre nouveau filtre extérieur EHEIM classic. Il offre d’ex-
cellentes performances avec une fiabilité et une efficacité maximales.
Consignes de sécurité
Avant la mise en marche de cet appareil, lisez et respectezattentive-
ment la notice d'utilisation et les consignes de sécurité. Conservez
impérativement cette notice d'utilisation.
Usage intérieur exclusivement. Destiné à être utilisé uniquement en
aquariophilie. Filtre aquarium pour usage domestique.

classic 1500 XL
Typ / Type
2260
Für Aquarien bis 1.500 l
For aquariums up to
Pour aquariums jusqu’à 330 Imp. gal.
Voor aquaria tot
För akvarier upp till 396 US gal.
Per acquari fino a
Pumpenleistung 2.400 l/h
Pump output
Débit de la pompe 528 Imp. gal.
Pompcapaciteit
Pumpkapacitet 634 US gal.
Potenza della pompa
Förderhöhe H
max.
3,70 m
Delivery head wat. col.
Hauteur de réf. col. d’eau 12 ft.
Opvoerhoogte wk
Lyfthöjd vst
Prevalenza
Leistungsaufnahme 65 W
Power consumption
Consommation de courant
Stroomverbruik
Eleffekt
Assorbimento
Behältervolumen 23 l
Canister volume
Volume de la cuve 5.06 Imp. gal.
Filterpotvolume
Volym av filterbehållaren 6.08 US gal.
Volume del contenitore
Filtervolumen/(Vorfilter) 18 l
Filter volume/(prefilter)
Volume du filtre/(préfiltre)
3.96 Imp. gal.
Filtervolume/(voorfilter)
Filtervolym/(förfilter) 4.75 US gal.
Volume del filtro/(prefiltro)
Maße (H x Ø) 570
x 355 mm
Dimensions (h x ø)
Dimensions (h x ø) 22.44.
x 13.98 in.
Afmetingen (h x ø)
Mått (h x ø)
Dimensioni (a x ø)
/