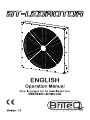
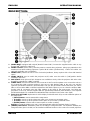
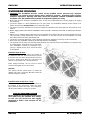
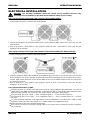
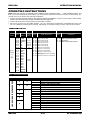
Briteq BT-LEDROTOR high power 70x70cm LED effect fan is a versatile lighting solution for various show applications, including TV studios, rentals, and discos. With 720 RGB LEDs distributed across 6 fan blades, each blade featuring 5 individual RGB sections, it offers amazing built-in pixel patterns and free pixel programming. The 32pcs 3W UV LEDs illuminate the white-colored blades, creating a striking effect in the dark. Choose from 3 DMX modes: 5 channels for easy recall of built-in effects, 12 channels for intermediate flexibility, or 33 channels for full control, including pixel control.
Briteq BT-LEDROTOR high power 70x70cm LED effect fan is a versatile lighting solution for various show applications, including TV studios, rentals, and discos. With 720 RGB LEDs distributed across 6 fan blades, each blade featuring 5 individual RGB sections, it offers amazing built-in pixel patterns and free pixel programming. The 32pcs 3W UV LEDs illuminate the white-colored blades, creating a striking effect in the dark. Choose from 3 DMX modes: 5 channels for easy recall of built-in effects, 12 channels for intermediate flexibility, or 33 channels for full control, including pixel control.


-
 1
1
-
 2
2
-
 3
3
-
 4
4
-
 5
5
-
 6
6
-
 7
7
-
 8
8
-
 9
9
-
 10
10
-
 11
11
-
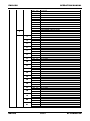 12
12
-
 13
13
-
 14
14
-
 15
15
-
 16
16


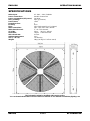
Briteq BT-LEDROTOR high power 70x70cm LED effect fan is a versatile lighting solution for various show applications, including TV studios, rentals, and discos. With 720 RGB LEDs distributed across 6 fan blades, each blade featuring 5 individual RGB sections, it offers amazing built-in pixel patterns and free pixel programming. The 32pcs 3W UV LEDs illuminate the white-colored blades, creating a striking effect in the dark. Choose from 3 DMX modes: 5 channels for easy recall of built-in effects, 12 channels for intermediate flexibility, or 33 channels for full control, including pixel control.
Ask a question and I''ll find the answer in the document
Finding information in a document is now easier with AI
Related papers
-
Briteq BEAMSPOT-4BAR NW Owner's manual
-
Briteq BT-RETRO Owner's manual
-
-
Briteq BT-SUNRAY 130R Owner's manual
-
-
-
Briteq BT-VENUELITE 4-Cell Projector Light User manual
-
-
-
Other documents
-
 Microh LEDP64(K) User manual
-
ACME CA-RS16 User manual
-
Audibax Spark 600 User manual
-
JB systems Intruder User manual
-
CLF Lighting Softled 100 VW User manual
-
CLF Lighting SOFTLED 200 VW User manual
-
 LEDDOO LED SQUARE BAR 144 User manual
-
Contest FLASHBEAM User guide
-
Beamz FLOOD36UV LED UV Flood Light Quick start guide
-
Beamz FLOOD36UV User guide

