Page is loading ...

Label Picture Description Qty
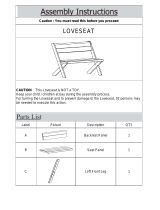
A Front Leg 2
Caution: You must read this before you proceed.
LOVESEAT
1 of 6

B1 Right Back Leg 1
B2 Left Back Leg 1
C Backrest 1
D Seat 1
Label Picture Description Qty
①
Long Bolts M8X60mm 3
②
Medium Bolts M8X40mm 17
③
Spring Washers 20
④
Washers 20
⑤
Allen Key 1
Backrest (C)
Right Back Leg (B1)
Front Leg (A)
Front Leg (A)
Seat (D)
FRONT FACING
2 of 6

This Loveseat has multiple parts and may require up to 30 minutes to assemble. To give
you an overview of the Loveseat parts, the above picture is to help you put the various
Loveseat parts into perspective. Please read through the instructions to familiarise yourself
with the parts and steps before assembly.
3 of 6

REMOVE the non-woven fabric from under the seat, take out the legs and hardware
accessories.
Put the Backrest onto a flat table or panel,You will see 6 ( six ) attachment points.
Step 2.1 Attach the Seat(D) to Backrest (C) with the Long Bolt (①) & Medium Bolt (②) +
Spring Washer Ring(③) + Washer(④) as shown. Use the Allen Key(⑤) to fasten all six
bolts.
Step 2.2 Attach the Seat(D) to Backrest (C) with the Medium Bolt (②) + Spring Washer
Ring(③) + Washer(④) as shown . Use the Allen Key(⑤) to fasten all six bolts.
Place the velcro non-woven fabric cover back underneath the Seat(D)
Step 2
Step 3
Step 1
④
③
②
⑤
①
②
④
②
③
④
Step 2.1
Step 2.2
4 of 6

Place the Loveseat on a LEVEL SURFACE to see if it wobbles.
If it wobbles, press firmly down on Seat and Backrest at the same time. This will help to
ensure all Bolts and gaps reach full alignment status.
If no wobbles found, proceed to tighten all the bolts.DO NOT fully tighten a BOLT in one
go and then move on to the next. Rather,In a sequential manner,gradually tighten each
Bolt until all bolts are evenly secured.
This methodology will ensure maximum eveness once all Bolts are fully tightened.
Now tighten all the bolts untill the chair is not wobbling on the LEVEL SURFACE.
Your Loveseat is ready for use.
This Loveseat can only be used on a flat, level surface.
Install the legs (A&B1&B2) to Seat by using the Medium Bolt (②) + Spring Washer (③) +
Washer(④) as shown. Use the Allen Key(⑤) to fasten all bolts.
Caution:Do not fully tighten.
Step 4
Step 5
②
③
④
A
A
B2
B1
⑤
5 of 6

6 of 6
/
