
Assembly Instructions: 1323-1W (Ella)
IMPORTANT:
• ALL INSTALLATION WORK SHOULD BE DONE BY ACCREDITED PROFESSIONAL.
• SHUT OFF POWER SUPPLY AT FUSE OR CIRCUIT BREAKER!
• USE ONLY THE SPECIFIED BULBS. DO NOT EXCEED THE MAXIMUM WATTAGE!
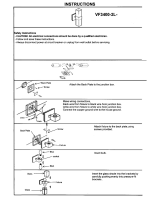
PREPARING FOR INSTALLATION
Remove all of the contents from the carton. See the important
notes above. Shut off the power at the circuit breaker and
completelyremovetheoldxturefromthewall,includingthe
oldmountingstrap.
Mountingstrap(B)containsseveralpairsofthreadedholes.
Findthepairofholesthatmatchesthespacingoftheholeson
thejunctionboxandyourxture’sbackplate.Note:Inorderfor
thexturetohangstraight,brackets(C)shouldbecenteredat
thetopandbottom.Pullthehousewiresthroughthecenterof
mountingstrap(B).Placemountingstrap(B)overthejunction
boxsothatmountingscrews(A)arehorizontal,andinalignment
withtheholelocationsonthexture’sbackplate(F).Secure
mountingstrap(B)tothejunctionboxwithmountingscrews(A)
andascrewdriver.Tightenthescrewssecurely.
CONNECTING THE WIRES
Attachthexture’swirestothepowersupplywiresfromthe
junctionbox.Connectblack(hot)tosmooth/black/transparent
(L);white(neutral)toribbed/white/transparent(N);andground
(green)tobarecopper/green/transparentwithgreeninterior.
Twisttheendsofthewirepairstogether,andthentwistona
wire connector. Make sure all twists are in the same direction.
Ifthereisnogroundwire(greenorcopper)fromthejunction
box,locategroundscrew(E)onthemountingbracket/mounting
strapandwrapthexture’sgroundwirearoundthegreen
groundscrew(E).Useascrewdrivertosecuregroundscrew(E)
ontothemountingbracket/mountingstrap.Tuckallwiresneatly
intothejunctionbox.
FINISHING THE INSTALLATION
Placebackplate(F)overbrackets(C)ofmountingstrap(B)and
line up the holes on the top and bottom of the backplate with
the holes in brackets (C). Insert screws (D) into the holes at the
topandbottomofbackplate(F)anduseascrewdrivertotighten
the screws securely.
Slide candle sleeve (J) over socket (I).
Installlightbulb(K)(notprovided)inaccordancewiththe
xture’sspecications.
Your installation is now complete. Turn on the power and test
thexture.
CLEANING TIPS
Treat the xture gently! Regular cleaning will reduce the need for deep cleaning. For regular cleaning, turn off the light and wipe down
the xture with a clean lint-free cotton or microber cloth. Dry with a lint-free or microber cloth.
For Customer Service, contact
the place of purchase.
E
A
B
D
C
F
G
H
I
J
K
Smooth / Black /
Transparent (L)
Black (Hot)
Ribbed / White /
Transparent (N)
Bare Copper / Transparent with
Green Interior / Green
White (Neutral)
Green
(Ground)

AA is a double sided crystal,
50mm
Part: PT-CRYSTAL-1323-AA
AS is a single sided crystal,
50mm
Part: PT-CRYSTAL-1323-AS
A - crystal drop
B - crystal drop
C - crystal drop
BB is a double sided crystal,
76mm
Part: PT-CRYSTAL-1323-BB
BS is a single sided crystal,
76mm
Part: PT-CRYSTAL-1323-BS
CC is a double sided crystal,
89mm
Part: PT-CRYSTAL-1323-CC
D5/D6 uses 5/6 pieces
of replacement part
PT-CRYSTAL-1323-D12
A1
A2
A4
A6
B2
BB1
CC5
D - crystal drop
A1, A2, A3, and A4
These crystal drops use
1/2/4/6 pieces of
PT-CRYSTAL-1323-D14
plus 1 piece of
PT-CRYSTAL-1323-AS
B2 uses 2 pieces of
PT-CRYSTAL-1323-D14
plus 1 piece of
PT-CRYSTAL-1323-BS
BB1 uses 1 piece of
PT-CRYSTAL-1323-D14 plus
1 piece of PT-CRYSTAL-
1323-BS
CC5 uses 5 pieces of part
PT-CRYSTAL-1323-D14 plus
1 piece of PT-CRYSTAL-
1323-CC
1323 Crystal Instructions
-
 1
1
-
 2
2


Golden Lighting 1323-1W WG Operating instructions
- Type
- Operating instructions
- This manual is also suitable for
Ask a question and I''ll find the answer in the document
Finding information in a document is now easier with AI
Related papers
-
Golden Lighting THDDDDDBA1 Operating instructions
-
-
-
-
-
-
-
Golden Lighting 3602-BA1 BLK-BE Installation guide
-
-
Other documents
-
 Designers Choice Collection VF3400-2L-CH Operating instructions
-
Ralph Lauren RL 2005 User manual
-
Heath Zenith 5310 User manual
-
Bradley Express MG-3/AST4 Installation guide
-
Sea gull lighting 77225-02 Installation guide
-
SECO-LARM SK-2323-SPQ Owner's manual
-
 ENFORCER SK-2323-SPQ Installation guide
-
 OALE CC5 Hard reset manual
-
Minka Lavery 4403-581 User manual
-
Metropolitan N7104-258B User manual


