Pitney Bowes Network SendKit Owner's manual

Type
Owner's manual

Pitney Bowes Network SendKit is a comprehensive shipping solution that enables seamless label printing, postage calculation, and package tracking. With its user-friendly interface and integration with major carriers, you can effortlessly manage your shipping processes and save time and money. The SendKit includes a scale for accurate weighing, a printer for high-quality labels, and a PC software for managing shipping data and generating reports.

Pitney Bowes Network SendKit is a comprehensive shipping solution that enables seamless label printing, postage calculation, and package tracking. With its user-friendly interface and integration with major carriers, you can effortlessly manage your shipping processes and save time and money. The SendKit includes a scale for accurate weighing, a printer for high-quality labels, and a PC software for managing shipping data and generating reports.

Right, let’s get your SendKit up
and running quickly
Let’s rst get together the things you will need:
The box containing your SendPro
®
Network SendKit.
A Welcome Email from Pitney Bowes containing your SendPro
®
Log in details.
A PC on which you have full admin rights to allow downloading
and installing software.
1 available USB ports on your PC.
If you have not received the email from Pitney Bowes, do not go
any further with this installation. Please visit pitneybowes.com for
contact details for your market.
Continue reading below
SendPro
®
Network SendKit
Read Now BEFORE you unpack your equipment
Microsoft Windows Installation Instruction
Network Printer Connection
1. Opening the box and unpacking.
3. Downloading the scale utility.
2. Signing into SendPro
®
.
Scale
Printer
USB
(not used
for network
installation)
Power Cord
Network Cable
sendpro.pitneybowes.com
Here’s a diagram and explanation of the items you should
nd in your box.
If you have any problems during this installation, refer to
‘Troubleshooting’.
Sign into SendPro® using the link in the welcome email.
Now you are signed into SendPro® Click on the Help icon.
Select Download SendPro® Scale Utility for Windows.
Select Run or Open (this depends on your internet browser).
Follow the prompts on screen to install.
Click Finish.
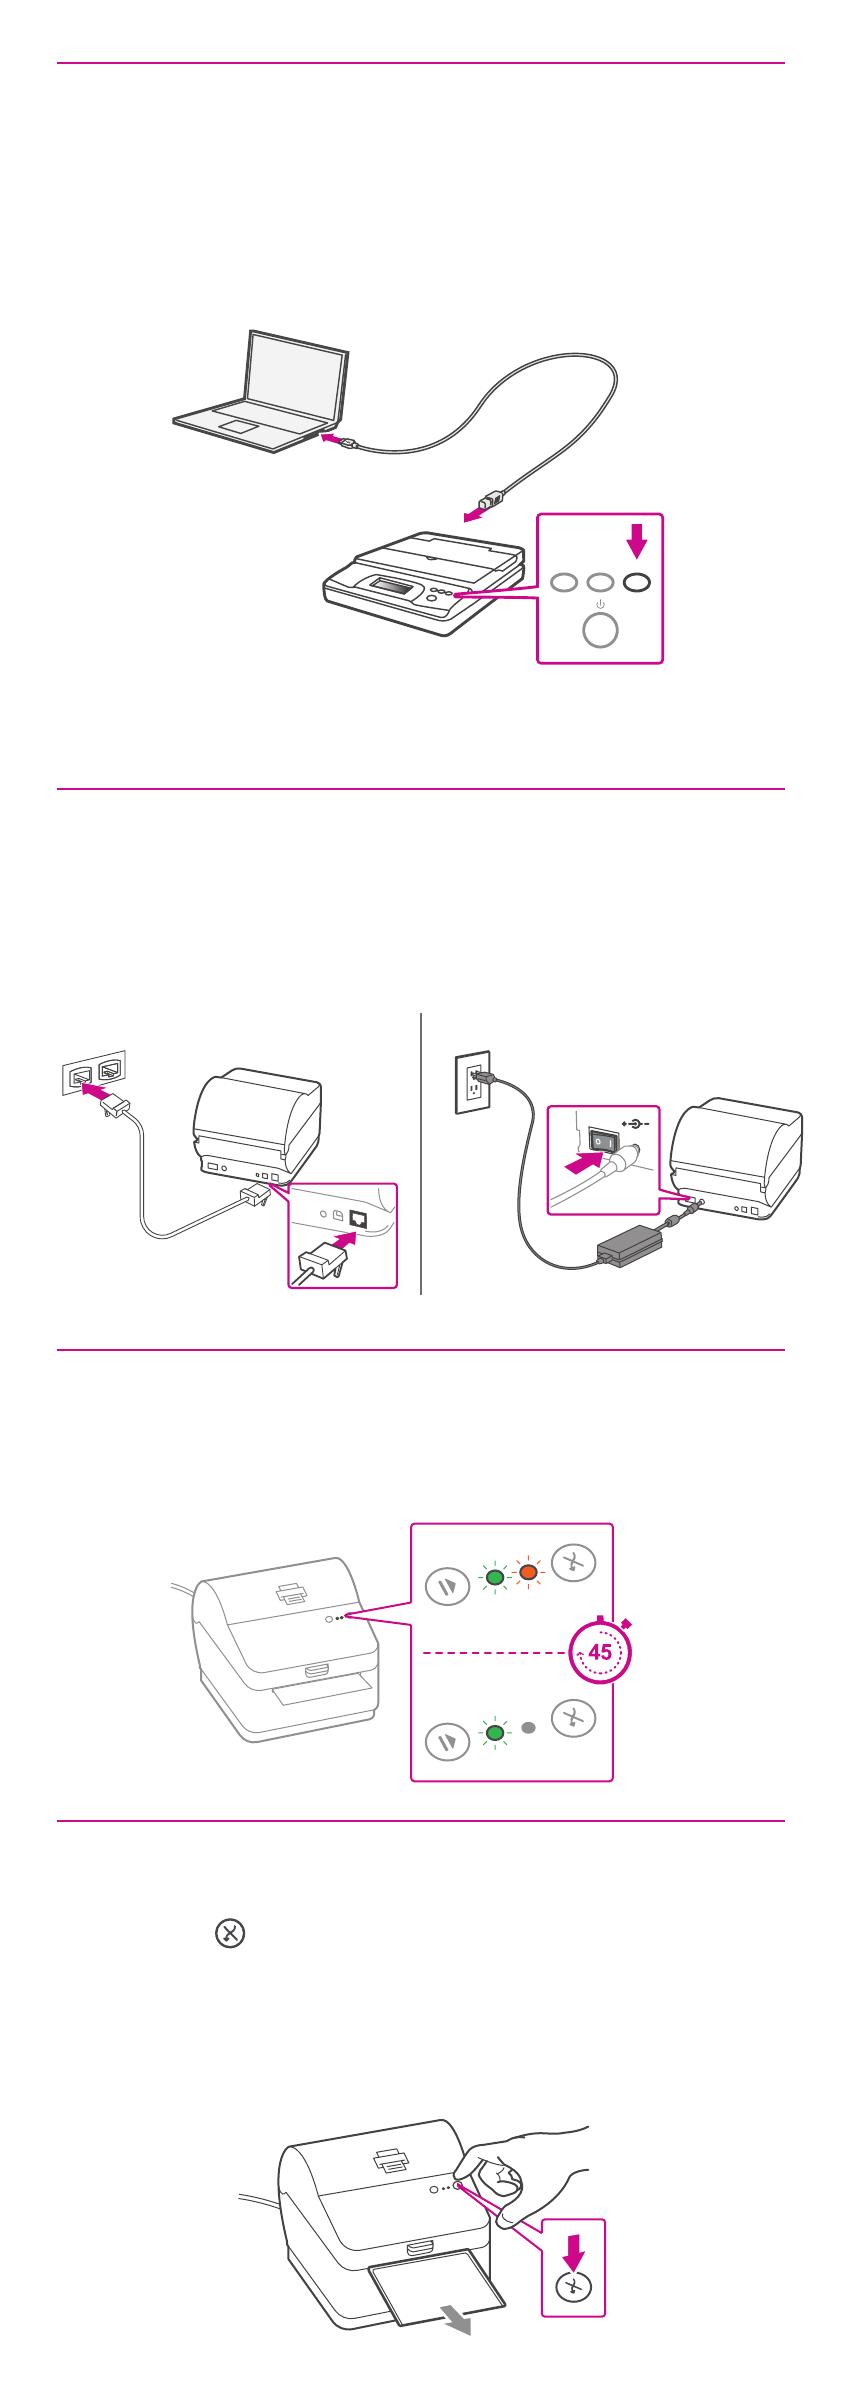
4. Connecting your scale.
5. Connecting the printer.
Connecto your Network cable to your printer and Network
socket.
Connect the power cord and adapter to your printer
(as shown) and switch on.
Note: If you do not wish to use a USB to connect your scale
refer to the online help for information on battery installation.
6. Printer ready.
7. Aligning the label roll.
Place your scale on a rm and at surface near to your
computer.
Connect your scale to your computer using the USB cable
supplied. Then press the Zero button.
Hold Mode Zero
Wait for approximately 45 seconds until the green
light remains constant and the printer is ready.
Press the button and check that the label feeds out correctly.
Note: If the label does not feed correctly please refer to label
alignment instructions inside the printer top cover.
Tear o the correctly dispensed label.
Network Cable Power Cable
10. Connecting to the printer.
Select Network and press Next.
Then select Datamax-O’Neil w1110 Printer model when
prompted and select Next.
8. Printing a system report.
9. Downloading the printer driver.
1. Ensure you are signed into SendPro® and click on the
Help icon.
2. Select the Datamax Printer Driver.
3. Select to download the correct printer driver for your
operating system.
4. Select Run or Open dependant on your browser.
5. Accept the licence agreement and follow the on screen
prompts to install.
Print the System Report to obtain the IP address assigned to
the label printer.
1. To print the system report simultaneously press the button
on the front of the label printer and the recessed button
on the back of the printer with a suitable object such as a
pencil or similar.
2. Keep the printed report that will be needed later in the
installation process.
System Report
...
Ethernet IP
Ethernet MAC
Ethernet DHCP
Hostname
11. Specifying a port.
Select Create Port.
13. Conrming the port.
The wizard will return to the Specify Port screen.
Use the vertical scroll bar to view and conrm the new port is
now in the list and select Next.
12. Printer port wizard.
Select Next to run the Printer Port Wizard.
Enter the Ethernet IP from the system report printed in step 8
and Select Next.
Note: The Port Name will automatically be populated with a
default value.
Windows Wizard will automatically nd the device.
If not found, Select Generic Network Card from the drop
down menu and Select Next.
Select Finish to complete the Printer Port Wizard and to
return to driver installation.
Note: The driver and port name will now show what was
entered in the screen above.
Select Close.
Then Select TCP/IP Port and click New Port.
16. Test print.
Your SendKit is now connected.
To test your printer is working correctly follow the steps
below.
On a PC
Go to your Control Panel
Select Devices & Printers
Double click on the Printer
(DataMax-O’Neil w1110)
1. Select Printer from the menu bar
2. Select Properties
3. Select General
4. Select Print Test Page.
Check that your label has printed correctly. If you have any
issues with the print refer to Troubleshooting later in this
document.
15. Completing printer setup.
14. Accepting the printer name.
Select Finish to complete the wizard and begin using your
printer.
Select Next to accept the default printer name.
*AW32616reva*
3001 Summer St.
Stamford, CT 06926
www.pitneybowes.com
AW32616 Rev. A 04/18
©2018 Pitney Bowes Inc.
All Rights Reserved
If you’re still having trouble, then visit
www.pitneybowes.com
and select Support.
Now let’s get shipping!
You can access in-depth Online Help that covers all operator and
feature aspects of your SendPro® software and SendKit in detail.
To access this information, press the Help ( ) icon from your App.
and select See More Help Topics. But for your convenience, we’ve
included links to most commonly needed support to get you started.
Creating a label
How to print a shipping label in
SendPro
Managing Sendpro users
How to view your history in
SendPro
Click Here
Click Here
Click Here
Click Here
Click Here
Carrier Services and Packaging
For information about size and weight restrictions, visit the carrier’s
website:
USPS
UPS
FedEx
Note: Available carriers dependent on Sendpro subscription.
How to change your username,
password, and account name for
SendPro
  • Page 1 1
  • Page 2 2
  • Page 3 3
  • Page 4 4
  • Page 5 5
  • Page 6 6
  • Page 7 7

Pitney Bowes Network SendKit Owner's manual

Type
Owner's manual

Pitney Bowes Network SendKit is a comprehensive shipping solution that enables seamless label printing, postage calculation, and package tracking. With its user-friendly interface and integration with major carriers, you can effortlessly manage your shipping processes and save time and money. The SendKit includes a scale for accurate weighing, a printer for high-quality labels, and a PC software for managing shipping data and generating reports.

Ask a question and I''ll find the answer in the document

Finding information in a document is now easier with AI