Page is loading ...

TDM-100/150 TO NMD-50
CONVERSION PROCEDURES
(MODEL RL5000 ATM)
TDN 07102-00062 03/2005
COPYRIGHT NOTICE
© 2005 Delaware Capital Formation, Inc. All Rights Reserved. TRITON, TRITON WHERE MONEY
COMES FROM, TRITON WAVES, DOVER and DOVER logo are registered trademarks of Dela-
ware Capital Formation, Inc., a wholly-owned subsidiary of Dover Corporation.
C
ORPORATE HEADQUARTERS: RMA (RETURN MATERIAL AUTHORIZATION)
RETURN ADDRESS:
522 E. Railroad Street 21405 Avenue “B”
Long Beach, MS 39560 Long Beach, MS 39560
Phone: (228) 868-1317
Fax: (228) 868-0437

2
TDM-100/150 TO NMD-50 CONVERSION PROCEDURES
PURPOSE
This guide covers the steps for replacing your TDM-100 or TDM-150 dispenser in the Model RL5000 ATM with an NMD-
50 multi-cassette dispenser. This procedure includes a list of all tools and hardware necessary for the conversion as well
as the steps involved.
SCOPE
This procedure applies to all service personnel involved in the process of maintaining or converting Triton ATMs.
APPLICATION
The two (2) conversion kits available depend on the Model RL5000 unit cabinet you currently have. The following
guidelines will determine which kit is required to upgrade your ATM:
¾ Units built with serial numbers Before LRL5111042931385 require kit P/N 06200-00104.
These cabinets are identified with a vault door “T-Handle” installed.
¾ Units built thereafter require kit P/N 06200-00103. These cabinets (current) are identified with
a vault door “Lift” handle.
How to Determine Unit Builds
To determine when your unit was built, the serial number (located on the
affixed label inside the control panel) has a “julian” date located in the
block of numbers. For example, in the serial number mentioned above,
LRL5111042931385, the “04293” is the year (04) and julian day (293th
day of the year) that the unit was built.
Section 1 - This section covers the conversion procedures with older style cabinets (P/N 06200-00104).
Section 2 - This section covers the conversion procedures with the current cabinet.

3
REQUIRED PARTS AND TOOLS
SECTION 1 - CONVERSION WITH “OLDER” STYLE CABINETS (W/T-HANDLE)
DERIUQERSLOOT
revirdwercSspillihPdnadettolS
revirDtuN)mm11("61/7dna)mm9("23/11
)40100-00260N/P(TIKNOISREVNOC05-DMNotMDT
tenibaC"eldnaH-T"
DEILPPUSSTRAP
REBMUNTRAP NOITPIRCSED YTITNAUQ
90000-00290ylppuSrewoP1
02100-50090)tluaVtcejeRdnasettessaC2/w(msinahceM05-DMN1
23020-11030potSedilS,depahs-
L,tekcarB1
90200-45020daehnaPdettolS,eliforPwoL,mm01xmm4,wercS6
40100-11030)resnepsiD(tekcarBeldnaH2
61400-06
010xeloM,tcennoCkciuQ,rotcennoC1
90000-27030elbaCevisehdAtiudnaP,pilC6
00000-28030"81,edilSmotsuC2
32050-11030t
ekcarBrecapSedilS1
75000-00690hceMotJE,elbaCataD1
71100-0219005-DMN,elbaCrewoPCD1
63020-00690wolleY,eludoMJE1
98
300-11030JE,tekcarB1
76300-0219005-DMN,eriWdnuorG1
50000-20320leetScniZ,"8/3x02-4/1,tloBxeH3
61000-90320leetScniZ,"4/1,rehsaWkcoL3
73000-1032002-4/1,tuNpeK2
84000-45020cniZ,daeHspillihPssurT,"8/3,23-8#,wercS8
51000-27030p
arWyT3
91000-27030evisehdA,pmalCelbaCtalF1
20000-27030citsalP,rotcennoCni-panS1
42000-00170)05-DMN(draCecneref
eRkciuQ0005LRledoM1
26000-20170)0005LR(serudecorPnoisrevnoC05-DMNotMDT1

4
TDM-100/150 TO NMD-50 CONVERSION PROCEDURES
DISASSEMBLY PROCEDURES
Figure 1. Disconnect all cables from power supply.
2. Dispenser Cable Harness - Using a 7/16" nut driver, remove the screw that secures the ground wire (Figure 3). After
removing the ground wire, reinstall the screw. Next, disconnect the
Dispenser data cable (RJ-45 end) connected to
the Docking board assembly. Loosen/turn the cable bundle guides (Figure 4) and separate data cable from bundle.
Feed the dispenser data, power, and ground wire harness down to the vault area through the cable access hole in
Figure 5.
1. Power Supply - Open the control panel. Disconnect all cables (AC/DC) from the terminal power supply (Figure 1).
Lift the control panel slightly. Using an 11/32" nut driver,
loosen the two (2) nuts that secure the power supply to the
cabinet (Figure 2). Slide the power supply towards the rear of cabinet and remove from the unit.
Before proceeding, follow these steps to remove power from the ATM:
Enter Management Functions > System Parameters > Shut Down the Terminal. When prompted, turn power OFF on the
ATMs power supply. Unlock and open the ATM control panel. Turn the power switch to the OFF (0) position. If possible,
unplug the ATM power cord at the wall outlet.
Figure 2. Loosen the 2 nuts that secure power supply.
Figure 3. Disconnect ground wire.
Figure 4. Loosen guides.
Figure 5. Feed cables down to vault area.
3. TDM Dispenser - Open the cabinet vault door. Release the locking slide rail and fully extend the dispenser from the
cabinet. Rotate the dispenser mounting platform 180° to the “Service” position. Locate the spring-loaded locking pin
on the underside of the mounting tray (Figure 6). Pull the pin down and turn the tray clockwise (Figure 7) so the note
and reject cassettes can be accessed from the front. Release the locking pin and move the platform back and forth
slightly to ensure the pin snaps into place to the “Service” position (Figure 8).
Figure 6. Pull release pin.
Figure 7. Rotate mechanism “clockwise”.
Figure 8. Mech in “Service” position.

5
SECTION 1 - CONVERSION WITH “OLDER” STYLE CABINETS (W/T-HANDLE)
Figure 11. Remove slide rails w/tray.
UPGRADE KIT ASSEMBLY PROCEDURES
1. Right Side Slide Assembly - On a flat surface, assemble the right side slide
assembly. Extend one of the slide rails (Figure 1) and secure to the slide
spacer bracket with four (4) Truss phillip head screws (Figures 1 and 2).
Mount this assembly to the right cabinet bracket shown in Figure 3. Using a 7/16" nut driver, secure the assembly to
the cabinet bracket using two (2) 3/8" hex bolts and lock washers. When installed, the slide rail (pushed in) should be
even with the door flange (Figure 4).
Figure 1. Slide rail extended.
Figure 2. Slide rail/spacer assembly.
Figure 4. Assembly mounted to cabinet.
Figure 3. Cabinet bracket.
4. Disconnect the power and communication (Comms) cables from the dispenser (Figure 9). Carefully cut any Ty wraps
that are securing the cables to the dispenser. Remove the cables from the cabinet. Remove the note and reject cassettes.
Using a phillips-head screwdriver, remove the four (4) or six (6) mounting screws that secure the dispenser to the
swivel platform (Figure 10). Remove the TDM dispenser mechanism.
Ferrite
Figure 10. Remove mounting screws.
Figure 9. Power and Comm cable disconnected.
6. Dispenser Slide Rail Hardware - With the tray extended out, use a phillips
screwdriver to remove the screws (3 on each side) that secure the slide rails
to the mounting brackets (Figure 11). Remove the slide rails (with mounting
tray attached) from the cabinet.

6
TDM-100/150 TO NMD-50 CONVERSION PROCEDURES
2. Left Side Slide Rail - Mount the other slide rail to the left cabinet bracket (Figure 5) using four (4) Truss phillip head
screws (Figure 6). Use the diagram below for screw locations. Note: When installing slide rail, ensure the power/
phone cables are “tucked” behind the cabinet bracket as shown in Figure 5. Slide rails will be offset when extended.
Figure 5. Cabinet bracket.
Figure 6. Slide rail installed.
3. Electronic Journal (EJ) and Bracket - The EJ (yellow), bracket, and cables (2 - EJ to dispenser, EJ to docking board)
should be pre-assembled in the kit. If they are not, use Figure 7 as a reference for assembly. Locate the two (2) bolts
in the upper right of the vault area (Figure 8). Mount the EJ assembly to the bolts (cable connects towards rear of
cabinet) and secure with the two (2) Kep nuts provided using a 7/16" nut driver (Figure 9).
Figure 7. EJ and hardware assembly. Figure 8. Mounting bolt location. Figure 9. EJ mounted.
4. Dispenser Ground - Remove the cabinet ground bolt (Figure 10), if installed. If no bolt is available, one is included in
the kit. Install the dispenser ground wire included and secure both ground wires with the bolt previously removed or
one included (Figure 11). The other end of ground wire will attach to the NMD-50 when installed.
Figure 10. Remove door ground bolt. Figure 11. Dispenser ground installed.
Dispenser ground

7
SECTION 1 - CONVERSION WITH “OLDER” STYLE CABINETS (W/T-HANDLE)
5. Dispenser Power and Data Cables - Feed the EJ to Docking board cable (RJ-45 connector end) through the control
panel access hole shown in Figure 12. Feed the dispenser power cable (insert) also up to the control panel (10-pin
connector end). These 2 cables will be connected in later steps. Route the 2 cables in the vault area (EJ to dispenser,
dispenser power cable end) in the existing cabinet cable clips (Figure 13).
Figure 12. EJ to Docking board cable.
Figure 13. Route power/data cables.
5. Dispenser - Extend the slides fully. Ensure all cables in vault area have been moved out of way before installing
mechanism. Remove cardboard support from mechanism cassettes. With 2-personnel, lift the NMD-50 by the green
handles and align the rails on the dispenser with the slide rails. Start inserting the rail on the RIGHT
first, then the
LEFT due to the offset of the rails (Figure 14). Slide mechanism up to the rail stops, then push the RIGHT release in,
then LEFT (Figure 15) and continue sliding mechanism fully into cabinet. Repeat extending/inserting mechanism
into cabinet a few times to ensure no binding on slide rails.
Figure 14. Rails extended (offset).
Figure 15. Push release tabs “in”.
6. Dispenser Cables - Connect the power, data, and ground wires to the NMD-50 as shown in Figures 16 and 17. Route
the cables through the cable clips attached to the mechanism covers (Figure 18). Ground wire routes down behind
slide and through the lower cable clips.
Figure 16. Power cable connection. Figure 17. Data/ground connections.
Figure 18. Route cables thru clips.
Dispenser power cable
Release tab
Ground wire routing

8
TDM-100/150 TO NMD-50 CONVERSION PROCEDURES
7. Power Supply/Cables - Open the control panel. Connect the EJ to Docking
board cable (RJ-45 connector end) to the “Auxillary” port of Docking board.
Route the cable through the cable guides (see Figure 4, “Disassembly
Procedures”). Next, install the new power supply by reversing the procedures
in Step 1, “Disassembly Procedures”. Reconnect all power cables (AC/
DC) to the power supply (Figure 19). Reconnect ATM power cord to wall
outlet, if applicable.
Figure 19. Power supply connected.
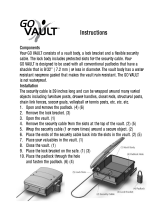
The following illustrations show the installation of the slide catch bracket to the
dispenser slide rail. Tool required is a #2 flat-tip screwdriver. Installation time
approximately less than 5 minutes. See table below to determine which type and
placement for the catch bracket.
)tnemecalP/ledoM(potSedilS05-DMN
tenibaC/ledoM #tekcarB tnemecalP
5115LR
)eldnaH-T/sruoHssenisuB(
23020-11030edisthgiR
03011-02032
(L-bracket)
03011-02033
(Acute-
angle
Step 1
Fully extend mechanism. Remove screw shown from Right
or Left side rail (see table). Retain screw.
Step 2
Slide catch bracket through slot on front of rail (L-shaped or
angle end pointing out).
Step 3
Secure bracket with screw previously removed.
Step 4
Slide mechanism back in cabinet.
L-Bracket

9
SECTION 2 - CONVERSION WITH “CURRENT” STYLE CABINETS (W/LIFT HANDLE)
R
EQUIRED PARTS AND TOOLS
DERIUQERSLOOT
srevirdwercSspillihPdnadettolS
revirDtuN)mm11("61/7dna)mm9("23/11
)30100-00260N/P(TIKNOISREVNOC05-DMNotMDT
tenibaC"eldnaHtfiL"
DEILPPUSSTRAP
REBMUNTRAP NOITPIRCSED YTITNAUQ
90000-00290ylppuSrewoP1
02100-50090)tluaVtcejeRdnasettessaC2/w(msinahceM05-DMN1
33020-11030potSedilS,elgnAetucA,tekcarB1
90200-45020daehnaPdettolS,eliforPwoL,mm01xmm4,wercS6
40100-11030)resnepsiD(tekcarBeldnaH2
61400-
06010xeloM,tcennoCkciuQ,rotcennoC1
90000-27030elbaCevisehdAtiudnaP,pilC6
00000-28030"81,edilSmotsuC2
02700-110
30tekcarBedilStfeL1
12700-11030tekcarBedilSthgiR1
75000-00690hceMotJE,elbaCataD1
71100-0219005-DMN,elbaCrewoPCD1
63020-00690wolleY,eludoMJE1
98300-11030JE,tekcarB1
76300-0219005-DMN,eriWdnuorG1
40000-10320cniZ,rehsaWhtooT.tx
E,23-8#,tuNxeH6
73000-1032002-4/1,tuNpeK2
84000-45020cniZ,daeHspillihPssurT,"8/3x23-8#,wercS6
51000-27030parWy
T3
20000-27030citsalP,rotcennoCni-panS1
42000-00170)05-DMN(draCecnerefeRkciuQ0005LRledoM1
26000-20170)0005LR(s
erudecorPnoisrevnoC05-DMNotMDT1

10
TDM-100/150 TO NMD-50 CONVERSION PROCEDURES
DISASSEMBLY PROCEDURES
Figure 1. Disconnect all cables from power supply.
2. Dispenser Cable Harness - Using a 7/16" nut driver, remove the screw that secures the ground wire (Figure 3). After
removing the ground wire, reinstall the screw. Next, disconnect the
Dispenser data cable (RJ-45 end) connected to
the Docking board assembly. Loosen/turn the cable bundle guides (Figure 4) and separate data cable from bundle.
Feed the dispenser data, power, and ground wire harness down to the vault area through the cable access hole in
Figure 5.
1. Power Supply - Open the control panel. Disconnect all cables (AC/DC) from the terminal power supply (Figure 1).
Lift the control panel slightly. Using an 11/32" nut driver, loosen the two (2) nuts that secure the power supply to the
cabinet (Figure 2). Slide the power supply towards the rear of cabinet and remove from the unit.
Before proceeding, follow these steps to remove power from the ATM:
Enter Management Functions > System Parameters > Shut Down the Terminal. When prompted, turn power OFF on the
ATMs power supply. Unlock and open the ATM control panel. Turn the power switch to the OFF (0) position. If possible,
unplug the ATM power cord at the wall outlet.
Figure 2. Loosen the 2 nuts that secure power supply.
Figure 3. Disconnect ground wire.
Figure 4. Loosen guides.
Figure 5. Feed cables down to vault area.
3. TDM Dispenser - Open the cabinet vault door. Release the locking slide rail and fully extend the dispenser from the
cabinet. Rotate the dispenser mounting platform 180° to the “Service” position. Locate the spring-loaded locking pin
on the underside of the mounting tray (Figure 6). Pull the pin down and turn the tray
clockwise (Figure 7) so the note
and reject cassettes can be accessed from the front. Release the locking pin and move the platform back and forth
slightly to ensure the pin snaps into place to the “Service” position (Figure 8).
Figure 6. Pull release pin.
Figure 7. Rotate mechanism “clockwise”.
Figure 8. Mech in “Service” position.

11
4. Disconnect the power and communication (Comms) cables from the dispenser (Figure 9). Carefully cut any Ty wraps
that are securing the cables to the dispenser. Remove the cables from the cabinet. Remove the note and reject cassettes.
Using a phillips-head screwdriver, remove the four (4) or six (6) mounting screws that secure the dispenser to the
swivel platform (Figure 10). Remove the TDM dispenser mechanism.
Ferrite
Figure 10. Remove mounting screws.
Figure 9. Power and Comm cable disconnected.
6. Dispenser Slide Rail Hardware - With the tray extended out, use a phillips screwdriver to remove the screws (3 on
each side) that secure the slide rails to the mounting brackets (Figure 11). Remove the slide rails (with mounting tray
attached) from the cabinet.
7. Mounting Brackets - Using an 11/32" nut driver,
loosen the two (2) nuts that secure the brackets to the cabinet (Figure
11). Remove the brackets. These will be replaced. Start two (2) more nuts (one each side) to the third bolt closest to
rear of cabinet (Figure 12). Note: The cabinet ground wire is attached to the left side front bolt. You will have to
temporarily remove this nut to remove the ground wire lug. Nut will be attached in later steps.
Figure 11. Side rails removed.
Figure 12. Nuts started on bolts.
8. Tray Stop (Door) - Locate the tray stop mounted on the door (Figure 13).
Remove this item from the door using a 7/16" nut driver..
Figure 13. Remove tray stop.
SECTION 2 - CONVERSION WITH “CURRENT” STYLE CABINETS (W/LIFT HANDLE)
Hex nuts
w/tooth
washer

12
TDM-100/150 TO NMD-50 CONVERSION PROCEDURES
UPGRADE KIT ASSEMBLY PROCEDURES
1. Electronic Journal (EJ) and Bracket - The EJ (yellow), bracket, and cables (2 - EJ to dispenser, EJ to docking board)
should be pre-assembled in the kit. If they are not, use Figure 1 as a reference for assembly. Locate the two (2) bolts
in the upper right, rear of the vault area (Figure 2). Mount the EJ assembly to the bolts (cable connects towards top of
cabinet, Figure 3) and secure with the two (2) Kep nuts provided using a 7/16" nut driver.
Figure 1. EJ and hardware assembly.
Figure 2. Mounting bolt location.
Figure 3. EJ mounted.
2. Slide Rail Mounting Brackets - Locate the two (2) mounting brackets in kit (Figure 4). There is a Left (L) and Right
(R) specific. Mount brackets by
first starting backslot (Figure 5) on the rear screw and rotating down over the other
two (2) screws. Using an 11/32" nut driver, secure the hex nuts.
* Important*
Ensure all screws are fully seated
in the bracket slots and not
resting on bracket. Brackets
must be level when installed!
Right
Left
Mounting brackets
Backslot seated
fully
Figure 4. Rail mounting brackets.
Figure 5. Mount bracket on rear screw
first, then rotate down.
3. Slide Assemblies - Install slide rails to the mounting brackets. Start a truss phillips screw in the second to last hole of
the slide assembly first (Figure 6). Extend rails out and install the other two (2) screws and secure all. Push in slide
rails. When installed correctly, the front of slide rails will be flush with mounting brackets (Figures 7 and 8).
Figures 7 and 8.
Slide rails flush w/bracket front.
Figure 6. Slide rail.

13
SECTION 2 - CONVERSION WITH “CURRENT” STYLE CABINETS (W/LIFT HANDLE)
4. Dispenser/Cabinet Grounds - Reconnect the cabinet ground wire removed in
Step 7 (page 11) to the front left screw. Install the dispenser ground wire
included and secure both ground wires with the nut previously removed (Figure
9). The other end of dispenser ground wire will attach to the NMD-50 when
installed.
Figure 9. Ground wires installed.
5. Dispenser Power and Data Cables - Feed the EJ to Docking board cable (RJ-
45 connector end) through the control panel access hole. Feed the dispenser
power cable (insert) also up to the control panel (Figure 10). These 2 cables
will be connected in later steps. Route the 2 cables in the vault area (EJ to
dispenser, dispenser power cable end) in the existing cabinet cable clips (Figure
11).
Dispenser power cable
Figure 12. EJ and dispenser power cables.
Figure 11. Route power/data cables.
6. Dispenser - Extend the slides fully. Ensure all cables in vault area have been moved out of way before installing
mechanism. Remove cardboard support from mechanism cassettes. With 2-personnel, lift the NMD-50 by the green
handles and align the rails on the dispenser with the slide rails. Insert the rails and slide mechanism up to the rail stops
(Figure 12). Push the release tabs in (Figure 13) and continue sliding mechanism fully into cabinet. Repeat extending/
inserting mechanism into cabinet a few times to ensure no binding on slide rails.
Figure 12. Insert mechanism to rail stop.
Figure 13. Push release tab.
7. Dispenser Cables - Connect the power, data, and ground wires to the NMD-50 as shown in Figures 14 and 15. Route
the cables through the cable clips attached to the mechanism covers (Figure 16). Ground wire routes down behind
slide and through the lower cable clips. Note: Ensure ground wire doesn’t catch on cabinet shoulder bolts when
sliding mechanism into cabinet.
Ground wire routing
Release tab
Figure 15. Data/ground connections.
Figure 14. Power cable connection.
Figure 16. Route cables thru clips.

14
TDM-100/150 TO NMD-50 CONVERSION PROCEDURES
8. Power Supply/Cables - Open the control panel. Connect the EJ to Docking
board cable (RJ-45 connector end) to the “Auxillary” port of Docking board.
Route the cable through the cable guides (see Figure 4, “Disassembly
Procedures”). Next, install the new power supply by reversing the procedures
in Step 1, “Disassembly Procedures”. Reconnect all power cables (AC/
DC) to the power supply (Figure 17). Reconnect ATM power cord to wall
outlet, if applicable.
Figure 17. Power supply connected.
The following illustrations show the installation of the slide catch bracket to the
dispenser slide rail. Tool required is a #2 flat-tip screwdriver. Installation time
approximately less than 5 minutes. See table below to determine which type and
placement for the catch bracket.
03011-02032
(L-bracket)
03011-02033
(Acute-
angle
Step 1
Fully extend mechanism. Remove screw shown from Right
or Left side rail (see table). Retain screw.
Step 2
Slide catch bracket through slot on front of rail (L-shaped or
angle end pointing out).
Step 3
Secure bracket with screw previously removed.
Step 4
Slide mechanism back in cabinet.
)tnemecalP/ledoM(potSedilS05-DMN
tenibaC/ledoM #tekcarB tnemecalP
5115LR
)eldnaH-tfiL/sruoHssenisuB(
33020-11030edisthgiR
5215LR
)tluaV-1leveL(
33020-11030edistfeL
Angle
/