Commax CDV-70KP Owner's manual
- Category
- Door intercom systems
- Type
- Owner's manual
This manual is also suitable for
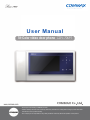
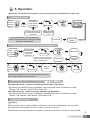
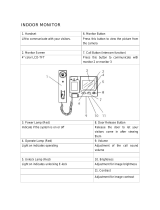
Commax CDV-70KPT is a tilt color video door phone offering clear communication and enhanced security features for your home or office. With its 7-inch TFT-DIGITAL LCD screen, you can view and converse with visitors at your door, ensuring you only grant access to known individuals. The device allows for easy monitoring of your entrance, displaying the visitor's image whenever the call button is pressed, and enabling dialog with them while they're at your door.
Commax CDV-70KPT is a tilt color video door phone offering clear communication and enhanced security features for your home or office. With its 7-inch TFT-DIGITAL LCD screen, you can view and converse with visitors at your door, ensuring you only grant access to known individuals. The device allows for easy monitoring of your entrance, displaying the visitor's image whenever the call button is pressed, and enabling dialog with them while they're at your door.


-
 1
1
-
 2
2
-
 3
3
-
 4
4
-
 5
5
-
 6
6
-
 7
7
-
 8
8


Commax CDV-70KP Owner's manual
- Category
- Door intercom systems
- Type
- Owner's manual
- This manual is also suitable for
Commax CDV-70KPT is a tilt color video door phone offering clear communication and enhanced security features for your home or office. With its 7-inch TFT-DIGITAL LCD screen, you can view and converse with visitors at your door, ensuring you only grant access to known individuals. The device allows for easy monitoring of your entrance, displaying the visitor's image whenever the call button is pressed, and enabling dialog with them while they're at your door.
Ask a question and I''ll find the answer in the document
Finding information in a document is now easier with AI
Related papers
-
Commax CDV-70K/CDV-70KM Owner's manual
-
-
-
-
Commax DP-4VHP Owner's manual
-
-
Commax CDV-43N Owner's manual
-
-
-
Commax CDV-70K User manual
Other documents
-
Falcon SD-920R1S Manual Instruction
-
 Clover VDP1500 Setup Manual
-
 Clover VDP1300 Setup Manual
-
SCS MONITOR User manual
-
Elvox 6931 Operating instructions
-
-
Renkforce 1168614 Digital Radio Intercom Owner's manual
-
Aiphone WL-11 Operating instructions
-
 ALT AF7 User manual
-
Xvision XA001 Instructions Manual


