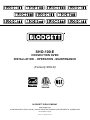
Blodgett SHO-100-E Owner's manual
- Category
- Cookers
- Type
- Owner's manual
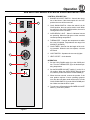
Blodgett SHO-100-E is a high-performance convection oven designed to deliver exceptional cooking results with energy efficiency. Its innovative air flow pattern ensures even heat distribution, allowing for quick and consistent cooking. Ideal for bakeries, restaurants, and catering businesses, the oven features solid-state manual controls with a 60-minute electromechanical timer for precise cooking.
Blodgett SHO-100-E is a high-performance convection oven designed to deliver exceptional cooking results with energy efficiency. Its innovative air flow pattern ensures even heat distribution, allowing for quick and consistent cooking. Ideal for bakeries, restaurants, and catering businesses, the oven features solid-state manual controls with a 60-minute electromechanical timer for precise cooking.


-
 1
1
-
 2
2
-
 3
3
-
 4
4
-
 5
5
-
 6
6
-
 7
7
-
 8
8
-
 9
9
-
 10
10
-
 11
11
-
 12
12
-
 13
13
-
 14
14
-
 15
15


Blodgett SHO-100-E Owner's manual
- Category
- Cookers
- Type
- Owner's manual
Blodgett SHO-100-E is a high-performance convection oven designed to deliver exceptional cooking results with energy efficiency. Its innovative air flow pattern ensures even heat distribution, allowing for quick and consistent cooking. Ideal for bakeries, restaurants, and catering businesses, the oven features solid-state manual controls with a 60-minute electromechanical timer for precise cooking.
Ask a question and I''ll find the answer in the document
Finding information in a document is now easier with AI
Related papers
-
Blodgett BDO-100-E Owner's manual
-
Blodgett Zephaire-100-E Owner's manual
-
-
-
-
Blodgett Zephaire-200-G Owner's manual
-
Blodgett Mark V-100 Owner's manual
-
Blodgett Zephaire-100-G-ES Owner's manual
-
Blodgett DFG-50 Owner's manual
-