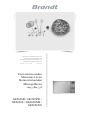
Brandt GE2626W Owner's manual
- Category
- Microwaves
- Type
- Owner's manual
This manual is also suitable for

MANUELD’INSTRUCTIONFR
INSTRUCTIONMANUALEN
MANUALDEINSTRUCCIONESES
GEBRUIKSHANDLEIDINGNL
ﻝﻳﻐﺷﺗﻟﺍﻭ ﺕﺍﺩﺎﺷﺭﻹﺍ ﻝﻳﻟﺩ ﺔﻳﺑﺭﻌﻟﺍ ﺔﻐﻠﻟﺍ
Four à micro-ondes
Microwave oven
Horno microondas
Microgolfoven
ﻒﻳﻭﻭﺮﻜﻴﻣ ﻥﺮﻓ
GE2626B / GE2626W /
GE2626S / GE2626NB /
GE2626NS
Page is loading ...
Page is loading ...
Page is loading ...
Page is loading ...
Page is loading ...
Page is loading ...
Page is loading ...
Page is loading ...
Page is loading ...
Page is loading ...
Page is loading ...
Page is loading ...
Page is loading ...
Page is loading ...
Page is loading ...
Page is loading ...
Page is loading ...
Page is loading ...
Page is loading ...
Page is loading ...
Page is loading ...
Page is loading ...
Page is loading ...
Page is loading ...
Page is loading ...
Page is loading ...
Page is loading ...

29
Dear Customer,
Thank you for buying a BRANDT product and for your confidence in our company.
This product has been designed and manufactured for you considering your lifestyle and
your requirements, so that it meets your expectations in the best way possible. We have
invested it with our expertise, spirit of innovation and all the enthusiasm which has driven
us for more than 60 years.
So that we are always able to satisfy your requirements as well as possible, our customer
service is available, ready to listen and answer all your questions or suggestions
You can also visit our website www.brandt.com where you will find our latest
innovations as well as additional useful information.
BRANDT is happy to support you daily and hopes you will enjoy your purchase to the
full.
Important: Before starting your machine, please read this guide for
installation and use carefully in order to familiarise yourself with how it
operates quickly.

30
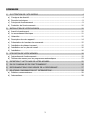
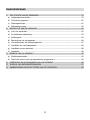
CONTENTS
1) FOR THE USER’S ATTENTION ...................................................................................... 31
a) Safety Instructions ................................................................................................... 31
b) Specifications .......................................................................................................... 36
c) Operating principle .................................................................................................. 36
d) Protecting the environment ...................................................................................... 37
2) INSTALLING YOUR APPLIANCE .................................................................................... 37
a) Utensils ................................................................................................................... 37
b) Description of your appliance .................................................................................... 39
c) The control panel ..................................................................................................... 40
d) Turntable installation ............................................................................................... 40
e) Countertop installation ............................................................................................. 41
f) Installation .............................................................................................................. 41
3) USING YOUR APPLIANCE ............................................................................................ 42
a) Operation instruction ................................................................................................ 42
b) Menu chart for automatic programs ........................................................................... 46
4) CARING FOR AND CLEANING YOUR APPLIANCE ............................................................ 48
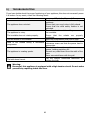
5) TROUBLESHOOTING ................................................................................................... 49
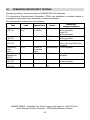
6) OPERATING PROFICIENCY TESTING ............................................................................ 50

31
1) FOR THE USER’S ATTENTION
Keep these instructions with your machine. If you sell this
machine to another person second-hand, make sure you
give the new owner these instructions. Please read these
instructions before installing and using your machine.
They are written for your safety and that of others.
a) Safety Instructions
General information:
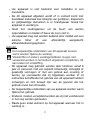
Your appliance is designed for standard household use for
cooking, reheating and defrosting foods and beverages. Use
this appliance only for its intended uses as described in
manual.
It can not be used in covered, closed and warmed
environment such as a kitchen or a room with the same
specifications. The manufacturer declines any responsibility
in the case of inappropriate use.
Children less than 8 years of age shall be kept away unless
continuously supervised.
Children shall not play with the appliance.
Keep the appliance and its cord out of reach of children less
than 8 years.
Installation:
Install or locate this oven only in accordance with the
installation instructions provided.
See the section INSTALLING YOUR APPLIANCE.
This appliance must not be placed in a cabinet.
Do not obstruct any of the vents of your appliance.

32
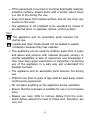
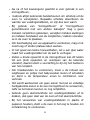
If this equipment is covered or touching flammable material,
including curtains, drapes items with a similar nature there
is a risk of fire during the use.
Keep cord away from heated surface, and do not cover any
events on the oven.
The appliance is not intended to be operated by means of
an external timer or separate remote- control system.
Use:
T
he appliance and its accessible parts become hot
during use.
Liquids and other foods should not be heated in sealed
containers because they may explode.
This appliance can be used by children aged from 8 years
and above and persons with reduced physical, sensory or
mental capabilities or lack of experience and knowledge if
they have been given supervision or instruction concerning
use of the appliance in a safe way and understand the
hazards involved.
The appliance and its accessible parts become hot during
use.
Children less than 8 years of age shall be kept away unless
continuously supervised.
Do not place anything on the appliance during operation.
Ensure that the cookware is suitable for use in a microwave
oven.
Always use oven mitts to remove dishes from the oven.
Some dishes absorb the heat of foods and, therefore, are
very hot.

33
For the microwave and microwave + circular heating
functions, the use of metallic cookware is not recommended
Remove wire twist- ties and metal handles from paper or
plastic containers/bags before placing them in the oven.
To avoid damaging your appliance, never operate it while
empty or without the turn-table.
In the case of small quantities (a sausage, a croissant, etc.)
place a glass of water next to the food.
Heating beverages in the microwave oven can cause sudden
and/or delayed splattering of boiling liquid, so precautions
must be taken when handling their containers.
The contents of baby bottles and baby food jars should be
shaken or stirred and their temperature checked before
consumption to avoid burns.
Never heat a baby bottle with the nipple on (risk of explosion
It is recommended that you avoid heating eggs in their shells
and whole hard-boiled eggs in the microwave oven because
they run the risk of explosion, even after cooking is
complete.
Do not use aluminium cooking foil to cover food. Do not
cover part of the oven with aluminium foil.
While heating food items in plastic or paper containers,
monitor the microwave's contents for there is a risk of
spontaneous combustion.
If smoke is emitted, switch off or unplug the appliance and
keep the door closed in order to stifle any flames.
The cookware not recommended by the manufacturer may
result in hazardous situations and injuries.

34
Do not use the oven cavity for storage purposes. Do not
store items, such as bread, cookies, etc. inside the oven
Cleaning:
Failure to maintain the oven in a clean condition
could lead to deterioration of the surface, that could
adversely affect the life of the appliance and possibly
result in a hazardous.
T
urn the oven off and remove the power plug from
the wall socket before cleaning.
This appliance generates microwave energy and is
equipped with a high voltage circuit, do not remove
the cover.
It is hazardous for anyone other than a competent
person to remove a cover.
Remove the protective cover of the device may result in
exposure to microwave energy.
Remove the protective cover of the device, even if it is
disconnected, may cause an electric shock on contact with
the high-voltage circuit.
Cleaning and user maintenance shall not be made by
children unless they are older than 8 and supervised.
This appliance should be cleaned regularly and any food
deposits removed.
Do not use harsh abrasive cleaners or sharp metal scrapers
to clean the oven door glass since they can scratch the
surface, which may result in shattering of the glass.
Steam cleaner is not to be used.
The seal and frame of the door must be regularly examined
to ensure that they have not deteriorated. If these areas are

35
damaged, discontinue use of the appliance and have a
specialised technician check it.
When it becomes necessary to replace the oven light, please
consult a dealer to have it replaced
When unplugging the power cord, do not pull on the cord
itself but pull on the plug.
If the supply cord is damaged, it must be replaced by the
manufacturer, its service agent or similarly qualified persons
in order to avoid a hazard.
Improper use :
The manufacturer assumes no liability for improper use.
Use this appliances only for the uses described in this
manual.
Observe general instructions and safety listed in this
chapter.
This device is intended for home use in private homes. Its
use in common areas such as local professionals or pause
office or
This microwave oven is not intended for drying food or
clothes. Similarly, it is not intended for heating slippers,
heating pads, sponges, damp cloth and other similar items.
It is not intended either to sterilization. These uses can
destroy your appliance and lead to a dangerous situation,
workshop, local
camping, hotel, etc. does not respond to an
intended use as defined by the manufacturer.

36
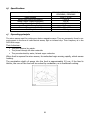
b) Specifications
Model GE2626B / GE2626W / GE2626S /
GE2626NB / GE2626NS
Rated Voltage 230V ~ 50 Hz
Rated Input Power(Microwave) 1 450 W
Rated Output Power(Microwave) 900 W
Rated Input Power(Grill) 1 000 W
Turntable Diameter 31.5 cm
External Dimensions(LxWxH) 513 x 430 x 307 mm
Net Weight 15.6 kg
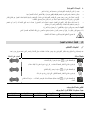
c) Operating principle
The micro-waves used for cooking are electro-magnetic waves. They are commonly found in our
environment in the form of radio-electric waves, light or infrared rays. Their frequency is in the
2450 MHz range.
Their behaviour:
• They are reflected by metals.
• They travel through all other materials.
• They are absorbed by water, fat and sugar molecules.
When food is exposed to micro-waves, its molecules begin moving rapidly, which causes
heating.
The penetration depth of waves into the food is approximately 2.5 cm; if the food is
thicker, the core of the food will be cooked by conduction, as in traditional cooking.

37
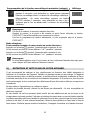
d) Protecting the environment
It is valuable to note that the micro-waves trigger within the food a simple thermal
phenomenon and that they are not harmful to one's health.
At the end of its life this product must not be discarded with household waste. It must
be taken to a recycling centre or to your dealer. This makes it possible to avoid
consequences resulting from inappropriate disposal that are harmful to health and the
environment, and to recycle materials to save energy and significant resources.
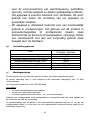
A logo appears on the product reminding you not to discard it with household waste.
For further information, contact your council offices or the shop where you bought this
product.
Your appliance also contains various recyclable materials. Thus it is stamped with this logo
to indicate to you that used appliances should be mixed with other waste. The recycling
of appliances organised by your manufacturer will take place under the best conditions,
in compliance with European directive 2002/96/CE concerning electrical and electronic
equipment waste.
Consult your city hall or your retailer to find the drop-off points for used appliances that
is nearest to your home. We thank you for your help in protecting the environment.
2) INSTALLING YOUR APPLIANCE
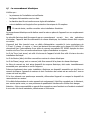
a) Utensils
See the instructions on "Materials you can use in microwave oven or to be avoided in
microwave oven." There may be certain non-metallic utensils that are not safe to use for
microwaving. If in doubt, you can test the utensil in question following the procedure
below.
Utensil Test:
1. Fill a microwave-safe container with 1 cup of cold water (250ml) along with the utensil in
question.
2. Cook on maximum power for 1 minute.
3. Carefully feel the utensil. If the empty utensil is warm, do not use it for microwave cooking.
4. Do not exceed 1 minute cooking time.
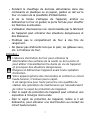
Caution
Personal Injury Hazard
It is hazardous for anyone other than a competent person to carry out any service or
repair operation that involves the removal of a cover which gives protection against
exposure to microwave energy.

38
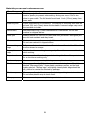
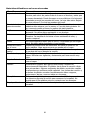
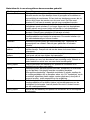
Materials you can use in microwave oven
Utensils Remarks
Aluminum foil Shielding only. Small smooth pieces can be used to cover thin parts of
meat or poultry to prevent overcooking. Arcing can occur if foil is too
close to oven walls. The foil should be at least 1 inch (2.5cm) away from
oven walls.
Browning dish Follow manufacturer's instructions. The bottom of browning dish must be
at least 3/16 inch (5mm) above the turntable. Incorrect usage may cause
the turntable to break.
Dinnerware Microwave-safe only. Follow manufacturer's instructions. Do not use
cracked or chipped dishes.
Glass jars Always remove lid. Use only to heat food until just warm. Most glass jars
are not heat resistant and may break.
Glassware Heat-resistant oven glassware only. Make sure there is no metallic trim.
Do not use cracked or chipped dishes.
Oven cooking
bags
Follow manufacturer's instructions. Do not close with metal tie. Make slits
to allow steam to escape.
Paper plates and
cups
Use for short-term cooking/warming only. Do not leave oven unattended
while cooking.
Paper towels Use to cover food for reheating and absorbing fat. Use with supervision
for a short-term cooking only.
Parchment paper Use as a cover to prevent splattering or a wrap for steaming.
Plastic Microwave-safe only. Follow the manufacturer's instructions. Should be
labeled "Microwave Safe”. Some plastic containers soften, as the food
inside gets hot. "Boiling bags" and tightly closed plastic bags should be
slit, pierced or vented as directed by package.
Plastic wrap Microwave-safe only. Use to cover food during cooking to retain moisture.
Do not allow plastic wrap to touch food.
Wax paper Use as a cover to prevent splattering and retain moisture.

39
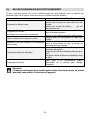
Materials to be avoided in microwave oven
Utensils Remarks
Aluminum tray May cause arcing. Transfer food into microwave-safe dish.
Food carton with
metal handle
May cause arcing. Transfer food into microwave-safe dish.
Metal or metal-
trimmed utensils
Metal shields the food from microwave energy. Metal trim may cause
arcing.
Metal twist ties May cause arcing and could cause a fire in the oven.
Paper bags May cause a fire in the oven.
Plastic foam Plastic foam may melt or contaminate the liquid inside when exposed to
high temperature.
Wood Wood will dry out when used in the microwave oven and may split or
crack.
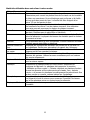
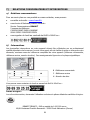
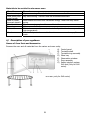
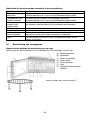
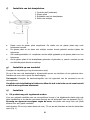
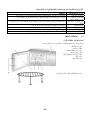
b) Description of your appliance
Names of Oven Parts and Accessories
Remove the oven and all materials from the carton and oven cavity.
A) Control panel
B) Turntable shaft
C) Turntable ring assembly
D) Glass tray
E) Observation window
F) Door assembly
G) Safety interlock system
Grill rack (Only for Grill
series)
Grill rack (Only for Grill series)

40
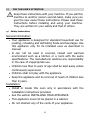
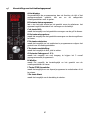
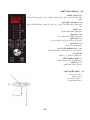
c) The control panel
A Displays:
to simplify programming, the display indicates: the time of day, the
types of food and functions, the minutes /seconds or weight
programmed.
B « Autoprogramme » key
automatically sets the correct programme time according to a
specified food type and weight.
C Grill key:
to set the grill's power level
D Microwave key:
to set the microwaves'power level.
E Defrost key:
to defrost according to the weight of food
F Clock key:
to set the clock
G Memory 12 3 key:
to reach quickly 3 preset operations
H Rotating knob:
to choose the time or the weight.
I STOP / Cancel key:
to interrupt or to erase a current program
J Start key:
to launch the cooking
d) Turntable installation
1. Hub (underside)
2. Glass tray
3. Turntable shaft
4. Turntable ring assembly

41
a. Never place the glass tray upside down. The glass tray should never be restricted.
b. Both glass tray and turntable ring assembly must always be used during cooking.
c. All food and containers of food are always placed on the glass tray for cooking.
d. If glass tray or turntable ring assembly cracks or breaks, contact your nearest authorized
service center.
e) Countertop installation
Remove all packing material and accessories. Examine the oven for any damage such as dents
or broken door. Do not install if oven is damaged.
Cabinet: Remove any protective film found on the microwave oven cabinet surface.
Do not remove the light brown Mica cover that is attached on the right side to the
oven cavity to protect the magnetron.
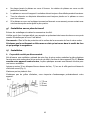
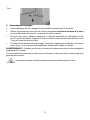
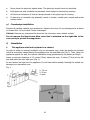
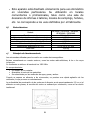
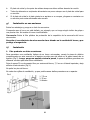
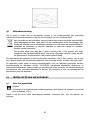
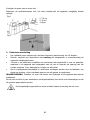
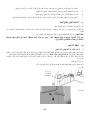
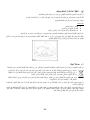
f) Installation
1. This appliance shall not be placed in a cabinet.
In order to obtain an optimal ventilation of your microwave oven, insert the plastic pin provided
with this instruction manual behind the appliance into the specified hole (Fig 2). Then, place the
appliance against the wall, the optimal ventilation being guaranteed by the plastic pin length.
Leave a minimum clearance of 12 inches (30cm) above the oven, 3 inches (7.5cm) at the left
side and leave the right side open (Fig 1).
Do not remove the legs from the appliance. Do not block airflow outlets, blocking the outlets can
damage your microwave oven.
Fig. 1
1. 7.5 cm
2. 30 cm
3. open
Fig 2

42
2. Electrical connection
• Your installation must be protected by a 16 Amp thermal fuse.
• It is mandatory to use a power point with a ground terminal, connected in accordance with
current safety regulations.
• In your electrical installation, provide a device that is accessible to the installer, capable of
separating the appliance from the mains power and whose contact opening is at least 3 mm
at all of the poles.
• If the supply cord is damaged, it must be replaced by the manufacturer, its service agent
or similarly qualified persons in order to avoid a hazard.
WARNING: Do not install oven over a range cooktop or other heat-producing appliance. If
installed near or over a heat source, the oven could be damaged and the warranty would be void.
The accessible surface may be hot during operation.
3) USING YOUR APPLIANCE
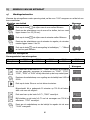
a) Operation instruction
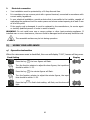
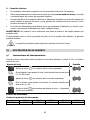
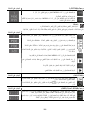
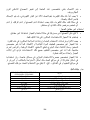
When the microwave oven is electrified, the oven will display "0:00", buzzer will ring once.
Clock Setting Display
Press the key , the hour figures will flash.
Turn the function selector to adjust the hour figures, the input time
should be within 0--23.
Press the key , the minute figures will flash.
Turn the function selector to adjust the minute figures, the input
time should be within 0--59.
Press the key to finish clock setting. will flash, and the time will
light.

43
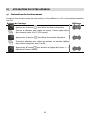
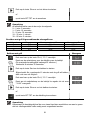
Microwave Power Chart
Power 900 W 700 W 500 W 350 W 150 W
Display 900 700 500 350 150
Display
Press the key M-O once,”P900” displays.
then keep pressing to choose the power you want, and “P900”,
“P700”, “P500”, “P350” or “P150” will display for each added
pressing.
Turn the function selector to set cooking time from 0:05 to 95:00.
Press the key DEPART to start cooking.
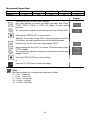
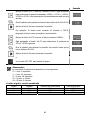
Example
: If you want to use 700W microwave power to cook for
20 minutes, you can operate the oven as the following steps.
Press the key M-O once, the screen display “P900”.
Keep pressing the key M-O to choose 700W microwave power.
“P700” displays.
Turn the function selector to adjust the cooking time until the oven
displays “20:00”.
Press the DEPART key to start cooking
or
Press the STOP key to cancel the setting.
Note:
the step quantities for the adjustment time are as follow:
0---1 min : 5 seconds
1---5 min : 10 seconds
5---10 min : 30 seconds
10---30 min : 1 minute
30---95 min : 5 minutes

44
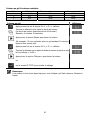
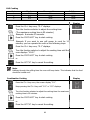
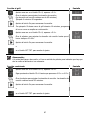
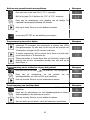
Grill Cooking
Order Display Microwave Power Grill Power
1 G-1 0% 100%
2 G-2 20% 80%
3 G-3 40% 60%
Display
Press the Gril key once, “G-1” displays.
T
urn the function selector to adjust the cooking time.
(The maximum cooking time is 95 minutes.)
Example
: 8 minutes 30 seconds.
Press the DEPART key to start cooking.
Exampl
e
: If you want to use grill power to cook for 10
minutes, you can operate the oven as the following steps.
Press the Gril key once, “G-1” displays.
Turn the function selector to adjust the cooking time until the
oven displays “10:00”.
Press the DEPART key to start cooking
or
Press the STOP key to cancel the setting.
Note:
Halfway through the grilling time the oven will beep twice. This indicates that the food
should be turned over.
Combination Cooking Display
Press the Gril key once, the screen display “G-1”.
Keep pressing the Gril key until “G-2” or “G-3” displays.
Turn the function selector to adjust the cooking time. the maximum
cooking time is 95 minutes.
Press the DEPART key to start cooking
or
Press the STOP key to cancel the setting.

45
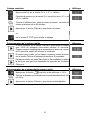
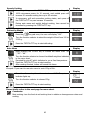
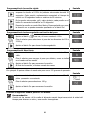
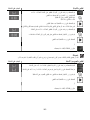
Speedy Cooking Display
In waiting state, press the DEPART key to start cooking with
100% microwave power for 30 seconds, each added press will
increase 30 seconds cooking time up to 95 minutes.
In microwave, grill and convection cooking states, each press of
the DEPART key can increase 30 seconds.
During auto menu and weight defrost cooking, time cannot be
increased by pressing the DEPART key.
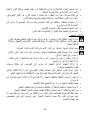
Defrost by Weight Display
Press the key pad once, the oven will display "100".
Turn the function selector to select the weight of food from 100 to
2 000 g.
Press the DEPART key to start defrosting.
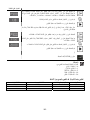
Auto Menu Display
Keep pressing the Auto key to choose the menu from "A1
","A2"..."A8".
Turn the function selector to choose the default weight as indicated
in the menu chart.
Excepted for pies A7 which indicates to you a fixed temperature.
Press the DEPART key to start cooking.
After cooking finished, buzzer will sound two times.
Example
: If you want to use auto menu to cook 150g of fish.
Display
Press the Auto key three times to choose "A3". The poisson
indicator lights up.
Turn the function selector to choose 150g.
Press the DEPART key to start cooking.
Please kindly refers to the next page for menu chart.
Comments:
Meat cooking: turn the food at mid cooking time to obtain an homogeneous colour and
cooking.

46
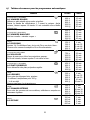
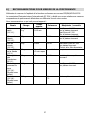
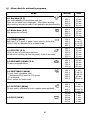
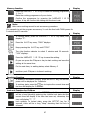
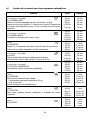
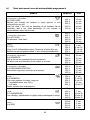
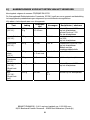
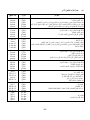
b) Menu chart for automatic programs
MENU WEIGHT TIME
A-1 Red Meat (G-2)
Use a dish adapted to microwaves and grill.
Take out the meat from refrigerator 1 hour before cooking.
After cooking, let rest the meat 10 min packed in an aluminium foil.
400 g
600 g
800 g
1000 g
1200 g
15 min
20 min
23 min
26 min
30 min
A-2 White Meat (G-3)
See advices for red meat
400 g
600 g
800 g
1000 g
1200 g
21 min
27 min
33 min
39 min
45 min
A-3 FISHES (500W)
Add from 2 to 3 spoon of water, lemon juice or white wine.
Cover it with an adequate lid or a plastic wrap
150 g
250 g
300 g
400 g
600 g
2 min 30
4 min
4 min 35
5 min 48
7 min 48
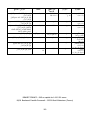
A-4 POULTRY (G-3)
Prick the skin to avoid the projections.
At the end of cooking, let rest the poultry 5 min in the oven
500 g
750 g
1000 g
1200 g
1500 g
20 min
25 min
30 min
35 min
40 min
A-5 PREPARED DISHES (G-2)
To warm prepared dishes
300 g
450 g
600 g
750 g
1000 g
22 min
28 min
34 min
40 min
46 min
A-6 VEGETABLES (900W)
To cook fresh vegetables, add:
- 2 tablespoonful of water for 200 grams
-1/2 dl beyond.
Cover, except for mushrooms
200 g
300 g
400 g
500 g
600 g
6 min
7 min 35
8 min 50
10 min
12 min 25
A-7 POTATOES (900W)
To cook entire, calibrated or cut in regular pieces potatoes.
200 g
400 g
600 g
800 g
1000 g
4 min
7 min
10 min 30
13 min 30
16 min 30
A-8 SOUP (900W)
200 ml
300 ml
400 ml
500 ml
600 ml
2 min
3 min
4 min
5 min
6 min

47
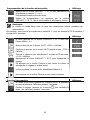
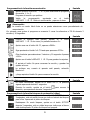
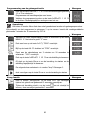
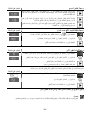
Memory function Display
Press the MEMO 1 2 3 key to select the cooking programme
1, 2 or 3.
Make the cooking programme of your choice.
Confirm the programme by pressing the MEMO 1 2 3
button. A bip will confirm the setting and the time is set.
Note :
Auto menu cooking cannot be set as memory procedure.
For example
: to set the program as memory 2: cook the food with 700W power for
3 minutes and 20 seconds.
Display
In waiting states, press the MEMO 1 2 3 key twice, LED
displays “2”.
Press the M-O key once, “P900” displays.
Keep pressing the M-O key until “P700”.
Turn the function selector to select 3 minutes and 20 seconds.
“3:20” displays.
Press the MEMO 1 2 3 key to save the setting.
Or you can press the Départ key to start cooking and save the
setting at the same time.
For the next time, in waiting states, select Memory 2
and then push Départ to launch cooking.
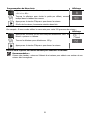
Inquiring Function Display
In states of microwave cooking, press the M-O key, the current
power will be displayed for 3 seconds.
In cooking state, press the key to inquire the current time and
the time will display for 3 seconds.
Lock-out Function for Children Display
Lock: In waiting state, press the STOP key for 3 seconds, there
will be a beep denoting entering the children-lock state and the
current time will display if the time has been set, otherwise, the
oven will display “ ”
Lock quitting: In locked state, press the STOP key for 3
seconds, there will be a long “beep“ denoting that the lock is
released.
Page is loading ...
Page is loading ...
Page is loading ...
Page is loading ...
Page is loading ...
Page is loading ...
Page is loading ...
Page is loading ...
Page is loading ...
Page is loading ...
Page is loading ...
Page is loading ...
Page is loading ...
Page is loading ...
Page is loading ...
Page is loading ...
Page is loading ...
Page is loading ...
Page is loading ...
Page is loading ...
Page is loading ...
Page is loading ...
Page is loading ...
Page is loading ...
Page is loading ...
Page is loading ...
Page is loading ...
Page is loading ...
Page is loading ...
Page is loading ...
Page is loading ...
Page is loading ...
Page is loading ...
Page is loading ...
Page is loading ...
Page is loading ...
Page is loading ...
Page is loading ...
Page is loading ...
Page is loading ...
Page is loading ...
Page is loading ...
Page is loading ...
Page is loading ...
Page is loading ...
Page is loading ...
Page is loading ...
Page is loading ...
Page is loading ...
Page is loading ...
Page is loading ...
Page is loading ...
Page is loading ...
Page is loading ...
Page is loading ...
Page is loading ...
Page is loading ...
Page is loading ...
Page is loading ...
Page is loading ...
Page is loading ...
Page is loading ...
Page is loading ...
Page is loading ...
Page is loading ...
Page is loading ...
Page is loading ...
Page is loading ...
Page is loading ...
Page is loading ...
Page is loading ...
Page is loading ...
-
 1
1
-
 2
2
-
 3
3
-
 4
4
-
 5
5
-
 6
6
-
 7
7
-
 8
8
-
 9
9
-
 10
10
-
 11
11
-
 12
12
-
 13
13
-
 14
14
-
 15
15
-
 16
16
-
 17
17
-
 18
18
-
 19
19
-
 20
20
-
 21
21
-
 22
22
-
 23
23
-
 24
24
-
 25
25
-
 26
26
-
 27
27
-
 28
28
-
 29
29
-
 30
30
-
 31
31
-
 32
32
-
 33
33
-
 34
34
-
 35
35
-
 36
36
-
 37
37
-
 38
38
-
 39
39
-
 40
40
-
 41
41
-
 42
42
-
 43
43
-
 44
44
-
 45
45
-
 46
46
-
 47
47
-
 48
48
-
 49
49
-
 50
50
-
 51
51
-
 52
52
-
 53
53
-
 54
54
-
 55
55
-
 56
56
-
 57
57
-
 58
58
-
 59
59
-
 60
60
-
 61
61
-
 62
62
-
 63
63
-
 64
64
-
 65
65
-
 66
66
-
 67
67
-
 68
68
-
 69
69
-
 70
70
-
 71
71
-
 72
72
-
 73
73
-
 74
74
-
 75
75
-
 76
76
-
 77
77
-
 78
78
-
 79
79
-
 80
80
-
 81
81
-
 82
82
-
 83
83
-
 84
84
-
 85
85
-
 86
86
-
 87
87
-
 88
88
-
 89
89
-
 90
90
-
 91
91
-
 92
92
-
 93
93
-
 94
94
-
 95
95
-
 96
96
-
 97
97
-
 98
98
-
 99
99
-
 100
100
-
 101
101
-
 102
102
-
 103
103
-
 104
104
-
 105
105
-
 106
106
-
 107
107
-
 108
108
-
 109
109
-
 110
110
-
 111
111
-
 112
112
-
 113
113
-
 114
114
-
 115
115
-
 116
116
-
 117
117
-
 118
118
-
 119
119


Brandt GE2626W Owner's manual
- Category
- Microwaves
- Type
- Owner's manual
- This manual is also suitable for
Ask a question and I''ll find the answer in the document
Finding information in a document is now easier with AI
in other languages
- français: Brandt GE2626W Le manuel du propriétaire
- español: Brandt GE2626W El manual del propietario
- Nederlands: Brandt GE2626W de handleiding
Related papers
-
Groupe Brandt SE2300ENB Owner's manual
-
-
-
Groupe Brandt CE3280ZP Owner's manual
-
Brandt SM2606W User manual
-
Brandt CE2605 User manual
-
-
-
-
Groupe Brandt CE2642W Owner's manual
Other documents
-
Thomson MWGT263XD Owner's manual
-
Whirlpool MWO 618-01 SL Owner's manual
-
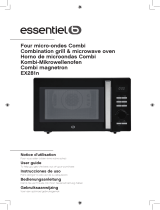 ESSENTIELB EX281n User manual
-
Whirlpool JC 216 WH User guide
-
Thermador MC30WP User guide
-
Whirlpool AMW 730/WH Safety guide
-
Whirlpool AMW 140 IX User guide
-
Domo DO2329 Owner's manual
-
Whirlpool MTAA 24S (MA) Safety guide
-
Domo DO2324 Owner's manual
