Avantgarde TBWC-168SS5 User manual

Category
Wine coolers
Type
User manual

This manual is also suitable for

12/27/2012
1.DESCRIPTION DES COMPOSANTES
1. PANNEAU DE CONTRÔLE & REGLAGE DE
TEMPERATURE EXTÉRIEUR
2. CABINET
3. TABLETTES COULISSANTES
4. CAVITE INTÉRIEURE
5. BASE DE LA VENTILATION AVANT
6. PIEDS AJUSTABLES
7. PENTURE DE PORTE
8. LUMIÈRE INTÉRIEURE
9. VENTILATEUR
3
1
11
1
12/27/2012
TABLE OF CONTENTS
1.COMPONENTS AND PARTS …………………………………………………..........14
2.SAFETY PRECAUTIONS ………………………………………………….……....15-16
3.INSTALLATION INSTRUCTIONS ………………………………………….............17
4.OPERATING YOUR APPLIANCE……………………………………….…………18-19
5.LAYOUT & STORAGE …………………………………………………….......... 20-21
6.CARE AND MAINTENANCE ……………………………………………………..…..22
7.TROUBLESHOOTING GUIDE………………………………………………….………23
13
12/27/2012
1. COMPONENTS AND PARTS
14
1
11
1
12/27/2012
2-IMPORTANT
SAFETY
INSTRUCTIONS
WARNING
To reduce the risk of fire, electrical shock, or injury when
using your appliance, follow these basic precautions:
READ ALL INSTRUCTIONS BEFORE USING THE WINE COOLER
DANGER OR WARNING: RISK OF CHILD ENTRAPMENT.
Child entrapment and suffocation represent a real danger. Junked or abandoned appliances are
dangerous even if they will “just sit in the garage for a few days”.
Before you throw away an old wine Cooler: Take off the door. Leave the Shelves in place so
that children may not easily climb inside.
Never allow children to operate, play with, or crawl inside the appliance.
Never clean appliance parts with flammable fluids. The fumes can create a fire hazard or
explosion.
Do not store or use gasoline or any other flammable vapors in the vicinity or any other
appliance. The fumes can help create a fire or explosion
.
-SAVE THESE INSTRUCTIONS-
15
12/27/2012
PRECAUTIONS
After removing the unit from its packaging, make sure that it is in good condition. If in doubt, don't use it and contact
an authorized Service Center.
Carefully read the operating manual and confirm that the nominal data on the identification plate corresponds to your
electrical outlet.
This unit can be used only for the residential use for which it was designed. The manufacturer accepts no liability for
any damage due to inappropriate use or repairs performed by non-qualified personnel.
Before cleaning the unit, make sure that it is disconnected. Never clean the equipment with an acid preparation,
gasoline, oil or other any chemical product which could damage the unit.
Repairs must only be performed by authorized maintenance centers.
If the power cord is damaged, it must be replaced by the manufacturer, a Service Center or a person of similar
qualification to prevent risks of fire, electrical shock, or injury.
Unscrew the door before you remove it.
Keep the unit away from flammable substances.
The unit must be installed according to the given instructions to avoid any functional problems.
Children should be monitored to ensure that they do not play with the appliance.
This appliance is not designed to be used by persons (including children) with reduced physical, sensory or mental
capabilities, or lacking experience or knowledge, unless it was allowed by a person responsible for their safety.
Keep all ventilation openings free from any obstruction inside and outside the unit.
To reduce the risk of fire, electric shock or injury during the use of your unit you must comply with these precautions.
16
12/27/2012
3-PREPARATION &
INSTALLATION
INSTRUCTIONS
BEFORE USING YOUR WINE COOLER
Remove the exterior and interior packaging.
Before connecting the Wine Cooler to the
power source, let it stand upright for
approximately 2 hours. This will reduce the
possibility of a malfunction in the cooling system
from handling during transportation.
Clean the interior surface with lukewarm water
using a soft cloth.
Install the handle on the left side of the door.
INSTALLATION DIAGRAM FOR THE BUILT-IN MODELS
Level the unit inside the cabinet.
Open the door of the unit at a 90°angle.
INSTALLATION OF YOUR WINE COOLER
This appliance is designed for free standing installation or built-in (fully recessed).
Place your Wine Cooler on a floor that is strong enough to support it when it is fully loaded. To level your
Wine Cooler, adjust the front leveling leg at the bottom of the Wine Cooler.
Locate the Wine Cooler away from direct sunlight and sources of heat (stove, heater, radiator, etc.).
Direct sunlight may affect the acrylic coating and heat sources may increase electrical consumption.
Extreme cold ambient temperatures may also cause the unit not to perform properly.
Avoid locating the unit in moist areas.
Plug the Wine Cooler into an exclusive, properly installed-grounded wall outlet. Do not under any
circumstances cut or remove the third (ground) prong from the power cord. Any questions concerning
about power and/or grounding should be directed to a certified electrician or an authorized product
Service Center.
17
12/27/2012
4-OPERATING
YOUR
WINE
COOLER
T
he wine cooler should be placed where the ambient temperature is between 15 to 25 ºC. If the ambient
temperature is above or below this range, the performance of the unit may be affected. For example, placing
your unit in extreme cold or hot conditions may cause interior temperatures to fluctuate. The zone
temperature may have a difference of +/- F (+/- 3ºC) from the setting depending on loading and
ambient conditions.
Recommended Temperatures for Chilling Wine
Red Wines: 15-18°C (58-65°F)
Dry/White Wines 9-15°C (48-58°F)
Sparkling Wines 5-9°C (40-48°F)
The above temperatures may vary slightly depending on whether or not the interior bulb is ON or OFF or
whether the bottles are located on the upper/middle or lower section.
ON/OFF POWER
To turn ON/OFF the appliance, press the ON/OFF Push button and hold for 3 seconds..
SETTING THE TEMPERATURE CONTROL
E
ach cooling compartment of the wine Cooler (upper & lower) is independently controlled. To set the
temperature: Connect the power cord to a properly grounded outlet. In the event of a power interruption, all
previous temperature settings are automatically saved and each compartment will keep the previous
temperature setting. The temperature preset at the factory is C for the upper compartment at the factory
and 12°C for the lower compartment.
Set the desired cooling temperature by pressing the corresponding the Push buttons .
Each depression of the Push button will scroll through the available temperature settings (for each
compartment) in increments of 1 degree. The temperature selected will flash in the LED display for
approximately 5 seconds, then will revert back and display the temperature inside the cabinet.
UPPER COMPARTMENT
T
he temperature setting can be adjusted from 5°C to 10°C (4F to 50°F).
18
12/27/2012
LOWER COMPARTMENT
T
he temperature setting can be adjusted from 10°C to 18°C (50°F to 65°F).
To view the “set” temperature press and hold the corresponding Push button for approximately 5 seconds, the
“set” temperature will temporarily “flash” in the LED display for 5 seconds.
COOLING
I
ndicator light illuminates to signify the cooling mode is currently in operation.
INTERIOR LIGHT
You can turn the interior light ON or OFF by pushing the light push button.
DOOR LOCK
This unit has the option to have a lock and key combination. Press the "LOCK" push button and hold for 3 seconds,
the control panel will lock and features are locked in until you press "LOCK" again, to unlock.
F ° OR C°
When you press "SET" and "LIGHT" Keys for 3 seconds, you can switch between Celsius and Fahrenheit
temperature showing.
NOTES
If
the unit is unplugged, looses power, or is turned off; you must wait 3 to 5 minutes before restarting.
If you attempt to restart before this interval the unit will not start.
When you use the wine cooler for the first time or restart the unit after having been shut off for a long time,
there could be a few degrees variance between the temperature you select and the one indicated on the LED
readout. This is normal and it is due to the length of the activation time. Once the wine Cooler is running for a
few hours everything will return back to normal.
19
12/27/2012
5-LAYOUT
AND
STORAGE
Your cabinet was designed to be flexible, and to be able to adapt to your requirements
Normal sliding Shelf
20
12/27/2012
TO REMOVE A SHELF
To remove a sliding shelf :
1. Remove all bottles
2. Pull out the shelf
3. Take out shelf by lifting the right side bracket and lowering the left side one, then pull out
RECOMMENDATIONS FOR LAYOUT AND STORAGE OF YOUR WINE CABINET
Your cabinet was designed to store a maximum number of bottles in total security.
We recommend that you observe the tips to optimize loading.
Spread your bottles out as evenly as possible over the shelves, so that the weight is not concentrated
in one area; also make sure your bottles do not touch the back of the cabinet, or the step at bottom.
Also make sure that the bottles are not all grouped together at the top or bottom of the cabinet.
Observe the loading instructions provided in section 5, according to the type of storage fixtures with
which your cabinet is equipped, AND NEVER STACK BOTTLES ON A SLIDING SHELF.
Never try to pull out more than one sliding shelf at a time.
PLEASE NOTE
Before modifying your cabinet’s original configuration in any way, be sure to ask your dealer for advice.
21
12/27/2012
6-CARE
AND
MAINTENANCE
CLEANING YOUR WINE COOLER
Turn off the power, unplug the appliance, and remove all items including shelves and rack.
Wash the inside surfaces with a warm water and baking soda solution. The solution should be about 2
tablespoons of baking soda per a liter of water.
Wash the shelves with a mild detergent solution.
Wring excess water out of the sponge or cloth when cleaning area of the controls, or any electrical parts.
Wash the outside cabinet with warm water and mild liquid detergent. Rinse well and wipe dry with a clean soft
cloth.
POWER FAILURE
Most power failures are corrected within a few hours and should not affect the temperature of your appliance if you
minimize the number of times the door is opened. If the power is going to be off for a longer period of time, you need to
take the proper steps to protect the content.
VACATION TIME
Short vacations: Leave the Wine Cooler operating during vacations of less than three weeks.
Long vacations: If the appliance will not be used for several months, remove all items and turn off the
appliance. Clean and dry the interior thoroughly. To prevent door and mold growth, leave the door open
slightly: blocking it open if necessary.
MOVING YOUR WINE COOLER
Remove all items.
Securely tape down all loose items (shelves) inside your appliance.
Turn the adjustable leg up to the base to avoid damage.
Tape the door shut.
Be sure the appliance stays secure in the upright position during transportation. Also protect the outside of
appliance with a blanket, or similar item.
ENERGY SAVING TIPS
The Wine Cooler should be located in the coolest area of the room, away from heat producing appliances, and out of
the direct sunlight.
WARRANTY
Residential usage: One year limited warranty, parts and labor.
Commercial use: One year limited warranty of parts, and 3 months limited warranty on labor.
22
12/27/2012
7-TROUBLESHOOTING
GUIDE
You can solve many common problems easily, saving you the cost of a possible service call. Try the suggestions below
to see if you can solve the problem before calling the authorized service center.
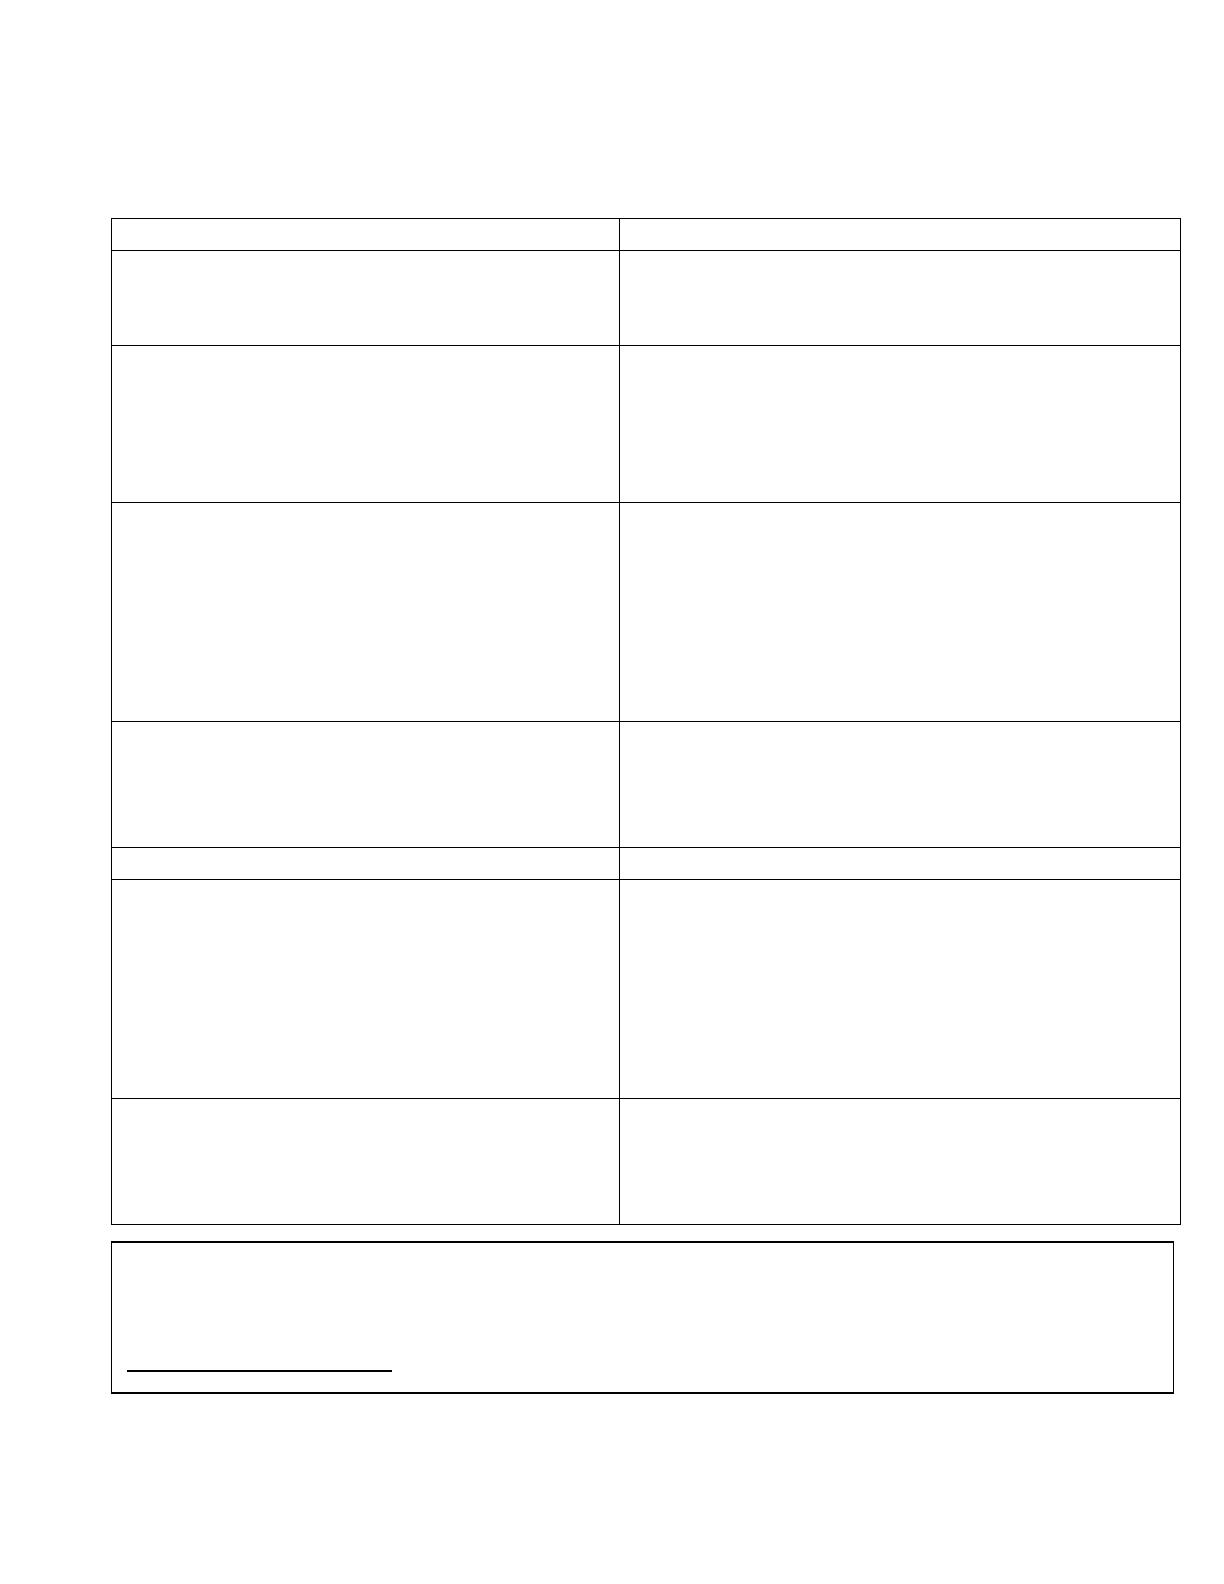
PROBLEM POSSIBLE CAUSE
Wine Cooler does not operate. Not plugged in.
The appliance is turned off.
The circuit breaker is tripped or a blown fuse.
Wine Cooler is not cold enough. Check the temperature control setting.
External environment may require a higher setting.
The door is opened too often.
The door is not closed completely.
The door gasket does not seal properly.
Turn on and off frequently. The room temperature is hotter than normal.
A large amount of contents has been added to the Wine
Cooler.
The door is opened too often.
The door is not closed completely.
The temperature control is not set correctly.
The door gasket does not seal properly.
The light does not work. Not plugged in.
The circuit breaker is tripped or a blown fuse.
The bulb has burned out.
The light Push button is “OFF”.
Vibrations. Check to assure that the Wine Cooler is leveled.
The Wine Cooler seems to make too much noise. The rattling noise may come from the flow of the refrigerator,
which is normal.
As each cycle ends, you may hear gurgling sounds caused
by the flow of refrigerator fluid in your Wine Cooler.
Contraction and expansion of the inside walls may cause
popping and crackling noises.
The Wine Cooler is not leveled
The door will not close properly. The Wine Cooler is not leveled
The door was reversed and not properly installed.
The gasket is dirty.
The shelves are out of position.
TO CONTACT THE AUTHORIZED SERVICE CENTER:
A.G.I SERVICE
450.963.1303/1.888.651.2534
23
  • Page 1 1
  • Page 2 2
  • Page 3 3
  • Page 4 4
  • Page 5 5
  • Page 6 6
  • Page 7 7
  • Page 8 8
  • Page 9 9
  • Page 10 10
  • Page 11 11
  • Page 12 12
  • Page 13 13
  • Page 14 14
  • Page 15 15
  • Page 16 16
  • Page 17 17
  • Page 18 18
  • Page 19 19
  • Page 20 20
  • Page 21 21
  • Page 22 22
  • Page 23 23

Avantgarde TBWC-168SS5 User manual

Category
Wine coolers
Type
User manual
This manual is also suitable for

Ask a question and I''ll find the answer in the document

Finding information in a document is now easier with AI

in other languages