Panasonic NVF User manual

Category
Cassette players
Type
User manual
Video Cassette Recorder
NV-FJ620 Series
NV-FJ621 Series
NV-FJ616 Series
NV-SJ220 Series
Operating Instructions
Contents Page
Warning and Important Information 2
Controls and Components 3
VCR Operation 4
Menu Operation 4
TV Operation 4
Connecting and Setting up 5
Playback 8
Recording 9
Satellite or Digital Receiver 11
Timer Recording 12
Search Functions 14
Connecting a Decoder 14
Connecting a Stereo Amplifier 15
Manual Tuning 15
Setting the VCR’s Clock 17
Various Settings 17
Other Function 19
Before Requesting Service 20
Index 23
Specifications Back cover
Please read through all these operating instructions
(especially the safety information) before connecting
or operating the video cassette recorder, or adjusting
any settings.VQT9014
2
-
-
+
+
Warning and Important
Information
Notes:
The service life of the batteries is approximately 1 year.
However, it varies considerably depending on the
frequency of use.
When they are exhausted, replace them with two AA, UM3,
or R6 size batteries.
When the batteries are exhausted, remove them
immediately and dispose of them correctly.
Make sure that the batteries are inserted with the polarity
(+ and -) correctly aligned.
Do not mix old battery with new battery.
Do not mix different battery types, i.e. Alkaline and
Manganese.
Do not use rechargeable (Ni-Cd) batteries.
Do not heat or short-circuit the batteries.
When you do not use the remote control for a long time,
take out the batteries and store them in a cool, dry place.
Conserve the environment
See [Power save] of page 18.
Disposal of old equipment
Batteries, packaging and old equipment should not be
disposed of as domestic waste, but in accordance with the
applicable regulations.
Cautions before you operate this VCR
Avoid:
Humidity and dust.
Extreme heat such as direct sunlight.
Magnets or electromagnetic objects.
Touching internal parts of the VCR.
Water or some other liquid.
Lightning. (Disconnect the aerial plug from the VCR during
lightning storms.)
Anything heavy on the VCR.
Connecting or handling the equipment with wet hands.
Do:
Wipe the VCR with a clean and dry cloth.
Install the VCR in a horizontal position.
Keep the VCR, TV and other equipment switched off until
you have finished all connections.
Condensation may form in the following cases:
The VCR is brought from cold surroundings into a
well-heated room.
The VCR is suddenly brought from cool surroundings, such
as an air-conditioned room or car, to a place which is hot
and humid.
Note:
In any of the above-mentioned conditions, do not operate
the VCR for at least 1 hour.
This VCR is not equipped with a dew sensor.
Standard Accessories
1 pc. RF Coaxial cable
1 pc. Remote Control (N2QAKB000001)
2 pcs. R6 size batteries
1 pc. AC mains lead
As this equipment gets hot during use, operate it
in a well ventilated place;
do not install this equipment in a confined space
such as a book case or similar unit.
Important
Your attention is drawn to the fact that the recording of
pre-recorded tapes or discs or other published or broadcast
material may infringe copyright laws.
Warning
To reduce the risk of fire or shock hazard, do not expose this
equipment to rain or moisture.
For your safety
Do not remove outer cover.
Touching internal parts of the VCR is dangerous, and may
seriously damage it.
To prevent electric shock, do not remove cover. There are no
user serviceable parts inside. Refer all servicing to qualified
service personnel.
Inserting Remote Control Batteries
Insert the batteries with the polarity (+ and -) correctly
aligned.
3
TIMER REC
REC/OTR
/
/
EXT LINK
65
EJECT
Í
TIMER
Á
TRACKING/V-LOCK
+
CVC
A
B
C
AC I N
~
SECTEUR
~
AV1
(
TV
)
IN
ENT
RF
ANT
OUT
SORTIE
AUDIO
OUT/SORTIE
L
/G
R
/
D
AV2
(
DECODER/DECODEUR/EXT
)
AC I N
~
SECTEUR
~
AV1
(
TV
)
IN
ENT
RF
ANT
OUT
SORTIE
Í
DIRECT TV REC TV ASPECT TV / TEXT
TRACKING/V-LOCK
VOLUME
STILL ALBUM
REPLAY
REC
VCR
DATE
CANCEL
RESET
AUDIO OSD/DISPLAY
AV LINK
SP/LP/EP
r
s
r
s
r
s
ON OFF
TV
SV/V
+
AV
+
+
MENU
EXIT
OK
PROG. / CHECK
TIMER
Á
SEARCH
INDEX
123
78
0
9
4
5
6
INPUT SELECT
Í
DIRECT TV REC TV ASPECT TV / TEXT
TRACKING/V-LOCK
VOLUME
STILL ALBUM
REPLAY
REC
VCR
DATE
CANCEL
RESET
AUDIO OSD/DISPLAY
AV LINK
SP/LP/EP
r
s
r
s
r
s
ON OFF
TV
SV/V
+
AV
+
MENU
EXIT
OK
PROG. / CHECK
TIMER
Á
SEARCH
INDEX
123
78
0
9
4
5
6
INPUT SELECT
+
Controls and Components
NV-FJ620 Series, NV-FJ621 Series and NV-FJ616 Series
NV-SJ220 Series
VCR Operation TV Operation
4
1
9
9
VCR
r
TV
Í
RESET
AUDIO
OK
r
s
OFF
Í
INPUT SELECT
AV
TRACKING/V-LOCK
+
TV ASPECT
VOLUME
+
TV / TEXT
VCR
r
TV
DATE
r
s
r
s
r
s
ON OFF
MENU
EXIT
OK
VCR Operation
When you want to operate the VCR,
set the [VCR/TV] switch to [VCR].
VCR-ON/OFF button
To switch the VCR from on to standby mode or vice
versa. In the standby mode, the VCR is still connected
to the mains.
Numeric buttons
To select the programme positions (199) of the VCR.
Example: 09:
19:
To enter a ShowView number.
To enter numbers for various settings.
RESET button
To reset the tape counter (elapsed time) to [0:00.00].
The tape counter is automatically reset to [0:00.00]
when a video cassette is inserted.
Cassette compartment
Infra-red Remote Control Receiver window
VCR display
AUDIO button
This button operates on NV-FJ620 Series, NV-FJ621
Series and NV-FJ616 Series.
AV LINK button
This button operates on NV-FJ620 Series, NV-FJ621
Series and NV-FJ616 Series.
SP/LP/EP button
This button operates on NV-FJ620 Series, NV-FJ621
Series and NV-FJ616 Series.
STILL ALBUM button
This button does not operate on this VCR.
Child Lock Function buttons
([OK] and [OFF (
ii
ii
i)] buttons)
This function deactivates all buttons on the VCR and
the remote control. Use this function, when you do not
want other people to operate the VCR.
To Activate the Child Lock Function
Hold down the [OK] and the [OFF (i)] buttons
simultaneously until the [!" hold] indication appears in
the VCR display.
If you press a button while the Child Lock function is
on, the [!" hold] indication appears in the VCR
display to inform you that no operation is possible.
To Cancel the Child Lock Function
Hold down the [OK] and the [OFF (i)] buttons
simultaneously until the [!" hold] indication
disappears.
If you disconnect the power cable, the Child Lock
function is automatically cancelled after the power
backup time of approximately 60 minutes has
elapsed.
If you cannot cancel the Child Lock function, press
the [EXIT] button and perform the operation.
Menu Operation
Cursor buttons
To select items on the menu.
MENU button
To display the Main menu.
EXIT button
To exit the menu.
OK button
To comfirm or store the selection.
TV Operation
Only Panasonic TVs can be operated with the provided
remote control.
The settings for operating the TV with the remote control
have already been made.
However, some Panasonic TVs cannot be operated using this
remote control.
When you want to operate the TV, set
the [VCR/TV] switch to [TV].
TV-ON/OFF button
To switch the TV on from standby mode or vice versa.
On some TVs it is only possible to switch the TV to
standby mode with this button, but not on. In this case,
try to turn the TV on with one of the following buttons:
Numeric buttons
AV button
Channel button
Numeric buttons
To select the programme positions (199) on the TV.
AV button
To select the desired AV input on the TV.
Channel button
To select the desired programme position (TV station)
on the TV.
TV ASPECT button
To switch the screen format between the wide-screen
and other formats.
VOLUME button
To adjust the volume of the TV.
TV/TEXT button
To switch between normal TV mode and teletext mode.
Teletext buttons
If your TV is equipped for
Teletext reception, you can use
these buttons to change the
teletext information displayed on
the screen and select desired
information. For details, refer to
your TVs operating instructions.
A
B
C
AV LINK
SP/LP/EP
STILL ALBUM
5
Hints:
Q Link is an advanced system that offers a range of
convenient functions such as automatic copying of the
tuning position of all available TV stations into your VCRs
memory (this is called Download) if you connect the VCR to
your TV with a fully-wired 21-pin Scart cable (not supplied).
Depending on the manufacturer, the equivalent of the
Q Link function has a different name and may not work
exactly the same.
°
1
[Q Link] is a registered trademark of Panasonic.
°
2
[DATA LOGIC] is a registered trademark of Metz.
°
3
[Easy Link] is a registered trademark of Philips.
°
4
[Megalogic] is a registered trademark of Grundig.
°
5
[SMARTLINK] is a registered trademark of Sony.
For details, refer to your TVs operating instructions or
consult your dealer.
Unlike in most commercially sold 21-pin Scart cables, in
fully-wired 21-pin Scart cables all 21 pins of one plug are
connected to the matching pin of the plug on the other end
of the cable.
Download in
progress,
please wait.
Position 67
Download
Panasonic VCR
Country
Belgien
Belgique
België
Danmark
España
Ελλάδα
France
Italia
Nederland
Norge
Deutschland
Österreich
Portugal
Suomi
Sverige
Schweiz
Suisse
Svizzera
others
Panasonic VCR
1
2
3
4
5
6
7
89
:
OK
MENU
OK
Connecting and Setting up
(For NV-FJ620 Series, NV-FJ621 Series and NV-FJ616
Series)
If you are connecting your VCR to a TV equipped with the
[Q Link]°
1
function, then follow the steps.
For a TV equipped with the [DATA LOGIC]°
2
, [Easy Link]°
3
,
[Megalogic]°
4
or [SMARTLINK]°
5
function and with a 21-pin
Scart socket, also read from this page.
For details about the connections, also read TVs operating
instructions.
Preset Download
(To Simultaneously Set Up this VCR with a
New TV)
First of all, make sure that the VCR is switched off.
Switch the TV on.
The TV starts to tune all available TV stations and to
adjust the clock.
When the TV has finished its
own auto setup, the VCR is
automatically switched on, and
the downloading of the setup
data from the TV to the VCR
starts. (Applicable to TVs with
[Q Link] or [DATA LOGIC]
function)
If your TV is equipped with the
[Easy Link], [Megalogic] or
[SMARTLINK] function, the
Country setting menu appears
on the TV screen. Press the
[Cursor] buttons 3421 to
select the desired country and
the [OK] button.
The downloading automatically
starts.
When the indication appears on
the VCR display, the
downloading is complete.
Note:
If you accidentally switch on the VCR before the TV,
downloading of the setup data from the TV may not be
performed correctly. In this case, follow the operation steps.
Wait until the Auto Setup is complete on both the TV
and the VCR.
Press the [MENU] button to display the Main menu on
the TV screen.
Press the [Cursor] buttons 3421 to select [Tuning]
and then [Download].
Press the [OK] button twice. Downloading of the setup
data from the TV to the VCR starts.
When the programme position and the current time
appear in the VCR display, downloading is complete.
Hints:
If you use a Panasonic TV, starting the downloading of the
setup data will automatically display the [Download]
indication. However, in case of a TV of another make, the
[Download] indication may not appear. In this case, select
the AV input on your TV if you want to see the [Download]
indication.
If you select [Schweiz], [Suisse] or [Svizzera] on the
Country setting menu, the other setting menu appears
automatically to let you set [Power save] to [ON]. In this
setting, the VCRs power consumption is minimised when it
is off (Standby mode). To turn the VCR on, keep the [VCR-
ON/OFF] button pressed on the VCR main unit, not with the
remote control.
1 AV1 21-pin Scart socket
2 Aerial Input socket
3 Aerial Output socket
4 Aerial (not supplied)
5 Aerial lead (not supplied)
06 TV equipped with the Q Link
(not supplied)
07 Aerial Input socket
08 21-pin Scart socket
09 RF Coaxial cable (supplied)
10 Fully-wired 21-pin Scart cable
(not supplied)
6
Preset Download
(To Set Up this VCR with a TV Already in
Use)
Switch the TV on.
Select the AV input on your TV.
Set the [VCR/TV] switch to [VCR].
Press the [VCR-ON/OFF] button
to switch the VCR on.
Downloading of the setup data
starts automatically. (Applicable
to TVs with [Q Link] or [DATA
LOGIC] function)
If your TV is equipped with the
[Easy Link], [Megalogic] or
[SMARTLINK] function, the
Country setting menu appears
on the TV screen. Press the
[Cursor] buttons 3421 to
select the desired country and
the [OK] button. The
downloading automatically
starts.
When the indication appears on
the VCR display, the
downloading is complete.
Hint:
If you select [Schweiz], [Suisse] or [Svizzera] on the
Country setting menu, the other setting menu appears
automatically to let you set [Power save] to [ON]. In this
setting, the VCRs power consumption is minimised when it
is off (Standby mode). To turn the VCR on, keep the
[VCR-ON/OFF] button pressed on the VCR main unit, not
with the remote control.
If you are connecting your VCR to a TV using RF coaxial
cable and 21-pin Scart cable, then follow the steps.
(AV Connection)
RF Coaxial cable must be connected to watch TV channels
even if 21-pin Scart cable is used to connect VCR to TV.
Auto Setup Function
The Auto Setup function automatically tunes all available TV
stations and sets the VCRs clock to the current date and
time.
Press the [VCR-ON/OFF] button
to turn on the VCR.
The Country setting menu
appears on the TV screen.
Press the [Cursor] buttons 3421.
Select the country where you are using the VCR.
Press the [OK] button.
The VCRs Auto Setup
automatically starts and tunes all
available TV stations and also
sets the clock. This takes about
5 minutes.
When the indication appears on
the VCR display, the Auto Setup
is complete.
Press the [MENU] button for more than 5 seconds.
The RF output channel number appears on the VCR
display.
The initial setting is channel 36.
Press the [Numeric] button [0].
The displayed RF output channel number changes to
[ ].
Press the [OK] button to conclude the setting.
To cancel the Auto Setup before it has finished
Press the [EXIT] button .
When the clock setting menu appears after Auto Setup
has finished
Press the [Cursor] buttons 3421 to set the correct
time and date.
Press the [OK] button to conclude the setting.
To confirm that the TV stations have been tuned correctly
by the Auto Setup function
See page 15.
When no station has been set, confirm all connections of
the VCR again and restart the Auto Setup
See page 16.
When the station names and/or channel numbers have
not been set correctly
See page 15.
Hint:
If you select [Schweiz], [Suisse] or [Svizzera] on the
Country setting menu, the other setting menu appears
automatically to let you set [Power save] to [ON]. In this
setting, the VCRs power consumption is minimised when it
is off (Standby mode). To turn the VCR on, keep the [VCR-
ON/OFF] button pressed on the VCR main unit, not with the
remote control.
Country
Belgien
Belgique
België
Danmark
España
Ελλάδα
France
Italia
Nederland
Norge
Deutschland
Österreich
Portugal
Suomi
Sverige
Schweiz
Suisse
Svizzera
others
Panasonic VCR
EXIT
MENU
OK
1
2
3
4
5
6
7
89
:
Country
Belgien
Belgique
België
Danmark
España
Ελλάδα
France
Italia
Nederland
Norge
Deutschland
Österreich
Portugal
Suomi
Sverige
Schweiz
Suisse
Svizzera
others
Panasonic VCR
Í
OK
1 AV1 21-pin Scart socket
2 Aerial Input socket
3 Aerial Output socket
4 Aerial (not supplied)
5 Aerial lead (not supplied)
06 TV (not supplied)
07 Aerial Input socket
08 21-pin Scart socket
09 RF Coaxial cable (supplied)
10 Fully-wired 21-pin Scart cable
(not supplied)
Country
Tuning
: others
: Ch 21
Auto-Setup
Panasonic VCR
OK
OK
Download in
progress,
please wait.
Position 67
Download
Panasonic VCR
Í
VCR
r
TV
7
Í
OK
MENU
EXIT
OK
Country
Belgien
Belgique
België
Danmark
España
Ελλάδα
France
Italia
Nederland
Norge
Deutschland
Österreich
Portugal
Suomi
Sverige
Schweiz
Suisse
Svizzera
others
Panasonic VCR
1
2
3
4
5
6
7
If you are connecting your VCR to a TV using only RF coaxial
cable, then follow the steps. (RF Connection)
RF Coaxial cable must be connected to watch TV channels.
Press the [VCR-ON/OFF] button
to turn on the VCR and tune
your TV until the Country setting
menu appears on the TV
screen.
Press the [Cursor] buttons 3421.
Select the country where you are using the VCR.
Press the [OK] button.
The VCRs Auto Setup automatically starts and tunes all
available TV stations and also sets the clock. This takes
about 5 minutes.
When the indication appears on
the VCR display, the Auto Setup
is complete.
If, after setup, the picture on the video playback channel
is distorted, change the RF output channel on the VCR to
another number.
Press the [MENU] button for more than 5 seconds.
The RF output channel number appears on the VCR
display.
The initial setting is channel 36.
Press the [Numeric] buttons.
Change the RF output channel.
Enter a channel number which differs by 2 or 3 from the
one initially set number. For example, as the original
number is 36, enter 39.
Retune your TV to the VCRs new RF output channel.
Press the [OK] button to conclude the setting.
To cancel the Auto Setup before it has finished
Press the [EXIT] button .
When the clock setting menu appears after Auto Setup
has finished
Press the [Cursor] buttons 3421 to set the correct
time and date.
Press the [OK] button to conclude the setting.
1 Aerial Input socket
2 Aerial Output socket
3 Aerial (not supplied)
4 Aerial lead (not supplied)
5 TV (not supplied)
6 Aerial Input socket
7 RF Coaxial cable (supplied)
To confirm that the TV stations have been tuned correctly
by the Auto Setup function
See page 15.
When no station has been set, confirm all connections of
the VCR again and restart the Auto Setup
See page 16.
When the station names and/or channel numbers have
not been set correctly
See page 15.
Hint:
If you select [Schweiz], [Suisse] or [Svizzera] on the
Country setting menu, the other setting menu appears
automatically to let you set [Power save] to [ON]. In this
setting, the VCRs power consumption is minimised when it
is off (Standby mode). To turn the VCR on, keep the [VCR-
ON/OFF] button pressed on the VCR main unit, not with the
remote control.
OK
8
Playback
For Normal Playback
Press the [Play] button.
For Cue or Review Playback
During playback, tap the [Fast Forward]
or [Rewind] button.
To return to normal playback, press
the [Play] button.
Press and hold down the [Fast
Forward] or [Rewind] button.
Cue or review playback continues for as long as you
keep the button pressed.
For High speed Cue or Review Playback (JET SEARCH)
(For NV-FJ620 Series, NV-FJ621 Series and NV-FJ616
Series)
During playback, tap the [Fast Forward] or [Rewind]
button twice.
For Still Playback
During playback, press the [Pause/
Slow] button.
To return to normal playback, press the [Play] button
or the [Pause/Slow] button.
For Slow Playback
During playback, keep the [Pause/
Slow] button pressed for 2 seconds or
more.
To return to normal playback, press the [Play] button.
Fast-forwarding or Rewinding the Tape
Press the [Fast Forward] or [Rewind] button in the stop
mode.
To stop fast-forwarding or rewinding, press the [Stop]
button.
To briefly view the picture during fast-forwarding or
rewinding, press and hold down the corresponding
button.
To Stop Playback
Press the [Stop] button.
Notes:
Cue, review or slow playback will be automatically
cancelled after 10 minutes, and still playback after
5 minutes.
During playback function other than normal playback,
horizontal noise bars may appear in the picture, the colour
of the picture may be unstable, or the picture may be
otherwise distorted.
When you play back a tape recorded in the LP mode, the
picture may be in black and white.
When you play back a tape recorded in the EP mode, the
picture and the sound may be distorted.
However, these are not malfunctions.
(For NV-FJ620 Series, NV-FJ621 Series and NV-FJ616
Series)
REPLAY
To Play back S-VHS Cassette Tape
(SQPB=S-VHS Quasi Playback)
It is also possible to play back tapes recorded in the S-VHS
system.
Some picture noise may occur depending on the type of
tape used.
It is not possible to fully obtain the high resolution that
S-VHS is capable of.
It is not possible to record in the S-VHS system with this
VCR.
To Play back a Recorded Part Repeatedly
Press the [Play] button on the remote control for more
than 5 seconds.
The [R] indication appears on the TV screen.
If [OSD] is set to [OFF] (See page 18), the [R]
indication will not appear in repeat playback mode.
To Cancel the Repeat Playback Mode
Press the [Stop] button.
To Rewind the Tape a Little to View the
Same Scene Again (Replay Function)
Press the [REPLAY] button.
Rewind the tape a little from its present position and
play it back again.
During review playback, when you press this button,
the VCR briefly switches over to cue playback and
play it back again.
When the VCR is in the stop, rewind, fast-forward,
slow playback, or standby mode, the Replay function
does not work.
To Stop Playback Automatically
(Playback Off Timer Function)
If you set the playback duration, the playback will stop
automatically.
After the set playback time has elapsed, the VCR
automatically stops playback and switches off.
During normal playback, press the [Play] button
on the
VCR for more than 2 seconds to put the VCR in the
Playback Off Timer mode.
After that, press this button on the VCR repeatedly until
the desired playback duration is displayed on the VCR
display.
Repeatedly pressing this button changes the
indication in the following order.
Counter display (normal playback mode)
#30 (min.)#60 (min.)#120 (min.)
#180 (min.)#240 (min.)
#Counter display (normal playback mode)
To stop midway
Press the [Stop] button.
9
REC
REC
REC
SP
Í
REC
SP/LP/EP
REC
OSD/DISPLAY
REC/OTR
REC/OTR
TRACKING/V-LOCK
+
Recording
Insert a video cassette with an intact erasure prevention
tab.
If it has already been inserted, press the [VCR-ON/
OFF] button to turn the VCR on.
Select the TV station using the
[Channel] button. (Set the [VCR/TV]
switch to [VCR].)
It is also possible to select by
pressing the [Numeric] buttons.
Press the [REC] button to start
recording.
Press the [Stop] button to stop recording.
To Select the Desired Tape Speed
(For NV-FJ620 Series, NV-FJ621 Series and NV-FJ616
Series)
Press the [SP/LP/EP] button before
recording.
SP provides standard recording time
and optimum picture quality.
LP provides double recording time with slightly
reduced picture quality.
EP provides triple recording time with slightly reduced
picture quality.
To Pause Recording
Press the [Pause/Slow] button during
recording.
Press it again to continue recording.
To View One TV Programme while
Recording Another TV Programme
After pressing the [REC] button to start recording, select
on your TV the programme position of the TV
programme that you want to view.
Notes:
When playing back an E300 cassette recorded in the LP or
EP mode, some picture distortion may occur. However, this
is not a malfunction. (For NV-FJ620 Series, NV-FJ621
Series and NV-FJ616 Series)
The recording pause mode will be automatically cancelled
after 5 minutes and return to the stop mode.
The tape recorded in the EP mode on this VCR cannot be
played back on the other VCR without EP mode function.
(For NV-FJ620 Series, NV-FJ621 Series and NV-FJ616
Series)
On the other VCR (even with EP mode function), when you
play back the tape recorded in the EP mode, the picture
may be distorted. However, this is not a malfunction.
(For NV-FJ620 Series, NV-FJ621 Series and NV-FJ616
Series)
To Display the Approximate Remaining
Tape Time
See page 17 to set the tape length.
Press the [OSD/DISPLAY] button repeatedly until the
remaining tape time appears on the VCR display.
Pressing the [OSD/DISPLAY] button once makes the
On Screen Display appear; after that, pressing it
repeatedly changes the indication in the following
order.
For certain cassettes, the remaining tape time may
not be displayed correctly.
Clock#Counter#Remaining Tape Time#Clock
To Select the Recording Duration and
Perform Timer Recording
(OTR=One-Touch Recording)
Press the [REC/OTR] button to start recording.
Press the [REC/OTR] button
on the VCR repeatedly to
select the desired recording duration.
Every time you press this button, the recording
duration indicated in the VCR display changes in the
following order.
Counter display (normal recording mode)
#30 (min.)#60 (min.)#120 (min.)
#180 (min.)#240 (min.)
#Counter display (normal recording mode)
To stop the OTR recording before the end
Press the [Stop] button.
Note:
This function also works during Direct TV Recording.
(For NV-FJ620 Series, NV-FJ621 Series and NV-FJ616
Series)
To Prevent Accidental Erasure of Recorded
Contents
Break out the erasure prevention tab
after recording.
If you insert a video cassette with a
broken out erasure prevention tab and
press the [REC] button, the [1]
indication flashes on the VCR display
to indicate that recording is not
possible.
In this case, cover the tab hole with
two layers of adhesive tape.
10
REC
DIRECT TV REC
Recording from an external source
Recording from an external source, for example from a video
movie camera, can be performed.
Video movie camera
Other VCR
Connect your VCR to a TV using only RF coaxial cable.
(For NV-SJ220 Series) (See page 7.)
Connect a video movie camera or a VCR to this VCR with a
21-pin Scart cable, as shown in the illustration.
Press the [INPUT SELECT] button to select the AV Input
according to the socket on the VCR to which the source
unit has been connected.
(For NV-FJ620 Series, NV-FJ621 Series and NV-FJ616
Series)
A1: When connected to the AV1 21-pin Scart socket
A2: When connected to the AV2 21-pin Scart socket
Make sure that [AV2] is set to [EXT].
(See page 18.)
(For NV-SJ220 Series)
AV: When connected to the AV1 21-pin Scart socket
Make sure that [AV] is set to [TV/EXT].
(See page 18.)
Press the [Play] button to start playback.
At the point where you want to join a new scene, press
the [Pause/Slow] button to put it in the still playback
mode.
Press the [REC] button to put it in the recording pause
mode.
If you leave the VCR in the recording pause mode for
more than 5 minutes, the VCR automatically switches
over to the stop mode to protect the video heads.
Start playback on the source unit and search for the
point from which you want to record (copy) onto this
VCR.
When that point is reached, press the [Pause/Slow]
button again to start recording the new picture and
sound from the playback unit.
To record (copy) additional scenes, press the [Pause/
Slow] button to put this VCR in the recording pause
mode and then perform above step again.
At the point where you want to stop recording, press the
[Stop] button to finish recording.
Hint:
The new sound is recorded on both the Hi-Fi audio tracks
and the normal audio track. The sound recorded on the
normal audio track is always in mono. (For NV-FJ620
Series, NV-FJ621 Series and NV-FJ616 Series)
To Immediately Record the Same TV
Programme That You Are Viewing on the
TV
(Direct TV Recording)
(For NV-FJ620 Series, NV-FJ621 Series and NV-FJ616
Series)
This function allows you to immediately start recording the
same programme that you are viewing on the TV.
The programme position selected on the VCR automatically
changes to that of the TV programme that you are viewing on
the TV.
Your TV must be equipped with the [Q Link] function.
The VCR must be connected to the TV via a fully-wired
21-pin Scart cable.
Press the [DIRECT TV REC] button.
Recording of the TV programme that you are viewing
on the TV starts.
In some cases, it may not be possible to change the
programme position on the TV during Direct TV
Recording.
Do not press the [AV LINK] button during Direct TV
REC, otherwise the recording may not be performed
correctly.
Press the [Stop] button to stop recording.
11
1
2
3
4
5
6
1
2
3
EXT LINK
EXT LINK
Satellite or Digital Receiver
Connecting the VCR to a Satellite Receiver
or Digital Receiver
If the satellite receiver is equipped with a 21-pin scart socket
Connect your VCR to a TV using only RF coaxial cable.
(For NV-SJ220 Series) (See page 7.)
1 Satellite receiver (not supplied)
2 21-pin Scart socket
If your satellite receiver has a VCR socket, connect the cable to it.
3 21-pin Scart cable (not supplied)
Set [AV2] to [EXT], [EXT LINK 1] or [EXT LINK 2].
(For NV-FJ620 Series, NV-FJ621 Series and NV-FJ616
Series)
Set [AV] to [TV/EXT], [EXT LINK 1] or [EXT LINK 2].
(For NV-SJ220 Series)
For details, see page 18.
If the satellite receiver is not equipped with a 21-pin scart
socket
1 Satellite receiver (not supplied)
2 Aerial Input socket
3 Aerial Output socket
4 Aerial (not supplied)
5 Aerial lead (not supplied)
6 RF coaxial cable (not supplied)
Hint:
The RF output channel of the satellite receiver should be
adjusted away from channel 36, which is used by the VCR,
e.g. re-adjust to channel 33.
Linked Timer Recordings by External
Equipments (EXT LINK)
If an external equipment (for example a satellite receiver) with
a timer function is connected to the AV socket of this VCR by
a 21-pin cable, it is possible to control the recording of the
VCR from this equipment.
Make sure that [AV2] is set to [EXT LINK 1] or [EXT
LINK 2]. (For NV-FJ620 Series, NV-FJ621 Series and
NV-FJ616 Series)
Make sure that [AV] is set to [EXT LINK 1] or [EXT
LINK 2]. (For NV-SJ220 Series) (See page 18.)
Timer programming has to be done on the external
equipment and switch to the timer recording standby
mode, refer to its operating instructions.
Press the [EXT LINK] button on the VCR to switch the
VCR over to the timer recording standby mode.
As long as a video picture is
being trasmitted by the Satellite
or Digital Receiver, the VCR will
record it.
This notice is displayed on the
TV screen.
To delete it, press the [OK]
button.
To cancel the external control, turn off the timer
recording standby mode of the VCR by pressing the
[EXT LINK] button again.
Notes:
To switch TV automatically to the picture from the VCR in
playback mode, connect the AV1 socket of this VCR to the
TV by a 21-pin cable. (For NV-FJ620 Series, NV-FJ621
Series and NV-FJ616 Series)
Some external equipments may not work with this function,
refer to its operating instructions.
VCR now recording
this programme
OK
12
1.
jjjjj jj
/
jj jj
:
jj jj
:
jj jj jjj
2.
jjjjj jj
/
jj jj
:
jj jj
:
jj jj jjj
3.
jjjjj jj
/
jj jj
:
jj jj
:
jj jj jjj
4.
jjjjj jj
/
jj jj
:
jj jj
:
jj jj jjj
5 jjjjj jj jj jj jj jj jj jj jjj
jjjjj jj jj jj jj jj jj jj jjj
Timer recording
Pos Start Stop VPS
Name DATE ON OFF PDC
Panasonic VCR
1/2
1
1. ZDF 27/10
20:00 21:30 SP ON
2.
jjjjj jj
/
jj jj
:
jj jj
:
jj jj jjj
3.
jjjjj jj
/
jj jj
:
jj jj
:
jj jj jjj
4.
jjjjj jj
/
jj jj
:
jj jj
:
jj jj jjj
jjjjj jj jj jj jj jj jj jj jjj
Timer recording
Pos Start Stop VPS
Name DATE ON OFF PDC
Panasonic VCR
1/2
1
ShowView
7 2 1 1 1 4
Panasonic VCR
PROG. / CHECK
r
s
ON
DATE
r
s
r
s
OFF
SP/LP/EP
OK
TIMER
Á
SV/V
+
OK
OK
TIMER
Á
SP/LP/EP
Timer Recording
This VCR lets you programme up to 16 TV programmes
(including weekly and daily programmes) for unattended
recording up to one month in advance.
To Programme with the On Screen Display
(OSD)
This method offers easy step-by-step programming with the
remote control while you view the prompts on the TV screen.
Example:
Programming the timer recording of a TV programme
broadcast on programme position 2 (ZDF) from 20:00 to
21:30 on 27 October.
Press the [PROG./CHECK]
button to display the menu for
programming timer recordings
on the TV screen.
Alternatively, you can press the [MENU] button and
then select [Timer recording].
Press the [Channel] button to select the programme
position of the desired TV station.
As an alternative method, after pressing the [Channel]
button, you can use the [Cursor] buttons 3421.
Press the [DATE] button to set the date on which the TV
programme will be broadcast.
Press the [ON] button to set the starting time.
When it is kept pressed, the indication changes
in 30-minute intervals.
Press the [OFF] button to set the ending time.
Press the [SP/LP/EP] button to set the desired tape
speed. (For NV-FJ620 Series, NV-FJ621 Series and
NV-FJ616 Series)
Regarding the [A] indication, refer to page 13.
Press the [Cursor] buttons 3421 to set [VPS/PDC] to
[ON] or [OFF] [jjj].
See page 13 for VPS/PDC recording.
Press the [OK] button to
conclude the setting.
Press the [TIMER] button to switch the VCR over to the
timer recording standby mode.
Check that [Á] is lit on the VCR display.
If it is flashing, check the timer recording details
again. (See page 13.)
To Programme with the ShowView
Function
The ShowView numbers make it extremely easy to set the
VCR for timer recording.
The duration of a timer recording programmed with
ShowView number may be slightly longer than the actual
duration of the TV programme.
S
HOWVIEW is a trademark of Gemstar Development
Corporation. The S
HOWVIEW system is manufactured
under licence from Gemstar Development Corporation.
Example:
Programming a timer recording of a TV programme with the
ShowView number 721114
Press the [SV/V
+
] button to
display the menu for entering
the ShowView number on the
TV.
Press the [Numeric] buttons to enter the ShowView
number.
If you have entered a wrong digit, press the [Cursor]
button 2 and then enter the correct digit.
Press the [OK] button to display the programmed
content.
Press the [SP/LP/EP] button to set the desired tape
speed. (For NV-FJ620 Series, NV-FJ621 Series and
NV-FJ616 Series)
Regarding the [A] indication, refer to page 13.
To change timer recording programmings, use the
[Cursor] buttons 3421, the [Channel], [DATE],
[ON] or [OFF] button.
See page 13 for VPS/PDC recording.
Press the [OK] button again to conclude the settings.
Press the [TIMER] button to switch the VCR over to the
timer recording standby mode.
Check that [Á] is lit on the VCR display.
If it is flashing, check the timer recording details
again. (See page 13.)
To Suspend the Timer Recording Standby
Mode
Press the [TIMER] button so that the [Á] indication on the
VCR display disappears.
After you have finished using the VCR, be sure to reactivate
the timer recording standby mode by pressing the [TIMER]
button again, otherwise the programmed timer recording will
not be performed.
Note:
If the VCR is not put in the timer recording standby mode at
the latest 10 minutes before the programmed timer
recording starting time, the [Á] flashes on the VCR display.
In this case, press the [TIMER] button to put the VCR in the
timer recording standby mode.
13
DATE
r
s
SP/LP/EP
If [ ––] Appears under [Pos/Name] after
Entering a ShowView Number
Pos/Name stands for Programme Position/TV Station Name.
Normally, the name of the TV station or the number of the
programme position is displayed under [Pos/Name].
However, if the [––] indication appears, follow the operation
steps below.
Press the [Channel] button repeatedly to select the
programme position on which the TV programme to be
recorded will be broadcast.
After you have entered the information of a TV station, it
remains stored in the VCRs memory, and you do not need to
enter it again in the future.
Setting the Recording Date/Day(s)
Press the [DATE] button to select the recording date
(1 to 31), daily timer recording date (SuSa, MoSa or
MoFr) or weekly timer recording date (Su to Sa).
Programming a timer recording (setting the date) is
possible up to one month ahead of the TV programmes
broadcasting date and time. Daily and weekly timer
recordings will continue until you cancel them.
Auto SP/LP Change Function
(For NV-FJ620 Series, NV-FJ621 Series and NV-FJ616
Series)
If the VCR determines that the remaining tape time is
insufficient to record the whole programme, LP mode is
automatically selected to ensure that the programme will be
recorded as long as possible.
Press the [SP/LP/EP] button to select [A].
This function cannot change the recording speed to the EP
mode.
If the remaining tape time is still not sufficient even in the
LP mode, the programme cannot be recorded to its end.
If the recording speed changes from SP to LP during a
timer recording, some brief picture distortion occurs at that
point.
VPS/PDC Function
If a TV programme, for example a football game runs longer
than scheduled, is shortened or starts earlier or later, this
function synchronises the recording start and stop with the
actual broadcasting start and stop of the TV programme.
Press the [Cursor] buttons 3421 to make the [ON]
indication appear.
[ON] must be displayed under [VPS/PDC] on the TV
screen.
The TV station must broadcast VPS/PDC signals.
The programme starting time must be set correctly to the
starting time listed in the newspaper/magazine.
To Check, Change or Cancel Timer
Recording Programmings
Press the [PROG./CHECK] button to display the timer
recording programmings on the TV screen.
When the VCR is in the timer recording standby mode
for a VPS/PDC recording, the On Screen Display may
be distorted.
Press the [Cursor] buttons 34 to select the
programming that you want to change or cancel.
To change or cancel timer recording programmings, use
the [Cursor] buttons 3421, the [Channel], [DATE],
[ON], [OFF] or [CANCEL] button.
Press the [OK] button to conclude the setting.
Press the [EXIT] button to exit the On Screen Display.
Note:
In some cases, for example as listed below, the programming
of a timer recording remains stored in the memory until 4 a.m.
the next day. However, this is not a malfunction.
When a timer recording was not performed up to the TV
programmes ending time because the remaining tape time
was not sufficient.
When you have stopped the timer recording while it was
being performed.
To Check the Total Timer Recording
Programming Time
The total time indication for timer
recording programming lets you check
how many programmes can be
recorded by comparing with the
remaining tape time in the VCR
display.
The total time is calculated in the SP mode.
The total time cannot be calculated when setting Daily/
Weekly timer recording.
OK
EXIT
PROG. / CHECK
1.
2. jjjjj jj/jj jj:jj jj:jj jj jjj
3. jjjjj jj/jj jj:jj jj:jj jj jjj
4. jjjjj jj/jj jj:jj jj:jj jj jjj
5. jjjjj jj/jj jj:jj jj:jj jj jjj
6. jjjjj jj/jj jj:jj jj:jj jj jjj
7. jjjjj jj/jj jj:jj jj:jj jj jjj
8. jjjjj jj/jj jj:jj jj:jj jj jjj
1
Total (SP) 90min
14
1
2
3
Connecting a Decoder
(For NV-FJ620 Series, NV-FJ621 Series and NV-FJ616
Series)
Decoder here refers to the device used to decode scrambled
broadcasts (Pay TV).
1 Decoder (not supplied)
2 21-pin Scart socket
3 21-pin Scart cable (not supplied)
Connect a 21-pin Scart cable (not supplied) to the AV2
21-pin Scart socket on the VCR and to the 21-pin Scart
socket on the decoder.
Connect the decoders mains lead to an AC mains
socket.
Set [AV2] to [DECODER].
For details, see page 18.
AV Link Function
(For NV-FJ620 Series, NV-FJ621 Series and NV-FJ616
Series)
If the VCR is connected to the TV via a 21-pin Scart cable,
you can use the [AV LINK] button to switch the TV from
normal TV reception over to the video playback channel (AV
input) (and vice versa). In the VCR mode (when the [VCR]
indication in the VCR display is lit), the TV is switched to the
video playback channel (AV input). In the TV mode (when the
[VCR] indication is not lit), the TV is switched to TV reception.
When you press the [MENU] button to display the menu on
the TV screen, the TV is also automatically switched to the
VCR mode, however, the [VCR] indication does not appear
in this case.
When you start playback on the VCR, the TV is
automatically switched to the VCR mode. However, during
playback, it is not possible to switch the TV back to the TV
mode.
If a Pay TV station has been selected on the VCR when
you switch to the TV mode, the picture on the TV is
scrambled when you select a Pay TV station on the TV. In
this case, either switch to the VCR mode or select the AV
input on the TV.
Hint:
[RGB] means separate Red/Green/Blue colour signals. If
you connect a TV equipped with RGB input capability to the
AV1 socket on this VCR, and a decoder equipped with
RGB output capability to the AV2 socket, the TV can
receive RGB signal input from the decoder via the VCR.
INDEX
SEARCH
Search Functions
Programme List Search
Each timer recording programming on the tape must be at
least 15 minutes long. (25 minutes in the EP mode)
Press the [SEARCH] button to
display the Programme List
menu.
Press the [Cursor] buttons 34 to select the
programme that you want to locate and play back.
Press the [SEARCH] button to start the search for the
beginning of the selected programme.
After the desired recorded programme has been
found, playback starts automatically.
If, after playback has started, you want to search for
the beginning of the same or another programme,
press the [SEARCH] button. Playback stops, and the
Programme List menu appears.
To Cancel the Programme List Search
Press the [EXIT] button.
Notes:
If you take out the cassette after a timer recording has
finished, pressing the [SEARCH] button activates the Intro-
Jet Scan.
If you programme linked timer recordings, Programme List
Search function does not work.
VISS=VHS Index Search System
Each programme recorded on the tape must be at least 5
minutes long.
Press the [INDEX] button to start the index search. If
you want to search for the 2nd recorded programme in
forward direction, press the [INDEX] ; button twice.
The VCR fast-forwards or rewinds the tape and
searches for the specified index signal. When it has
been found, playback starts automatically.
To Cancel the Index Search or to Stop Playback
Press the [Stop] button.
Intro-Jet Scan
Each programme recorded on the tape must be at least
15 minutes long. (25 minutes in the EP mode)
Press the [SEARCH] button to start the Intro-Jet Scan.
After rewinding the tape to the beginning, the VCR
plays it back at high speed for approximately
10 seconds. It then fast-forwards the tape to the next
tape position marked by an index signal (beginning of
a programme), and every time an index signal is
found, the VCR switches over to high-speed playback
(Cue) for about 10 seconds.
When you have found the programme that you want to
view, press the [Play] button to start normal playback.
To Cancel the Intro-Jet Scan or to Stop Playback
Press the [Stop] button.
Note:
If you press the [SEARCH] button after a timer recording
has finished, but before ejecting that cassette, the
Programme List Search will be activated.
Programme List
Pos
Name Date Start
1. ZDF 27/10 17:46
2. ARD 28/10 15:00
Panasonic VCR
SEARCH
SEARCH
EXIT
15
Manual Tuning
This VCR has 99 programme positions that can be preset to
receive TV stations.
If available TV stations are not received due to extraordinary
transmission circumstances, or if you want to change the
name of a TV station or change a TV station, you can set it
up manually.
Press the [MENU] button to
display the Main menu on the
TV screen.
Press the [Cursor] buttons 34
to select [Tuning].
Press the [OK] button to display
the Tuning menu on the TV
screen.
Press the [Cursor] buttons 34
to select [Manual].
Press the [OK] button to display
the list of tuned TV stations.
Press the [Cursor] buttons 34
to select the TV station that you
want to tune manually.
Press the [OK] button to display
the Manual Tuning menu.
Press the [Cursor] buttons 3421 to select the
desired field.
Pos: To change the order in which the TV
stations are assigned to the
programme positions.
Press the [Numeric] buttons to enter the number of
the desired programme position.
Name: To enter or change the name of a TV
station.
Press the [Cursor] buttons 3421 and [OK] button
to enter the station name.
If the station name needs a blank space, select the
blank between [Z] and [¢].
Channel: To enter newly available TV stations or
change the channel number of an
already tuned TV station.
Press the [Numeric] buttons to enter the channel
number of the desired TV station.
Wait a few moments until the desired TV station has
been tuned.
Timer recording
Tuning
Clock setting
Other settings
Main menu
Panasonic VCR
Manual
Auto-Setup Restart
Download
Shipping condition
Tuning
Panasonic VCR
Pos Name Ch
1 ARD 1
2 ZDF 2
3N3 19
4 HR3 26
5 BR3 18
6 RB3 3
7 SFB3 36
8SW3 29
Tuning
Panasonic VCR
Pos : 5
Name : BR3
Channel : 18
Fine tuning : AUTO
Decoder : OFF
Video system : PAL
Mono : OFF
MENU
OK
OK
OK
1
2
3
Connecting a Stereo Amplifier
(For NV-FJ620 Series, NV-FJ621 Series and NV-FJ616
Series)
1 Audio cable (not supplied)
2 Stereo amplifier (not supplied)
3 Audio Input sockets
Connect an Audio cable (not supplied) to the Audio
Output sockets on the VCR and to Audio Input sockets
on the stereo amplifier.
Connect the stereo amplifiers mains lead to an AC
mains socket.
16
Note:
If downloading of the setup data has been performed, only
the instruction indication
[Delete] appears.
Hint:
If you have performed Manual Tuning to enter TV stations,
the [––] indication may appear under [Pos/Name] on the
On Screen Display when programming a ShowView timer
recording.
To Restart the Auto Setup, Restart the
Download or Return the VCR to the
Shipping Condition
Press the [MENU] button to display the Main menu on
the TV screen.
Press the [Cursor] buttons 34
to select [Tuning].
Press the [OK] button to display
the Tuning menu on the TV
screen.
Press the [Cursor] buttons 34 to select [Auto-Setup
Restart], [Download] (For NV-FJ620 Series, NV-FJ621
Series and NV-FJ616 Series) or [Shipping condition].
Press the [OK] button to prepare for Auto Setup start,
Download start or resetting the VCR to the shipping
condition.
Press the [OK] button again to actually start the Auto
Setup, start the Download or change the settings back
to the shipping condition.
After returning the VCR to the shipping condition,
disconnect and reconnect the AC Mains Cable to
re-tune the VCR.
Fine tuning: To obtain the best tuning condition.
Press the [Cursor] buttons 34 to obtain the best
tuning condition.
If you do not want to change the tuning condition,
press the [Cursor] button 1 to return to the original
condition [AUTO].
Decoder: To preset pay TV stations.
(For NV-FJ620 Series, NV-FJ621
Series and NV-FJ616 Series)
Press the [Cursor] buttons 34 to select [ON].
If [Decoder] is set to [OFF], normal TV stations are
preset.
Video system: To change the type of video system.
Press the [Cursor] buttons 34 to select [PAL] or
[MESECAM].
PAL: For receiving PAL signals.
MESECAM: For receiving SECAM signals.
Mono: To select the type of sound to be
recorded. (For NV-FJ620EC/ECM/
ECN/ECY Series, NV-FJ621EC/ECM/
ECN/ECY Series and NV-FJ616EC/
ECM/ECN/ECY Series)
Press the [Cursor] buttons 34 to select [OFF].
Select [ON] if you want to record the normal (mono)
sound on the Hi-Fi audio tracks during a stereo,
bilingual or NICAM broadcast, or if the stereo sound
is distorted due to inferior reception conditions.
Press the [OK] button to conclude the setting.
Press the [EXIT] button to exit the On Screen Display.
To Delete, Add or Move a Programme
Position
Press the [MENU] button to display the Main menu on
the TV screen.
Press the [Cursor] buttons 34 to select [Tuning].
Press the [OK] button to display the Tuning menu on
the TV screen.
Press the [Cursor] buttons 34
to select [Manual].
Press the [OK] button to display
the list of tuned TV stations.
Press the [Cursor] buttons 3421 to select the
desired TV station.
Follow the operations below.
To delete a programme position [Delete]:
Press the [Channel] button (J, red).
To insert a blank programme position [Add]:
Press the [DATE] button (i, green).
To move a TV station to another programme position
[Move]:
Press the [ON] button (i, yellow), and then use the
[Cursor] buttons 34 to select the new programme
position to which you want to assign the TV station.
Press the [OK] button to conclude the setting.
Press the [EXIT] button to exit the On Screen Display.
Delete
Add
Move
Pos Name Ch
1 ARD 1
2 ZDF 2
3N3 19
4 HR3 26
5 BR3 18
6 RB3 3
7 SFB3 36
8 SW3 29
Tuning
Panasonic VCR
Manual
Auto-Setup Restart
Download
Shipping condition
Tuning
Panasonic VCR
r
s
ON
DATE
r
s
OK
EXIT
OK
EXIT
MENU
OK
OK
OK
MENU
OK
OK
17
If [Clock setting] is set to [AUTO] and [Power save] to [ON],
the Automatic time correction function does not work while
the VCR is turned off. However, as soon as it is turned on,
the Automatic time correction function is activated and the
clock is set correctly.
Various Settings
Press the [MENU] button to display the Main menu
on the TV screen.
Press the [Cursor] buttons 34
to select [Other settings].
Press the [OK] button to display
Other settings menu.
Press the [Cursor] buttons 3421 to select the
desired field then desired position.
Tape length: To set the Tape length of the cassette
being used to ensure correct indication
of the remaining tape time.
Set Tape length as follows:
[AUTO (2 E-240)]:
The VCR automatically distinguishes
E30, -60, -90, -120, -180 and -240
tapes.
[E-195]: For E195 tape
[E-260]: For E260 tape
[E-300]: For E300 tape
Even if you have selected the correct tape length, the
remaining tape time may not be indicated correctly
with certain kinds of cassettes.
SQPB: To play back tapes recorded in the
S-VHS format (SQPB=S-VHS Quasi
Playback).
Set SQPB mode as follows:
[AUTO]: VCR automatically detects the format
in which the recording was made and
selects the same format for playback.
However, picture distortion may
appear.
Therefore, set to [ON] or [OFF].
[ON]: Use this setting when playing back a
cassette tape recorded in the S-VHS
format.
[OFF]: Use this setting when playing back a
cassette tape recorded in the VHS
format only.
Clock setting
Time
Date
Panasonic VCR
Clock setting
: AUTO
: 20:30:24
: 16.10.05
Clock setting
Time
Date
Panasonic VCR
Clock setting
: MAN.
: 20:30:24
: 16.10.05
Tape length
SQPB
Power save
VCR display
OSD
AV2
TV system
Language
Country
: AUTO (2 E-240)
: AUTO
: OFF
: DIMMED
: 4:3
: DECODER
: PAL
: English
: others
Other settings
Panasonic VCR
OK
OK
OK
EXIT
EXIT
OK
OK
MENU
MENU
MENU
OK
Setting the VCRs Clock
To Manually Adjust the Clock
Press the [MENU] button to display the Main menu on
the TV screen.
Press the [Cursor] buttons 34
to select [Clock setting].
Press the [OK] button to display
the Clock setting menu on the
TV screen.
Confirm that [Clock setting] is set to [MAN.], and then
press the [OK] button.
Use the [Cursor] buttons 3421 to set the date and
time.
Instead of the [Cursor] buttons 3421, you can also
use the [Numeric] buttons to set the date and time.
Press the [OK] button to conclude the setting.
Press the [EXIT] button to exit the On Screen Display.
To Activate the Automatic Time Correction
Function
If a TV station transmits a signal for time setting, performing
the operation steps below activates the Automatic time
correction function and the time is corrected automatically.
Press the [MENU] button to display the Main menu on
the TV screen.
Press the [Cursor] buttons 34
to select [Clock setting].
Press the [OK] button to display
the Clock setting menu on the
TV screen.
Press the [Cursor] buttons 34 to set [Clock setting] to
[AUTO].
Press the [OK] button to conclude the setting.
Under adverse reception conditions, etc., the
Automatic time correction function may not work. In
this case, the indication for [Clock setting] is
automatically reset to [MAN.].
If the reception conditions improve later on, it may be
possible to activate this function.
Press the [EXIT] button to exit the On Screen Display.
Hints:
If [Clock setting] is set to [AUTO] when you open the Clock
screen, do not set it to [MAN.], otherwise, the automatic
time correcting function is deactivated.
The built-in clock employs the 24-hour system.
In case of a power failure, an automatic back-up system
automatically maintains the operation of the clock for
approximate 60 minutes.
When [Clock setting] is set to [AUTO], the automatic time
correction function checks and if necessary adjusts the time
several times every day.
The automatic time correction function only works when the
VCR is switched off; it does not work in the timer recording
standby mode.
If [Clock setting] is set to [MAN.] and [Power save] to [ON]
(see page 18), the time may not be maintained correctly. In
this case, manually adjust the clock.
18
EXIT
OK
Power save: To reduce the VCRs power
consumption when the VCR is
switched off.
Set Power save mode as follows:
[ON]: The power consumption is greatly
reduced when the VCR is turned off.
[OFF]: The power consumption is not reduced
when the VCR is turned off.
Refer to the followings when [Power save] is set to
[ON].
[VCR display] is automatically set to [OFF].
To turn the VCR on, keep the [VCR-ON/OFF] button
pressed on the VCR main unit. It is not possible to
turn it on with the remote control.
The Power save function does not work in the timer
recording standby mode. After all programmed timer
recordings have been made, and after all
programmed data have been erased, the VCR
switches over to the Power save mode.
When the VCR is off, Pay TV programmes cannot be
watched on the TV because the signal from the
connected decoder is not looped through. To watch
them, turn on the VCR. (For NV-FJ620 Series,
NV-FJ621 Series and NV-FJ616 Series)
VCR display: For automatic change of the brightness
of the VCR display when the VCR is
switched off.
Set the brightness of the VCR display as follows:
[ON]: Indications are brightly lit.
[OFF]: Indications are not lit.
[DIMMED]: Indications are dimly lit.
OSD: For automatic display on the TV
screen of the TV station information,
type of sound system of the
programme being watched and the
sound playback mode. (See page 19.)
Set OSD mode as follows:
[4:3]: Indications can be displayed on the TV
screen.
[16:9]: Indications can be displayed on the TV
screen when using wide type of TV
screen and selecting the wide screen
mode on the TV setting.
Even if setting to [16:9], indications may be cut off
depending on the TV.
[OFF]: No indications appears.
AV2: To select the type of external source
equipment which is connected to the
VCRs AV2 21-pin socket.
(For NV-FJ620 Series, NV-FJ621
Series and NV-FJ616 Series)
Set the external source equipment as follows:
[DECODER]: When a decoder is connected.
[EXT LINK 1]: When a digital receiver which transmits
a special control signal recordings via
the 21-pin Scart cable, for example the
F.U.N. receiver (TU-DSF30/S3) is
connected for the linked timer
recordings. (See page 11.)
[EXT LINK 2]: When an external equipment with a
timer function is connected for the
linked timer recordings. (See page 11.)
[EXT]: When another VCR or a satellite
receiver is connected.
AV: To select the type of external source
equipment which is connected to the
VCRs AV1 21-pin socket.
(For NV-SJ220 Series)
Set the external source equipment as follows:
[TV/EXT]: When TV, another VCR or a satellite
receiver is connected.
[EXT LINK 1]: When a digital receiver which transmits
a special control signal recordings via
the 21-pin Scart cable, for example the
F.U.N. receiver (TU-DSF30/S3) is
connected for the linked timer
recordings. (See page 11.)
[EXT LINK 2]: When an external equipment with a
timer function is connected for the
linked timer recordings. (See page 11.)
TV system: To select the type of colour TV system
to be used during playback or during
recording from an external source.
Set the colour TV system as follows:
[PAL]: When PAL system is used.
[MESECAM]: When SECAM system is used.
Press the [OK] button to conclude the setting.
Press the [EXIT] button to exit the On Screen Display.
19
Tape length
SQPB
Power save
VCR display
OSD
AV2
TV system
Language
Country
: AUTO (2 E-240)
: AUTO
: OFF
: DIMMED
: 4:3
: DECODER
: PAL
: English
: others
Other settings
Panasonic VCR
MENU
OK
OK
EXIT
1
2
3
ARD
0:00:29
6
L R SP
4
5
STEREO
OSD/DISPLAY
AUDIO
Language or Country Setting
Press the [MENU] button to display the Main menu
on the TV screen.
Press the [Cursor] buttons 34
to select [Other settings].
Press the [OK] button to display
Other settings menu.
Press the [Cursor] buttons 3421 to select
[Language] or [Country] and the entry field for
[Language] or [Country] in this order.
Press the [Cursor] buttons 34 to select the desired
language or country.
Press the [OK] button to conclude the setting.
Press the [EXIT] button to exit the On Screen Display.
Other Function
Indications that Can Be Displayed on the
TV Screen
At a press of the [OSD/
DISPLAY] button, the following
indications appear on the TV
screen.
1 TV station name
2 STEREO or BILINGUAL Indicator
(For NV-FJ620EG/EGY Series, NV-FJ621EG/EGY
Series and NV-FJ616EG/EGY Series)
When receiving a TV programme, the type of sound
system in which it is broadcast is automatically
indicated.
STEREO, M1 and M2 Indicator
(For NV-FJ620EC/ECM/ECN/ECY Series,
NV-FJ621EC/ECM/ECN/ECY Series and
NV-FJ616EC/ECM/ECN/ECY Series)
When receiving a TV programme with the Stereo,
Bilingual or NICAM sound system, the type of sound
system in which it is broadcast is automatically
indicated.
STEREO: When receiving a Stereo/NICAM stereo
broadcast.
M1/M2: When receiving a Bilingual/NICAM dual-
sound broadcast.
M1: When receiving a NICAM monaural
broadcast.
3 Sound mode during playback (L/R)
(For NV-FJ620 Series, NV-FJ621 Series and
NV-FJ616 Series)
At each press of the [AUDIO] button, the selected
playback sound is indicated with L (Left) and R (Right).
Stereo playback:
The L and R indications are displayed.
Left audio channel playback:
The L indication alone is displayed.
Right audio channel playback:
The R indication alone is displayed.
Playback of normal audio track:
Neither L nor R indication is displayed.
4 Tape speed indicator
(For NV-FJ620 Series, NV-FJ621 Series and
NV-FJ616 Series)
5 Tape running display
6 Present time/Tape counter/Remaining tape time/
Index Search/One-Touch Recording (OTR)/
Playback Off Timer Function
Present time 17:24:31
Tape counter 2:35.47
Remaining tape time REMAIN: 2:34
Index Search 5 02
One-Touch Recording (OTR) OTR 60
Playback Off Timer Function 30
Notes:
If [OSD] is set to [OFF], none of the above indications
appear.
None of the above indications appear during special
playback.
During playback and when the AV input for the external
source is selected, indications 1 and 2 do not appear.
Some of the above indications do not appear when using
NTSC tapes.
To Play Back NTSC Video Cassettes on
Your PAL TV
(Quasi-NTSC Playback Function)
(For NV-FJ620 Series, NV-FJ621 Series and NV-SJ220
Series)
This VCR allows playback of tapes recorded in the NTSC
system on a normal PAL system TV with the same operations
as usual.
On some TVs, however, the playback picture may roll up or
down.
If your TV has a V-HOLD control or equivalent adjustment
function, use it to try to stop the picture movement.
Crystal View Control (CVC)
The crystal view control function ensures that you always
obtain the optimum picture quality so that you get the best
picture automatically.
While the VCR is turned on, the [CVC] indication is always
displayed to show that the Crystal View Control is activated.
20
TRACKING/V-LOCK
+
TRACKING/V-LOCK
+
TRACKING/V-LOCK
+
Convenient Automatic Functions
VCR Auto Power On
When you insert a video cassette, the VCR switches on
automatically.
Auto Playback Start
When you insert a video cassette with a broken erasure
prevention tab, playback start automatically without having to
press the [Play] button.
VCR-off Playback
When the VCR is off, an inserted cassette can be played
back by pressing the [Play] button.
Auto Rewind
When the tape reaches the end, the VCR automatically
rewinds it to the beginning.
This function does not work during timer recording and
OTR.
Automatic Switching Off and Ejection
When the VCR is switched off, and inserted cassette can be
ejected simply by pressing the [EJECT] button. The VCR will
eject the cassette and automatically turn itself off again.
VCR-off Search
When the VCR is off, the VCR starts Intro-Jet Scan of an
inserted cassette by pressing the [SEARCH] button.
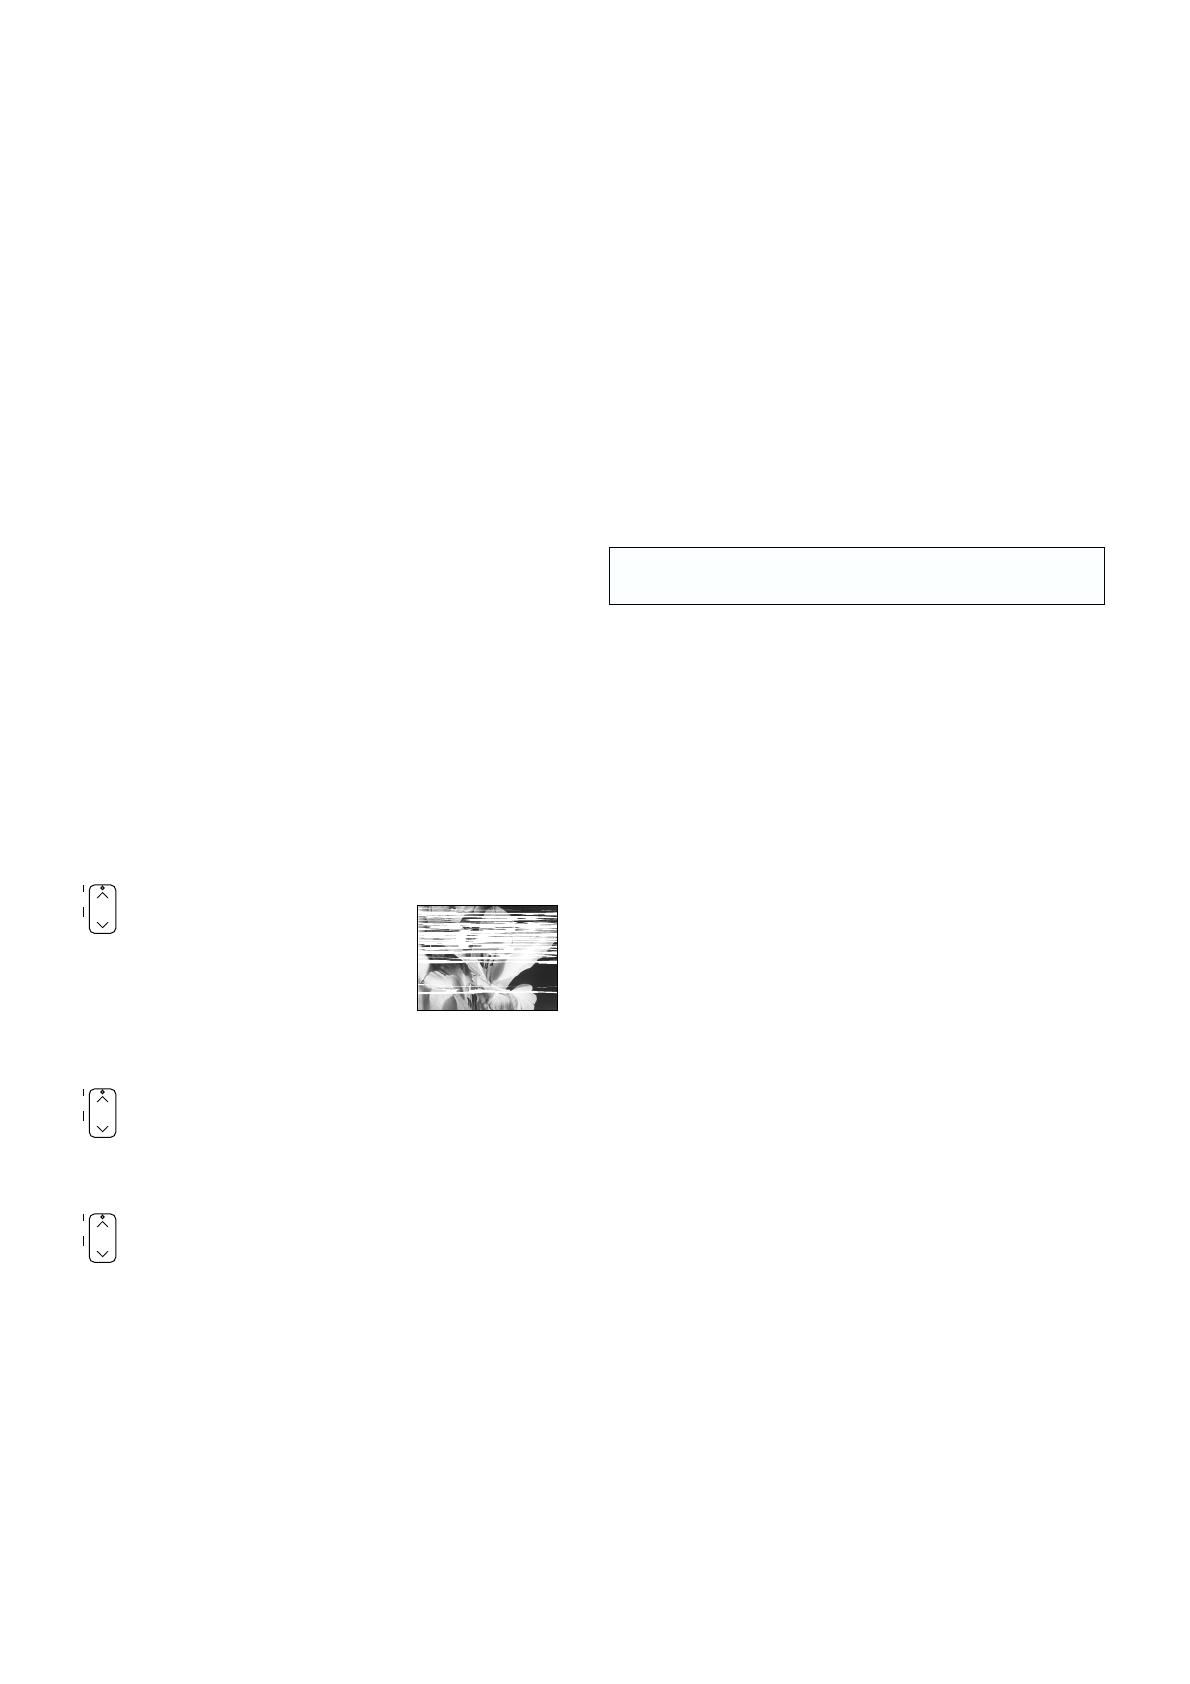
Adjusting the Playback Picture
Under normal conditions, the VCR automatically adjusts the
playback picture for optimum quality. However, in some
cases it may be necessary to adjust it manually.
If noise bars appear during normal playback, slow playback
or still playback, follow the operations below.
During normal or slow playback,
press the [Channel] button I
(j) or J (i) until the bars noise
disappear.
If the noise bars appear during
still playback, switch the VCR
over to the slow playback
mode and then adjust the
tracking as explained above.
Press the [Channel] buttons I (j) and J (i)
simultaneously to return to Auto Tracking.
TV screen
Playback picture
containing noise bars
NICAM Broadcasting System
(For NV-FJ620EC/ECM/ECN/ECY Series, NV-FJ621EC/
ECM/ECN/ECY Series and NV-FJ616EC/ECM/ECN/ECY
Series)
NV-FJ620EC/ECM/ECN/ECY Series, NV-FJ621EC/ECM/
ECN/ECY Series and NV-FJ616EC/ECM/ECN/ECY Series
feature the NICAM digital sound system, a 2-channel sound
broadcast system that provides either 2 high-quality stereo
sound tracks or 2 independent mono sound tracks, M1 and
M2.
NICAM programmes are always accompanied by standard
(mono) sound broadcasts, and during playback, you can
select the desired sound with the [AUDIO] button.
The NICAM stereo sound can only be recorded on the Hi-Fi
audio tracks.
If, for some reason, you want to record a stereo, bilingual or
NICAM TV programme intentionally in mono on the Hi-Fi
audio tracks, set [Mono] to [ON] for the programme position
on which the desired programme is broadcast, as
described on page 16.
Before Requesting Service
On Screen Display Messages
The error messages are given in brackets [ ].
[Please insert video tape!]
You pressed the [REC] button, [REC/OTR] button, the
[DIRECT TV REC] button°, the [Play] button, the [Fast
Forward] button, the [Rewind] button or the [SEARCH]
button when no cassette was inserted in the VCR.
You pressed the [TIMER] button when no cassette was
inserted in the VCR with a timer recording programmed.
Insert a video cassette.
[Please use tape with unbroken recording tab!]
You pressed the [REC] button, [REC/OTR] button or the
[DIRECT TV REC] button° when a cassette with a broken
out erasure prevention tab was inserted in the VCR.
You pressed the [TIMER] button when a cassette with a
broken out erasure prevention tab was inserted in the VCR
with a timer recording programmed.
Insert a video cassette with an intact erasure prevention tab
on which recording is possible.
° For NV-FJ620 Series, NV-FJ621 Series and NV-FJ616
Series
[This action is not possible before time and date are set]
You pressed the [SV/V
+
] button or the [PROG./CHECK]
button, even though the time and date have not yet been
set on the VCR.
Set the time and date.
[No timer programmes to be done!]
You pressed the [TIMER] button even though no timer
recording has been programmed.
Programme a timer recording before pressing the [TIMER]
button.
[Please put VCR into stop mode first]
You attempted to change the contents of the timer
programming while a timer recording was being performed.
Put the VCR into the stop mode first.
Other messages may also appear.
Follow the instructions given on the TV screen.
If the still picture scrolls up or down, perform the following
operation.
During still playback, keep the [Channel] button I
(j) or J (i) pressed until the picture stops scrolling.
Precautions:
With certain TV models and tapes, it may not be possible to
adjust the tracking.
If you play back a cassette that was recorded on another
VCR, the picture quality may be inferior and it may be
necessary to adjust the tracking. Also, on some TVs, the
picture may scroll up and down in the special playback
functions.
However, these are not malfunctions.
  • Page 1 1
  • Page 2 2
  • Page 3 3
  • Page 4 4
  • Page 5 5
  • Page 6 6
  • Page 7 7
  • Page 8 8
  • Page 9 9
  • Page 10 10
  • Page 11 11
  • Page 12 12
  • Page 13 13
  • Page 14 14
  • Page 15 15
  • Page 16 16
  • Page 17 17
  • Page 18 18
  • Page 19 19
  • Page 20 20
  • Page 21 21
  • Page 22 22
  • Page 23 23
  • Page 24 24

Panasonic NVF User manual

Category
Cassette players
Type
User manual

Ask a question and I''ll find the answer in the document

Finding information in a document is now easier with AI