KitchenAid KDSCM 82140 Owner's manual

Category
Dishwashers
Type
Owner's manual
Instructions for use
Precautions and general recommendations 4
Dishwasher description 6
Control panel description 7
First time use 7
Programming 14
Program table 16
Additional options 17
Menu/Settings 18
Maintenance and care 19
What to do if... 20
4
1. Packing
The packaging materials are 100% recyclable and marked with the recycling symbol .
2. Removing the packaging and inspecting the contents
After unpacking, make sure the appliance is undamaged and the door closes correctly. If in doubt, contact a
qualified technician or your local retailer.
3. Before using the dishwasher for the first time
- The appliance is designed to operate with a minimum ambient temperature of 5°C.
- This appliance has been tested by the manufacturer to ensure it functions correctly. Such testing may
leave slight drips/water marks which will disappear with the first wash.
4. Energy and water savings
- Do not rinse crockery under running water.
- Always fully load the appliance before running it or select the “Half load/Multizone” option (if
available).
- If ecological energy sources are available such as solar panel heating, heat pumps or centralised heating
systems, the appliance may be connected to the hot water mains up to a maximum temperature of 60°C.
Make sure the water inlet hose is the correct type (“70°C Max” or “90°C Max”).
5. Child safety
- Keep packaging materials out of the reach of children.
- Children must not be allowed to play with the appliance.
- Store the detergent, rinse aid and salt out of the reach of children.
6. Safety warnings
-This appliance can be used by children aged from 8 years and above and
persons with reduced physical, sensory or mental capabilities or lack of
experience and knowledge if they have been given supervision or
instruction concerning use of the appliance in a safe way and understand
the hazards involved. Children shall not play with the appliance.
Cleaning and user maintenance shall not be made by children without
supervision.
-Do not operate the appliance in the open air.
-Do not store flammable materials in close proximity to the appliance.
-The water in the appliance is not potable.
-Do not use solvents inside the appliance: risk of explosion!
-Be careful when the door is open: risk of tripping!
- The open appliance door can only support the weight of the loaded rack
when pulled out. Do not rest objects on the open door or sit or stand on it.
-Sharp items that might cause injury (e.g. knives), must be placed in the
cutlery basket with the sharp end facing downwards. Long-handled
utensils must be arranged horizontally in the upper rack, with the sharp
end facing away from the front of the appliance.
-Before cleaning or carrying out maintenance, disconnect the mains plug
Precautions and general recommendations
5
and turn off the water tap; also disconnect in the event of any
malfunction.
-Repairs and technical modifications must be carried out exclusively by a
qualified technician.
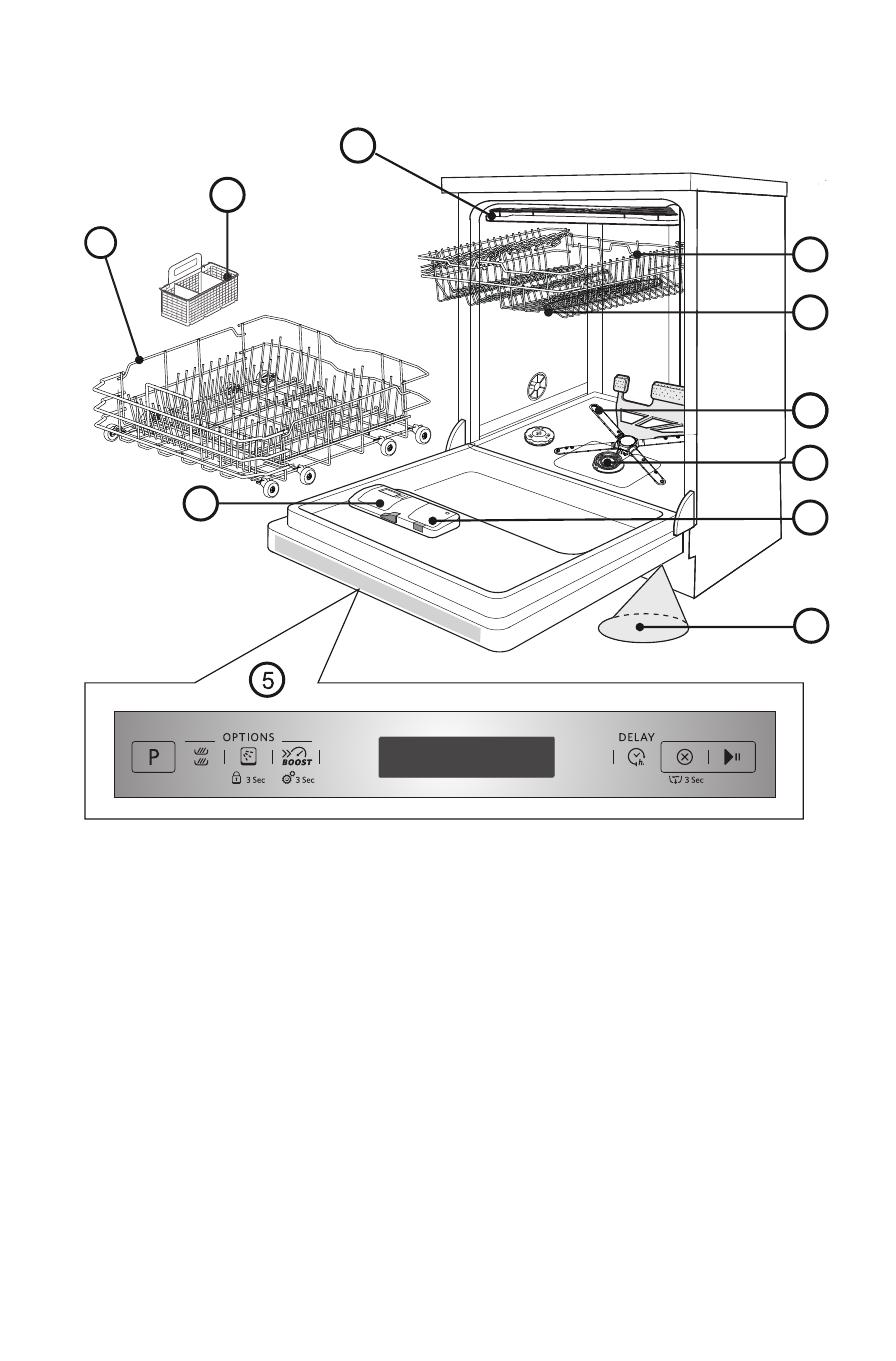
-The appliance is not intended to be used without decorative plate. Please
ensure that appliance after instalation always have decorative plate.
-Use special glows at the assembling of appliance.
-During use, the access to the rear wall should be limited in a sustainable
manner such as approaching the device to the wall or furniture board.
-Keep packaging materials out of the reach of children.
-Children must not be allowed to play with the appliance.
-Store the detergent, rinse aid and salt out of the reach of children.
7. Resistance to frost
If the appliance is placed in surroundings exposed to the risk of frost, it must be drained completely. Turn
off the water tap, remove the inlet and outlet hoses, and let all the water drain away. Make sure there is at
least 1 kg of dissolved regeneration salt in the salt container, to protect the appliance from temperatures of
up to -20° C. When the program resumes, an error message may be indicated.
“F6 E1” - the appliance must remain at an ambient temperature of min. 5°C for at least 24 hours.
After eliminating these faults, RESET the appliance (see chapter “What to do if...”)..
8. Disposal
- The appliance is manufactured using recyclable materials. If you decide to scrap the appliance, it must be
disposed of in compliance with local waste disposal regulations. Make it unusable by cutting off the
power cord.
- To prevent situations of potential danger to children (e.g. danger of suffocation), break the lock of the
door so that it can no longer be closed.
- This appliance is marked according to the European directive 2012/19/EU on Waste Electrical and
Electronic Equipment (WEEE). By ensuring that this appliance is scrapped suitably, you can help prevent
potentially damaging consequences for the environment and health. Unsuitable disposal of an appliance
of this type as household waste could have detrimental effects on the environment.
The symbol on the appliance, or on documentation enclosed with the appliance, indicates that this
product must not be treated as household waste, but must be delivered to the nearest collection centre for
the recycling of electrical and electronic appliances.
- Disposal must be carried out in accordance with local environmental regulations for waste disposal. For
further information on the treatment, recovery and recycling of this appliance, contact your competent
local authority, the collection service for household waste or the shop where you purchased the appliance.
EC Declaration of conformity
This appliance has been designed, constructed and distributed in compliance with the safety requirements
of EC Directives: 2006/95/EC, 2004/108/EC, 93/68/EEC and 2011/65/EU (RoHS Directive).
The guarantee is not applicable if faults are caused by incorrect use of the appliance.
We reserve the right to make technical modifications.
Dishwasher capacity: 14 place settings
6
1
2
3
10
9
8
7
6
11
4
1. Cutlery Rack
2. Cutlery Basket
3. Lower Rack
4. Detergent dispenser
5. Control Panel
6. Rinse aid dispenser
7. Filter
8. Lower spray arm
9. Upper spray arm
10. Upper rack
11. Light on the floor
Dishwasher description
7
Control panel description
First time use
ABCD
E1 E2
E3
FHG
A. Program selection button
B. Multizone button
C. DynamicClean / Keylock (press 3 sec.)
D. Boost / Settings (press 3 sec.)
E1. Display - Options area
E2. Display - information area
E3. Display - status area
F. Delay
G. Cancel/Reset (drain water when pressed 3 sec.)
H. Start/Pause
After connecting the appliance to the power supply, the device must be programmed. The display will
guide the user to set up the appliance for first use.
Detergents
When using Powder or Gel you must add
regeneration salt and set up water hardness
level as indicated in the table below.
Also, when using Tablets which include salt
unctionality you must still add regeneration
salt.
1. The language selection
To select preferred language please press button. Confirm
pressing button.
After language confirmation, the appliance will go through the
settings.
ENGLISH?
P =NO, |>||=YES
1. Ask your water supply company what the water hardness is...
2. ...enter this value on
your dishwasher
SALT
required
German
degrees °dH
French
degrees °fH
English
degrees °eH
Water hardness
level
Insert value is shown in
the display
0 -5 0 - 9 0 - 6.3
Soft
1 NO
6 - 10 10 - 18 7 - 12.6
Medium
2
YES
11 - 15 19 - 27 13.3 - 18.9
Average
3
16 - 21 28 - 37 19.6 - 25.9
Medium-hard
4
22 - 28 38 - 50 26.6 - 35
Hard
5
29 - 35 51 - 63 35.7 - 44.1
Very hard
6
36 - 50 64 - 90 44.8 - 62.4
Extremely hard
7
2. Setting the water hardness
The water hardness is by default set to level 4. To change water
hardness level press button repeatedly.
To confirm your choice press
button. The level must be set according to the table below.
WATER HARD.= 4
P =NO, |>||=YES
WATER HARDNESS
<1=Min, 7=Max>
8
3. Filling the salt reservoir
When water hardness is set, it is required to fill salt reservoir
with water and special regeneration salt. As a first step it is
needed to fill reservoir with 1.5 litres of fresh water. Confirm
operation by pressing button.
SALT RESERVOIR
|>||= DONE
SALT IN THE
|>||= DONE
ADD 1KG OF
|>||= DONE
INSERT SALT
OPERATION
INSERT 1,5L OF
|>||= DONE
SALT RESERVOIR
|>||= DONE
WATER IN THE
|>||= DONE
POUR WATER
OPERATION
4. Detergent type operation
DETERGENT?
P =NO, |>||=YES
DO YOU USE
P =NO, |>||=YES
“ALL IN ONE”
P =NO, |>||=YES
DETERGENT TYPE
OPERATION
Unscrew cap. Fill the salt reservoir
with water.
Add 1kg of special
regeneration salt
dedicated only for
dishwashers. Other kind
of salt cannot be used.
Salt residue around the cap needs to be removed. Residual saline solution or grains of salt can lead to
deep-down corrosion, irreparably damaging the stainless steel components.
In this step it is very important to choose what type of
detergent will be used (tablet/capsule or gel/powder).
If you prefer to use multiphase detergent in tablet or capsule
for washing - press , then go to step 6. Open tap
operation on the next page.
The symbol on display will be lit.
If you prefer to use gel or powder detergent for washing -
press , then go to step 5. Rinse aid operation.
Screw on the cap.
Setting rinse aid dosage (not necessary when using tablets/capsules)
The rinse aid dosage can be adjusted to the detergent used.
The lower the setting, the less rinse aid is dispensed (factory
setting: position 4).
Press the button to open the cover. Using a coin or similar
object, turn the arrow to the desired setting.
After adjusting the rinse aid setting, shut the cover again.
If there are streaks: reduce the dosage by turning the dial to a
lower setting (1-3). If crockery is not perfectly dry: increase
the dosage by turning the dial to a higher setting (5-6).
Plastic dishes have more difficulty drying and a higher rinse
aid setting will not improve the situation. Detergents with rinse aid incorporated may be effective only with
longer programs. In the case of shorter programs, detergent residue may be a problem (if necessary, use
powder detergent). Detergents with rinse aid incorporated tend to form excess suds.
9
5. Rinse aid operation*
INSERT RINSE AID
|>||= DONE
IN THE DISPENSER
|>||= DONE
RINSE AID
OPERATION
Press right button to open the cover of rinse aid dispenser.
Fill the rinse aid dispenser to MAX line (~150 ml).
Take care not to spill any rinse aid when filling the
dispenser!
Close the cover properly after filling and immediately wipe
away any rinse aid spilt accidentally. This prevents the
formation of excess foam that might decrease washing
results.
Confirm operation by pressing button.
*If multifunctional detergent was chosen in the previous
step, this step will be skipped by the appliance.
+
-
10
6. Open tap operation
PLEASE OPEN
|>||= DONE
THE WATER TAP
|>||= DONE
OPEN TAP
OPERATION
Check water tap is open. If closed,
open it then confirm by pressing
button.
7. First cycle operation
SETUP
|>||= OK
TO COMPLETE THE
|>||= OK
PLEASE RUN THE
|>||= OK
INTENSIVE CYCLE
|>||= OK
FIRST CYCLE
OPERATION
Before normal use of appliance it is recommended to run
Intensive cycle first, to calibrate the appliance.
Insert a detergent into dispenser chamber A (see below),
then press .
Press button to choose Intensive program, press
and close the appliance door.
This first cycle can be up to 20 minutes longer as a result of
the automatic calibration process.
After this process the appliance is ready for normal use.
30
20
30
20
30
20
A
30
20
B
11
Open detergent dispenser pressing left, grey lock.
Inside there are two chambers for detergent. Chamber A is
for detergent used in main wash. Chamber B is for
additional dose of detergent.
Insert detergent: powder/gel into chamber A.
When dishes are heavily soiled, fill chamber B with 5
grams of detergent.
If Multifunctional detergent in one dose (tablet/capsule)
is used, it has to be inserted into chamber A. Option Tablet
has to be chosen!
Shut the cover by pressing dedicated ribs.
ADDING A DETERGENT
USE ONLY DETERGENT SPECIFICALLY FOR DISHWASHERS IN ACCORDANCE WITH
SUPPLIERS RECOMMENDATIONS!
Use only one tablet/capsule per cycle, placed in detergent dispenser.
Some types of tablets/capsules may not dissolve completely during the short cycles (Glass, Fast).
Placing the tablet/capsule on the tub bottom helps dissolving and washing.
12
RACKS LOADING
Arrange crockery so that water does not collect in their cavities, ensuring that the spray arms turn
freely. Only use dishwasher-proof crockery and dishes.
Do not use the dishwasher for washing wooden items, aluminium, tin, silver cutlery or decorated
crockery (unglazed).
When placing dishes (e.g. plates, bowls, pots) in the baskets ensure they allow water to flow
downwards!
Upper rack
In upper rack you can load glasses, cups, bowls. On the right side of the rack, small dishes (tea or coffee
cups) can be loaded.
Foldable flaps A can be opened and used to load stemmed glasses, long utensils or coffee cups.
Plate holders B can be folded down to load bowls.
Putting rack in the lower position you can also load dessert dishes (up to Ø 20 cm).
See the instructions below for adjusting the upper rack height.
How to remove cutlery rack (if available) - it could be
useful to remove cutlery rack to load stemmed glasses in
upper rack.
- Open the two retainers H to take off the rack. When the
cutlery rack is in place the retainers must always be
closed.
Long tools can be loaded in the frontal part of the rack
(if long tools do not fit in the cutlery rack they can be
placed on foldable flaps in upper rack).
Load long knives with the handle in the left side.
Cutlery rack
Closed Open
B
BAAA
1
2
A - Closed A - Open
13
How to adjust upper rack height (if available) - it could
be useful to lift up upper rack to have more space in lower
rack. Bring it down to load long stemmed glasses.
- Grasp and take out the two lateral handles C (they must be
on the same level) and lift up or take down the upper rack.
How to remove upper rack (if available) - It could be
useful to remove upper rack to load bulky items in lower
rack.
- Open the two retainers D to take off the rack. When the
upper rack is in place the retainers must always be closed.
C
D
Closed Open
In the lower rack plates and pots can be loaded.
Vertical plate holders E can be folded down to create more
space to load pots.
When the Multizone option is selected, the cutlery basket F
can be placed in the lower rack.
Lower rack
F
EE
FF
E
14
How to use DynamicClean
DynamicClean uses special water jets to provide an intensive wash for shallow dishes and pans loaded
centrally to the DynamicClean area.
1. Adjust the DynamicClean area G folding down rear plate holders to load pots.
2. Load pots and casseroles inclined vertically in DynamicClean area. Pots have to be inclined towards the
power water jets.
Programming
The list of available programs and options can be found in program table on next page. To switch on the
appliance, press .
Press button to choose program in accordance with the level of soiling of the dishes and with
Program table. Information will be shown on the display:
When a program, additional options or Delay is chosen, press button and close the door within 3
seconds to start chosen program.
E1. Active additional options
E2. Selected program indication
E3. Short program description and program duration,
program progress
To cancel or change the program in progress:
- Press button for 3 seconds to cancel the program on running (water is drained for up to 1 minute,
then the appliance switches off).
- A short press of button will wake up the unit.
- Select a new program pressing button.
- Press the button and close the door.
To pause the program (e.g. if you want to insert an
item):
- Press button or open the door with caution (the
program pauses) and insert the items, (beware of HOT
steam!).
- Press button and close the door within 3 sec. to
restart the cycle (the program resumes the cycle from where
it was interrupted).
PAUSE
PRESS |>||
15
During program running time, the progress of the program is shown on the display (as bar) as well as
phase of program, and time to the end of the program:
After the program is complete, the display shows:
Open appliance door (beware of hot steam!) and unload the racks, starting from the lower rack first.
If it is needed to refill salt reservoir or rinse aid dispenser, it is recommended to do this operations right
before start of the next cycle.
According to the cycles, the display may provide additional
information:
- DYNAMIC SENSOR - with animation (on bar) -
sensor is adjusting time and energy and water
consumption to the level of soil amount on the dishes.
Present only in Dynamic Sensor program.
- MAIN WASH - main washing.
- HOT RINSE/RINSE - rinsing phase of program.
- STATIC DRY - drying phase of program.
- CALIBRATING - appliance is calibrating its sensor.
On the display additional information can be shown:
- REFILL RINSE AID - refill rinse aid.
- REFILL SALT - refill salt reservoir.
- CHECK FILTER - clean filters when needed.
After 30 seconds the appliance switches off.
MAIN WASH
END OF CYCLE
16
Program
Program description
(Loading information)
Available
options
Detergent Consumption
Program
duration
a)
(min.)
Drying
phase
No.
Name Temp. A B
Water
(litres)
Energy
(KWh)
1
Dynamic
Sensor
40-70°C
Use for normal soiled dishes with
driedon food. Senses the level of soiling
on the dishes and adjusts the program
accordingly. When the sensor is
detecting the soil level an animation
appears in the display and the cycle
duration is updated. The DynamicClean
option is activated automatically with
this program. To deactivate, press the
DynamicClean button on the control
panel.
7.5-13 0.95-1.45 85-175
2
Pre-Wash
Cold Crockery to be washed later.
4.0 0.01 14-16
3
Glass
40°C
Lightly soiled crockery, for example
glasses and cups.
10.5 0.85 105-114
4
Fast
45°C
Lightly soiled crockery, with no dried-on
food.
11.0 0.85 30-50
5
Eco
b)
50°C
Normally soiled crockery. Standard
program the most efficient in terms of its
combined energy and water
consumption.
9.0 0.936 240
6
Daily
60°C Normally soiled crockery. 11.0 1.30 80-95
7
Hygiene
70°C
Normally or heavily soiled crockery,
with additional antibacterial wash.
Program interruption (e.g. due to door
opening) can compromise elimination
of germs.
14.0 1.40 110-120
8
Professional
65°C
Recommended program for heavily
soiled crockery, especially suitable for
pans and saucepans.
18.6 1.73 215-225
a) Program data obtained under normal conditions and with default options on. Data may vary depending
on ambient conditions and used options. Differences of up to 20 minutes are possible with sensor
programs as a result of the appliance’s automatic calibration system.
b) Reference program for energy label in compliance with EN 50242 regulations. - Note for Testing
Institutes: for detailed information on the EN/Standard loading comparison test and other tests, contact
the following address: “[email protected]”.
Power consumption in: Left-on mode: 1.50 W / Off-mode: 0.50 W.
Program table
17
Additional options
With each program additional options can be used. A full list of available options working with specific
programs can be found in the Program Table on the previous page. All active options are shown on the
display in the Option area.
Multizone - allows you to choose the washing zones. Press button to select the wash zones between:
1. Washing all baskets (default).
2. Washing upper basket and cutlery rack. On the display symbol is lit.
3. Washing lower basket and cutlery basket. On the display symbol is lit.
All info will be shown on the display.
When function is active, the symbol is lit on the display.
DynamicClean/Key lock - thanks to the additional power jets this option provides a more intensive and
powerful wash in the lower rack, in the specific area. When function is active, the symbol is lit on the
display. Press button for 3 seconds to lock or unlock control panel. Children will not be able to accidentally
start the dishwasher by pressing the buttons on the control panel when this option is selected.
To activate this option, hold down the button for 3 seconds - KEY LOCK Activated will be shown
on the display.
Repeat the same operation to unlock the panel - KEY LOCK Deactivated will be shown on the
display.
When key lock is active, if any button is pressed - KEY LOCK Enable will be shown on the display.
Boost/Settings - this option delivers a cut by 50% of the duration for the main cycles, while ensuring an
optimal level of washing and drying. In order to do that, it will require additional water and energy compared
to the regular full-lenght cycles.
Press this botton to active this option - BOOST Activated will be shown on the display.
To deactivate this option press again - BOOST Deactivated will be shown on the display.
Press button for 3 seconds to access the setup options. For more information about setup, refer to next page.
Delay - press button repeatedly to delay the start of the program.
Adjustable from 0:30 to 24 hours. With each press of the button, the delay start increases by:
- every 0:30 if selection below 4 hours,
- every 1:00 if selection is below 12 hours,
- every 4 hours if selection is above 12 hours.
Then press button . The dishwasher will start after the set time.
If this option has to be cancelled press Delay button repeatedly.
The screen shows:
The " :" will be blinking.
Cancel/Reset - push this button to switch off the control panel. If pressed for 3 seconds
when a program is running it cancels the program and drains the water out.
If pressed during program and delayed start selection, it cancels the selection and returns
to previous cycle and option selection.
START/PAUSE - press this button or open the door during washing cycle to pause the cycle.
To resume the cycle press this button and close the door within 3 seconds.
Operation indicator - a LED light projected on the floor indicates that dishwasher is working.
Waiting…
18
Press P to
Scroll Setting
Press |>||to
Change values
SETTINGS
If you want to change any of the appliance parameters, press
button for 3 seconds.
On the display the word "SETTINGS" will be shown. Press
to scroll to change values.
To exit settings in any step, press .
1. Tablet
P TABLET
|>||Enabled
P TABLET
|>||Enabled
To enable or disable Tablet option press .
To go to the next setting press .
If this option is enabled the symbol is lit.
Menu/Settings
2. Sound
P SOUND
|>||Turned On
To enable or disable the sound, press .
To go to the next setting press .
3. Water hardness
P WATER HARD.
|>||LEVEL 4
To change water hardness press .
To setup correct level according to water hardness, see table.
To confirm press .
5. Language
P LANGUAGE
|>||English
To choose language press .
To go to the next step press .
4. Screen brightness
P BRIGHTNESS
|>||Low
P BRIGHTNESS
|>||Medium
P BRIGHTNESS
|>||High
To change display brightness press .
Choose between three levels: High, Medium and Low.
To go to the next step press .
19
6. Reset to factory default
P FACT DEF.
|>||OK
This function allows you to reset the appliance to the factory
settings. To use this function press button.
First setup wizard appears as a next step.
You need to set all parameters again including a choice of
language.
7. Exit
P EXIT
|>||OK
To exit menu press button. Press to come back to
the first step.
Maintenance and care
For hygienic reasons it is recommended to run a high-temperature cycle (e.g. Intensive) at least once per
month. It will help to keep the appliance clean, fully functional and avoid odours.
Cleaning the filters
Check filters and clean if necessary.
Unscrew microfilter (1),
remove it (2) and
remove fine sieve (3).
Rinse under running
water...
Insert Screw on microfilter
NOTE MARK!
Unscrew and
remove upper
arm.
Unscrew and remove
lower arm....
Clean spray nozzles
under running water
(use toothpicks if
necessary).
Insert and screw on upper and lower arms
tightly.
Cleaning the spray arms
CLICK!
6
1 6
2 5
2
5
3
4
1
4
3
7
8
6
1 6
2 5
2
5
3
4
1
4
3
7
8
20
What to do if...
If fault occurs, before contacting the After-sales Service, make the following checks to try and
remedy the problem. Most faults can be remedied by taking the following action, quickly restoring
normal appliance operation.
The appliance... Possible causes... Solutions...
Display shows:
CHECK SALT or
REFILL SALT
Salt reservoir is empty. Refill reservoir with salt.
Adjust water hardness.
Display shows:
CHECK RINSE AID or
REFILL RINSE AID
Rinse aid dispenser is empty. Refill dispenser with rinse aid.
...is not working/will not start
The appliance must be switched on. Check the household circuit fuse if
there is no power supply.
The appliance door doesn’t close. Check if the appliance door is closed.
“Delay” option is ON. Check whether the "Delay" option has
been selected. If it has, the appliance
will start once the set time has
elapsed. If necessary, RESET the
appliance by pressing or start the
cycle immediately by pressing .
Display shows:
NO WATER!
CHECK CONNECTION
MORE INFORMAITON
IS AVAILABLE IN
THE INSTRUCTIONS
(CODE F6-E1)
Water tap closed. The water tap must be open.
Water pressure is too low. The water tap must be fully open
during water inlet (minimum capacity:
0.5 litres per minute).
Kinked water inlet hose or closed inlet
filters.
The water inlet hose must not be
kinked and the relative inlet filter in
the water tap connector must not be
dirty or clogged.
Display shows:
CYCLE STOPPED
CHECK DRAIN HOSE
MORE INFORMAITON
IS AVAILABLE IN
THE INSTRUCTIONS
(CODE F8-E1)
Dirty filters. Clean the filters.
Kinked drain hose. The drain hose must not be kinked.
Syphon hose connection closed. The closure disk of the syphon hose
connection must be removed.
Display shows:
CYCLE STOPPED
CHECK FILTER
MORE INFORMAITON IS
AVAILABLE IN
THE INSTRUCTIONS
(CODE F6-E3)
Dirty filters or spray arms. Clean filters and spray arms.
Too little water in the appliance
system.
Concave items (e.g. bowls, cups) must
be arranged facing downwards in the
rack.
Drain hose incorrectly fitted. The drain hose must be fitted correctly
(for high mounted appliances, leave
min. 200 - 400mm from the lower
edge of the appliance) - see Assembly
Instruction.
High level of foam inside. Repeat without detergent or wait until
foam disappears.
1 / 1

KitchenAid KDSCM 82140 Owner's manual

Category
Dishwashers
Type
Owner's manual

Ask a question and I''ll find the answer in the document

Finding information in a document is now easier with AI

Ask the document