
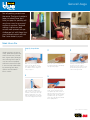
Not all painting projects are
the same. The type of painter’s
tape you should use, and
how you prep for painting will
vary from room to room and
surface to surface. Textured
ceilings, bathrooms and
accent walls present unique
challenges but with these tips,
your finished project will look
like it was done by a pro.
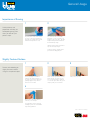
Step-By-Step Guide:
General Usage
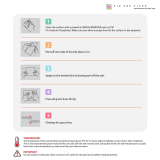
Remove the tape at a 45-degree
angle, and at a moderate speed.
Just pull the tape back on itself. If
adhesive sticks to the surface, try a
90-degree angle. If paint is pulling
up with the tape, try scoring the
edge of the tape with a razor blade
before pulling further.
TM
1
5
32
Pull tape off the roll a few feet
at a time. Lay it onto surface
depressions. Press down as you go.
Avoid stretching the tape; this can
cause it to lift up or break.
(Steps continued on next page)
Make sure you’re using the best
tape for the job. Check out our
Tape Selector Chart to see which
ScotchBlue
™
Painter’s Tape best
suits your project.
Clean the surface, and make sure
it is dry and dust-free. This will help
the tape stick properly.
4
Secure the tape by pressing the
edge down with a flexible putty
knife or 5-in-1 tool. If the surface is
textured, seal the edge of the tape
with the existing base color of the
wall. This will prevent the new paint
color from seeping under the tape.
Good masking is the key to
sharp, professional paint lines
and an overall neat, finished
look. A great paint job begins
with knowing which tape to
use, how to mask properly
and how to remove the tape.
It also can help avoid rework
by preventing paint drips,
spatters and accidental
brush strokes.
Mask Like a Pro

General Usage
TM
(Steps continued on next page)
1 2
Any latex paint can lift off the surface
if you try to remove the tape before
the paint is thoroughly dry (see paint
manufacturer dry times on can).
For clean removal, use a flexible
putty knife or 5-in-1 tool and score
along the edge of the tape. This will
help break the paint bond between
the wall and tape edge.
Taking your time, lift up the painter’s
tape at a 45 degree angle.
You’ll get a sharp, clean line and a
professional looking paint job!
A little patience and
preparation will help you
avoid peeling away paint
when you take off your
painter’s tape.
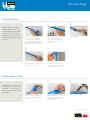
Importance of Scoring
Prevent paint bleeding on
slightly textured surfaces
using this simple technique.
When paint is dry (approximately
24 hours), score the tape.
Peel off painter’s tape at an angle,
revealing a perfect accent wall with
super sharp paint lines.
1
5
32
Paint your accent wall.Start by applying ScotchBlue
TM
Painter’s Tape Delicate Surface, to
the edge of the wall you will not be
painting. Apply the tape where it
meets the accent wall.
Paint over the tape with the existing
wall color (the color that’s on your
non-accent wall) using a dry brush
to seal it into place. Once dry, you’re
ready to paint your accent wall.
Slightly Textured Surface

General Usage
TM
(Steps continued on next page)
Nobody wants over-splash
when painting — here’s how
to avoid getting paint where
you don’t want it. This tip is
particularly useful when you
are masking textured ceilings
or walls.
Textured Surface
Gently peel away the tape at an
angle (it’s okay for some caulking to
remain). Admire your work.
1
5
32
Paint your walls.
The secret to preventing painting
mistakes on textured surfaces is
to use a thin strip of caulking to
seal your tape. Start by applying
ScotchBlue
TM
Painter’s Tape Original
Multi-Surface directly to the ceiling.
Dispense a small amount of caulk
(less than 1/8”), and apply to the
edge of the tape along the top of
the wall. Allow it to dry for a few
minutes.
4
Wait about 24 hours for the paint to
dry and then score the tape.
1 32
Now you’re ready to paint!
Carefully apply ScotchBlue
TM
Painter’s Tape Original Multi-Surface
along tiles – pressing it down a little
at a time.
Go back and press down again,
making sure the tape gets into the
grooves. This will help ensure that
the tape adheres properly to to
prevent paint bleed.
Painting rooms with tile, such
as bathrooms, is easier than
you think. Just follow these
tips to ensure you get into the
tile grooves.
Painting Next to Tiles

TM
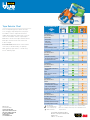
Tape Selector Chart
A successful painting project requires the right
tools, including a tape designed for your project.
ScotchBlue
™
Painter’s Tape Delicate Surface
enables precise paint lines when used on smooth
surfaces. ScotchBlue
™
Painter’s Tape Original
Multi-Surface works well on light textured surfaces.
Both tapes are UV-resistant and can be used
in direct sunlight.
To use the chart: Determine the surface texture
of the area you will be masking, not painting.
When masking rough surfaces, consider using
Scotch
®
Masking Tape.
Minimum 10%
Post-Consumer Fiber
Construction and Home
Improvement Markets Division
3M Center, Building 223-4S-02
St. Paul, MN 55144-1000
1-800-494-3552
www.ScotchBlue.com
3M, ScotchBlue, the Plaid Design and the
BLUE color of the tape are trademarks of 3M.
Printed in U.S.A.
©3M 2010 70-0713-3539-4
Walls & Ceilings
-Heavy Texture*
-Light Texture
-Smooth Texture
Ceiling Tiles & Grids
Paneling
Vinyl Coated Wallpaper, Borders
Wood Trim
-Heavy Grain (oak, hickory)
-Smooth Grain (birch, ash, maple)
Vinyl, Aluminum, Metal Trim
Solid Hardwood
-Finished, Engineered Hardwood
-Unfinished
Carpet
Marble, Slate, Stone, Concrete
Vinyl, Laminate
Brick, Block, Stone, Concrete
Hardware, Glass
Vinyl, Aluminum, Metal Trim
Vinyl Siding, Clapboard (non-rough)
Wood Siding (rough & non-rough)
Cabinets
-Heavy Grain (oak, hickory)
-Smooth Grain (birch, ash, maple)
-Paper or Veneer Laminates
Countertops, Tile, Grout, Caulk
Hardware, Glass, Porcelain
AREA YOU NEED TO MASK
Freshly Painted
Non-Textured Surfaces
Freshly Painted
Non-Textured Surfaces
Freshly Painted
Non-Textured Surfaces
Freshly Painted
Non-Textured Surfaces
Freshly Painted
Non-Textured Surfaces
ScotchBlue
TM
Original
Multi-Surface
ScotchBlue
TM
Advanced
Multi-Surface
ScotchBlue
TM
Delicate Surface
Walls & Ceilings
Floors
Other Interior Surfaces
Other Exterior Surfaces
Baseboards, Window & Door Trim
= Not Recommended
= Recommended
= Test compatibility before
use as results may vary.
* Learn more about masking on textured surfaces at www.ScotchBlue.
com
** None of the ScotchBlue
™
Painter’s Tapes are recommended for use on
laquered surfaces
-
 1
1
-
 2
2
-
 3
3
-
 4
4


Ask a question and I''ll find the answer in the document
Finding information in a document is now easier with AI
Related papers
-
Scotch 2098-36CC-XS User guide
-
3M 2080EL-48N Installation guide
-
-
-
-
-
-
-
3M 2093EL-36CVP User guide
-
Other documents
-
 ScotchBlue 2090-24N-XXS Installation guide
-
 Tic Tac Tiles HD-SQS01-5 Installation guide
-
 Tic Tac Tiles HD-BBW51-10 Installation guide
-
Genesis 70099 Installation guide
-
 EZ Strip ESA-750 User manual
-
 WallPOPs WPE0446 Operating instructions
-
 Stick-It Tiles 27087 Installation guide
-
Ekena Millwork CT24X24LO Installation guide
-
 Wooster 0HR2670064 User manual
-
Wooster 0H21410020 User manual


