Page is loading ...

©Copyright Lotronic 2013 1
L
L
A
A
S
S
E
E
R
R
S
S
H
H
O
O
W
W
S
S
Y
Y
S
S
T
T
E
E
M
M
E
E
F
F
F
F
E
E
T
T
L
L
A
A
S
S
E
E
R
R
R
R
V
V
B
B
R
R
G
G
B
B
L
L
A
A
S
S
E
E
R
R
E
E
F
F
F
F
E
E
K
K
T
T
R
R
e
e
f
f
.
.
:
:
I
I
B
B
I
I
Z
Z
A
A
5
5
0
0
0
0
(
(
1
1
5
5
-
-
1
1
1
1
5
5
6
6
)
)
U
U
S
S
E
E
R
R
’
’
S
S
M
M
A
A
N
N
U
U
A
A
L
L
M
M
A
A
N
N
U
U
E
E
L
L
D
D
’
’
U
U
T
T
I
I
L
L
I
I
S
S
A
A
T
T
I
I
O
O
N
N
B
B
E
E
D
D
I
I
E
E
N
N
U
U
N
N
G
G
S
S
A
A
N
N
L
L
E
E
I
I
T
T
U
U
N
N
G
G
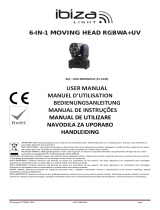
GB - This LASER effect is built for PROFESSIONAL use only. It must be used and controlled by a
professional in sufficiently large premises because of its high output power. Always set up and
install all laser effects so that all laser light is at least 3 meters (9.8 feet) above the floor. Never
create a fixed point.
F - Cet effet LASER est un appareil conçu uniquement pour un usage PROFESSIONNEL. Il doit utilisé et
installé par un professionnel à une hauteur minimale de 3m dans des salles suffisamment grandes en raison
de sa puissance importante. Toujours installer et configurer le laser de sorte que tous les effets du laser sont
au moins à 3 mètres au-dessus du sol. Ne jamais créer de point fixe.
D – Dieser LASER Effekt ist nur für GEWERBLICHEN Gebrauch. Aufgrund seiner hohen Ausgangsleistung
darf das Gerät nur von einem Fachmann in ausreichend großen Räumen installiert und betrieben werden. Es
muss in mindesten 3m Bodenhöhe angebracht werden. Der Strahl darf auf keinen Fall auf einen festen Punkt
gerichtet sein.
NL - Dit LASER effect is alleen voor professioneel gebruik. Door zijn hoge vermogen mag het apparaat alleen
van een specialist in voldoende grote ruimten worden geïnstalleerd en bediend. Het moet worden aangebracht
in tenminste 3m vloerhoogte. In geen geval de beam op een vast punt richten.
PT - Este efeito LASER foi desenhado apenas para uso PROFISSIONAL. Deve ser usado e controlado por um
profissional em locais grandes devido à sua elevada potência de saída. Configurar sempre e instalar todos os
efeitos laser de modo a que a luz do laser esteja a pelo menos 3 metros (9,8 pés) do chão. Nunca crie um
ponto fixo.
Imported from China by:
LOTRONIC SA
Avenue Zénobe Gramme 11
1480 SAINTES
Belgium
INSTRUCTIONS FOR USE
Thank you for purchasing this product. Please read user guide for safety
and operations information before using the product. Keep this manual
for future reference. This product can create perfect laser programs and
effects since it has passed a series of strictly tests before delivery. Please
check the attachments listed on the page after opening the carton. In the
event of carton damage or attachment missing in transit, please contact
your dealer or our after sales service department.
Technical specifications
1. Voltage: AC220-240V, 50Hz/60Hz, Fuse: 3A/250V
2. Rated Power: 50W
3. Laser diode: DPSS, green 532nm 60mW, red 650nm 350mW,
blue 450nm 120mW, mixed white >500mW
4. Laser power: 500mW
5. Scanner: 15K high speed scanner
6. Control mode: sound control/auto/DMX
7. DMX channel: 12 channels
8. Dimensions: 314mm x 197mm x 102mm
9. Net weight: 3.0kg
10. Gross weight: 3.5kg
Warning
Do not expose the human eye directly to the laser beam.
Do not turn on and off the unit frequently.
Before using this unit make sure the power supply is grounded.
This unit is intended for indoor use only and should be prevented
from water, moisture and shakes. The working temperature of this
unit is 18-30°C, do not use this continuously over 4 hours, otherwise it
shortens the lifetime of the unit.
Use cleaning tissue to remove the dust absorbed on the external
lenses periodically to optimize light output.
Do not remove or break the warranty label, otherwise it void the
warranty.
GB

©Copyright Lotronic 2013 2
Always replace with the exact same type fuse, replacement with
anything other than the specified fuse can cause fire or electric shock
and damage your unit, and will void your manufactures warranty.
Function setting
Use the dipswitches to assign the unit’s function: DMX/slave, sound
active or AUTO mode. For DMX mode, set the DMX address. Each
dipswitch represents a binary value. See the “Function chart”.
0=OFF 1=ON X=OFF or ON
DIPSWITCH CHART
FUNCTION
#1
#2
#3
#4
#5
#6
#7
#8
#9
#10
0
X
X
X
X
X
X
X
X
0
SOUND ACTIVE
1
X
X
X
X
X
X
X
X
0
AUTO -beam
1
1
X
X
X
X
X
X
X
0
AUTO-animation
X
X
1
X
X
X
X
X
X
0
Slave for Sound
and Auto
1
SET DMX ADDRESS FOR DMX
MODE
1
DMX
Sound Active
The change of the laser pattern is controlled by sound. That means the
rhythm of the sound controls the change of the laser pattern. Turn the
sensitivity knob in the clockwise direction to increase the fixture’s
sensitivity to sound, turn the knob in the counterclockwise direction to
decrease.
AUTO
Auto cycles the built-in programs without being controlled externally.
DMX Control
The system only accepts the DMX512 signal of international standard to
control the system mode, the laser pattern ON /OFF, the size, the position,
the speed, etc.
Master-Slave Operation
This mode will allow you to link up to 32 units together without controller.
1. Install the units in a suitable position (laying or appending).
2. Choose a unit to function as Master mode, set dipswitch to select
Sound Active or AUTO mode. The others must be set to Slave mode, set
dipswitch to select Slave mode.
Slave units set #3 on
3. Use standard XLR microphone cable chain your units together via the
XLR connector on the rear of the units. For longer cable runs we suggest
a terminator at the last fixture.
4. Turn on the all units' power, the units begin to reset, then the units
begin working. The slave units will react the same as the master unit.
5. The units will react to the low frequencies of music via the internal
microphone. Adjust the audio sensitivity knob on the back of the master
unit to make the unit more or less sensitive in sound active. The panel
has LED indicating for sound active.
DMX512
1. Install the units in a suitable position (laying or appending).
2. Use standard XLR microphone cable chain your units together via the
XLR connector on the rear of the units. For longer cable runs we suggest
a terminator at the last fixture.
3. Assign a DMX address to each the unit using dipswitches; see the
"DMX Address Quick Reference Char». (All units set to #1 and #10 on will
be OK)
4. Turn on all units' power, the units begins reset, then the unit begins
working.
5. Use DMX console to control your units.
DMX address calculation
For DMX mode, DMX512 address from #1 to 9# dipswitches must be set,
the address is set from 1 to 511. Each dipswitch represents a binary
value.
No.
Digital No.
No.
Digital No.
1st 1 6th 32
2nd 2 7th 64
3rd 4 8th 128
4th 8 9th 256
5th
16
10th
Set to 0
One unit has 12 channels, so each unit must be assigns 12 channels
at least

©Copyright Lotronic 2013 3
Loop
Address
Binary
Dipswitches
1
1
100000000
#
1
2
13
101100000
#
1 + #3+#4
3
25
100110000
#
1 + #4+#5
N
(N-1)*12+1
The dipswitches setting for DMX address see the " DMX Address
Quick Reference Chart ".
DMX Control Parameter Chart
Channel No DMX512 fig. Content
Channel 1
Control
mode
0~49 Sound control
50~99 Auto- beam
100-149
Auto-animation
150~255
manual
Channel 2
Color select
0 Laser off
1-255
Green, red, blue, yellow,
cyan, pink, white
Channel 3
Pattern
select
0-255 patterns
Channel 4
Vertical
move
0-127 Manual
128-191
From down to up speedy
192-255
From up to down speedy
Channel 5
Horizontal
move
1~127
Manual
128-191 From right to left move
192-255 From left to right move
Channel 6
Vertical
rotate
0-255 From slow to speedy
Channel 7
Horizontal
rotate
0-255 From slow to speedy
Channel 8
rotate
0-127
manual
128-191 Anticlockwise rotate
192-255
Clockwise rotate
Channel 9
zoom
0
static
1-85
From small to big
86-170
From big to small
171-255 Auto zoom
Channel
10
Pattern size
0
normal size
1-255 Small to big
Channel
11
Spot and line
0-255 Line to spot
Channel
12
Twinkle
speed
0-22 Slow to speedy
PC Control
If it is set to ILDA mode (use PC software to control light), you just need to
connect the ILDA signal to the DB25 jack. ILDA mode (PC control) and
built-in program mode can be identified and transformed automatically.
Troubleshooting
1. If the power supply indicator doesn't light up and the laser doesn't work,
please check the power supply and the input voltage.
2. In Stand-Alone operation, if the power supply indicator is light up and
sound active indicator isn't light up, but the laser is shut off doesn't work.
A. Because sound is too small make for laser shut off in sound active,
please increase the music volume or increase audio sensitivity with
sensitivity knob, please check as below.
B. Please check if unit has been set up in slave mode, then set up in
master mode.
3. In Master-Slave operation, slave unit don't function, please check as
below.
A. Make sure to there's only one master in the chain, and the others
are set in slave mode.
B.Make sure to take a good quality power cable and connection.
4. In DMX mode operation, the laser is OFF and the DMX signal indicator
is unlighted, please check as below.
A. Make sure to set up the DMX mode.
B. Make sure to have a good connection.
5. In DMX operation, the unit can’t be controlled by the DMX console, but
the DMX signal indicator is flashing, please make sure the DMX console
and unit have the same channel.
6. If the output beam direction above isn't the right way, please restart the
unit.
7. If the unit is fail, please turn off the unit, then turn on again after 5
minutes.
8. In PC mode operation, the laser is OFF after the swimming fish, please
check as below
A. Please press the button of animation
B. Make sure the SD card is insert with good connection
After trying the above solution you still have a problem, please
contact your dealer or our company for service.
/